
User Manual (ENGLISH)
Page 3
...Toner Cartridge 1.10 Loading Paper 1.12 Making Connections 1.15 Turning the Machine On 1.17 Changing the Display Language 1.17 Setting the Paper Type and Size 1.18 Using the Save Modes 1.19 Toner Save Mode 1.19 Power Save Mode 1.19 CCD Power Save Mode 1.20 Chapter 2: INSTALLING SOFTWARE About Samsung... Software 2.2 Printer Driver Features 2.3 System Requirements 2.4 Installing Samsung Software in Windows 2.5 Installing the USB Driver...
...Toner Cartridge 1.10 Loading Paper 1.12 Making Connections 1.15 Turning the Machine On 1.17 Changing the Display Language 1.17 Setting the Paper Type and Size 1.18 Using the Save Modes 1.19 Toner Save Mode 1.19 Power Save Mode 1.19 CCD Power Save Mode 1.20 Chapter 2: INSTALLING SOFTWARE About Samsung... Software 2.2 Printer Driver Features 2.3 System Requirements 2.4 Installing Samsung Software in Windows 2.5 Installing the USB Driver...
User Manual (ENGLISH)
Page 6
... Machine 7.3 Cleaning the Outside 7.3 Cleaning the Inside 7.3 Cleaning the Scan Unit 7.5 Maintaining the Toner Cartridge 7.6 Redistributing Toner 7.7 Replacing the Toner Cartridge 7.8 Setting the Notify Toner Option (For SCX-4216F 7.10 Cleaning the Drum 7.10 Consumables and Replacement Parts 7.11 Chapter 8: TROUBLESHOOTING Clearing Document Jams (For SCX-4116/4216F) ...... 8.2 Input Misfeed 8.2 Exit Misfeed 8.3 Roller Misfeed 8.3 Clearing Paper Jams 8.4 In the Paper...
... Machine 7.3 Cleaning the Outside 7.3 Cleaning the Inside 7.3 Cleaning the Scan Unit 7.5 Maintaining the Toner Cartridge 7.6 Redistributing Toner 7.7 Replacing the Toner Cartridge 7.8 Setting the Notify Toner Option (For SCX-4216F 7.10 Cleaning the Drum 7.10 Consumables and Replacement Parts 7.11 Chapter 8: TROUBLESHOOTING Clearing Document Jams (For SCX-4116/4216F) ...... 8.2 Input Misfeed 8.2 Exit Misfeed 8.3 Roller Misfeed 8.3 Clearing Paper Jams 8.4 In the Paper...
User Manual (ENGLISH)
Page 18
Your machine provides printing, copying, scanning, and faxing (SCX-4216F only) functions! This chapter includes: • Unpacking • Understanding the Component Location • Installing the Toner Cartridge • Loading Paper • Making Connections • Turning the Machine On • Changing the Display Language • Setting the Paper Type and Size • Using the Save Modes This chapter gives you for setting up your machine. 1 GETTING STARTED Thank you step-by-step instructions for purchasing this Samsung multifunctional product.
Your machine provides printing, copying, scanning, and faxing (SCX-4216F only) functions! This chapter includes: • Unpacking • Understanding the Component Location • Installing the Toner Cartridge • Loading Paper • Making Connections • Turning the Machine On • Changing the Display Language • Setting the Paper Type and Size • Using the Save Modes This chapter gives you for setting up your machine. 1 GETTING STARTED Thank you step-by-step instructions for purchasing this Samsung multifunctional product.

User Manual (ENGLISH)
Page 19
For details, refer to your country's specifications. **. If you are replacing it with the following items: Starter Toner Cartridge AC Power Cord* CD-ROM** Quick Install Guide Telephone Line Cord* (only for SCX-4216F) *. NOTES: • You should be AWG #26 or lower gage. • Power cord must be plugged into a grounded power socket. •...
For details, refer to your country's specifications. **. If you are replacing it with the following items: Starter Toner Cartridge AC Power Cord* CD-ROM** Quick Install Guide Telephone Line Cord* (only for SCX-4216F) *. NOTES: • You should be AWG #26 or lower gage. • Power cord must be plugged into a grounded power socket. •...
User Manual (ENGLISH)
Page 24
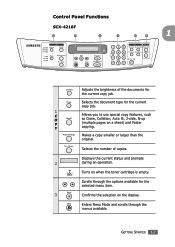
... document type for the current copy job. Displays the current status and prompts 2 during an operation. Turns on a sheet) and Poster Y copying. Control Panel Functions SCX-4216F 1 2 3 4 5 6 1 Adjusts the brightness of copies. Scrolls through the menus available. Enters Menu Mode and scrolls through the options available for the selected menu item. 3 Confirms... for the current copy job. 1 C Allows you to use special copy features, such O as Clone, Collation, Auto fit, 2-side, N-up P (multiple pages on when the toner cartridge is empty.
... document type for the current copy job. Displays the current status and prompts 2 during an operation. Turns on a sheet) and Poster Y copying. Control Panel Functions SCX-4216F 1 2 3 4 5 6 1 Adjusts the brightness of copies. Scrolls through the menus available. Enters Menu Mode and scrolls through the options available for the selected menu item. 3 Confirms... for the current copy job. 1 C Allows you to use special copy features, such O as Clone, Collation, Auto fit, 2-side, N-up P (multiple pages on when the toner cartridge is empty.

User Manual (ENGLISH)
Page 26
SCX-4016/4116 1 2 3 4 5 1 Adjusts the brightness of copies. Scrolls through the menus available. 3 Sends you back to the upper menu level. Stops an operation at any time. Starts a job. GETTING STARTED 1.9 Turns on the display. Confirms the selection on when the toner cartridge is empty. Enters Menu Mode and scrolls through the options available...
SCX-4016/4116 1 2 3 4 5 1 Adjusts the brightness of copies. Scrolls through the menus available. 3 Sends you back to the upper menu level. Stops an operation at any time. Starts a job. GETTING STARTED 1.9 Turns on the display. Confirms the selection on when the toner cartridge is empty. Enters Menu Mode and scrolls through the options available...
User Manual (ENGLISH)
Page 27
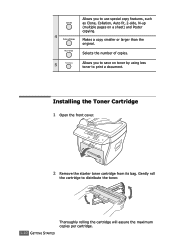
Thoroughly rolling the cartridge will assure the maximum copies per cartridge. 1.10 GETTING STARTED Selects the number of copies. 5 Allows you to use special copy features, such as Clone, Collation, Auto fit, 2-side, N-up (multiple pages on toner by using less toner to distribute the toner. Gently roll the cartridge to print a document. Installing the Toner Cartridge 1 Open the front cover. 2 Remove the starter toner cartridge from its bag. Allows you to save on a sheet) and Poster copying. 4 Makes a copy smaller or larger than the original.
Thoroughly rolling the cartridge will assure the maximum copies per cartridge. 1.10 GETTING STARTED Selects the number of copies. 5 Allows you to use special copy features, such as Clone, Collation, Auto fit, 2-side, N-up (multiple pages on toner by using less toner to distribute the toner. Gently roll the cartridge to print a document. Installing the Toner Cartridge 1 Open the front cover. 2 Remove the starter toner cartridge from its bag. Allows you to save on a sheet) and Poster copying. 4 Makes a copy smaller or larger than the original.
User Manual (ENGLISH)
Page 28
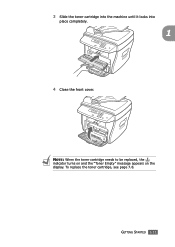
GETTING STARTED 1.11 3 Slide the toner cartridge into the machine until it locks into place completely. 1 4 Close the front cover. NOTE: When the toner cartridge needs to be replaced, the indicator turns on and the "Toner Empty" message appears on the display. To replace the toner cartridge, see page 7.8.
GETTING STARTED 1.11 3 Slide the toner cartridge into the machine until it locks into place completely. 1 4 Close the front cover. NOTE: When the toner cartridge needs to be replaced, the indicator turns on and the "Toner Empty" message appears on the display. To replace the toner cartridge, see page 7.8.
User Manual (ENGLISH)
Page 36
...button (¥ or Š) to display "On" on , the mode is active and the machine uses less toner when printing a document. • If the button backlight is deactivated and the machine prints with the normal quality.... (¥ or Š) until "Power Save" appears on each page. Using the Save Modes Toner Save Mode 1 The toner save mode allows your machine to reduce power consumption when it is on the bottom line and press... you want appears. To turn this mode extends the life of the toner cartridge longer than the normal mode, but it switches to Standby Mode, press Stop/Clear.
...button (¥ or Š) to display "On" on , the mode is active and the machine uses less toner when printing a document. • If the button backlight is deactivated and the machine prints with the normal quality.... (¥ or Š) until "Power Save" appears on each page. Using the Save Modes Toner Save Mode 1 The toner save mode allows your machine to reduce power consumption when it is on the bottom line and press... you want appears. To turn this mode extends the life of the toner cartridge longer than the normal mode, but it switches to Standby Mode, press Stop/Clear.
User Manual (ENGLISH)
Page 95
... dpi (Normal) or 300 dpi (Draft). Higher settings may increase time it takes to print a document. 2 Toner Save Selecting this option extends the life of your toner cartridge and reduces your specific printing needs. See page 5.2 for your cost per page without a significant reduction in the ...print quality. • Printer Setting: When you select this option, the Toner Save feature is determined by the ...
... dpi (Normal) or 300 dpi (Draft). Higher settings may increase time it takes to print a document. 2 Toner Save Selecting this option extends the life of your toner cartridge and reduces your specific printing needs. See page 5.2 for your cost per page without a significant reduction in the ...print quality. • Printer Setting: When you select this option, the Toner Save feature is determined by the ...
User Manual (ENGLISH)
Page 106
7 MAINTENANCE This chapter provides information for maintaining your machine and the toner cartridge. This chapter includes: • Clearing the Memory • Cleaning Your Machine • Maintaining the Toner Cartridge • Consumables and Replacement Parts
7 MAINTENANCE This chapter provides information for maintaining your machine and the toner cartridge. This chapter includes: • Clearing the Memory • Cleaning Your Machine • Maintaining the Toner Cartridge • Consumables and Replacement Parts
User Manual (ENGLISH)
Page 108
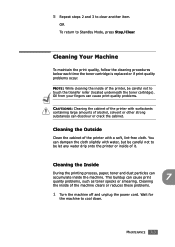
..., press Stop/Clear. OR To return to cool down. 5 Repeat steps 2 and 3 to touch the transfer roller (located underneath the toner cartridge). This buildup can discolour or crack the cabinet. Cleaning Your Machine To maintain the print quality, follow the cleaning procedures below each time the... toner cartridge is replaced or if print quality problems occur. NOTE: While cleaning the inside of the printer, be let any water drip ...
..., press Stop/Clear. OR To return to cool down. 5 Repeat steps 2 and 3 to touch the transfer roller (located underneath the toner cartridge). This buildup can discolour or crack the cabinet. Cleaning Your Machine To maintain the print quality, follow the cleaning procedures below each time the... toner cartridge is replaced or if print quality problems occur. NOTE: While cleaning the inside of the printer, be let any water drip ...
User Manual (ENGLISH)
Page 109
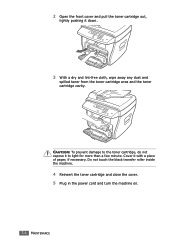
CAUTION: To prevent damage to light for more than a few minute. Cover it to the toner cartridge, do not expose it with a piece of paper, if necessary. Do not touch the black transfer roller inside the machine. 4 Reinsert the toner cartridge and close the cover. 5 Plug in the power cord and turn the machine on. 7.4 MAINTENANCE 2 Open the front cover and pull the toner cartridge out, lightly pushing it down. 3 With a dry and lint-free cloth, wipe away any dust and spilled toner from the toner cartridge area and the toner cartridge cavity.
CAUTION: To prevent damage to light for more than a few minute. Cover it to the toner cartridge, do not expose it with a piece of paper, if necessary. Do not touch the black transfer roller inside the machine. 4 Reinsert the toner cartridge and close the cover. 5 Plug in the power cord and turn the machine on. 7.4 MAINTENANCE 2 Open the front cover and pull the toner cartridge out, lightly pushing it down. 3 With a dry and lint-free cloth, wipe away any dust and spilled toner from the toner cartridge area and the toner cartridge cavity.
User Manual (ENGLISH)
Page 111
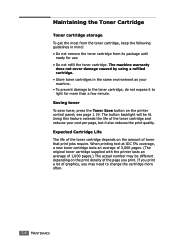
... minute. The machine warranty does not cover damage caused by using a refilled cartridge. • Store toner cartridges in mind: • Do not remove the toner cartridge from the toner cartridge, keep the following guidelines in the same environment as your cost per page, but it to the toner cartridge, do not expose it also reduces the print quality. Expected...
... minute. The machine warranty does not cover damage caused by using a refilled cartridge. • Store toner cartridges in mind: • Do not remove the toner cartridge from the toner cartridge, keep the following guidelines in the same environment as your cost per page, but it to the toner cartridge, do not expose it also reduces the print quality. Expected...

User Manual (ENGLISH)
Page 112
... and wash clothing in the cartridge. 1 Open the front cover. 2 Pull the toner cartridge out and gently roll the cartridge to distribute the toner evenly inside the cartridge. The LCD displays the warning message, "Toner Low." You can temporarily reestablish the print quality by redistributing the remaining toner in cold water. Redistributing Toner When the toner cartridge is near the end...
... and wash clothing in the cartridge. 1 Open the front cover. 2 Pull the toner cartridge out and gently roll the cartridge to distribute the toner evenly inside the cartridge. The LCD displays the warning message, "Toner Low." You can temporarily reestablish the print quality by redistributing the remaining toner in cold water. Redistributing Toner When the toner cartridge is near the end...
User Manual (ENGLISH)
Page 113
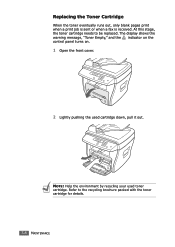
The display shows the warning message, "Toner Empty," and the indicator on the control panel turns on. 1 Open the front cover. 2 Lightly pushing the used toner cartridge. NOTE: Help the environment by recycling your used cartridge down, pull it out. Refer to be replaced. Replacing the Toner Cartridge When the toner eventually runs out, only blank pages print when a print job is sent or when a fax is received. At this stage, the toner cartridge needs to the recycling brochure packed with the toner cartridge for details. 7.8 MAINTENANCE
The display shows the warning message, "Toner Empty," and the indicator on the control panel turns on. 1 Open the front cover. 2 Lightly pushing the used toner cartridge. NOTE: Help the environment by recycling your used cartridge down, pull it out. Refer to be replaced. Replacing the Toner Cartridge When the toner eventually runs out, only blank pages print when a print job is sent or when a fax is received. At this stage, the toner cartridge needs to the recycling brochure packed with the toner cartridge for details. 7.8 MAINTENANCE
User Manual (ENGLISH)
Page 114
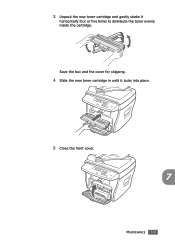
3 Unpack the new toner cartridge and gently shake it locks into place. 5 Close the front cover. 7 MAINTENANCE 7.9 Save the box and the cover for shipping. 4 Slide the new toner cartridge in until it horizontally four or five times to distribute the toner evenly inside the cartridge.
3 Unpack the new toner cartridge and gently shake it locks into place. 5 Close the front cover. 7 MAINTENANCE 7.9 Save the box and the cover for shipping. 4 Slide the new toner cartridge in until it horizontally four or five times to distribute the toner evenly inside the cartridge.

User Manual (ENGLISH)
Page 115
...drum surface are streaks or spots on your print, the OPC drum of the cartridge may require cleaning. 1 Before setting the cleaning procedure, make sure that your machine requires a new toner cartridge when the toner cartridge needs to be replaced. The first available menu item, "Clean Drum," displays ...to enable this feature. 4 Press Enter to save the selection. The display confirms your selection. Setting the Notify Toner Option (For SCX-4216F) If you have set the Notify Toner menu option to "On", your machine automatically sends a fax to your service company or the dealer to notify them...
...drum surface are streaks or spots on your print, the OPC drum of the cartridge may require cleaning. 1 Before setting the cleaning procedure, make sure that your machine requires a new toner cartridge when the toner cartridge needs to be replaced. The first available menu item, "Clean Drum," displays ...to enable this feature. 4 Press Enter to save the selection. The display confirms your selection. Setting the Notify Toner Option (For SCX-4216F) If you have set the Notify Toner menu option to "On", your machine automatically sends a fax to your service company or the dealer to notify them...
User Manual (ENGLISH)
Page 116
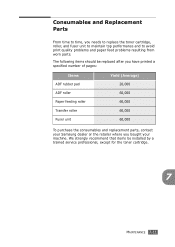
The following items should be installed by a trained service professional, except for the toner cartridge. 7 MAINTENANCE 7.11 We strongly recommend that items be replaced after you have printed a specified number of pages: Items ADF rubber pad ADF roller ...the consumables and replacement parts, contact your machine. Consumables and Replacement Parts From time to time, you bought your Samsung dealer or the retailer where you needs to replace the toner cartridge, roller, and fuser unit to maintain top performance and to avoid print quality problems and paper feed problems resulting ...
The following items should be installed by a trained service professional, except for the toner cartridge. 7 MAINTENANCE 7.11 We strongly recommend that items be replaced after you have printed a specified number of pages: Items ADF rubber pad ADF roller ...the consumables and replacement parts, contact your machine. Consumables and Replacement Parts From time to time, you bought your Samsung dealer or the retailer where you needs to replace the toner cartridge, roller, and fuser unit to maintain top performance and to avoid print quality problems and paper feed problems resulting ...
User Manual (ENGLISH)
Page 121
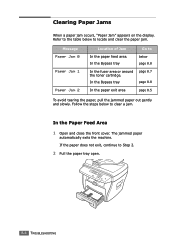
... Jam 2 Location of Jam Go to Step 2. 2 Pull the paper tray open. 8.4 TROUBLESHOOTING Follow the steps below page 8.8 In the fuser area or around the toner cartridge. If the paper does not exit, continue to In the paper feed area. In the Bypass tray below to locate and clear the paper jam...
... Jam 2 Location of Jam Go to Step 2. 2 Pull the paper tray open. 8.4 TROUBLESHOOTING Follow the steps below page 8.8 In the fuser area or around the toner cartridge. If the paper does not exit, continue to In the paper feed area. In the Bypass tray below to locate and clear the paper jam...


