

User Manual (user Manual) (ver.1.0) (English, Spanish)
Page 20
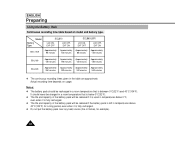
... Notas: ✤ La batería debe recargarse a temperatura ambiente entre 0°C(32°F) y 40°C(104°F). Model SCL810 Battery Type SB-L110A LCD ON, EVF OFF Approximately 90 minutes LCD OFF, EVF ON Approximately 130 minutes SB-L160 SB-L320 Approximately 130 minutes... Approximately 260 minutes Approximately 190 minutes Approximately 390 minutes SCL860/L870 LCD ON, EVF OFF Approximately 80 minutes Approximately 120 minutes Approximately 240 minutes LCD OFF, EVF ON Approximately 120 minutes...
... Notas: ✤ La batería debe recargarse a temperatura ambiente entre 0°C(32°F) y 40°C(104°F). Model SCL810 Battery Type SB-L110A LCD ON, EVF OFF Approximately 90 minutes LCD OFF, EVF ON Approximately 130 minutes SB-L160 SB-L320 Approximately 130 minutes... Approximately 260 minutes Approximately 190 minutes Approximately 390 minutes SCL860/L870 LCD ON, EVF OFF Approximately 80 minutes Approximately 120 minutes Approximately 240 minutes LCD OFF, EVF ON Approximately 120 minutes...
User Manual (user Manual) (ver.1.0) (English)
Page 2
... OSD (On Screen Display) ...16 Accessories Supplied with the Camcorder...18 Remote Control (SCL860/L870 only) ...19 s Self Timer Recording ...19 Preparing Adjusting the Hand Strap and Shoulder Strap ...20 Lithium Battery Installation ...21 Connecting the Power Source...22 s To use the AC Power Adapter...22... s To use the Battery Pack ...23 Using the Battery Pack...24 s Continuous Recording time table...24 s Battery Level Display ...25 Inserting and Ejecting a Cassette ...26 Basic Recording Making Your First Recording ...27 ...
... OSD (On Screen Display) ...16 Accessories Supplied with the Camcorder...18 Remote Control (SCL860/L870 only) ...19 s Self Timer Recording ...19 Preparing Adjusting the Hand Strap and Shoulder Strap ...20 Lithium Battery Installation ...21 Connecting the Power Source...22 s To use the AC Power Adapter...22... s To use the Battery Pack ...23 Using the Battery Pack...24 s Continuous Recording time table...24 s Battery Level Display ...25 Inserting and Ejecting a Cassette ...26 Basic Recording Making Your First Recording ...27 ...
User Manual (user Manual) (ver.1.0) (English)
Page 15
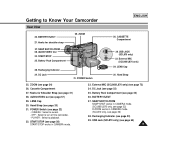
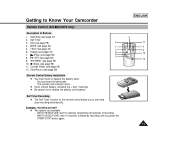
.... Hand Strap 25. OFF : Select to Know Your Camcorder ENGLISH Rear View 36. External MIC (SCL860/L870 only) (see page 23) 39. Battery Pack Compartment (see page 20) 31. SNAP SHOT/D.ZOOM SNAP SHOT works in CAMERA mode. (SCL860/L870 only, see page 21) 28. Hooks for Shoulder Strap (see page 52) D.ZOOM... 26. DC Jack (see page 34) 26. AUDIO/VIDEO out (see page 22) - POWER Switch (see page 57) 29. PLAYER : Select to record. - USB Jack (SCL870 only) (see page 36) 38. START/STOP (see page 28) START/STOP works in CAMERA mode. (SCL810 only, see page 65) 15 USB JACK...
.... Hand Strap 25. OFF : Select to Know Your Camcorder ENGLISH Rear View 36. External MIC (SCL860/L870 only) (see page 23) 39. Battery Pack Compartment (see page 20) 31. SNAP SHOT/D.ZOOM SNAP SHOT works in CAMERA mode. (SCL860/L870 only, see page 21) 28. Hooks for Shoulder Strap (see page 52) D.ZOOM... 26. DC Jack (see page 34) 26. AUDIO/VIDEO out (see page 22) - POWER Switch (see page 57) 29. PLAYER : Select to record. - USB Jack (SCL870 only) (see page 36) 38. START/STOP (see page 28) START/STOP works in CAMERA mode. (SCL810 only, see page 65) 15 USB JACK...
User Manual (user Manual) (ver.1.0) (English)
Page 16
...i. a. Program AE (see page 40) Indicates manual focus is activated g. Self record waiting timer. (SCL860/L870 only) (see page 19) (30 seconds or END). Date (see page 34) Indicates zoom position. Battery level (see page 39) Indicates DIS is displayed in the viewfinder and the LCD monitor. h. ENGLISH ...Getting to Know Your Camcorder OSD (On Screen Display) 1 You can turn the OSD on/off . 1 The OSD is activated. DIS (SCL860/L870 only) (see...
...i. a. Program AE (see page 40) Indicates manual focus is activated g. Self record waiting timer. (SCL860/L870 only) (see page 19) (30 seconds or END). Date (see page 34) Indicates zoom position. Battery level (see page 39) Indicates DIS is displayed in the viewfinder and the LCD monitor. h. ENGLISH ...Getting to Know Your Camcorder OSD (On Screen Display) 1 You can turn the OSD on/off . 1 The OSD is activated. DIS (SCL860/L870 only) (see...
User Manual (user Manual) (ver.1.0) (English)
Page 18
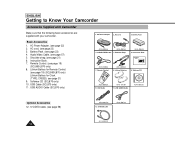
...SCL860/L870 only) Lithium Battery for Clock. (TYPE: CR2025, see page 22) 2. Software CD (SCL870 only) 10. USB Cable (SCL870 only) 11. AUDIO/VIDEO Cable 5. AC Power Adapter. (see page 21) 9. Lithium Batteries 9. Software CD AD59-00062A 10. USB AUDIO Cable AD46-00033B Optional Accessories 12. Battery... Pack Basic Accessories 1. USB AUDIO Cable (SCL870 only) AD44-00038A AD39-00028A 4. Battery Pack. (see page 21) 6. Remote...
...SCL860/L870 only) Lithium Battery for Clock. (TYPE: CR2025, see page 22) 2. Software CD (SCL870 only) 10. USB Cable (SCL870 only) 11. AUDIO/VIDEO Cable 5. AC Power Adapter. (see page 21) 9. Lithium Batteries 9. Software CD AD59-00062A 10. USB AUDIO Cable AD46-00033B Optional Accessories 12. Battery... Pack Basic Accessories 1. USB AUDIO Cable (SCL870 only) AD44-00038A AD39-00028A 4. Battery Pack. (see page 21) 6. Remote...
User Manual (user Manual) (ver.1.0) (English)
Page 19
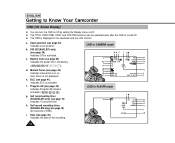
...: wait 10 seconds, followed by recording until you to reverse the polarity of the battery. ENGLISH 3 START/ COUNTER STOP DISPLAY RESET WIDE SELF TIMER ZERO STILL RETURN TELE... 7 9. (REW) (see page 59) 10. (Stop) (see page 59) Remote Control Battery Installation 1 You must insert or replace this battery when: - Example: recording yourself 1 Two options are available - Zero Return (see page 58)...Counter Reset (see page 27) 2. The remote control doesn't work. 1 Insert Lithium Battery, following the + and - WAIT-10S/SELF-END: wait 10 seconds, followed by 30...
...: wait 10 seconds, followed by recording until you to reverse the polarity of the battery. ENGLISH 3 START/ COUNTER STOP DISPLAY RESET WIDE SELF TIMER ZERO STILL RETURN TELE... 7 9. (REW) (see page 59) 10. (Stop) (see page 59) Remote Control Battery Installation 1 You must insert or replace this battery when: - Example: recording yourself 1 Two options are available - Zero Return (see page 58)...Counter Reset (see page 27) 2. The remote control doesn't work. 1 Insert Lithium Battery, following the + and - WAIT-10S/SELF-END: wait 10 seconds, followed by 30...
User Manual (user Manual) (ver.1.0) (English)
Page 24
...used in temperatures below 0°C, even when it is fully recharged. 1 The life and capacity of the battery pack will be charged in a room temperature that is fully recharged. 1 Do not put the battery pack near any heat source (fire or flames, for a long period, even when it is between 0&#...based on usage. Actual recording time depends on model and battery type. Notes: 1 The battery pack should never be reduced if the battery pack is left in the table are approximate. Model Battery Type SCL810 LCD ON, EVF OFF LCD OFF, EVF ON SCL860/L870 LCD ON, EVF OFF LCD OFF, EVF ON SB...
...used in temperatures below 0°C, even when it is fully recharged. 1 The life and capacity of the battery pack will be charged in a room temperature that is fully recharged. 1 Do not put the battery pack near any heat source (fire or flames, for a long period, even when it is between 0&#...based on usage. Actual recording time depends on model and battery type. Notes: 1 The battery pack should never be reduced if the battery pack is left in the table are approximate. Model Battery Type SCL810 LCD ON, EVF OFF LCD OFF, EVF ON SCL860/L870 LCD ON, EVF OFF LCD OFF, EVF ON SB...
User Manual (user Manual) (ver.1.0) (English)
Page 37
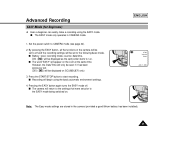
Set the power switch to start recording. s Battery level, recording mode, counter, date/time, DIS ( ) will begin using the EASY mode. s The word "EASY" will appear on . By pressing the EASY button, all ... START/STOP button to CAMERA mode (see page 22). 2. s The camera will return to the settings that were set . (DIS ( ) will only be displayed on SCL860/L870 only) 3. However, the Date/Time will be seen if it has been previously set prior to run. s The EASY mode only operates in the...
Set the power switch to start recording. s Battery level, recording mode, counter, date/time, DIS ( ) will begin using the EASY mode. s The word "EASY" will appear on . By pressing the EASY button, all ... START/STOP button to CAMERA mode (see page 22). 2. s The camera will return to the settings that were set . (DIS ( ) will only be displayed on SCL860/L870 only) 3. However, the Date/Time will be seen if it has been previously set prior to run. s The EASY mode only operates in the...


