User Guide
Page 3
... Contents Chapter 1 SCC-931T(P) Overview 5 SCC-931T(P) Introduction 6 SCC-931T(P) Part Names and Functions 7 Chapter 2 Installing SCC-931T(P) 9 Checking the Contents of the Package 10 Precautions for Installation and Use 12 Preparing Cables 14 Installing SCC-931T(P) 15 Connecting Cables and Checking Operations 22 Chapter 3 Setup Menu Overview 24 Structure of the Setup Menu 25 CAMERA MENU Organization 26 CAMERA ID 26...
... Contents Chapter 1 SCC-931T(P) Overview 5 SCC-931T(P) Introduction 6 SCC-931T(P) Part Names and Functions 7 Chapter 2 Installing SCC-931T(P) 9 Checking the Contents of the Package 10 Precautions for Installation and Use 12 Preparing Cables 14 Installing SCC-931T(P) 15 Connecting Cables and Checking Operations 22 Chapter 3 Setup Menu Overview 24 Structure of the Setup Menu 25 CAMERA MENU Organization 26 CAMERA ID 26...

User Guide
Page 4
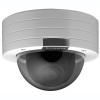
... of the key features of the existing surveillance cameras: the LowLight Surveillance function that enables shooting moving subject. SCC-931T(P) Part Names and Functions Front View Rear View BNC POWER 6 7 The SCC-931T(P) is an advanced surveillance device that automatically tracks.... It is designed to withstand intentional or accidental impact or vandalism, and is waterproof, dustproof, and shockproof. 00326A SCC-931T(P)-eng 9/25/02 12:30 PM Page 6 SCC-931T(P) Introduction The SCC-931T(P) Anti-Vandal Dome Camera is a dome-typed surveillance device that offers the best features of...
... of the key features of the existing surveillance cameras: the LowLight Surveillance function that enables shooting moving subject. SCC-931T(P) Part Names and Functions Front View Rear View BNC POWER 6 7 The SCC-931T(P) is an advanced surveillance device that automatically tracks.... It is designed to withstand intentional or accidental impact or vandalism, and is waterproof, dustproof, and shockproof. 00326A SCC-931T(P)-eng 9/25/02 12:30 PM Page 6 SCC-931T(P) Introduction The SCC-931T(P) Anti-Vandal Dome Camera is a dome-typed surveillance device that offers the best features of...

User Guide
Page 5
... 9/25/02 12:30 PM Page 8 SCC-931T(P) Part Names and Functions ❶ Camera Operation Switches (Setup Switches) The functions of the camera operation switches change depending on whether the SCC-931T(P) is currently in the usual operation mode (i.e., the setup menu is not showing on the screen) or...cable used for transmitting the ALARM signal at the time of the MOTION DET mode. 8 Chapter 2 Installing SCC-931T(P) This chapter explains what to check before installing the SCC-931T(P), how to choose an installation site, and what precautions should be taken during installation. Now, let's install...
... 9/25/02 12:30 PM Page 8 SCC-931T(P) Part Names and Functions ❶ Camera Operation Switches (Setup Switches) The functions of the camera operation switches change depending on whether the SCC-931T(P) is currently in the usual operation mode (i.e., the setup menu is not showing on the screen) or...cable used for transmitting the ALARM signal at the time of the MOTION DET mode. 8 Chapter 2 Installing SCC-931T(P) This chapter explains what to check before installing the SCC-931T(P), how to choose an installation site, and what precautions should be taken during installation. Now, let's install...

User Guide
Page 6
... in the package. 00326A SCC-931T(P)-eng 9/25/02 12:30 PM Page 10 Before Installation Checking the Contents of the Package Be sure to the holes at the bottom for waterproof protection when installing the camera on a pipe (CH M5 L8 XM7 + 0 RING) ✔ L WRENCH 1 ea. ❙ for COVER DOME removal ✔ DECORATION...
... in the package. 00326A SCC-931T(P)-eng 9/25/02 12:30 PM Page 10 Before Installation Checking the Contents of the Package Be sure to the holes at the bottom for waterproof protection when installing the camera on a pipe (CH M5 L8 XM7 + 0 RING) ✔ L WRENCH 1 ea. ❙ for COVER DOME removal ✔ DECORATION...
User Guide
Page 8
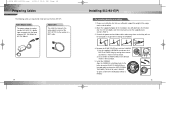
... terminal of the SCC-931T(P) to be installed. 2. Align the CAMERA's installation holes to install and use the SCC-931T(P). Connect the power cord and video cable, and arrange them counterclockwise as shown in the illustration. 2) Disassemble the ASSY-DOME in the direction shown...CAMERA. 00326A SCC-931T(P)-eng 9/25/02 12:30 PM Page 14 Preparing Cables The following cables are required to the holes where the PLASTIC ANCHORS are inserted and then fasten the ASSY SCREWTAPPINGS (TH M4 X 30) with O RINGS. (2 spots) (It will not be waterproof without O RINGS.) 2) 15 ➜ SAMSUNG...
... terminal of the SCC-931T(P) to be installed. 2. Align the CAMERA's installation holes to install and use the SCC-931T(P). Connect the power cord and video cable, and arrange them counterclockwise as shown in the illustration. 2) Disassemble the ASSY-DOME in the direction shown...CAMERA. 00326A SCC-931T(P)-eng 9/25/02 12:30 PM Page 14 Preparing Cables The following cables are required to the holes where the PLASTIC ANCHORS are inserted and then fasten the ASSY SCREWTAPPINGS (TH M4 X 30) with O RINGS. (2 spots) (It will not be waterproof without O RINGS.) 2) 15 ➜ SAMSUNG...

User Guide
Page 9
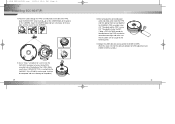
... 9/25/02 12:30 PM Page 16 Installing SCC-931T(P) 6. Adjust the LENS direction. 1) Turn the STOPPER RING counter-clockwise as a short circuit or broken wire.) ☛ The BOTTOM marking of the DOME is dirty, wipe off dirt with the COVER LENS to adjust the horizontal direction. (There is ... of the LENS must face downward. STOPPERRING (Otherwise, the image may twist the inside the PIPE and then pulling them out, put together the CAMERA's PIPE assembly screw (3/4" Threaded) and the PIPE's screw (3/4" Threaded) to fasten the SET. (*Wrap a TEFLON TAPE around the threaded area ...
... 9/25/02 12:30 PM Page 16 Installing SCC-931T(P) 6. Adjust the LENS direction. 1) Turn the STOPPER RING counter-clockwise as a short circuit or broken wire.) ☛ The BOTTOM marking of the DOME is dirty, wipe off dirt with the COVER LENS to adjust the horizontal direction. (There is ... of the LENS must face downward. STOPPERRING (Otherwise, the image may twist the inside the PIPE and then pulling them out, put together the CAMERA's PIPE assembly screw (3/4" Threaded) and the PIPE's screw (3/4" Threaded) to fasten the SET. (*Wrap a TEFLON TAPE around the threaded area ...

User Guide
Page 10
... the ceiling installation for CASE fixing by turning them counter- 00326A SCC-931T(P)-eng 9/25/02 12:30 PM Page 18 Installing SCC-931T(P) SAMSUNG 6. Adjust the LENS direction and assemble the DOME COVER. (Refer the steps 6 to remove it. 18 ➜ ➜ 5) Remove the CAMERA body from the CASE. (Completely separate the power cable from the...
... the ceiling installation for CASE fixing by turning them counter- 00326A SCC-931T(P)-eng 9/25/02 12:30 PM Page 18 Installing SCC-931T(P) SAMSUNG 6. Adjust the LENS direction and assemble the DOME COVER. (Refer the steps 6 to remove it. 18 ➜ ➜ 5) Remove the CAMERA body from the CASE. (Completely separate the power cable from the...
User Guide
Page 11
... 9/25/02 12:30 PM Page 20 Installing SCC-931T(P) 7) Route the cables through the PIPE assembly hole on the side of the PIPE, align the INDEX KEY arrow mark ( ) of the CAMERA body to the groove on the CAMERA, mount the CAMERA body and turn it clockwise all the way tight, and then fasten... make the connection watertight, and make sure that the cables are not caught by the fastening area.) 10) Adjust the LENS direction and assemble the DOME COVER. (Refer the steps 6 to 8 of the ceiling installation for LENS adjustment and DOME COVER assembly.) 21 If the O RING is inserted into the CAP-BOLT.
... 9/25/02 12:30 PM Page 20 Installing SCC-931T(P) 7) Route the cables through the PIPE assembly hole on the side of the PIPE, align the INDEX KEY arrow mark ( ) of the CAMERA body to the groove on the CAMERA, mount the CAMERA body and turn it clockwise all the way tight, and then fasten... make the connection watertight, and make sure that the cables are not caught by the fastening area.) 10) Adjust the LENS direction and assemble the DOME COVER. (Refer the steps 6 to 8 of the ceiling installation for LENS adjustment and DOME COVER assembly.) 21 If the O RING is inserted into the CAP-BOLT.

User Guide
Page 12
... controlling an RS485, please check the following screen will be displayed for 5 seconds before it disappears. Use a "minus" screwdriver to the VIDEO OUT. 2. If the camera operates normally, the following : - Data Bit Number: 8 bits - Parity Bit: None 23 Communication Speed: 4800 bps ~ 38400 bps - Stop Bit Number: 1 bit ...of the monitor. 3. Then, plug the power adapter into the power receptacle. 5. ADDR:0 TYPE:RS485, HALF BAUD:38400 LENS CHECK:OK! 6. 00326A SCC-931T(P)-eng 9/25/02 12:30 PM Page 22 Connecting Cables and Checking Operations 1. Then, plug in the power adapter.
... controlling an RS485, please check the following screen will be displayed for 5 seconds before it disappears. Use a "minus" screwdriver to the VIDEO OUT. 2. If the camera operates normally, the following : - Data Bit Number: 8 bits - Parity Bit: None 23 Communication Speed: 4800 bps ~ 38400 bps - Stop Bit Number: 1 bit ...of the monitor. 3. Then, plug the power adapter into the power receptacle. 5. ADDR:0 TYPE:RS485, HALF BAUD:38400 LENS CHECK:OK! 6. 00326A SCC-931T(P)-eng 9/25/02 12:30 PM Page 22 Connecting Cables and Checking Operations 1. Then, plug in the power adapter.

User Guide
Page 13
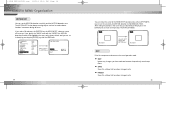
...MENU... EXIT QUIT/SAVE/PRESET CAMERA ID SETUP CAMERA ID POSITION SETUP AREA SETUP BLC SETUP LEVEL SETUP LEVEL SETUP 3200K/5600K/USER RED, BLUE SETUP PHASE SETUP RS485, PRESET D-ZOOM, PIP, MIRROR, POSI/NEGA ZOOM SPEED DETAIL SETUP AREA SETUP SENSITIVITY SETUP 25 00326A SCC-931T(P)-eng 9/25/02 12:...30 PM Page 24 Chapter 3 Setup Menu Overview This chapter looks into the overall organization of the setup menus and explains their functions. 24 Structure of the Setup Menu SETUP CAMERA ID ON.../OFF IRIS ALC.../MANU...
...MENU... EXIT QUIT/SAVE/PRESET CAMERA ID SETUP CAMERA ID POSITION SETUP AREA SETUP BLC SETUP LEVEL SETUP LEVEL SETUP 3200K/5600K/USER RED, BLUE SETUP PHASE SETUP RS485, PRESET D-ZOOM, PIP, MIRROR, POSI/NEGA ZOOM SPEED DETAIL SETUP AREA SETUP SENSITIVITY SETUP 25 00326A SCC-931T(P)-eng 9/25/02 12:...30 PM Page 24 Chapter 3 Setup Menu Overview This chapter looks into the overall organization of the setup menus and explains their functions. 24 Structure of the Setup Menu SETUP CAMERA ID ON.../OFF IRIS ALC.../MANU...
User Guide
Page 14
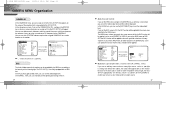
... where you can assign an ID to the SCC-931T(P) will be set the BLC menu to ON, the BLC function will appear. If you set to PRESET or USER. 00326A SCC-931T(P)-eng 9/25/02 12:30 PM Page 26 CAMERA MENU Organization CAMERA ID In the CAMERA ID menu, you can assign an ID to... the SCC-931T(P) that there is a submenu. The AREA menu, where you press the [ENTER] key...
... where you can assign an ID to the SCC-931T(P) will be set the BLC menu to ON, the BLC function will appear. If you set to PRESET or USER. 00326A SCC-931T(P)-eng 9/25/02 12:30 PM Page 26 CAMERA MENU Organization CAMERA ID In the CAMERA ID menu, you can assign an ID to... the SCC-931T(P) that there is a submenu. The AREA menu, where you press the [ENTER] key...

User Guide
Page 15
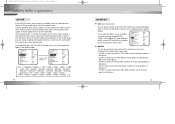
...not flashing, the area will be exited from the "AREA" setup menu. ➼ MANU (Manual IRIS) CAMERA ID IRIS AUTO FOCUS SHUTTER MOTION WHITE BAL SYNC SPECIAL MOTION DET EXIT OFF... AF AUTO X8 F.FAST .... ALC... ONEAF AUTO X8 F.FAST ATW INT ... This is same as the MF Mode while the SCC-931T(P) is stopped and same as the AF Mode while it is moving. ➼ MF (Manual Focus)...Using the [LEFT, RIGHT] keys CAMERA ID IRIS AUTO FOCUS SHUTTER MOTION WHITE BAL SYNC SPECIAL MOTION DET EXIT OFF... 00326A SCC-931T(P)-eng 9/25/02 12:30 PM Page 28 CAMERA MENU Organization SIZE SIZE POSITION Using the...
...not flashing, the area will be exited from the "AREA" setup menu. ➼ MANU (Manual IRIS) CAMERA ID IRIS AUTO FOCUS SHUTTER MOTION WHITE BAL SYNC SPECIAL MOTION DET EXIT OFF... AF AUTO X8 F.FAST .... ALC... ONEAF AUTO X8 F.FAST ATW INT ... This is same as the MF Mode while the SCC-931T(P) is stopped and same as the AF Mode while it is moving. ➼ MF (Manual Focus)...Using the [LEFT, RIGHT] keys CAMERA ID IRIS AUTO FOCUS SHUTTER MOTION WHITE BAL SYNC SPECIAL MOTION DET EXIT OFF... 00326A SCC-931T(P)-eng 9/25/02 12:30 PM Page 28 CAMERA MENU Organization SIZE SIZE POSITION Using the...
User Guide
Page 16
... FAST is used to maximize the AGC GAIN to monitor very fast moving objects in the following order: CAMERA ID IRIS AUTO FOCUS SHUTTER MOTION WHITE BAL SYNC SPECIAL MOTION DET EXIT OFF... The high-speed electronic shutter supports 7 shutter speeds from 1/100 seconds to 1/10K seconds, and the AUTO low-...minimize the AGC GAIN to monitor motionless objects in the high-speed SHUTTER (1/100 ~ 1/10K) mode or OFF mode to position to AGC, use the UP/DOWN keys while in dark places. - 00326A SCC-931T(P)-eng 9/25/02 12:30 PM Page 30 CAMERA MENU Organization SHUTTER In the SHUTTER menu, you to...
... FAST is used to maximize the AGC GAIN to monitor very fast moving objects in the following order: CAMERA ID IRIS AUTO FOCUS SHUTTER MOTION WHITE BAL SYNC SPECIAL MOTION DET EXIT OFF... The high-speed electronic shutter supports 7 shutter speeds from 1/100 seconds to 1/10K seconds, and the AUTO low-...minimize the AGC GAIN to monitor motionless objects in the high-speed SHUTTER (1/100 ~ 1/10K) mode or OFF mode to position to AGC, use the UP/DOWN keys while in dark places. - 00326A SCC-931T(P)-eng 9/25/02 12:30 PM Page 30 CAMERA MENU Organization SHUTTER In the SHUTTER menu, you to...
User Guide
Page 17
...AUTO X12 FAST ATW INT ... CAMERA ID IRIS AUTO FOCUS SHUTTER MOTION WHITE BAL SYNC SPECIAL MOTION DET EXIT OFF... OFF QUIT Using the [LEFT, RIGHT] keys CAMERA ID IRIS AUTO FOCUS SHUTTER MOTION WHITE BAL SYNC SPECIAL MOTION DET EXIT OFF... ALC... 00326A SCC-931T(P)-eng 9/25/02 12:30 PM... Page 32 CAMERA MENU Organization When the SHUTTER is pressed. ➼ MANU (Manual White Balance)...
...AUTO X12 FAST ATW INT ... CAMERA ID IRIS AUTO FOCUS SHUTTER MOTION WHITE BAL SYNC SPECIAL MOTION DET EXIT OFF... OFF QUIT Using the [LEFT, RIGHT] keys CAMERA ID IRIS AUTO FOCUS SHUTTER MOTION WHITE BAL SYNC SPECIAL MOTION DET EXIT OFF... ALC... 00326A SCC-931T(P)-eng 9/25/02 12:30 PM... Page 32 CAMERA MENU Organization When the SHUTTER is pressed. ➼ MANU (Manual White Balance)...
User Guide
Page 18
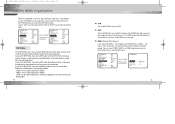
...IRIS AUTO FOCUS SHUTTER MOTION WHITE BAL SYNC SPECIAL MOTION DET EXIT OFF... OFF QUIT When you select LINE... 00326A SCC-931T(P)-eng 9/25/02 12:30 PM Page 34 CAMERA MENU Organization SYNC Select INT when using the external signal (AC signal -60Hz(NTSC), AC signal -50Hz(PAL)). ... from -138 to +138. Position the cursor on the SCC-931T(P). ➼ RS485 Select the Baud Rate (4800, 9600, 19200, or 38400 bps) and Camera Address (0~255) for PAL from 0 to 9. ➼ D-ZOOM Sets the magnification of cameras, each CAMERA set between each must use the [LEFT/RIGHT] keys to...
...IRIS AUTO FOCUS SHUTTER MOTION WHITE BAL SYNC SPECIAL MOTION DET EXIT OFF... OFF QUIT When you select LINE... 00326A SCC-931T(P)-eng 9/25/02 12:30 PM Page 34 CAMERA MENU Organization SYNC Select INT when using the external signal (AC signal -60Hz(NTSC), AC signal -50Hz(PAL)). ... from -138 to +138. Position the cursor on the SCC-931T(P). ➼ RS485 Select the Baud Rate (4800, 9600, 19200, or 38400 bps) and Camera Address (0~255) for PAL from 0 to 9. ➼ D-ZOOM Sets the magnification of cameras, each CAMERA set between each must use the [LEFT/RIGHT] keys to...

User Guide
Page 19
...ENTER] key CTRL TYPE --- PRESET ... RET When you press the [ENTER] key PIP SCREEN When you can store up to set the Camera Address and Baud Rate. PRESET ... CTRL TYPE --- ON... D-ZOOM X2 PIP ON... D-ZOOM OFF PIP --- D-ZOOM OFF PIP ---... 36 You can set the desired item. CTRL TYPE --- ALC... MIRROR OFF POSI/NEGA + ZOOM SPEED 3 DETAIL (0) ----|-- CTRL TYPE --- 00326A SCC-931T(P)-eng 9/25/02 12:30 PM Page 36 CAMERA MENU Organization CAMERA ID IRIS AUTO FOCUS SHUTTER MOTION WHITE BAL SYNC SPECIAL MOTION DET EXIT OFF... RS485 ...
...ENTER] key CTRL TYPE --- PRESET ... RET When you press the [ENTER] key PIP SCREEN When you can store up to set the Camera Address and Baud Rate. PRESET ... CTRL TYPE --- ON... D-ZOOM X2 PIP ON... D-ZOOM OFF PIP --- D-ZOOM OFF PIP ---... 36 You can set the desired item. CTRL TYPE --- ALC... MIRROR OFF POSI/NEGA + ZOOM SPEED 3 DETAIL (0) ----|-- CTRL TYPE --- 00326A SCC-931T(P)-eng 9/25/02 12:30 PM Page 36 CAMERA MENU Organization CAMERA ID IRIS AUTO FOCUS SHUTTER MOTION WHITE BAL SYNC SPECIAL MOTION DET EXIT OFF... RS485 ...
User Guide
Page 20
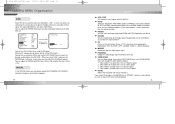
...applied to the area set by pressing the [ENTER] key with BLC AREA, press the [ENTER] key to return to the previous MOTION DET MENU. CAMERA ID IRIS AUTO FOCUS SHUTTER MOTION WHITE BAL SYNC SPECIAL MOTION DET EXIT OFF... The MOTION DET fuction detects moving objects and can move the... DET submenu screen will be used to set the sensitivity for MOTION detection (LOW, MEDIUM, HIGH). ALC... ON... QUIT When you did with the USER item. 00326A SCC-931T(P)-eng 9/25/02 12:30 PM Page 38 CAMERA MENU Organization MOTION DET You can set it directly by factory default, and you can set...
...applied to the area set by pressing the [ENTER] key with BLC AREA, press the [ENTER] key to return to the previous MOTION DET MENU. CAMERA ID IRIS AUTO FOCUS SHUTTER MOTION WHITE BAL SYNC SPECIAL MOTION DET EXIT OFF... The MOTION DET fuction detects moving objects and can move the... DET submenu screen will be used to set the sensitivity for MOTION detection (LOW, MEDIUM, HIGH). ALC... ON... QUIT When you did with the USER item. 00326A SCC-931T(P)-eng 9/25/02 12:30 PM Page 38 CAMERA MENU Organization MOTION DET You can set it directly by factory default, and you can set...


