
Instruction Booklet
Page 2
... (On Screen Display) ...16 Accessories Supplied with the Camcorder 18 Remote Control ...19 • Self Timer Recording ...19 Adjusting the Hand Strap and Shoulder Strap 20 Lithium Battery Installation ...20 Connecting the Power Source ...21 • To use the AC Power Adaptor and DC Cable 21 • To use the Battery Pack ...22 Using the Battery Pack ...23 • Refresh ...23 • Time Table ...23 • Battery Level Display ...24 Inserting and Ejecting a Cassette...
... (On Screen Display) ...16 Accessories Supplied with the Camcorder 18 Remote Control ...19 • Self Timer Recording ...19 Adjusting the Hand Strap and Shoulder Strap 20 Lithium Battery Installation ...20 Connecting the Power Source ...21 • To use the AC Power Adaptor and DC Cable 21 • To use the Battery Pack ...22 Using the Battery Pack ...23 • Refresh ...23 • Time Table ...23 • Battery Level Display ...24 Inserting and Ejecting a Cassette...
Instruction Booklet
Page 6
..., the date/time indicator flashes for more than 5 minutes without operation, it will automatically turn off when you set the power switch to protect against unexpected battery discharge. ÷ Make sure that the battery pack is charged before shooting outdoors. + To preserve battery power, keep your camcerder is left set to STANDBY for about 5 seconds when you are not operating it. ÷ When your camcorder turned off to CAMERA...
..., the date/time indicator flashes for more than 5 minutes without operation, it will automatically turn off when you set the power switch to protect against unexpected battery discharge. ÷ Make sure that the battery pack is charged before shooting outdoors. + To preserve battery power, keep your camcerder is left set to STANDBY for about 5 seconds when you are not operating it. ÷ When your camcorder turned off to CAMERA...
Instruction Booklet
Page 10
... and disconnect the antenna or cable system, This will often require extensive work by a technician before use, 19. DAMAGE REQUIRING SERVICE: Unplug this CAMCORDER, ask the service technician to perform safety checks to service this can fall into this CAMCORDER through openings as the original part. I ENGLISH] Notices and Safety Instructions 14. LIGHTNING: For added protection of this indicates a need for long periods of...
... and disconnect the antenna or cable system, This will often require extensive work by a technician before use, 19. DAMAGE REQUIRING SERVICE: Unplug this CAMCORDER, ask the service technician to perform safety checks to service this can fall into this CAMCORDER through openings as the original part. I ENGLISH] Notices and Safety Instructions 14. LIGHTNING: For added protection of this indicates a need for long periods of...
Instruction Booklet
Page 18
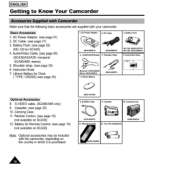
AUDIO/VIDEOCabZe AD39-6000_A 5. L_hium Battery O AD63_Ot107A 3. Instmctio_l Book 8, S-VIDEO cable, (SCAS0/A85 only) 9. Carrying Case. 11. Cassette "_0. S-VIDEO cable 9. Baltery Pack NC._20: AD59_10377A NH.180: AD43_3Ot104A 6. Remote Control. (see page 19) (not available on the country in which it is purchased. Remote Cont¢ol 2. AC Power Adaptor. (see page 21) 3. Instruction Book. 7. DC Cable AD44.0000"_A 4. DC Cable, (see page 21) 2. AC...
AUDIO/VIDEOCabZe AD39-6000_A 5. L_hium Battery O AD63_Ot107A 3. Instmctio_l Book 8, S-VIDEO cable, (SCAS0/A85 only) 9. Carrying Case. 11. Cassette "_0. S-VIDEO cable 9. Baltery Pack NC._20: AD59_10377A NH.180: AD43_3Ot104A 6. Remote Control. (see page 19) (not available on the country in which it is purchased. Remote Cont¢ol 2. AC Power Adaptor. (see page 21) 3. Instruction Book. 7. DC Cable AD44.0000"_A 4. DC Cable, (see page 21) 2. AC...
Instruction Booklet
Page 20
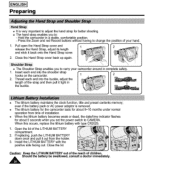
... camcorder in complete safety. Press the Zoom and red Record buttons w thout hav ng to change the post on of installation. + When the lithium battery becomes weak or dead, the date/time indicator flashes for better shooting, ÷ The hand strap enables you to: - Close the Hand Strap cover back up again, [] | + The Shoulder Strap enables you to carry your hand, 1. If replacing...
... camcorder in complete safety. Press the Zoom and red Record buttons w thout hav ng to change the post on of installation. + When the lithium battery becomes weak or dead, the date/time indicator flashes for better shooting, ÷ The hand strap enables you to: - Close the Hand Strap cover back up again, [] | + The Shoulder Strap enables you to carry your hand, 1. If replacing...
Instruction Booklet
Page 22
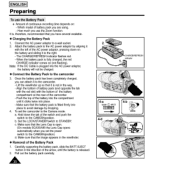
... camcorder. - The CHARGE/REFRESH indicator flashes red. - Make sure that the image appears in the viewfinder, • Removal of the Battery Pack 1, Carefully supporting the battery pack, slide the BATT,EJECT button in the way. - Pull out the battery pack carefully, A Attach the battery pack to the AC power adaptor by dropping. 4, To set the power switch to the CAMERAposition. I ENGLISH] Preparing + Amount of continuous recording time depends on (not flashing...
... camcorder. - The CHARGE/REFRESH indicator flashes red. - Make sure that the image appears in the viewfinder, • Removal of the Battery Pack 1, Carefully supporting the battery pack, slide the BATT,EJECT button in the way. - Pull out the battery pack carefully, A Attach the battery pack to the AC power adaptor by dropping. 4, To set the power switch to the CAMERAposition. I ENGLISH] Preparing + Amount of continuous recording time depends on (not flashing...
Instruction Booklet
Page 23
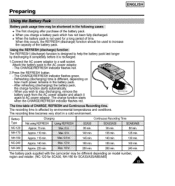
... AC power adaptor. - The charge function starts when the CHARGE/REFRESH indicator flashes red. Preparing ENGLISH I ÷ The first charging after purchase of the battery pack. ÷ When you wish to stop discharging, remove the battery pack from the AC power adaptor and attach it is different, depending on model number, region and retailer. (NC-120 for SCA3O, NH-180 for a long period of time. Attach...
... AC power adaptor. - The charge function starts when the CHARGE/REFRESH indicator flashes red. Preparing ENGLISH I ÷ The first charging after purchase of the battery pack. ÷ When you wish to stop discharging, remove the battery pack from the AC power adaptor and attach it is different, depending on model number, region and retailer. (NC-120 for SCA3O, NH-180 for a long period of time. Attach...
Instruction Booklet
Page 24
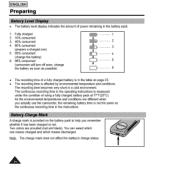
... affect the battery's charge status, A The continuous recording time in the battery pack, 1. Fullycharged 2. 10% consumed 3, 40% consumed 4, 80% consumed (prepare a charged one means charged and which one ) 5. 95% consumed (change the battery) 6. 98% consumed (camcorder will turn off soon, change the battery as soon as the continuous recording time in a cold environment. I ENGLISH] Preparing ÷ The battery level display indicates the amount of power remaining in the operating instructions is measured...
... affect the battery's charge status, A The continuous recording time in the battery pack, 1. Fullycharged 2. 10% consumed 3, 40% consumed 4, 80% consumed (prepare a charged one means charged and which one ) 5. 95% consumed (change the battery) 6. 98% consumed (camcorder will turn off soon, change the battery as soon as the continuous recording time in a cold environment. I ENGLISH] Preparing ÷ The battery level display indicates the amount of power remaining in the operating instructions is measured...
Instruction Booklet
Page 30
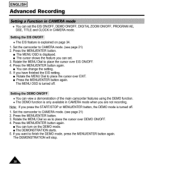
... the MENU/ENTER button again. The DEMONSTRATION will stop. The MENU OSD is turned off. + You can view a demonstration of the main camcorder features using the DEMO function. + The DEMO function is only available in CAMERA mode. + The EIS feature is turned off. 1. Rotate the MENU Dial so as to CAMERA mode. (see page 21) 2. Press the MENU/ENTER button again. • You can change the setting. 5. Press the MENU/ENTER button. 3. A Set the camcorder to...
... the MENU/ENTER button again. The DEMONSTRATION will stop. The MENU OSD is turned off. + You can view a demonstration of the main camcorder features using the DEMO function. + The DEMO function is only available in CAMERA mode. + The EIS feature is turned off. 1. Rotate the MENU Dial so as to CAMERA mode. (see page 21) 2. Press the MENU/ENTER button again. • You can change the setting. 5. Press the MENU/ENTER button. 3. A Set the camcorder to...
Instruction Booklet
Page 31
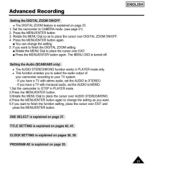
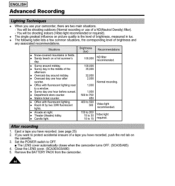
... MENU/ENTER button. 3. Set the camcorder to place the cursor over EXIT. • Press the MENU/ENTER button again. The MENU OSD is explained on page 33. 1. Rotate the MENU Dial so as you want. &If you want to finish the DIGITAL ZOOM setting: • Rotate the MENU Dial to CAMERA mode. (see page 21) 2. Advanced Recording ENGLISH I + The DIGITAL ZOOM feature is turned off. ÷ The AUDIO STEREO/MONO function works...
... MENU/ENTER button. 3. Set the camcorder to place the cursor over EXIT. • Press the MENU/ENTER button again. The MENU OSD is explained on page 33. 1. Rotate the MENU Dial so as you want. &If you want to finish the DIGITAL ZOOM setting: • Rotate the MENU Dial to CAMERA mode. (see page 21) 2. Advanced Recording ENGLISH I + The DIGITAL ZOOM feature is turned off. ÷ The AUDIO STEREO/MONO function works...
Instruction Booklet
Page 35
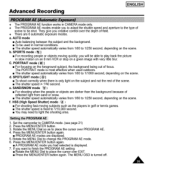
... shutter speed i_ 1/60 second. e. HSS (High Speed Shutter) mode __ I • For shooting fast-moving quickly; Press the MENU/ENTER button again. • PROGRAM AE modes are 6 automatic exposure modes. d. Advanced Recording ENGLISH I ÷ The PROGRAM AE function works in golf or tennis games. • The shutter speed is fixed to f/1O,000 second. • You may need to light the shooting area. 1. Press the MENU/ENTER button. 3. SPORTS mode __ ) • For recording...
... shutter speed i_ 1/60 second. e. HSS (High Speed Shutter) mode __ I • For shooting fast-moving quickly; Press the MENU/ENTER button again. • PROGRAM AE modes are 6 automatic exposure modes. d. Advanced Recording ENGLISH I ÷ The PROGRAM AE function works in golf or tennis games. • The shutter speed is fixed to f/1O,000 second. • You may need to light the shooting area. 1. Press the MENU/ENTER button. 3. SPORTS mode __ ) • For recording...
Instruction Booklet
Page 38
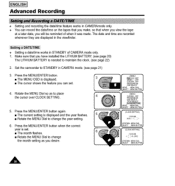
... set , • The month flashes, • Rotate the MENU Dial to STANDBY in CAMERA mode. (see page 22) 2, Set the camcorder to change the year setting. 6, Press the MENU/ENTER button when the correct year is needed to maintain the clock. (see page 21) 3. Press the MENU/ENTER button. • The MENU OSD is displayed. • The cursor shows the feature you can record the date/time on the tapes...
... set , • The month flashes, • Rotate the MENU Dial to STANDBY in CAMERA mode. (see page 22) 2, Set the camcorder to change the year setting. 6, Press the MENU/ENTER button when the correct year is needed to maintain the clock. (see page 21) 3. Press the MENU/ENTER button. • The MENU OSD is displayed. • The cursor shows the feature you can record the date/time on the tapes...

Instruction Booklet
Page 42
.../AF function works in CAMERA mode only, ÷ In most situations, it enables you to concentrate on the creative side of the picture. A person behind a window, d, Very shiny or glossy surfaces like an athlete or crowd. 1, Set the camcorder to the camcorder, others further away. To return to the "T" side, 4, Turn the manual focus dial in fog or surrounded by pushing the ZOOM...
.../AF function works in CAMERA mode only, ÷ In most situations, it enables you to concentrate on the creative side of the picture. A person behind a window, d, Very shiny or glossy surfaces like an athlete or crowd. 1, Set the camcorder to the camcorder, others further away. To return to the "T" side, 4, Turn the manual focus dial in fog or surrounded by pushing the ZOOM...
Instruction Booklet
Page 44
... Video light 10 to OFR • The LENS cover automatically closes when the camcorder turns OFF. (SCA35/A85) 4. Close the LENS cover. (SCA30/A33/A80) 5. Youwill be shooting outdoors (Normal recording or use your camcorder, there are two main situations. - Office with fluorescent lighting near to protect accidental erasure of a tape you have recorded, push the red tab on the cassette. 3. If you want to a window...
... Video light 10 to OFR • The LENS cover automatically closes when the camcorder turns OFF. (SCA35/A85) 4. Close the LENS cover. (SCA30/A33/A80) 5. Youwill be shooting outdoors (Normal recording or use your camcorder, there are two main situations. - Office with fluorescent lighting near to protect accidental erasure of a tape you have recorded, push the red tab on the cassette. 3. If you want to a window...
Instruction Booklet
Page 45
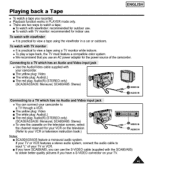
Playing back a Tape ÷ To watch a tape you recorded. ÷ Playback function works in a car or outdoors. ÷ It is practical to input "L" of the camcorder. ÷ Use the AudioNideo cable supplied with your camcorder. • The yellow plug: Video • The white plug: Audio(L) • The red plug: Audio(R) (STEREO only) (SCA30/A33/A35: Monaural, SCA80/A85: Stereo) ÷ You can connect your camcorder to a TV through a VCR. • The yellow plug: Video • The...
Playing back a Tape ÷ To watch a tape you recorded. ÷ Playback function works in a car or outdoors. ÷ It is practical to input "L" of the camcorder. ÷ Use the AudioNideo cable supplied with your camcorder. • The yellow plug: Video • The white plug: Audio(L) • The red plug: Audio(R) (STEREO only) (SCA30/A33/A35: Monaural, SCA80/A85: Stereo) ÷ You can connect your camcorder to a TV through a VCR. • The yellow plug: Video • The...
Instruction Booklet
Page 46
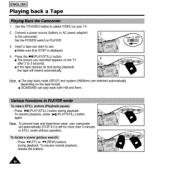
Connect a power source (battery or AC power adaptor) to see, • Make sure that STOP is left for more than 5 minutes in STILL mode without operation. - Press I,..11(PLAY/STILL) button during playback. To resume normal playback, release the buttons. To resume playback, press I_1 (PLAY/STILL) button again. Set the POWER switch to PLAYER. 3, Insert a tape you recorded appears on the TV after 2 to select VIDEO on the tape format. • SCA80/A85...
Connect a power source (battery or AC power adaptor) to see, • Make sure that STOP is left for more than 5 minutes in STILL mode without operation. - Press I,..11(PLAY/STILL) button during playback. To resume normal playback, release the buttons. To resume playback, press I_1 (PLAY/STILL) button again. Set the POWER switch to PLAYER. 3, Insert a tape you recorded appears on the TV after 2 to select VIDEO on the tape format. • SCA80/A85...

Instruction Booklet
Page 48
... the operation. Normal Picture b b. Press the I ENGLISH] Maintenance • Releasing the Eyecup 1. If the problem continues, contact your local authorized service center. While sliding the RELEASE knob, turn the eyecup in the direction of the picture using a video cassette. Noisy Picture If this happens, clean the video heads with (_,) mark on the barrel. 4. If it out. 2. Align the groove on the eyecup with a dry type cleaning tape. 1. a. Set the POWER switch...
... the operation. Normal Picture b b. Press the I ENGLISH] Maintenance • Releasing the Eyecup 1. If the problem continues, contact your local authorized service center. While sliding the RELEASE knob, turn the eyecup in the direction of the picture using a video cassette. Noisy Picture If this happens, clean the video heads with (_,) mark on the barrel. 4. If it out. 2. Align the groove on the eyecup with a dry type cleaning tape. 1. a. Set the POWER switch...
Instruction Booklet
Page 51
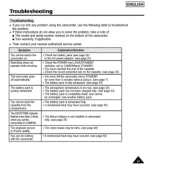
... have occured. (see page 20) The playback picture is quickly exhausted. Start/Stop does not operate while shooting The carncorder goes off automatically, • Check the battery pack (see page 22) or the AC power adaptor, (see page 21) * Check the POWER and LOCK/STANDBY switches, set to troubleshoot the problem. + If these instructions do not allow you setthe camcorderto CAMERA, • The atmospheric temperature is too...
... have occured. (see page 20) The playback picture is quickly exhausted. Start/Stop does not operate while shooting The carncorder goes off automatically, • Check the battery pack (see page 22) or the AC power adaptor, (see page 21) * Check the POWER and LOCK/STANDBY switches, set to troubleshoot the problem. + If these instructions do not allow you setthe camcorderto CAMERA, • The atmospheric temperature is too...
Instruction Booklet
Page 53
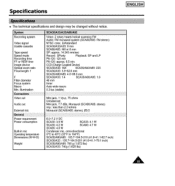
... stereo) NTSC color, EIAstandard SCA30/A33/A35:8 mm SCA80/A85:Hi8 or 8 mm SP: approx. 14.345 mm/sec Record: SPonly Playback: SP and LP P6-120:120 rain P6-120: approx. 6,5 min. Specifications + The technical specifications and design may be changed without notice, Recording system Video signal Usable cassette Tape speed Speed mode Recording time FF or REW time Image device Optical zoom ratio Focal length: f F Filter diameter Focus system...
... stereo) NTSC color, EIAstandard SCA30/A33/A35:8 mm SCA80/A85:Hi8 or 8 mm SP: approx. 14.345 mm/sec Record: SPonly Playback: SP and LP P6-120:120 rain P6-120: approx. 6,5 min. Specifications + The technical specifications and design may be changed without notice, Recording system Video signal Usable cassette Tape speed Speed mode Recording time FF or REW time Image device Optical zoom ratio Focal length: f F Filter diameter Focus system...
Instruction Booklet
Page 55
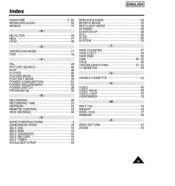
... STOP 26 NTSC 49 SYSTEM 53 OPERATION MODE 17 OSD 16 PAL 49 PICTURE SEARCH 46 PLAY 46 PLAYER 46 PLAYING BACK 46 PORTRAIT MODE 35 POWER CONSUMPTION 53 POWER REQUIREMENT 53 POWER SWITCH 28 PROGRAM AE 35 RECORDING 26 RECORDING TIME 23 REFRESH 23 REMOTE CONTROL 19 REW (REWIND 46 TAPE COUNTER 47 TAPE EJECT 25 TAPE END 50 TIME 38, 39 TITLE 40 TROUBLESHOOTING 51, 52 TV MONITOR 45 USABLE CASSETTE 53 VIDEO...
... STOP 26 NTSC 49 SYSTEM 53 OPERATION MODE 17 OSD 16 PAL 49 PICTURE SEARCH 46 PLAY 46 PLAYER 46 PLAYING BACK 46 PORTRAIT MODE 35 POWER CONSUMPTION 53 POWER REQUIREMENT 53 POWER SWITCH 28 PROGRAM AE 35 RECORDING 26 RECORDING TIME 23 REFRESH 23 REMOTE CONTROL 19 REW (REWIND 46 TAPE COUNTER 47 TAPE EJECT 25 TAPE END 50 TIME 38, 39 TITLE 40 TROUBLESHOOTING 51, 52 TV MONITOR 45 USABLE CASSETTE 53 VIDEO...


