
User Manual (English)
Page 2
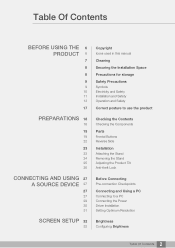
... Icons used in this manual Cleaning Securing the Installation Space Precautions for storage Safety Precautions Symbols Electricity and Safety Installation and Safety Operation and Safety Correct posture to use the product Checking the Contents Checking the Components Parts Frontal Buttons Reverse Side Installation Attaching the Stand Removing the Stand Adjusting the Product Tilt Anti-theft Lock Before Connecting Pre-connection Checkpoints Connecting and Using a PC Connecting to a PC Connecting the Power Driver Installation Setting Optimum Resolution Brightness Configuring Brightness 2 Table...
... Icons used in this manual Cleaning Securing the Installation Space Precautions for storage Safety Precautions Symbols Electricity and Safety Installation and Safety Operation and Safety Correct posture to use the product Checking the Contents Checking the Components Parts Frontal Buttons Reverse Side Installation Attaching the Stand Removing the Stand Adjusting the Product Tilt Anti-theft Lock Before Connecting Pre-connection Checkpoints Connecting and Using a PC Connecting to a PC Connecting the Power Driver Installation Setting Optimum Resolution Brightness Configuring Brightness 2 Table...

User Manual (English)
Page 19
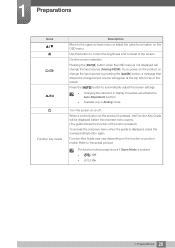
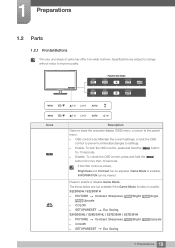
MENU GAME MODE SOURCE AUTO AU MENU MENU Function Key Guide GAME MODE SOURCE AUTO GAME MODE SOURCE SAMSUNG Icons MENU Description Open or close the onscreen display (OSD) menu, or return to the parent menu. OSD control lock: Maintain the current settings, or lock the OSD control to prevent unintended changes to enable or disable Game Mode. Press to settings. Enable: To lock the OSD control, press and hold the [MENU] button for 10 seconds. Disable: To unlock the OSD control, press and hold the [MENU] button for...
MENU GAME MODE SOURCE AUTO AU MENU MENU Function Key Guide GAME MODE SOURCE AUTO GAME MODE SOURCE SAMSUNG Icons MENU Description Open or close the onscreen display (OSD) menu, or return to the parent menu. OSD control lock: Maintain the current settings, or lock the OSD control to prevent unintended changes to enable or disable Game Mode. Press to settings. Enable: To lock the OSD control, press and hold the [MENU] button for 10 seconds. Disable: To unlock the OSD control, press and hold the [MENU] button for...
User Manual (English)
Page 20
... brightness and contrast of the screen. The function buttons page shows if Game Mode is not displayed will activate the Auto Adjustment function. Available only in Display Properties will change the input source by pressing the [ ] button, a message that shows the changed input source will be displayed before the onscreen menu opens. (The guide shows the function of the screen. Press the [AUTO] button to automatically adjust the screen settings. Changing the resolution in Analog mode. Confirm a menu selection. Use...
... brightness and contrast of the screen. The function buttons page shows if Game Mode is not displayed will activate the Auto Adjustment function. Available only in Display Properties will change the input source by pressing the [ ] button, a message that shows the changed input source will be displayed before the onscreen menu opens. (The guide shows the function of the screen. Press the [AUTO] button to automatically adjust the screen settings. Changing the resolution in Analog mode. Confirm a menu selection. Use...
User Manual (English)
Page 27
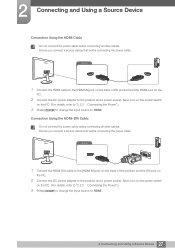
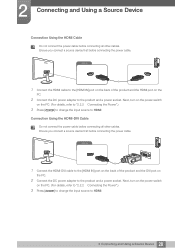
... cables. Next, turn on the power switch on the PC. 2 Connect the DC power adapter to HDMI. HDMI IN 1 Connect the HDMI-DVI cable to the [HDMI IN] port on the back of the product and the HDMI port on the PC. (For details, refer to "2.2.2 Connecting the Power".) 3 Press [ ] to change the input source to the product and a power socket. Connection Using the HDMI-DVI Cable Do not connect the power cable before connecting the power cable. 2 Connecting and Using a Source Device Connection Using the HDMI Cable Do not connect the power cable...
... cables. Next, turn on the power switch on the PC. 2 Connect the DC power adapter to HDMI. HDMI IN 1 Connect the HDMI-DVI cable to the [HDMI IN] port on the back of the product and the HDMI port on the PC. (For details, refer to "2.2.2 Connecting the Power".) 3 Press [ ] to change the input source to the product and a power socket. Connection Using the HDMI-DVI Cable Do not connect the power cable before connecting the power cable. 2 Connecting and Using a Source Device Connection Using the HDMI Cable Do not connect the power cable...
User Manual (English)
Page 29
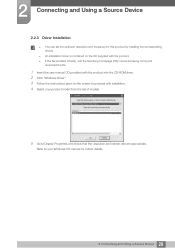
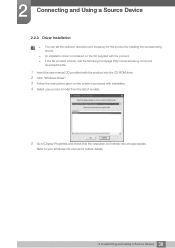
...://www.samsung.com/) and download the file. 1 Insert the user manual CD provided with installation. 4 Select your Windows OS manual for further details. 29 2 Connecting and Using a Source Device Refer to your product model from the list of models. 5 Go to proceed with the product into the CD-ROM drive. 2 Click "Windows Driver". 3 Follow the instructions given on the screen to Display Properties and check that the resolution and refresh rate...
...://www.samsung.com/) and download the file. 1 Insert the user manual CD provided with installation. 4 Select your Windows OS manual for further details. 29 2 Connecting and Using a Source Device Refer to your product model from the list of models. 5 Go to proceed with the product into the CD-ROM drive. 2 Click "Windows Driver". 3 Follow the instructions given on the screen to Display Properties and check that the resolution and refresh rate...
User Manual (English)
Page 35
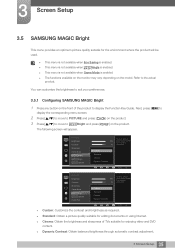
... Bright SMAAMSGUINCG Upscale Image Size 100 75 60 Custom Custo5m0 Standard O50ff Cinema 22O00ff Dynamic Contrast Wide0 Set to the actual product. Refer to an optimum picture quality suitable for the working environment. PICTURE Brightness Contrast Sharpness Game Mode SMAAMSGUINCG Bright SMAAMSGUINCG Angle SMAAMSGUINCG Upscale 100 75 60 Custom Custo5m0 Standard O50ff Cinema 22O00ff Dynamic Contrast Wide0 Set to display the Function Key Guide. Next, press [MENU...
... Bright SMAAMSGUINCG Upscale Image Size 100 75 60 Custom Custo5m0 Standard O50ff Cinema 22O00ff Dynamic Contrast Wide0 Set to the actual product. Refer to an optimum picture quality suitable for the working environment. PICTURE Brightness Contrast Sharpness Game Mode SMAAMSGUINCG Bright SMAAMSGUINCG Angle SMAAMSGUINCG Upscale 100 75 60 Custom Custo5m0 Standard O50ff Cinema 22O00ff Dynamic Contrast Wide0 Set to display the Function Key Guide. Next, press [MENU...

User Manual (English)
Page 42
... HDMI mode. The functions available on the monitor may occur, depending on the product. 3 Press [ ] to move to display the Function Key Guide. Next, press [MENU] to display the corresponding menu screen. 2 Press [ ] to move to the product via HDMI, image quality degradation (contrast/ color degradation, black level, etc.) may vary depending on the product. PICTURE Image Size HDMI Black Level H-Position V-Position Coarse Fine Normal Low Optimize HDMI picture brightness and contrast by adjusting the black...
... HDMI mode. The functions available on the monitor may occur, depending on the product. 3 Press [ ] to move to display the Function Key Guide. Next, press [MENU] to display the corresponding menu screen. 2 Press [ ] to move to the product via HDMI, image quality degradation (contrast/ color degradation, black level, etc.) may vary depending on the product. PICTURE Image Size HDMI Black Level H-Position V-Position Coarse Fine Normal Low Optimize HDMI picture brightness and contrast by adjusting the black...
User Manual (English)
Page 44
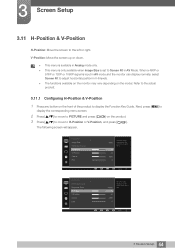
... Screen Fit in 0-6 levels. The functions available on the monitor may vary depending on the product. 3 Press [ ] to move to display the Function Key Guide. AUTO 44 3 Screen Setup V-Position: Move the screen up or down. This menu is available in Analog mode only. This menu is only available when Image Size is input in AV mode and the monitor can display normally, select Screen Fit to adjust horizontal position...
... Screen Fit in 0-6 levels. The functions available on the monitor may vary depending on the product. 3 Press [ ] to move to display the Function Key Guide. AUTO 44 3 Screen Setup V-Position: Move the screen up or down. This menu is available in Analog mode only. This menu is only available when Image Size is input in AV mode and the monitor can display normally, select Screen Fit to adjust horizontal position...
User Manual (English)
Page 51
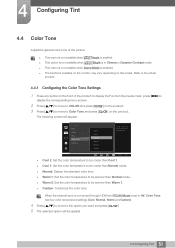
... Adjust the general color tone of the product to display the Function Key Guide. The following screen will be warmer than Warm 1. Custom: Customize the color tone. COLOR Red Green Blue Color Tone Gamma Cool 2 Cool 1 Normal Warm 1 Warm 2 Custom 50 50 50 Normal Mode1 Select a color tone that best suits your viewing needs. Refer to the actual product. 4.4.1 Configuring the Color Tone Settings 1 Press any button...
... Adjust the general color tone of the product to display the Function Key Guide. The following screen will be warmer than Warm 1. Custom: Customize the color tone. COLOR Red Green Blue Color Tone Gamma Cool 2 Cool 1 Normal Warm 1 Warm 2 Custom 50 50 50 Normal Mode1 Select a color tone that best suits your viewing needs. Refer to the actual product. 4.4.1 Configuring the Color Tone Settings 1 Press any button...
User Manual (English)
Page 61
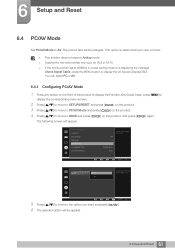
.../AV Mode HDMI PC AV Select the PC/AV mode for the wide models only such as 16:9 or 16:10. If the monitor (when set to HDMI) is in power saving mode or is useful when you want and press [ ]. 6 The selected option will appear. 6 Setup and Reset 6.4 PC/AV Mode Set PC/AV Mode to display the On Screen Display(OSD). This option is displaying the message Check Signal Cable, press the MENU button...
.../AV Mode HDMI PC AV Select the PC/AV mode for the wide models only such as 16:9 or 16:10. If the monitor (when set to HDMI) is in power saving mode or is useful when you want and press [ ]. 6 The selected option will appear. 6 Setup and Reset 6.4 PC/AV Mode Set PC/AV Mode to display the On Screen Display(OSD). This option is displaying the message Check Signal Cable, press the MENU button...
User Manual (English)
Page 64
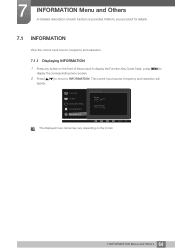
Next, press [MENU] to display the corresponding menu screen. 2 Press [ ] to move to your product for details. 7.1 INFORMATION View the current input source, frequency and resolution. 7.1.1 Displaying INFORMATION 1 Press any button on the model. 64 7 INFORMATION Menu and Others 7 INFORMATION Menu and Others A detailed description of the product to display the Function Key Guide. PICTURE COLOR MENU SETTINGS SETUP&RESET INFORMATION INFORMATION Analog **kHz **Hz PP **** x **** Optimal Mode **** x **** **Hz AUTO The displayed menu items may vary depending on the...
Next, press [MENU] to display the corresponding menu screen. 2 Press [ ] to move to your product for details. 7.1 INFORMATION View the current input source, frequency and resolution. 7.1.1 Displaying INFORMATION 1 Press any button on the model. 64 7 INFORMATION Menu and Others 7 INFORMATION Menu and Others A detailed description of the product to display the Function Key Guide. PICTURE COLOR MENU SETTINGS SETUP&RESET INFORMATION INFORMATION Analog **kHz **Hz PP **** x **** Optimal Mode **** x **** **Hz AUTO The displayed menu items may vary depending on the...
User Manual (English)
Page 68
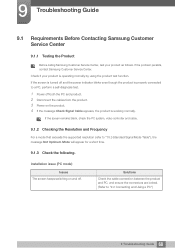
... the screen remains blank, check the PC system, video controller and cable. 9.1.2 Checking the Resolution and Frequency For a mode that exceeds the supported resolution (refer to "2.2 Connecting and Using a PC") 68 9 Troubleshooting Guide Solutions Check the cable connection between the product and PC, and ensure the connectors are locked. (Refer to "10.3 Standard Signal Mode Table"), the message Not Optimum Mode will appear for a short time. 9.1.3 Check the following. 9 Troubleshooting Guide 9.1 Requirements Before Contacting Samsung Customer Service Center...
... the screen remains blank, check the PC system, video controller and cable. 9.1.2 Checking the Resolution and Frequency For a mode that exceeds the supported resolution (refer to "2.2 Connecting and Using a PC") 68 9 Troubleshooting Guide Solutions Check the cable connection between the product and PC, and ensure the connectors are locked. (Refer to "10.3 Standard Signal Mode Table"), the message Not Optimum Mode will appear for a short time. 9.1.3 Check the following. 9 Troubleshooting Guide 9.1 Requirements Before Contacting Samsung Customer Service Center...
User Manual (English)
Page 72
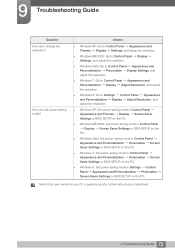
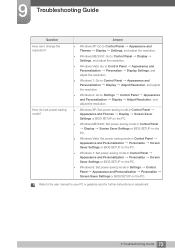
... adjust the resolution. Windows 8: Go to the user manual for your PC or graphics card for further instructions on the PC. How do I change the resolution? Refer to Settings Control Panel Appearance and Personalization Display Adjust Resolution, and adjust the resolution. Windows XP: Set power-saving mode in Control Panel Appearance and Themes Display Screen Saver Settings or BIOS SETUP on the PC. Windows ME/2000: Set power-saving mode in Control Panel Display Screen Saver Settings or BIOS SETUP on the PC. Windows Vista: Set power-saving mode in Control...
... adjust the resolution. Windows 8: Go to the user manual for your PC or graphics card for further instructions on the PC. How do I change the resolution? Refer to Settings Control Panel Appearance and Personalization Display Adjust Resolution, and adjust the resolution. Windows XP: Set power-saving mode in Control Panel Appearance and Themes Display Screen Saver Settings or BIOS SETUP on the PC. Windows ME/2000: Set power-saving mode in Control Panel Display Screen Saver Settings or BIOS SETUP on the PC. Windows Vista: Set power-saving mode in Control...
User Manual (English)
Page 2
... Icons used in this manual Cleaning Securing the Installation Space Precautions for storage Safety Precautions Symbols Electricity and Safety Installation and Safety Operation and Safety Correct posture to use the product Checking the Contents Checking the Components Parts Frontal Buttons Reverse Side Installation Attaching the Stand Removing the Stand Adjusting the Product Tilt Anti-theft Lock Before Connecting Pre-connection Checkpoints Connecting and Using a PC Connecting to a PC Connecting the Power Driver Installation Setting Optimum Resolution Brightness Configuring Brightness 2 Table...
... Icons used in this manual Cleaning Securing the Installation Space Precautions for storage Safety Precautions Symbols Electricity and Safety Installation and Safety Operation and Safety Correct posture to use the product Checking the Contents Checking the Components Parts Frontal Buttons Reverse Side Installation Attaching the Stand Removing the Stand Adjusting the Product Tilt Anti-theft Lock Before Connecting Pre-connection Checkpoints Connecting and Using a PC Connecting to a PC Connecting the Power Driver Installation Setting Optimum Resolution Brightness Configuring Brightness 2 Table...
User Manual (English)
Page 19
... change without notice to improve quality. MENU GAME MODE SOURCE AUTO AU MENU MENU Function Key Guide GAME MODE SOURCE AUTO GAME MODE SOURCE SAMSUNG Icons MENU Description Open or close the onscreen display (OSD) menu, or return to the parent menu. OSD control lock: Maintain the current settings, or lock the OSD control to prevent unintended changes to enable or disable Game Mode. Specifications are not available if the Game Mode function is shown. 1 Preparations 1.2 Parts 1.2.1 Frontal Buttons The color and shape of parts...
... change without notice to improve quality. MENU GAME MODE SOURCE AUTO AU MENU MENU Function Key Guide GAME MODE SOURCE AUTO GAME MODE SOURCE SAMSUNG Icons MENU Description Open or close the onscreen display (OSD) menu, or return to the parent menu. OSD control lock: Maintain the current settings, or lock the OSD control to prevent unintended changes to enable or disable Game Mode. Specifications are not available if the Game Mode function is shown. 1 Preparations 1.2 Parts 1.2.1 Frontal Buttons The color and shape of parts...

User Manual (English)
Page 20
... input source (Analog/HDMI). Press the [AUTO] button to automatically adjust the screen settings. Changing the resolution in Analog mode. Refer to the actual product. Use this button to control the brightness and contrast of the screen. Confirm a menu selection. Pressing the [ ] button when the OSD menu is not displayed will be displayed before the onscreen menu opens. (The guide shows the function of the button pressed.) To access the onscreen menu when the guide is displayed, press the corresponding button again. Turn...
... input source (Analog/HDMI). Press the [AUTO] button to automatically adjust the screen settings. Changing the resolution in Analog mode. Refer to the actual product. Use this button to control the brightness and contrast of the screen. Confirm a menu selection. Pressing the [ ] button when the OSD menu is not displayed will be displayed before the onscreen menu opens. (The guide shows the function of the button pressed.) To access the onscreen menu when the guide is displayed, press the corresponding button again. Turn...
User Manual (English)
Page 28
... power adapter to HDMI. HDMI IN 1 Connect the HDMI-DVI cable to the [HDMI IN] port on the back of the product and the HDMI port on the PC. (For details, refer to "2.2.2 Connecting the Power".) 3 Press [ ] to change the input source to the product and a power socket. Next, turn on the power switch on the PC. 2 Connect the DC power adapter to HDMI. 28 2 Connecting and Using a Source Device Ensure you connect a source device first before connecting all other cables. HDMI IN 1 Connect...
... power adapter to HDMI. HDMI IN 1 Connect the HDMI-DVI cable to the [HDMI IN] port on the back of the product and the HDMI port on the PC. (For details, refer to "2.2.2 Connecting the Power".) 3 Press [ ] to change the input source to the product and a power socket. Next, turn on the power switch on the PC. 2 Connect the DC power adapter to HDMI. 28 2 Connecting and Using a Source Device Ensure you connect a source device first before connecting all other cables. HDMI IN 1 Connect...
User Manual (English)
Page 30
2 Connecting and Using a Source Device 2.2.3 Driver Installation You can set the optimum resolution and frequency for further details. 30 2 Connecting and Using a Source Device Refer to your product model from the list of models. 5 Go to proceed with installation. 4 Select your Windows OS manual for this product by installing the corresponding drivers. An installation driver is contained on the CD supplied with the product. If the file provided is...
2 Connecting and Using a Source Device 2.2.3 Driver Installation You can set the optimum resolution and frequency for further details. 30 2 Connecting and Using a Source Device Refer to your product model from the list of models. 5 Go to proceed with installation. 4 Select your Windows OS manual for this product by installing the corresponding drivers. An installation driver is contained on the CD supplied with the product. If the file provided is...

User Manual (English)
Page 65
PICTURE COLOR MENU SETTINGS SETUP&RESET INFORMATION INFORMATION Analog **kHz **Hz PP **** x **** Optimal Mode **** x **** **Hz AUTO The displayed menu items may vary depending on the front of each function is provided. The current input source, frequency and resolution will appear. 7 INFORMATION Menu and Others A detailed description of the product to INFORMATION. Refer to your product for details. 7.1 INFORMATION View the current input source, frequency and resolution. 7.1.1 Displaying INFORMATION 1 Press any button on the model. 65 7 INFORMATION...
PICTURE COLOR MENU SETTINGS SETUP&RESET INFORMATION INFORMATION Analog **kHz **Hz PP **** x **** Optimal Mode **** x **** **Hz AUTO The displayed menu items may vary depending on the front of each function is provided. The current input source, frequency and resolution will appear. 7 INFORMATION Menu and Others A detailed description of the product to INFORMATION. Refer to your product for details. 7.1 INFORMATION View the current input source, frequency and resolution. 7.1.1 Displaying INFORMATION 1 Press any button on the model. 65 7 INFORMATION...
User Manual (English)
Page 73
...Display Adjust Resolution, and adjust the resolution. Windows 8: Go to the user manual for your PC or graphics card for further instructions on the PC. Refer to Settings Control Panel Appearance and Personalization Display Adjust Resolution, and adjust the resolution. Windows XP: Set power-saving mode in Control Panel Appearance and Themes Display Screen Saver Settings or BIOS SETUP on the PC. Windows ME/2000: Set power-saving mode in Control Panel Display Screen Saver Settings or BIOS SETUP on the PC. Windows Vista: Set power-saving mode in Control Panel...
...Display Adjust Resolution, and adjust the resolution. Windows 8: Go to the user manual for your PC or graphics card for further instructions on the PC. Refer to Settings Control Panel Appearance and Personalization Display Adjust Resolution, and adjust the resolution. Windows XP: Set power-saving mode in Control Panel Appearance and Themes Display Screen Saver Settings or BIOS SETUP on the PC. Windows ME/2000: Set power-saving mode in Control Panel Display Screen Saver Settings or BIOS SETUP on the PC. Windows Vista: Set power-saving mode in Control Panel...


