

User Manual Ver.1.0 (English)
Page 2
... the product Checking the Contents Removing the Packaging Checking the Components Parts Frontal Button Direct Key guide Function Key Guide Reverse Side Installation Attaching the Stand Removing the Stand Adjusting the Product Tilt Anti-theft Lock Before Connecting Pre-connection Checkpoints Connecting the Power 2 Table Of Contents
... the product Checking the Contents Removing the Packaging Checking the Components Parts Frontal Button Direct Key guide Function Key Guide Reverse Side Installation Attaching the Stand Removing the Stand Adjusting the Product Tilt Anti-theft Lock Before Connecting Pre-connection Checkpoints Connecting the Power 2 Table Of Contents

User Manual Ver.1.0 (English)
Page 17
...; An electric shock or fire may cause it to fall and break or cause a personal injury. Exercise caution when adjusting the product angle or stand height. Otherwise, children's fingers or hands may become hot. Before Using the Product Do not hold the monitor upside-down or move ...it by holding the stand. The product may fall and result in personal injury. When using headphones or earphones, do not turn the volume too high. &#...
...; An electric shock or fire may cause it to fall and break or cause a personal injury. Exercise caution when adjusting the product angle or stand height. Otherwise, children's fingers or hands may become hot. Before Using the Product Do not hold the monitor upside-down or move ...it by holding the stand. The product may fall and result in personal injury. When using headphones or earphones, do not turn the volume too high. &#...

User Manual Ver.1.0 (English)
Page 20
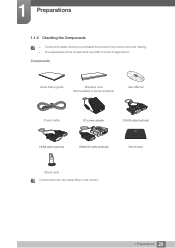
Components Quick Setup guide Warranty card (Not available In some locations) User Manual Power cable DC power adapter D-SUB cable (optional) HDMI cable (optional) HDMI-DVI cable (optional) Stand base Stand neck Components may differ from the images shown. 1 Preparations 1.1.2 Checking the Components Contact the dealer where you purchased the product if any components are missing. The appearance of the components may vary depending on the country. 20 1 Preparations
Components Quick Setup guide Warranty card (Not available In some locations) User Manual Power cable DC power adapter D-SUB cable (optional) HDMI cable (optional) HDMI-DVI cable (optional) Stand base Stand neck Components may differ from the images shown. 1 Preparations 1.1.2 Checking the Components Contact the dealer where you purchased the product if any components are missing. The appearance of the components may vary depending on the country. 20 1 Preparations

User Manual Ver.1.0 (English)
Page 26
... is facing downwards. Tightly fasten the connecting screw at the bottom of the product is facing downwards. Push the assembled stand into the stand base in the direction shown in the figure. - Caution Do not hold the product upside down on a flat and stable surface so ...that the screen is firmly connected. 1 Preparations 1.3 Installation 1.3.1 Attaching the Stand Before assembling the product, place the product down only by the figure. Place a soft cloth over the table to protect the product and place the...
... is facing downwards. Tightly fasten the connecting screw at the bottom of the product is facing downwards. Push the assembled stand into the stand base in the direction shown in the figure. - Caution Do not hold the product upside down on a flat and stable surface so ...that the screen is firmly connected. 1 Preparations 1.3 Installation 1.3.1 Attaching the Stand Before assembling the product, place the product down only by the figure. Place a soft cloth over the table to protect the product and place the...

User Manual Ver.1.0 (English)
Page 27
Remove the stand neck from the stand base by pulling it . 1 Preparations 1.3.2 Removing the Stand Place a soft cloth over the table to detach the stand base. While holding the stand neck with one hand, pound the other fisted hand down onto the top of the stand base in the direction of the arrow to protect the product and place the product onto the cloth so that the front of the arrow as shown in the direction of the product faces downwards. Turn the connecting screw at the bottom of the stand base to separate it in the figure. 27 1 Preparations
Remove the stand neck from the stand base by pulling it . 1 Preparations 1.3.2 Removing the Stand Place a soft cloth over the table to detach the stand base. While holding the stand neck with one hand, pound the other fisted hand down onto the top of the stand base in the direction of the arrow to protect the product and place the product onto the cloth so that the front of the arrow as shown in the direction of the product faces downwards. Turn the connecting screw at the bottom of the stand base to separate it in the figure. 27 1 Preparations

User Manual Ver.1.0 (English)
Page 70
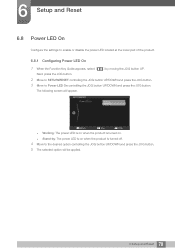
... and press the JOG button. 5 The selected option will appear. SETUP&RESET Power LED On Working Stand-by Return Move Enter Working: The power LED is on when the product is turned on. Stand-by moving the JOG button UP. 6 Setup and Reset 6.8 Power LED On Configure the settings to...
... and press the JOG button. 5 The selected option will appear. SETUP&RESET Power LED On Working Stand-by Return Move Enter Working: The power LED is on when the product is turned on. Stand-by moving the JOG button UP. 6 Setup and Reset 6.8 Power LED On Configure the settings to...
User Manual Ver.1.0 (English)
Page 84
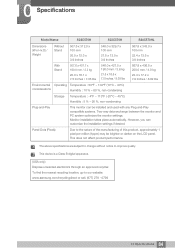
... device is a Class B digital apparatus. (USA only) Dispose unwanted electronics through an approved recycler. Monitor installation takes place automatically. 10 Specifications Model Name S22C570H S23C570H S24C570HL Dimensions (W x H x D) / Weight Without Stand 507.6 x 312.0 x 100 mm 20.0 x 12.3 x 3.9 Inches 546.0 x 329.7 x 100 mm 21.5 x 13.0 x 3.9 Inches 567.8 x 343.0 x 100 mm 22.4... the installation settings if desired. The above specifications are subject to change without notice to our website: www.samsung.com/recyclingdirect or call, (877) 278 - 0799 84 10 Specifications
... device is a Class B digital apparatus. (USA only) Dispose unwanted electronics through an approved recycler. Monitor installation takes place automatically. 10 Specifications Model Name S22C570H S23C570H S24C570HL Dimensions (W x H x D) / Weight Without Stand 507.6 x 312.0 x 100 mm 20.0 x 12.3 x 3.9 Inches 546.0 x 329.7 x 100 mm 21.5 x 13.0 x 3.9 Inches 567.8 x 343.0 x 100 mm 22.4... the installation settings if desired. The above specifications are subject to change without notice to our website: www.samsung.com/recyclingdirect or call, (877) 278 - 0799 84 10 Specifications
User Manual Ver.1.0 (English)
Page 2
... the product Checking the Contents Removing the Packaging Checking the Components Parts Frontal Button Direct Key guide Function Key Guide Reverse Side Installation Attaching the Stand Removing the Stand Adjusting the Product Tilt Anti-theft Lock Before Connecting Pre-connection Checkpoints Connecting the Power 2 Table Of Contents
... the product Checking the Contents Removing the Packaging Checking the Components Parts Frontal Button Direct Key guide Function Key Guide Reverse Side Installation Attaching the Stand Removing the Stand Adjusting the Product Tilt Anti-theft Lock Before Connecting Pre-connection Checkpoints Connecting the Power 2 Table Of Contents
User Manual Ver.1.0 (English)
Page 17
... Eye fatigue will become stuck and injured. ! Tilting the product excessively may become hot. Exercise caution when adjusting the product angle or stand height. Otherwise, children's fingers or hands may cause it to fall and break or cause a personal injury. Before Using the Product Do not... hold the monitor upside-down or move it by holding the stand. The product may damage your eyes for more than 5 minutes for an extended period of time as it will be relieved. !...
... Eye fatigue will become stuck and injured. ! Tilting the product excessively may become hot. Exercise caution when adjusting the product angle or stand height. Otherwise, children's fingers or hands may cause it to fall and break or cause a personal injury. Before Using the Product Do not... hold the monitor upside-down or move it by holding the stand. The product may damage your eyes for more than 5 minutes for an extended period of time as it will be relieved. !...
User Manual Ver.1.0 (English)
Page 20
1 Preparations 1.1.2 Checking the Components Contact the dealer where you purchased the product if any components are missing. The appearance of the components may vary depending on the country. 20 1 Preparations Components Quick Setup guide Warranty card (Not available In some locations) User Manual Power cable DC power adapter D-SUB cable (optional) HDMI cable (optional) HDMI-DVI cable (optional) Stand base Stand neck Components may differ from the images shown.
1 Preparations 1.1.2 Checking the Components Contact the dealer where you purchased the product if any components are missing. The appearance of the components may vary depending on the country. 20 1 Preparations Components Quick Setup guide Warranty card (Not available In some locations) User Manual Power cable DC power adapter D-SUB cable (optional) HDMI cable (optional) HDMI-DVI cable (optional) Stand base Stand neck Components may differ from the images shown.

User Manual Ver.1.0 (English)
Page 26
...screw at the bottom of the product is facing downwards. 1 Preparations 1.3 Installation 1.3.1 Attaching the Stand Before assembling the product, place the product down only by the figure. Check that the front of the stand base. Place a soft cloth over the table to protect the product and place the product ...onto the cloth so that the stand neck is facing downwards. Insert the stand neck into the main body in the direction of the...
...screw at the bottom of the product is facing downwards. 1 Preparations 1.3 Installation 1.3.1 Attaching the Stand Before assembling the product, place the product down only by the figure. Check that the front of the stand base. Place a soft cloth over the table to protect the product and place the product ...onto the cloth so that the stand neck is facing downwards. Insert the stand neck into the main body in the direction of the...

User Manual Ver.1.0 (English)
Page 27
Turn the connecting screw at the bottom of the stand base to protect the product and place the product onto the cloth so that the front of the product faces downwards. Remove the stand neck from the stand base by pulling it . 1 Preparations 1.3.2 Removing the Stand Place a soft cloth over the table to separate it in the direction of the arrow as shown in the direction of the arrow to detach the stand base. While holding the stand neck with one hand, pound the other fisted hand down onto the top of the stand base in the figure. 27 1 Preparations
Turn the connecting screw at the bottom of the stand base to protect the product and place the product onto the cloth so that the front of the product faces downwards. Remove the stand neck from the stand base by pulling it . 1 Preparations 1.3.2 Removing the Stand Place a soft cloth over the table to separate it in the direction of the arrow as shown in the direction of the arrow to detach the stand base. While holding the stand neck with one hand, pound the other fisted hand down onto the top of the stand base in the figure. 27 1 Preparations
User Manual Ver.1.0 (English)
Page 70
... the Function Key Guide appears, select [ ] by : The power LED is on when the product is turned on. Stand-by moving the JOG button UP. SETUP&RESET Power LED On Working Stand-by Return Move Enter Working: The power LED is on when the product is turned off. 4 Move to...
... the Function Key Guide appears, select [ ] by : The power LED is on when the product is turned on. Stand-by moving the JOG button UP. SETUP&RESET Power LED On Working Stand-by Return Move Enter Working: The power LED is on when the product is turned off. 4 Move to...
User Manual Ver.1.0 (English)
Page 83
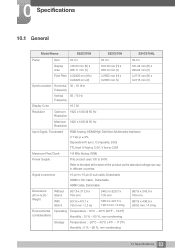
Signal connectors 15 pin-to-15 pin D-sub cable, Detachable HDMI to 240V. 10 Specifications 10.1 General Model Name S22C570H S23C570H S24C570HL Panel Size 54 cm 58 cm 59 cm Display area 476.64 mm (H) x 268.11 mm (V) 509.76 mm (H) x 286.74 ... ≤ 0.8V) Maximum Pixel Clock 148 MHz (Analog, HDMI) Power Supply This product uses 100 to DVI Cable , Detachable HDMI Cable, Detachable Dimensions (W x H x D) / Weight Without Stand With Stand 507.6 x 312.0 x 100 mm 507.6 x 407.7 x 190.0 mm / 3.2 kg 546.0 x 329.7 x 100 mm 546.0 x 427.5 x 190.0 mm / 3.8 kg Environmental ...
Signal connectors 15 pin-to-15 pin D-sub cable, Detachable HDMI to 240V. 10 Specifications 10.1 General Model Name S22C570H S23C570H S24C570HL Panel Size 54 cm 58 cm 59 cm Display area 476.64 mm (H) x 268.11 mm (V) 509.76 mm (H) x 286.74 ... ≤ 0.8V) Maximum Pixel Clock 148 MHz (Analog, HDMI) Power Supply This product uses 100 to DVI Cable , Detachable HDMI Cable, Detachable Dimensions (W x H x D) / Weight Without Stand With Stand 507.6 x 312.0 x 100 mm 507.6 x 407.7 x 190.0 mm / 3.2 kg 546.0 x 329.7 x 100 mm 546.0 x 427.5 x 190.0 mm / 3.8 kg Environmental ...


