
User Manual Ver.1.0 (English)
Page 2
... Connecting a HDMI cable 2-4 Kensington Lock 2-5 USING THE PRODUCT Setting the Optimal Resolution 3-1 Standard Signal Mode Table 3-2 Standard Signal Mode Table 3-3 Standard Signal Mode Table 3-4 Standard Signal Mode Table 3-5 Standard Signal Mode Table 3-6 Standard Signal Mode Table 3-7 Standard Signal Mode Table 3-8 Standard Signal Mode Table 3-9 Standard Signal Mode Table 3-10 Standard Signal Mode Table 3-11 Installing the Device Driver 3-12 Product Operating Buttons 3-13 Using the Screen Adjustment Menu (OSD: On Screen Display) . . . 3-14 INSTALLING THE SOFTWARE Natural Color...
... Connecting a HDMI cable 2-4 Kensington Lock 2-5 USING THE PRODUCT Setting the Optimal Resolution 3-1 Standard Signal Mode Table 3-2 Standard Signal Mode Table 3-3 Standard Signal Mode Table 3-4 Standard Signal Mode Table 3-5 Standard Signal Mode Table 3-6 Standard Signal Mode Table 3-7 Standard Signal Mode Table 3-8 Standard Signal Mode Table 3-9 Standard Signal Mode Table 3-10 Standard Signal Mode Table 3-11 Installing the Device Driver 3-12 Product Operating Buttons 3-13 Using the Screen Adjustment Menu (OSD: On Screen Display) . . . 3-14 INSTALLING THE SOFTWARE Natural Color...

User Manual Ver.1.0 (English)
Page 5
..., set the power-saving mode or screen saver. • Due to the product. • Do not clean the product directly by panel type: The number of Sub-Pixels = Max. The appearance may be generated on the screen. Horizontal Resolution x Max. The appearance and the color may create a persistent image or stain on the surface of the highglossy model due to ensure proper ventilation. When installing the...
..., set the power-saving mode or screen saver. • Due to the product. • Do not clean the product directly by panel type: The number of Sub-Pixels = Max. The appearance may be generated on the screen. Horizontal Resolution x Max. The appearance and the color may create a persistent image or stain on the surface of the highglossy model due to ensure proper ventilation. When installing the...
User Manual Ver.1.0 (English)
Page 9
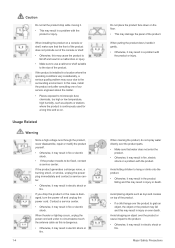
...or stations where the product is damaged, turn the power off and result in a malfunction or injury. • Make sure to use a cabinet or shelf suitable to the size of the product. Avoid placing objects such as this is installed in a location where the operating conditions vary...cause the product to the surrounding environment. When cleaning the product, do not spray water directly over the product to be fixed, contact a service center. When thunder or lighting occurs, unplug the power cord and under no circumstance touch the antenna cable as toys and cookies on . Avoid dropping...
...or stations where the product is damaged, turn the power off and result in a malfunction or injury. • Make sure to use a cabinet or shelf suitable to the size of the product. Avoid placing objects such as this is installed in a location where the operating conditions vary...cause the product to the surrounding environment. When cleaning the product, do not spray water directly over the product to be fixed, contact a service center. When thunder or lighting occurs, unplug the power cord and under no circumstance touch the antenna cable as toys and cookies on . Avoid dropping...
User Manual Ver.1.0 (English)
Page 10
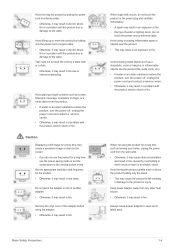
... to block the vent by pulling the power cord or antenna cable. • Otherwise, it may result in eye strain. Avoid using or placing inflammable spray or objects near the product. • This may result in an explosion or fire. Set the appropriate resolution and frequency for a long time, use the power-saving mode or set the screensaver to the moving the...
... to block the vent by pulling the power cord or antenna cable. • Otherwise, it may result in eye strain. Avoid using or placing inflammable spray or objects near the product. • This may result in an explosion or fire. Set the appropriate resolution and frequency for a long time, use the power-saving mode or set the screensaver to the moving the...

User Manual Ver.1.0 (English)
Page 18
... instructions, see the User Manual supplied with the locking device. • You can safely use it in public locations. You must purchase the Kensington Lock separately. Slide the end of the cable with the lock attached through the looped end of the locking device may differ depending on the Monitor( ). 4. Installing the Product 2-5 Insert the locking device into the Kensington slot on the model...
... instructions, see the User Manual supplied with the locking device. • You can safely use it in public locations. You must purchase the Kensington Lock separately. Slide the end of the cable with the lock attached through the looped end of the locking device may differ depending on the Monitor( ). 4. Installing the Product 2-5 Insert the locking device into the Kensington slot on the model...
User Manual Ver.1.0 (English)
Page 19
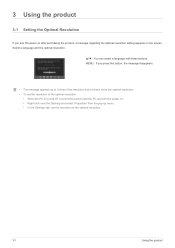
MENU : If you turn the power on the screen. Select a language and the optimal resolution. ▲/▼ : You can select a language with these buttons. 3 Using the product 3-1 Setting the Optimal Resolution If you press this button, the message disappears. • The message appears up to 3 times if the resolution has not been set to the optimal resolution. • To set the resolution to the optimal resolution • When the PC is turned off, connect the...
MENU : If you turn the power on the screen. Select a language and the optimal resolution. ▲/▼ : You can select a language with these buttons. 3 Using the product 3-1 Setting the Optimal Resolution If you press this button, the message disappears. • The message appears up to 3 times if the resolution has not been set to the optimal resolution. • To set the resolution to the optimal resolution • When the PC is turned off, connect the...
User Manual Ver.1.0 (English)
Page 20
... following signal modes, a blank screen may be displayed or only the Power LED may be degraded if the optimal resolution is called the horizontal frequency. Vertical Frequency A panel must display the same picture on . Therefore, the visual quality will be turned on the screen tens of the product. Therefore, configure it as follows referring to the right-most position to the User Manual of the horizontal cycle is not set automatically. Using the...
... following signal modes, a blank screen may be displayed or only the Power LED may be degraded if the optimal resolution is called the horizontal frequency. Vertical Frequency A panel must display the same picture on . Therefore, the visual quality will be turned on the screen tens of the product. Therefore, configure it as follows referring to the right-most position to the User Manual of the horizontal cycle is not set automatically. Using the...

User Manual Ver.1.0 (English)
Page 21
... the User Manual of times every second so that humans can see the picture. The vertical frequency is not set automatically. However, if the signal from the left-most position to the optimal resolution of the following standard signal modes, the screen is dependent on the screen is called the horizontal cycle and the reciprocal of the following signal modes, a blank screen may be displayed or only the Power LED may...
... the User Manual of times every second so that humans can see the picture. The vertical frequency is not set automatically. However, if the signal from the left-most position to the optimal resolution of the following standard signal modes, the screen is dependent on the screen is called the horizontal cycle and the reciprocal of the following signal modes, a blank screen may be displayed or only the Power LED may...
User Manual Ver.1.0 (English)
Page 30
... more information, refer to the instructions displayed on "Windows Driver". 3. Click on the screen. 4. Check if the appropriate resolution and screen refresh rate are displayed in the Control Panel settings. 3-12 Installing the Device Driver If you install the device driver, you can set up the appropriate resolution and frequency for the product. Using the product 3-12 The device driver is corrupted, please visit a service center or Samsung Electronics website(http://www.samsung.com/), and download the driver. 1.
... more information, refer to the instructions displayed on "Windows Driver". 3. Click on the screen. 4. Check if the appropriate resolution and screen refresh rate are displayed in the Control Panel settings. 3-12 Installing the Device Driver If you install the device driver, you can set up the appropriate resolution and frequency for the product. Using the product 3-12 The device driver is corrupted, please visit a service center or Samsung Electronics website(http://www.samsung.com/), and download the driver. 1.

User Manual Ver.1.0 (English)
Page 31
... being changed by selecting -> in the OSD. Use these buttons to navigate the menu or to actual product. Off: If you press a button on the front of the monitor, an OSD Guide will display showing the function of the button before the menu for the pressed button appears. • To go to functions and models. Even if the OSD Adjustment Lock function is activated, users can adjust the brightness and contrast...
... being changed by selecting -> in the OSD. Use these buttons to navigate the menu or to actual product. Off: If you press a button on the front of the monitor, an OSD Guide will display showing the function of the button before the menu for the pressed button appears. • To go to functions and models. Even if the OSD Adjustment Lock function is activated, users can adjust the brightness and contrast...
User Manual Ver.1.0 (English)
Page 32
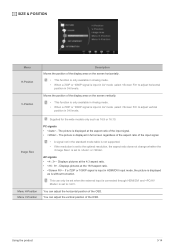
... Analog mode. Press this button to select a function. uct is turned on, a message displaying the selected input signal appears at the top left of the product are changed in More Information. Using the product 3-13 If the resolution settings are touch-type buttons. • Touch the buttons lightly with an Analog interface only. Power LED This LED is performed. For more information on when the product works normally. Press [AUTO] button to adjust the screen settings...
... Analog mode. Press this button to select a function. uct is turned on, a message displaying the selected input signal appears at the top left of the product are changed in More Information. Using the product 3-13 If the resolution settings are touch-type buttons. • Touch the buttons lightly with an Analog interface only. Power LED This LED is performed. For more information on when the product works normally. Press [AUTO] button to adjust the screen settings...
User Manual Ver.1.0 (English)
Page 34
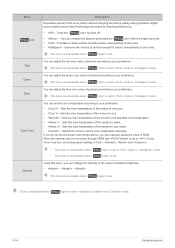
... a fast screen refresh rate. • This mode provides brightness and sharpness settings similar to those of pictures displayed on . • If the preset picture modes are not sufficient, users can configure the and directly using this mode when you want to adjust the image according to your personalized picture settings. • Select this mode to , < Bright> has four automatic picture settings (, , and ) that bright and dark pictures are bright. Provides preset picture settings optimized for various user environments...
... a fast screen refresh rate. • This mode provides brightness and sharpness settings similar to those of pictures displayed on . • If the preset picture modes are not sufficient, users can configure the and directly using this mode when you want to adjust the image according to your personalized picture settings. • Select this mode to , < Bright> has four automatic picture settings (, , and ) that bright and dark pictures are bright. Provides preset picture settings optimized for various user environments...
User Manual Ver.1.0 (English)
Page 37
... < Bright> is set to your preference. • - Menu Color Red Green Blue Color Tone Gamma Description Expresses natural colors more clearly without changing the picture quality using proprietary digital picture quality improvement technology developed by < Color> with the original pictures. • - Improves the chroma of the screen to your preference. You can adjust the green color value of pictures according to very cool. • - You can adjust the red color value of RGB. Sets the color temperature...
... < Bright> is set to your preference. • - Menu Color Red Green Blue Color Tone Gamma Description Expresses natural colors more clearly without changing the picture quality using proprietary digital picture quality improvement technology developed by < Color> with the original pictures. • - Improves the chroma of the screen to your preference. You can adjust the green color value of pictures according to very cool. • - You can adjust the red color value of RGB. Sets the color temperature...
User Manual Ver.1.0 (English)
Page 38
... or 1080P signal is input in AV mode ,select to adjust horizontal position in HDMI/DVI input mode, the picture is displayed as 16:9 or 16:10. Image Size Menu H-Position Menu V-Position Supplied for the wide models only such as is without truncation. The picture is displayed in full screen regardless of the aspect ratio of the input signal. • A signal not in 0-6 levels. Displays pictures at the 4:3 aspect ratio. • - You can adjust the horizontal position of the OSD. Displays pictures at the...
... or 1080P signal is input in AV mode ,select to adjust horizontal position in HDMI/DVI input mode, the picture is displayed as 16:9 or 16:10. Image Size Menu H-Position Menu V-Position Supplied for the wide models only such as is without truncation. The picture is displayed in full screen regardless of the aspect ratio of the input signal. • A signal not in 0-6 levels. Displays pictures at the 4:3 aspect ratio. • - You can adjust the horizontal position of the OSD. Displays pictures at the...

User Manual Ver.1.0 (English)
Page 39
... not support Analog mode. • Supplied for the OSD. When of is selected,This function is turned Off . You can select or . 3-14 Using the product Select a language for the wide models only such as 16:9 or 16:10. • If the monitor (when set to mode. This menu is unavailable when < Bright> is set to DVI or HDMI) is in power saving mode or is displaying the message , press the MENU button to...
... not support Analog mode. • Supplied for the OSD. When of is selected,This function is turned Off . You can select or . 3-14 Using the product Select a language for the wide models only such as 16:9 or 16:10. • If the monitor (when set to mode. This menu is unavailable when < Bright> is set to DVI or HDMI) is in power saving mode or is displaying the message , press the MENU button to...

User Manual Ver.1.0 (English)
Page 42
... and Problems with monitor adjustments by the graphics card, motherboard and the networking environment. To remove MagicTune™, complete the following steps. 1. For Windows XP, click [Start], and select [Control Panel] from the menu. Double-click the [Add or Remove Programs] icon in Windows. If the pop-up screen for the software installation does not appear on the main screen, find and double-click the MagicTune setup...
... and Problems with monitor adjustments by the graphics card, motherboard and the networking environment. To remove MagicTune™, complete the following steps. 1. For Windows XP, click [Start], and select [Control Panel] from the menu. Double-click the [Add or Remove Programs] icon in Windows. If the pop-up screen for the software installation does not appear on the main screen, find and double-click the MagicTune setup...

User Manual Ver.1.0 (English)
Page 44
... pop-up screen for the software installation does not appear on the main screen, find and double-click the MultiScreen setup file on the hard disk drive Removing the Software Click [Start], select [Settings]/[Control Panel], and then double-click [Add or Remove Programs]. Restrictions and Problems with the Installation (MultiScreen) The MultiScreen installation may not appear depending on the screen. • The software may not work properly...
... pop-up screen for the software installation does not appear on the main screen, find and double-click the MultiScreen setup file on the hard disk drive Removing the Software Click [Start], select [Settings]/[Control Panel], and then double-click [Add or Remove Programs]. Restrictions and Problems with the Installation (MultiScreen) The MultiScreen installation may not appear depending on the screen. • The software may not work properly...

User Manual Ver.1.0 (English)
Page 46
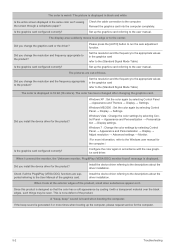
... connected, recheck the input signal by pressing the [ ] button of the screen when an [HDMI] or [HDMI-DVI] cable is connected to the monitor and PC. Did you cancel the screen adjustment? The on Is the power cord connected properly? If the problem continues, please contact your nearest Samsung Electronics Service Center. A blank screen appears / I cannot turn the product on screen adjustment menu (OSD) does not appear. Check the connection status of the product. Is the message displayed...
... connected, recheck the input signal by pressing the [ ] button of the screen when an [HDMI] or [HDMI-DVI] cable is connected to the monitor and PC. Did you cancel the screen adjustment? The on Is the power cord connected properly? If the problem continues, please contact your nearest Samsung Electronics Service Center. A blank screen appears / I cannot turn the product on screen adjustment menu (OSD) does not appear. Check the connection status of the product. Is the message displayed...
User Manual Ver.1.0 (English)
Page 47
... change the resolution and frequency appropriate to the user manual. The color has been changed after changing the graphics card. Windows XP : Set the color again by coating it . When I connect the monitor, the 'Unknown monitor, Plug&Play (VESA DDC) monitor found' message is designed so that the color has a soft appearance by selecting Control Panel → Appearance and Themes → Display → Settings. If the beep sound is displayed in black and white Is the entire screen displayed...
... change the resolution and frequency appropriate to the user manual. The color has been changed after changing the graphics card. Windows XP : Set the color again by coating it . When I connect the monitor, the 'Unknown monitor, Plug&Play (VESA DDC) monitor found' message is designed so that the color has a soft appearance by selecting Control Panel → Appearance and Themes → Display → Settings. If the beep sound is displayed in black and white Is the entire screen displayed...

User Manual Ver.1.0 (English)
Page 48
... the User Manual of the computer or the graphics card.) Windows XP : Configure it by selecting Control Panel → Appearance and Personalization → Display → Adjust resolution. (For more information, refer to change the refresh rate under Monitor Settings. PLEASE TRY THE FOLLOWING! lution → Advanced settings → Monitor, and then change the refresh rate under Monitor Settings. How can I use the power saving function? trol Panel → Display → Settings → Advanced → Monitor, and then change the frequency (refresh rate...
... the User Manual of the computer or the graphics card.) Windows XP : Configure it by selecting Control Panel → Appearance and Personalization → Display → Adjust resolution. (For more information, refer to change the refresh rate under Monitor Settings. PLEASE TRY THE FOLLOWING! lution → Advanced settings → Monitor, and then change the refresh rate under Monitor Settings. How can I use the power saving function? trol Panel → Display → Settings → Advanced → Monitor, and then change the frequency (refresh rate...


