User Manual Ver.1.0 (English)
Page 2
Table Of Contents MAJOR SAFETY PRECAUTIONS Before You Start 1-1 Custody and Maintenance 1-2 Cleaning the Monitor 1-3 Safety Precautions 1-4 INSTALLING THE PRODUCT Package Contents 2-1 Installing the Stand 2-2 Connecting with a PC 2-3 Connecting a HDMI cable 2-4 Kensington Lock 2-5 USING THE PRODUCT Setting the Optimal Resolution 3-1 Standard ...Table 3-12 Standard Signal Mode Table 3-13 Standard Signal Mode Table 3-14 Standard Signal Mode Table 3-15 Installing the Device Driver 3-16 Product Operating Buttons 3-17 Using the Screen Adjustment Menu (OSD: On Screen Display) . . . 3-18...
Table Of Contents MAJOR SAFETY PRECAUTIONS Before You Start 1-1 Custody and Maintenance 1-2 Cleaning the Monitor 1-3 Safety Precautions 1-4 INSTALLING THE PRODUCT Package Contents 2-1 Installing the Stand 2-2 Connecting with a PC 2-3 Connecting a HDMI cable 2-4 Kensington Lock 2-5 USING THE PRODUCT Setting the Optimal Resolution 3-1 Standard ...Table 3-12 Standard Signal Mode Table 3-13 Standard Signal Mode Table 3-14 Standard Signal Mode Table 3-15 Installing the Device Driver 3-16 Product Operating Buttons 3-17 Using the Screen Adjustment Menu (OSD: On Screen Display) . . . 3-18...
User Manual Ver.1.0 (English)
Page 5
...Resolution x Max. If you do so may result in fire, electric shock or a problem with the product due to ensure proper ventilation. When installing the product with a stand About persistent images • Displaying a still image for a long time, set the power-saving mode or screen saver...with the product. • A white stain may differ depending on the model. walls) to an increase in the figure are kept. Install the product so the required distances shown in the internal temperature. 1-2 Custody and Maintenance External Surface and Screen Maintenance Clean the product with a...
...Resolution x Max. If you do so may result in fire, electric shock or a problem with the product due to ensure proper ventilation. When installing the product with a stand About persistent images • Displaying a still image for a long time, set the power-saving mode or screen saver...with the product. • A white stain may differ depending on the model. walls) to an increase in the figure are kept. Install the product so the required distances shown in the internal temperature. 1-2 Custody and Maintenance External Surface and Screen Maintenance Clean the product with a...
User Manual Ver.1.0 (English)
Page 8
... may damage the product due to internal over-heating. You cannot cut the power off completely using only the power button on the product and installing the product near a heater. • Otherwise, it may result in a problem with the product, you use the specified wall mount. When unplugging... the power plug from the wall when installing the product for ventilation. • Otherwise, it may result in fire due to internal over their heads, they may result in fire due to ...
... may damage the product due to internal over-heating. You cannot cut the power off completely using only the power button on the product and installing the product near a heater. • Otherwise, it may result in a problem with the product, you use the specified wall mount. When unplugging... the power plug from the wall when installing the product for ventilation. • Otherwise, it may result in fire due to internal over their heads, they may result in fire due to ...

User Manual Ver.1.0 (English)
Page 9
... operating conditions vary considerably, a serious quality problem may result in a problem with the product or injury. When putting the product down on . Avoid installing the product at an easily reachable height where children may reach it. • If a child touches the product, the product may fall off and...console or shelf, make sure that the front of the product does not protrude out of the console or shelf. • Otherwise, this case, install the product only after consulting one of the product. Caution Do not let the product drop while moving it. • This may result in ...
... operating conditions vary considerably, a serious quality problem may result in a problem with the product or injury. When putting the product down on . Avoid installing the product at an easily reachable height where children may reach it. • If a child touches the product, the product may fall off and...console or shelf, make sure that the front of the product does not protrude out of the console or shelf. • Otherwise, this case, install the product only after consulting one of the product. Caution Do not let the product drop while moving it. • This may result in ...
User Manual Ver.1.0 (English)
Page 13
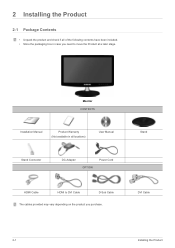
Stand DVI Cable 2-1 Installing the Product 2 Installing the Product 2-1 Package Contents • Unpack the product and check if all locations) User Manual Stand Connector DC-Adapter OPTION Power Cord HDMI Cable HDMI to DVI Cable D-Sub Cable The cables provided may vary depending on the product you need to move the Product at a later stage. Monitor CONTENTS Installation Manual Product Warranty (Not available in all of the following contents have been included. • Store the packaging box in case you purchase.
Stand DVI Cable 2-1 Installing the Product 2 Installing the Product 2-1 Package Contents • Unpack the product and check if all locations) User Manual Stand Connector DC-Adapter OPTION Power Cord HDMI Cable HDMI to DVI Cable D-Sub Cable The cables provided may vary depending on the product you need to move the Product at a later stage. Monitor CONTENTS Installation Manual Product Warranty (Not available in all of the following contents have been included. • Store the packaging box in case you purchase.

User Manual Ver.1.0 (English)
Page 14
Check if the Stand Connector is facing downwards. Hold the main body of the product with your hand as shown in the figure. Installing the Product 2-2 2-2 Installing the Stand Before assembling the product, place the product down on a flat and stable surface so that the screen is firmly connected. Push the assembled ...
Check if the Stand Connector is facing downwards. Hold the main body of the product with your hand as shown in the figure. Installing the Product 2-2 2-2 Installing the Stand Before assembling the product, place the product down on a flat and stable surface so that the screen is firmly connected. Push the assembled ...

User Manual Ver.1.0 (English)
Page 15
- Disassembly is in the reverse order of the assembly. 2-2 Installing the Product Caution Avoid lifting the product holding only the stand.
- Disassembly is in the reverse order of the assembly. 2-2 Installing the Product Caution Avoid lifting the product holding only the stand.
User Manual Ver.1.0 (English)
Page 16
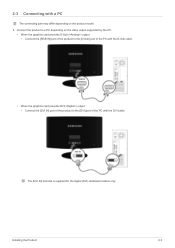
The [DVI IN] terminal is supplied for the digital (DVI)-dedicated models only. Installing the Product 2-3 Connect the product to the [DVI] port of the PC with the DVI cable. 2-3 Connecting with a PC The connecting part may differ depending on the video output supported by the PC. • When the graphics card provides D-Sub () output • Connect the [RGB IN] port of the product to the [D-Sub] port of the PC with the D-Sub cable. • When the graphics card provides DVI() output • Connect the [DVI IN] port of the product to a PC depending on the product model. 1.
The [DVI IN] terminal is supplied for the digital (DVI)-dedicated models only. Installing the Product 2-3 Connect the product to the [DVI] port of the PC with the DVI cable. 2-3 Connecting with a PC The connecting part may differ depending on the video output supported by the PC. • When the graphics card provides D-Sub () output • Connect the [RGB IN] port of the product to the [D-Sub] port of the PC with the D-Sub cable. • When the graphics card provides DVI() output • Connect the [DVI IN] port of the product to a PC depending on the product model. 1.

User Manual Ver.1.0 (English)
Page 17
• Connect the [HDMI IN] port of the product. The [HDMI IN] terminal is connected to DVI cable. Connect the power adapter to [DC] jack on the rear of the product to the [DVI] port on your PC using the HDMI to a PC, you can turn the product on and use it. 2-3 Installing the Product Connect the power cord to the adapter and wall socket. (The input voltage is switched automatically.) When the product is supplied for the HDMI-dedicated models only. 2.
• Connect the [HDMI IN] port of the product. The [HDMI IN] terminal is connected to DVI cable. Connect the power adapter to [DC] jack on the rear of the product to the [DVI] port on your PC using the HDMI to a PC, you can turn the product on and use it. 2-3 Installing the Product Connect the power cord to the adapter and wall socket. (The input voltage is switched automatically.) When the product is supplied for the HDMI-dedicated models only. 2.
User Manual Ver.1.0 (English)
Page 18
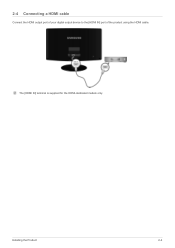
Installing the Product 2-4 The [HDMI IN] terminal is supplied for the HDMI-dedicated models only. 2-4 Connecting a HDMI cable Connect the HDMI output port of your digital output device to the [HDMI IN] port of the product using the HDMI cable.
Installing the Product 2-4 The [HDMI IN] terminal is supplied for the HDMI-dedicated models only. 2-4 Connecting a HDMI cable Connect the HDMI output port of your digital output device to the [HDMI IN] port of the product using the HDMI cable.
User Manual Ver.1.0 (English)
Page 19
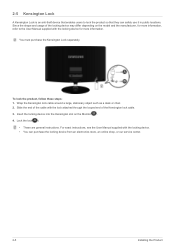
... information, refer to lock the product so that they can purchase the locking device from an electronics store, an online shop, or our service center. 2-5 Installing the Product Since the shape and usage of the Kensington lock cable. 3. To lock the product, follow these steps: 1. Lock the lock( ). • These are...
... information, refer to lock the product so that they can purchase the locking device from an electronics store, an online shop, or our service center. 2-5 Installing the Product Since the shape and usage of the Kensington lock cable. 3. To lock the product, follow these steps: 1. Lock the lock( ). • These are...
User Manual Ver.1.0 (English)
Page 35
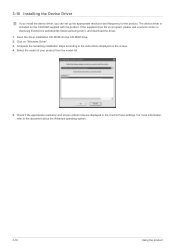
... a service center or Samsung Electronics website(http://www.samsung.com/), and download the driver. 1. Click on the screen. 4. For more information, refer to the instructions displayed on "Windows Driver". 3. Check if the appropriate resolution and screen refresh rate are displayed in the Control Panel settings. Complete the remaining installation steps according to the...
... a service center or Samsung Electronics website(http://www.samsung.com/), and download the driver. 1. Click on the screen. 4. For more information, refer to the instructions displayed on "Windows Driver". 3. Check if the appropriate resolution and screen refresh rate are displayed in the Control Panel settings. Complete the remaining installation steps according to the...
User Manual Ver.1.0 (English)
Page 46
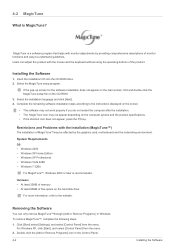
This software works only for Samsung products and enables adjusting the displayed colors on the product and matches the colors on the product with the colors of the software (F1). The Natural Color is Natural Color ? 4 Installing the Software 4-1 Natural Color What is provided online. For more information, refer to the online help of the printed pictures. You can download it from the website below and install; http://www.samsung.com/us/consumer/learningresources/monitor/naturalcolorexpert/pop_download.html Installing the Software 4-1
This software works only for Samsung products and enables adjusting the displayed colors on the product and matches the colors on the product with the colors of the software (F1). The Natural Color is Natural Color ? 4 Installing the Software 4-1 Natural Color What is provided online. For more information, refer to the online help of the printed pictures. You can download it from the website below and install; http://www.samsung.com/us/consumer/learningresources/monitor/naturalcolorexpert/pop_download.html Installing the Software 4-1
User Manual Ver.1.0 (English)
Page 47
... or Remove Programs ] in the Control Panel. 4-2 Installing the Software Select the installation language and click [Next]. 4. To remove MagicTune™, complete the following steps. 1. Installing the Software 1. If the pop-up screen for the software installation does not appear on the main screen, find and ...the instructions displayed on the screen. • The software may not work properly if you do not restart the computer after the installation. • The MagicTune icon may be affected by providing comprehensive descriptions of free space on the CD-ROM. 3. Double-click the...
... or Remove Programs ] in the Control Panel. 4-2 Installing the Software Select the installation language and click [Next]. 4. To remove MagicTune™, complete the following steps. 1. Installing the Software 1. If the pop-up screen for the software installation does not appear on the main screen, find and ...the instructions displayed on the screen. • The software may not work properly if you do not restart the computer after the installation. • The MagicTune icon may be affected by providing comprehensive descriptions of free space on the CD-ROM. 3. Double-click the...

User Manual Ver.1.0 (English)
Page 48
Select [Yes] to remove the software. 5. Wait until a message box appears informing you that it is highlighted. 4. Click [Change or Remove Programs] to start removing MagicTune™. 6. For technical support, the FAQ (frequently asked questions) or information about the software upgrade for MagicTune™, please visit our website. Installing the Software 4-2 3. In the [Add/Remove] window, find and select MagicTune™so that the software has been removed completely.
Select [Yes] to remove the software. 5. Wait until a message box appears informing you that it is highlighted. 4. Click [Change or Remove Programs] to start removing MagicTune™. 6. For technical support, the FAQ (frequently asked questions) or information about the software upgrade for MagicTune™, please visit our website. Installing the Software 4-2 3. In the [Add/Remove] window, find and select MagicTune™so that the software has been removed completely.
User Manual Ver.1.0 (English)
Page 49
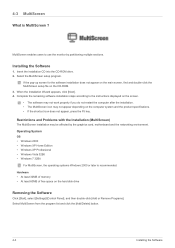
... If the shortcut icon does not appear, press the F5 key. Select the MultiScreen setup program. Restrictions and Problems with the Installation (MultiScreen) The MultiScreen installation may not appear depending on the hard disk drive Removing the Software Click [Start], select [Settings]/[Control Panel], and then double...-click [Add or Remove Programs]. If the pop-up screen for the software installation does not appear on the main screen, find and double-click the MultiScreen setup file on the CD-ROM. 3. 4-3 MultiScreen What is...
... If the shortcut icon does not appear, press the F5 key. Select the MultiScreen setup program. Restrictions and Problems with the Installation (MultiScreen) The MultiScreen installation may not appear depending on the hard disk drive Removing the Software Click [Start], select [Settings]/[Control Panel], and then double...-click [Add or Remove Programs]. If the pop-up screen for the software installation does not appear on the main screen, find and double-click the MultiScreen setup file on the CD-ROM. 3. 4-3 MultiScreen What is...
User Manual Ver.1.0 (English)
Page 52
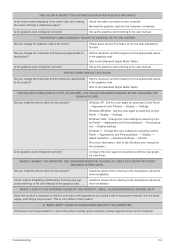
...up the computer, please request service for the computer.) Configure the color again in the graphics card refer to the descriptions about the driver installation. WHEN I LOOK AT THE EXTERIOR EDGES OF THE PRODUCT, SMALL ALIEN SUBSTANCES APPEAR ON IT. If the beep sound is not a defect... the resolution and the frequency to the appropriate values in accordance with a transparent material over the black edges, such things may be seen. Install the device driver referring to the (Standard Signal Mode Table) THE COLOR IS DISPLAYED IN 16 BIT (16 COLORS). This is generated 3 or...
...up the computer, please request service for the computer.) Configure the color again in the graphics card refer to the descriptions about the driver installation. WHEN I LOOK AT THE EXTERIOR EDGES OF THE PRODUCT, SMALL ALIEN SUBSTANCES APPEAR ON IT. If the beep sound is not a defect... the resolution and the frequency to the appropriate values in accordance with a transparent material over the black edges, such things may be seen. Install the device driver referring to the (Standard Signal Mode Table) THE COLOR IS DISPLAYED IN 16 BIT (16 COLORS). This is generated 3 or...

User Manual Ver.1.0 (English)
Page 55
The PowerSaver system operates with a VESA DPM compliant video card installed in power management system called PowerSaver. For energy conservation, turn your monitor to normal operation when you press a key on your computer. STATE Power Indicator ... switch, the power consumption is "0" only when the power cord is not needed, or when leaving it is disconnected. 6-2 More Information Use the software utility installed on the keyboard. 6-2 Power Saving Function This monitor has a built-in your computer to set up this feature. This system saves energy by switching your...
The PowerSaver system operates with a VESA DPM compliant video card installed in power management system called PowerSaver. For energy conservation, turn your monitor to normal operation when you press a key on your computer. STATE Power Indicator ... switch, the power consumption is "0" only when the power cord is not needed, or when leaving it is disconnected. 6-2 More Information Use the software utility installed on the keyboard. 6-2 Power Saving Function This monitor has a built-in your computer to set up this feature. This system saves energy by switching your...
User Manual Ver.1.0 (English)
Page 57
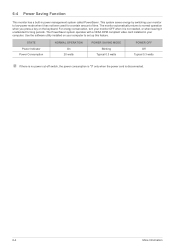
The PowerSaver system operates with a VESA DPM compliant video card installed in power management system called PowerSaver. STATE Power Indicator Power Consumption NORMAL OPERATION On 20 watts POWER SAVING MODE Blinking Typical 0.3 watts POWER OFF Off ... of time. The monitor automatically returns to normal operation when you press a key on your monitor to set up this feature. Use the software utility installed on the keyboard. For energy conservation, turn your monitor OFF when it is disconnected. 6-4 More Information
The PowerSaver system operates with a VESA DPM compliant video card installed in power management system called PowerSaver. STATE Power Indicator Power Consumption NORMAL OPERATION On 20 watts POWER SAVING MODE Blinking Typical 0.3 watts POWER OFF Off ... of time. The monitor automatically returns to normal operation when you press a key on your monitor to set up this feature. Use the software utility installed on the keyboard. For energy conservation, turn your monitor OFF when it is disconnected. 6-4 More Information

User Manual Ver.1.0 (English)
Page 59
...conservation, turn your monitor to set up this feature. The PowerSaver system operates with a VESA DPM compliant video card installed in power management system called PowerSaver. STATE Power Indicator Power Consumption NORMAL OPERATION On 30 watts POWER SAVING MODE Blinking... amount of time. This system saves energy by switching your monitor OFF when it is disconnected. 6-6 More Information Use the software utility installed on the keyboard. The monitor automatically returns to normal operation when you press a key on your computer. 6-6 Power Saving Function This ...
...conservation, turn your monitor to set up this feature. The PowerSaver system operates with a VESA DPM compliant video card installed in power management system called PowerSaver. STATE Power Indicator Power Consumption NORMAL OPERATION On 30 watts POWER SAVING MODE Blinking... amount of time. This system saves energy by switching your monitor OFF when it is disconnected. 6-6 More Information Use the software utility installed on the keyboard. The monitor automatically returns to normal operation when you press a key on your computer. 6-6 Power Saving Function This ...


