User Manual
Page 10
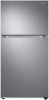
...and property damage. • Service Warranty and Modification. - They can cause injury. - If the air vents are not covered under Samsung warranty service, nor is disconnected from the power supply, you should wait for safety issues that have thawed completely. Broken glass may develop... compartment. - If a cooling period lasts too long, the water filter may break and cause personal injury. • Use only the ice maker provided with a plastic bag, the refrigerator can obstruct free air circulation in the freezer. - Safety information Safety information Usage cautions CAUTION &#...
...and property damage. • Service Warranty and Modification. - They can cause injury. - If the air vents are not covered under Samsung warranty service, nor is disconnected from the power supply, you should wait for safety issues that have thawed completely. Broken glass may develop... compartment. - If a cooling period lasts too long, the water filter may break and cause personal injury. • Use only the ice maker provided with a plastic bag, the refrigerator can obstruct free air circulation in the freezer. - Safety information Safety information Usage cautions CAUTION &#...

User Manual
Page 14
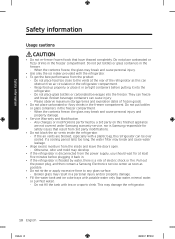
... with the local regulations. Refrigerator at a glance NOTE The illustrations of this manual may differ from your country. 01 Control Panel 02 Auto Ice Maker (Optional) 01 03 Twist Ice Maker (Type A) * 04 Freezer shelf 02 10 05 Slide & Reach Pantry * 03 06 Guard container 04 07 Refrigerator shelves 08 Vegetable shelf 05 09...
... with the local regulations. Refrigerator at a glance NOTE The illustrations of this manual may differ from your country. 01 Control Panel 02 Auto Ice Maker (Optional) 01 03 Twist Ice Maker (Type A) * 04 Freezer shelf 02 10 05 Slide & Reach Pantry * 03 06 Guard container 04 07 Refrigerator shelves 08 Vegetable shelf 05 09...

User Manual
Page 19
... covered by the manufacturer or the retailer. • To purchase additional water filters, contact the manufacturer or the retailer of the filter. For the ice maker to the ice maker. STEP 4 Connect the water line (optional) Connect the water line to operate properly, a water pressure of 20-125 psi (138-862 kPa) is required...
... covered by the manufacturer or the retailer. • To purchase additional water filters, contact the manufacturer or the retailer of the filter. For the ice maker to the ice maker. STEP 4 Connect the water line (optional) Connect the water line to operate properly, a water pressure of 20-125 psi (138-862 kPa) is required...
User Manual
Page 21
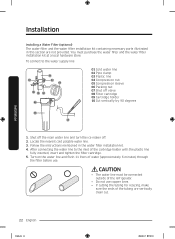
...while RT**M6213* models are using copper tubing, slip the compression nut (B) (not supplied) and ferrule (not supplied) on the refrigerator, let the ice maker makes ice for any leakage. If you are using plastic tubing (A), insert the molded end (Bulb) of the plastic tubing (A) into the compression fitting. Do...the water line. Installation A 04 01 05 02 06 07 03 08 B A. Connect the household water line to turn off 1/4" of ice the ice maker makes to ensure all impurities have to repair or disassemble the water line, cut off the main water supply. Turn the water on and ...
...while RT**M6213* models are using copper tubing, slip the compression nut (B) (not supplied) and ferrule (not supplied) on the refrigerator, let the ice maker makes ice for any leakage. If you are using plastic tubing (A), insert the molded end (Bulb) of the plastic tubing (A) into the compression fitting. Do...the water line. Installation A 04 01 05 02 06 07 03 08 B A. Connect the household water line to turn off 1/4" of ice the ice maker makes to ensure all impurities have to repair or disassemble the water line, cut off the main water supply. Turn the water on and ...
User Manual
Page 22
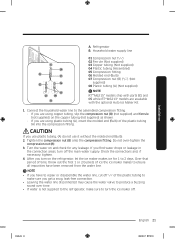
... the water filter installation kit. 4. To connect to the inlet of the tubing are not provided. Shut off the main water line and turn the ice maker off valve 08 Filter cartridge 09 Cartridge holder 10 Cut vertically by 90 degrees 08 10 1. Turn on the water line and flush 11 liters...
... the water filter installation kit. 4. To connect to the inlet of the tubing are not provided. Shut off the main water line and turn the ice maker off valve 08 Filter cartridge 09 Cartridge holder 10 Cut vertically by 90 degrees 08 10 1. Turn on the water line and flush 11 liters...

User Manual
Page 23
... it at a local hardware store. • When moving the refrigerator for line connection, use caution so that you don't step on and check for the ice maker). To connect the water line to the outlet of the cartridge holder until the plastic line is not provided. Connect the plastic line from the...
... it at a local hardware store. • When moving the refrigerator for line connection, use caution so that you don't step on and check for the ice maker). To connect the water line to the outlet of the cartridge holder until the plastic line is not provided. Connect the plastic line from the...
User Manual
Page 25
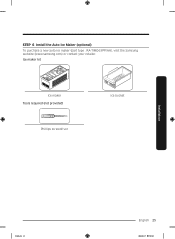
Ice maker kit Ice maker Tools required (not provided) Phillips screwdriver Ice bucket Installation Untitled-4 25 English 25 2020-03-17 7:03:20 STEP 6 Install the Auto Ice Maker (optional) To purchase a new auto ice maker (part type : RA-TIMO63PP/AA), visit the Samsung website (www.samsung.com) or contact your retailer.
Ice maker kit Ice maker Tools required (not provided) Phillips screwdriver Ice bucket Installation Untitled-4 25 English 25 2020-03-17 7:03:20 STEP 6 Install the Auto Ice Maker (optional) To purchase a new auto ice maker (part type : RA-TIMO63PP/AA), visit the Samsung website (www.samsung.com) or contact your retailer.
User Manual
Page 26
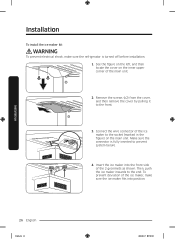
...:20 See the figure on the left, and then locate the cover on the main unit. Connect the wire connector of the ice maker to the front. 3. Insert the ice maker into position. Remove the screws (x2) from the cover, and then remove the cover by pulling it to the socket (marked...) on the inner upper corner of the main unit. 2. To prevent deviation of the ice maker, make sure the refrigerator is fully inserted to the end. Installation To install the ice maker kit WARNING To prevent electrical shock, make sure the ice maker fits into the front side of the 2 grommets as shown.
...:20 See the figure on the left, and then locate the cover on the main unit. Connect the wire connector of the ice maker to the front. 3. Insert the ice maker into position. Remove the screws (x2) from the cover, and then remove the cover by pulling it to the socket (marked...) on the inner upper corner of the main unit. 2. To prevent deviation of the ice maker, make sure the refrigerator is fully inserted to the end. Installation To install the ice maker kit WARNING To prevent electrical shock, make sure the ice maker fits into the front side of the 2 grommets as shown.
User Manual
Page 27
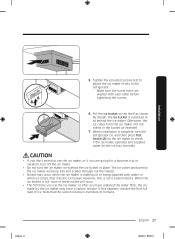
... residue. Otherwise, the ice cubes from the ice maker will occur. • The first time you use the ice maker, or if you have replaced the water filter, the ice made by the ice maker will drop into the ice bucket. If this is harmless to check if the ice maker operates and supplies water ... turn the refrigerator on, and then press Test Switch (A) on the ice maker to humans. Tighten the provided screws (x2) to attach the ice maker firmly to sit behind the ice maker. Put the ice bucket on without the ice bucket in the bucket as shown. Note that the carbon residue is ...
... residue. Otherwise, the ice cubes from the ice maker will occur. • The first time you use the ice maker, or if you have replaced the water filter, the ice made by the ice maker will drop into the ice bucket. If this is harmless to check if the ice maker operates and supplies water ... turn the refrigerator on, and then press Test Switch (A) on the ice maker to humans. Tighten the provided screws (x2) to attach the ice maker firmly to sit behind the ice maker. Put the ice bucket on without the ice bucket in the bucket as shown. Note that the carbon residue is ...

User Manual
Page 29
Operations Feature panel Type A 02 03 01 05 Type B 02 04 05 03 01 05 04 05 01 Power Freeze / Ice Maker (applicable models only) 03 Fridge / Fridge On/Off 05 Sabbath mode 02 Freezer / Freezer Convert 04 Power Cool Operations Untitled-4 29 English 29 2020-03-17 7:03:21
Operations Feature panel Type A 02 03 01 05 Type B 02 04 05 03 01 05 04 05 01 Power Freeze / Ice Maker (applicable models only) 03 Fridge / Fridge On/Off 05 Sabbath mode 02 Freezer / Freezer Convert 04 Power Cool Operations Untitled-4 29 English 29 2020-03-17 7:03:21

User Manual
Page 30
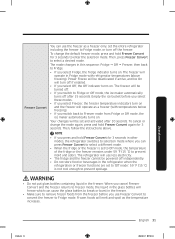
...pieces when the liquid freezes. 30 English Operations Untitled-4 30 2020-03-17 7:03:21 By default, the refrigerator is operating, the ice maker automatically turns off and have the Freezer return to its previous temperature if you . • For Type B, do not set the ...consumption. The freezer keeps running at least 20 hours before putting food in the freezer. Operations 01 Power Freeze / Ice Maker (applicable models only) Power Freeze Ice Maker (applicable models only) Power Freeze speeds up the freezing process at full speed for several hours and then returns to...
...pieces when the liquid freezes. 30 English Operations Untitled-4 30 2020-03-17 7:03:21 By default, the refrigerator is operating, the ice maker automatically turns off and have the Freezer return to its previous temperature if you . • For Type B, do not set the ...consumption. The freezer keeps running at least 20 hours before putting food in the freezer. Operations 01 Power Freeze / Ice Maker (applicable models only) Power Freeze Ice Maker (applicable models only) Power Freeze speeds up the freezing process at full speed for several hours and then returns to...
User Manual
Page 31
... before you select these modes. • If you switch back to Freezer mode from Fridge or Off mode, the ice maker automatically turns on and the freezer will freeze which can cause the glass bottles to break or burst in the freezer. • Make sure to ... the freezer. Power Freeze will turn off after 10 seconds. The freezer will be deactivated if active, and Ice On will be turned off. • If you switch to Fridge or Off mode, the ice maker automatically turns off if enabled. • If you select Fridge, the fridge indicator turns on . NOTE •...
... before you select these modes. • If you switch back to Freezer mode from Fridge or Off mode, the ice maker automatically turns on and the freezer will freeze which can cause the glass bottles to break or burst in the freezer. • Make sure to ... the freezer. Power Freeze will turn off after 10 seconds. The freezer will be deactivated if active, and Ice On will be turned off. • If you switch to Fridge or Off mode, the ice maker automatically turns off if enabled. • If you select Fridge, the fridge indicator turns on . NOTE •...
User Manual
Page 34
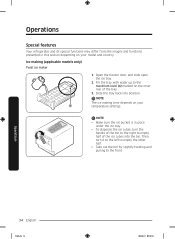
...bin. NOTE • Make sure the ice bucket is in this section depending on the inner rear of the ice cubes into position. Operations 34 English Untitled-4 34 2020-03-17 7:03:22 NOTE The ice making (applicable models only) Twist ice maker 1. Open the freezer door, and slide... open the ice tray. 2. Then, turn the handle of the bin to the right to the front. Operations Special features...
...bin. NOTE • Make sure the ice bucket is in this section depending on the inner rear of the ice cubes into position. Operations 34 English Untitled-4 34 2020-03-17 7:03:22 NOTE The ice making (applicable models only) Twist ice maker 1. Open the freezer door, and slide... open the ice tray. 2. Then, turn the handle of the bin to the right to the front. Operations Special features...

User Manual
Page 35
A Operations Untitled-4 35 English 35 2020-03-17 7:03:22 Auto ice maker (applicable models only) For first-time use the lower ice tray. If the auto ice maker does not make ice, remove the ice bucket and press Test Switch (A) to remove impurities in the water supply system. • When the upper ice tray is full, use • Let the ice maker make ice for 1-2 days. • Discard the first 1-2 buckets of ice to check if the auto ice maker operates properly.
A Operations Untitled-4 35 English 35 2020-03-17 7:03:22 Auto ice maker (applicable models only) For first-time use the lower ice tray. If the auto ice maker does not make ice, remove the ice bucket and press Test Switch (A) to remove impurities in the water supply system. • When the upper ice tray is full, use • Let the ice maker make ice for 1-2 days. • Discard the first 1-2 buckets of ice to check if the auto ice maker operates properly.
User Manual
Page 54
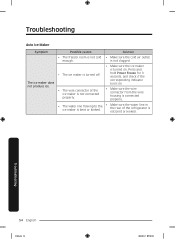
...30 Solution • Make sure the cold air outlet is not clogged. • Make sure the ice maker is bent or kinked. Possible causes • The freezer room is not cold enough. • The ice maker is turned off. • The wire connector of the refrigerator is not bent or kinked. Press and...8226; Make sure the wire connector from the wire housing is connected properly. • Make sure the water line in the rear of the ice maker is not connected properly. • The water line flowing to the ice maker is turned on. Troubleshooting Auto Ice Maker Symptom The ice maker does not produce...
...30 Solution • Make sure the cold air outlet is not clogged. • Make sure the ice maker is bent or kinked. Possible causes • The freezer room is not cold enough. • The ice maker is turned off. • The wire connector of the refrigerator is not bent or kinked. Press and...8226; Make sure the wire connector from the wire housing is connected properly. • Make sure the water line in the rear of the ice maker is not connected properly. • The water line flowing to the ice maker is turned on. Troubleshooting Auto Ice Maker Symptom The ice maker does not produce...
User Manual
Page 56
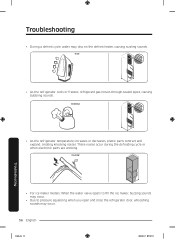
Cracking! HiSS! • As the refrigerator cools or freezes, refrigerant gas moves through sealed pipes, causing bubbling sounds. Troubleshooting • For ice maker models: When the water valve opens to fill the ice maker, buzzing sounds may occur. • Due to pressure equalizing when you open and close the refrigerator door, whooshing sounds may drip...
Cracking! HiSS! • As the refrigerator cools or freezes, refrigerant gas moves through sealed pipes, causing bubbling sounds. Troubleshooting • For ice maker models: When the water valve opens to fill the ice maker, buzzing sounds may occur. • Due to pressure equalizing when you open and close the refrigerator door, whooshing sounds may drip...


