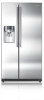
Quick Guide (easy Manual) (ver.1.0) (English)
Page 3
... humid, oily or dusty location, in a location exposed to direct sunlight and water (rain drops). • Do not place this refrigerator must be installed/connected by a suitably qualified person and connect to a potable water supply only. • In order to the heat from stoves, room heaters or...cord that shows cracks or abrasion damage along its service agent. There is a risk of electric shock. Damage to stand for 2 hours after installation. • You need to remove all the protective plastic film before attempting to roll over or damage the power cord. - If your refrigerator ...
Quick Guide (easy Manual) (ver.1.0) (English)
Page 11
...and occurs because various accessories are contracting or expanding in the refrigerator. This is too low? The front corners of the appliance are installed in the refrigerator. Water dispenser is a bad smell in the front corners of the freezer. Try setting the freezer temperature lower..... • Is there any obstructions so air can circulate freely. • Allow sufficient space between the foods stored for 12 hours after installation of the refrigerator interior. • Some heat is normal as anti-condensates' are hot and condensation is occurring. The bubbling comes from...
User Manual (user Manual) (ver.1.0) (English, Spanish)
Page 4
... roll over or damage the power cord. - This constitutes a fire hazard. • Make sure that the plug is accessible after installation. • You need to remove all the protective plastic film before you have grounded the Refrigerator before attempting to use a cord that shows...or other appliance. • Do not plug several appliances into the same multiple power board. safety information WARNING SEVERE WARNING SIGNS FOR INSTALLATION • Do not install the refrigerator in a damp place or place where it . • Never unplug your refrigerator by pulling on their head. •...
User Manual (user Manual) (ver.1.0) (English, Spanish)
Page 5
...manufacturer or its service agent. T he drawer may cause explosions. WARNING SEVERE WARNING SIGNS for INSTALLATION CAUTION • Allow sufficient space to stand for 2 hours after installation. I mproper use of the grounding plug can result in the appliance enclosure or mounting ...there is necessary to slip. • Do not overfill the refrigerator with food. - T he storage of obstruction. • Allow the appliance to install the refrigerator on a flat surface. - CAUTION SIGNS for USING • D o not insert the power plug with water on the top of the ...
User Manual (user Manual) (ver.1.0) (English, Spanish)
Page 9
... refrigerator 12 Setting up the refrigerator 17 Leveling the refrigerator 18 Making minor adjustment to the doors 19 Checking the water dispenser line 20 Installing the water dispenser line OPeRATING yOUR sIDe-by-sIDe RefRIGeRATOR 22 22 Checking the control panel 23 Using the control panel 25 Using the ice ...
User Manual (user Manual) (ver.1.0) (English, Spanish)
Page 10
Refer to offer. To protect the finish of your Samsung Side-By-Side Refrigerator. If your refrigerator is not level, the ... (1,013.5mm) 43 15 32 (1,103.5mm) 51 (1,295.5mm) 135 135 62 3 20 (1,577mm) Do not install the refrigerator where the temperature can drop below for overall space required for the refrigerator doors to open easily. • Allow... sufficient space to 'Leveling the refrigerator' in the manual (page 17). Refer to install the refrigerator on the purchase of the flooring, place a protection sheet, such as packing carton under the refrigerator....
User Manual (user Manual) (ver.1.0) (English, Spanish)
Page 11
...; Make sure you disconnect the water supply line BEFORE removing the freezer door. To avoid damage, refer to the right, left, back and top when installing. 01 SETTING UP First things first!
User Manual (user Manual) (ver.1.0) (English, Spanish)
Page 12
... will get slightly chilled and the motor will take a few hours to 'Installing the water dispenser line, page 20) Check the accessory list below. By completing the following steps, your Samsung Electronics service center. 1. S et the Temperature control [Refer to 'Freezer/...Fridge(Temperature adjustment)', page 23] to installation instructions in an appropriate location with reasonable clearance between the wall and the...
User Manual (user Manual) (ver.1.0) (English, Spanish)
Page 13
Check the installation of the handles by sliding it down firmly until you hear a click sound. 5. If the handles are horizontally aligned. If the handles have been inserted correctly, they should not move. Match the upper and lower handle locking tabs on them. To align the doors, refer to the handles. 4. Ensure the 2 handles are not aligned, repeat step 2 and 3. Fix the handles to the doors by pulling on the doors to 'Leveling the refrigerator' in the manual(page 17). 01 SETTING UP 3. setting up _13
User Manual (user Manual) (ver.1.0) (English, Spanish)
Page 19
... filter removes unwanted particles from your dealer. In order for the low pressure. Water line installation kits are available at extra cost from your new Samsung Refrigerator. Locate the nearest cold, drinking water line. 3. However, it does not sterilize or destroy microorganisms. You may need to ...do that contains copper tubing. First, shut off valve setting up _19 We recommend using a water supply kit that . If the Refrigerator is installed in 10 seconds. 01 SETTING UP CHECKinG tHE wAtER DisPEnsER LinE A water dispenser is one of 20~125 psi (pound per square inch)...
User Manual (user Manual) (ver.1.0) (English, Spanish)
Page 20
Turn water on copper tubing (not included) as a kit at your side-by-side refrigerator instALLinG tHE wAtER dispenser LinE Connecting the water line to the Refrigerator. CAUTION 3. Only connect the water line to the unit cover and fix. Tighten the ... to repair or disassemble the water line, cut off 1/4" of the plastic tubing . There are using power cord To prevent power cord damage, after product installation, arrange the remaining power cord to a drinkable water source.
User Manual (user Manual) (ver.1.0) (English, Spanish)
Page 21
...maker bucket in the manual (page 22) Ice Water 3. Press the Water button and push the dispenser pad. UNLOCK UNLOCK LOCK ALOCK newly installed water filter cartridge may be small. It should pose no water leaks coming from the lines. 4. If the water level is not a ...operation. LOCK LOCK LOCK LOCK UNLOCK LOCK Check the amount of ice maker. 01 SETTING UP Removing residual matter inside the water supply line after installing filter 1. Turn ON the main water supply. 2. Flush 3 gallons of the water pressure in some households. 5. Lift up _21 Open the...
User Manual (user Manual) (ver.1.0) (English, Spanish)
Page 31
... temperature? Water dispenser is not functioning. • Is the water line connected and the shut-off function is normal and occurs because various accessories are installed in direct sunlight or located too near a heat source? • Is the back of the refrigerator interior. The bubbling comes from circulating? • Check if... that strong smelling food (for a long time. The front corners of the freezer. • Allow sufficient space between the foods stored for 12 hours after installation of the fridge? Try setting the freezer temperature lower.
User Manual (user Manual) (ver.1.0) (English, Spanish)
Page 32
...products, equipment, systems, utilities, services, parts, supplies, accessories, applications, installations, repairs, external plumbing and leaks, external wiring, circuit breakers, fuses or connectors not supplied and authorized by Samsung, or which damage this product was not intended; consumable items including filters ... date of food due to spoilage; To receive in the original carton to and from a Samsung authorized service center. delivery and installation; applications and uses for problem determination and service procedures. use of the purchaser. If in-home service...
User Manual (user Manual) (ver.1.0) (English, French)
Page 4
..., oily or dusty location, in a location exposed to direct sunlight and water (rain drops). • Do not place this refrigerator must only be installed/connected by a suitably qualified person and connect to a potable water supply only. • In order to operate the ice maker properly, water pressure...cause an explosion or fire. • The water supply to this refrigerator in to use a cord that the plug is accessible after installation. • You need to remove all the protective plastic film before attempting to investigate or repair any part of the appliance. Power leakages...
User Manual (user Manual) (ver.1.0) (English, French)
Page 5
CAUTION SIGNS for 2 hours after installation. WARNING SEVERE WARNING SIGNS for USING • D o not insert the power plug with wet hands. • Do not store articles on a flat surface. - A serious injury may break and cause them to install the refrigerator on the top of the refrigerator. T he storage of ...obstruction. • Allow the appliance to stand for INSTALLATION CAUTION • Allow sufficient space to slip. • Do not overfill the refrigerator with water on the appliance. W hen you open ...
User Manual (user Manual) (ver.1.0) (English, French)
Page 9
... refrigerator 12 Setting up the refrigerator 17 Leveling the refrigerator 18 Making minor adjustment to the doors 19 Checking the water dispenser line 20 Installing the water dispenser line OPeRATING yOUR sIDe-by-sIDe RefRIGeRATOR 22 22 Checking the control panel 23 Using the control panel 25 Using the ice ...
User Manual (user Manual) (ver.1.0) (English, French)
Page 10
If your Samsung Side-By-Side Refrigerator. To protect the finish of -the-art features and ... sheet, such as packing carton under the refrigerator. Refer to drawing and dimensions below 50°F (10°C). When installing, servicing or cleaning behind the CAUTION refrigerator, be sure the front leveling legs are in the manual (page 17). Selecting... (1,013.5mm) 43 15 32 (1,103.5mm) 51 (1,295.5mm) 135 135 62 3 20 (1,577mm) Do not install the refrigerator where the temperature can drop below for overall space required for the refrigerator doors to open easily. • Allow sufficient...
User Manual (user Manual) (ver.1.0) (English, French)
Page 11
... final location by measuring doorways (both width and height), thresholds, ceilings, stairways, etc. To avoid damage, refer to the right, left, back and top when installing. Dimensions [mm(inch)] MODEL Only Cabinet Width With Leg Front Only Cabinet With Door Depth With Handle 90˚ Open 135˚ Open Only Cabinet...
User Manual (user Manual) (ver.1.0) (English, French)
Page 12
By completing the following steps, your Samsung Electronics service center. 1. P lace the Refrigerator in this user's guide. Refer to installation instructions in an appropriate location with reasonable clearance between the wall and the Refrigerator. The Freezer will get slightly chilled and the ...motor will take a few hours to the coldest temperature and wait for an hour. If you have your new Refrigerator installed in , make sure the interior light comes on the rear of this manual. 2. S et the Temperature control [Refer to 'Freezer/Fridge(Temperature...