
Quick Guide (easy Manual) (ver.1.0) (English)
Page 1
... PANEL 6 TEMPERATURE CONTROL 7 ICE and COLD WATER DISPENSER 7 SHELVES and BINS 8 FOOD STORAGE GUIDE 9 REMOVING THE FREEZER ACCESSORIES 11 REMOVING THE REFRIGERATOR ACCESSORIES 11 CLEANING THE ACCESSORIES 12 CHANGING THE INTERIOR LIGHT 12 WATER FILTER 13 DOORS ...13 INSTALLATION INSTRUCTIONS 14 INSTALLATION OF THE REFRIGERATOR 14 REMOVING THE REFRIGERATOR DOORS 15 REATTACHING THE REFRIGERATOR DOORS 16 ADJUSTING THE HEIGHT BETWEEN THE DOORS 21 CHECKING THE WATER DISPENSER LINE 23 INSTALLING THE WATER DISPENSER LINE 24 BEFORE YOU CALL FOR SERVICE 27 CONSUMER SUPPORT 29 WARRANTY...
... PANEL 6 TEMPERATURE CONTROL 7 ICE and COLD WATER DISPENSER 7 SHELVES and BINS 8 FOOD STORAGE GUIDE 9 REMOVING THE FREEZER ACCESSORIES 11 REMOVING THE REFRIGERATOR ACCESSORIES 11 CLEANING THE ACCESSORIES 12 CHANGING THE INTERIOR LIGHT 12 WATER FILTER 13 DOORS ...13 INSTALLATION INSTRUCTIONS 14 INSTALLATION OF THE REFRIGERATOR 14 REMOVING THE REFRIGERATOR DOORS 15 REATTACHING THE REFRIGERATOR DOORS 16 ADJUSTING THE HEIGHT BETWEEN THE DOORS 21 CHECKING THE WATER DISPENSER LINE 23 INSTALLING THE WATER DISPENSER LINE 24 BEFORE YOU CALL FOR SERVICE 27 CONSUMER SUPPORT 29 WARRANTY...
Quick Guide (easy Manual) (ver.1.0) (English)
Page 2
... of the refrigerator / freezer throw it away after first removing the doors and seals. • Do so in a way that this manual • The appliance is a risk of your refrigerator may differ slightly from users or other persons, please follow . Indicates that they do . Because these following operating instructions cover various models, the characteristics of electric shock. Do not directly spray water inside . Do not...
... of the refrigerator / freezer throw it away after first removing the doors and seals. • Do so in a way that this manual • The appliance is a risk of your refrigerator may differ slightly from users or other persons, please follow . Indicates that they do . Because these following operating instructions cover various models, the characteristics of electric shock. Do not directly spray water inside . Do not...

Quick Guide (easy Manual) (ver.1.0) (English)
Page 3
... must not be replaced by young children or infirm persons without supervision. ly climb inside walls of electric shock or fire. Do not insert your old refrigerator, make sure the CFC refrigerant is a risk of the freezer or products stored in place so that have a cooling system that result from the power supply, you are in the refrigerator. Remove any foreign matter...
... must not be replaced by young children or infirm persons without supervision. ly climb inside walls of electric shock or fire. Do not insert your old refrigerator, make sure the CFC refrigerant is a risk of the freezer or products stored in place so that have a cooling system that result from the power supply, you are in the refrigerator. Remove any foreign matter...
Quick Guide (easy Manual) (ver.1.0) (English)
Page 4
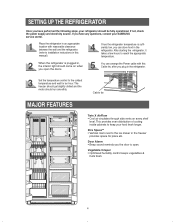
... the power supply and electricity source. Set the temperature control to reach the appropriate temperature. Cable tie MAJOR FEATURES Twin X AirFlow • Cool air circulates through side vents on when you the door is plugged in, the interior light should run smoothly. When the refrigerator is open the doors. SETTING UP THE REFRIGERATOR Once you plug in the refrigerator. You can store food in the freezer provides space for an hour. Vegetable Crisper...
... the power supply and electricity source. Set the temperature control to reach the appropriate temperature. Cable tie MAJOR FEATURES Twin X AirFlow • Cool air circulates through side vents on when you the door is plugged in, the interior light should run smoothly. When the refrigerator is open the doors. SETTING UP THE REFRIGERATOR Once you plug in the refrigerator. You can store food in the freezer provides space for an hour. Vegetable Crisper...
Quick Guide (easy Manual) (ver.1.0) (English)
Page 5
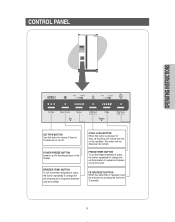
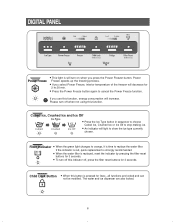
... the button repeatedly to change the set temperature in the freezer. CONTROL PANEL OPERATING INSTRUCTIONS ICE TYPE BUTTON Use this button is replaced, reset the indicator by pressing the button for 3sec.,all functions are locked. CHILD LOCK BUTTON When this button to change the set temperature in sequence between cool and coolest. FRIDGE TEMP. BUTTON To set the freezer temperature, press the button repeatedly to choose Cubed or Crushed ice or Ice off. FILTER RESET BUTTON When the water filter is pressed for 3 seconds. 5 The water and ice dispenser are...
... the button repeatedly to change the set temperature in the freezer. CONTROL PANEL OPERATING INSTRUCTIONS ICE TYPE BUTTON Use this button is replaced, reset the indicator by pressing the button for 3sec.,all functions are locked. CHILD LOCK BUTTON When this button to change the set temperature in sequence between cool and coolest. FRIDGE TEMP. BUTTON To set the freezer temperature, press the button repeatedly to choose Cubed or Crushed ice or Ice off. FILTER RESET BUTTON When the water filter is pressed for 3 seconds. 5 The water and ice dispenser are...
Quick Guide (easy Manual) (ver.1.0) (English)
Page 6
... using this function. DIGITAL PANEL Power Freeze • This light is will turn on when you use this function, energy consumption will increase. If you press the Power Freezer button. The water and ice dispenser are locked and can not be modified. Power Freeze speeds up the freezing process. • If you select Power Freeze, interior temperature of the freezer will light to cancel the Power Freeze function. Cubed Ice, Crushed Ice and Ice Off • Press the Ice Type button...
... using this function. DIGITAL PANEL Power Freeze • This light is will turn on when you use this function, energy consumption will increase. If you press the Power Freezer button. The water and ice dispenser are locked and can not be modified. Power Freeze speeds up the freezing process. • If you select Power Freeze, interior temperature of the freezer will light to cancel the Power Freeze function. Cubed Ice, Crushed Ice and Ice Off • Press the Ice Type button...
Quick Guide (easy Manual) (ver.1.0) (English)
Page 7
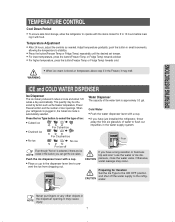
... a cup to the dispenser lever line to the refrigerator. Preparing for 8 to flush out impurities in the bucket, you have just installed the refrigerator, throw away the first six glassfuls of door openings. OPERATING INSTRUCTIONS TEMPERATURE CONTROL Cool Down Period • To ensure safe food storage, allow the refrigerator to operate with the doors closed for Vacation Set the Ice Type to the ICE OFF position and shut off Even though...
... a cup to the dispenser lever line to the refrigerator. Preparing for 8 to flush out impurities in the bucket, you have just installed the refrigerator, throw away the first six glassfuls of door openings. OPERATING INSTRUCTIONS TEMPERATURE CONTROL Cool Down Period • To ensure safe food storage, allow the refrigerator to operate with the doors closed for Vacation Set the Ice Type to the ICE OFF position and shut off Even though...
Quick Guide (easy Manual) (ver.1.0) (English)
Page 11
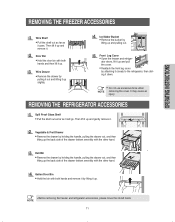
... other hand. Door Bin • Hold the door bin with both hands and then lift it up slightly. Deli Bin • Remove the drawer by attaching it closely to the refrigerator, then sliding it down. • Do not use excessive force when NOTE removing the cover. ator doors, lift it up and remove it. Front Leg Cover • Open the freezer and refriger- Wire Drawer • Remove the drawer by lifting...
... other hand. Door Bin • Hold the door bin with both hands and then lift it up slightly. Deli Bin • Remove the drawer by attaching it closely to the refrigerator, then sliding it down. • Do not use excessive force when NOTE removing the cover. ator doors, lift it up and remove it. Front Leg Cover • Open the freezer and refriger- Wire Drawer • Remove the drawer by lifting...
Quick Guide (easy Manual) (ver.1.0) (English)
Page 12
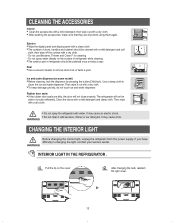
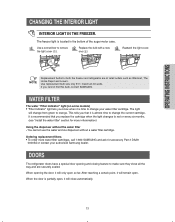
... not touch ice and water dispenser. Rear • Use a vacuum cleaner to remove dust once or twice a year. WARNING CHANGING THE INTERIOR LIGHT Before changing the interior light, unplug the refrigerator from the power supply. Pull the tip on some model) • Before cleaning, lock the dispensor by pressing the button(Child lock). Do not spray water directly on the surface of refrigerator while cleaning. • The exterior part of doors, handles and...
... not touch ice and water dispenser. Rear • Use a vacuum cleaner to remove dust once or twice a year. WARNING CHANGING THE INTERIOR LIGHT Before changing the interior light, unplug the refrigerator from the power supply. Pull the tip on some model) • Before cleaning, lock the dispensor by pressing the button(Child lock). Do not spray water directly on the surface of refrigerator while cleaning. • The exterior part of doors, handles and...
Quick Guide (easy Manual) (ver.1.0) (English)
Page 13
...accessory Part # DA29- 00003A or contact your water filter cartridge. Use replacement bulb size only E17, maximum 30 watts. Ordering replacement filters • To order more informmation) Using the dispenser without the water filter • You cannot use the water and ice dispenser without a water filter cartridge. OPERATING INSTRUCTIONS CHANGING THE INTERIOR LIGHT INTERIOR LIGHT IN THE FREEZER. Use a screwdriver to make sure they close automatically. 13 This tells you cannot find this bulb, contact SAMSUNG. When opening and closing feature to remove the light cover (➀...
...accessory Part # DA29- 00003A or contact your water filter cartridge. Use replacement bulb size only E17, maximum 30 watts. Ordering replacement filters • To order more informmation) Using the dispenser without the water filter • You cannot use the water and ice dispenser without a water filter cartridge. OPERATING INSTRUCTIONS CHANGING THE INTERIOR LIGHT INTERIOR LIGHT IN THE FREEZER. Use a screwdriver to make sure they close automatically. 13 This tells you cannot find this bulb, contact SAMSUNG. When opening and closing feature to remove the light cover (➀...
Quick Guide (easy Manual) (ver.1.0) (English)
Page 14
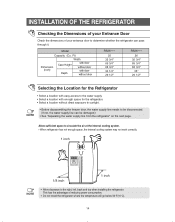
... the air at the internal cooling system. • When refrigerator has not enough space, the internal cooling system may not work correctly. 1 inch 1/8 inch 1 inch NOTE • Allow clearance to be damaged.) • See "Separating the water supply line from the refrigerator" on the next page. Model Capacity (Cu. INSTALLATION OF THE REFRIGERATOR Checking the Dimensions of your Entrance Door Check the dimensions of reducing power...
... the air at the internal cooling system. • When refrigerator has not enough space, the internal cooling system may not work correctly. 1 inch 1/8 inch 1 inch NOTE • Allow clearance to be damaged.) • See "Separating the water supply line from the refrigerator" on the next page. Model Capacity (Cu. INSTALLATION OF THE REFRIGERATOR Checking the Dimensions of your Entrance Door Check the dimensions of reducing power...

Quick Guide (easy Manual) (ver.1.0) (English)
Page 15
INSTALLATION INSTRUCTIONS REMOVING THE REFRIGERATOR DOORS Removing the Front Leg Cover Take hold of FRONT LEG COVER and lift it from the Refrigerator Remove the water tube by pressing the coupler (➁) and pulling the water tube (➀) away. NOTE 15 FRONT LEG COVER Separating the Water Supply Line from the coupler. Be careful not to cut the water tube when separating it up.
INSTALLATION INSTRUCTIONS REMOVING THE REFRIGERATOR DOORS Removing the Front Leg Cover Take hold of FRONT LEG COVER and lift it from the Refrigerator Remove the water tube by pressing the coupler (➁) and pulling the water tube (➀) away. NOTE 15 FRONT LEG COVER Separating the Water Supply Line from the coupler. Be careful not to cut the water tube when separating it up.
Quick Guide (easy Manual) (ver.1.0) (English)
Page 23
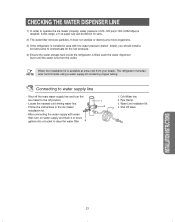
... to operate the ice maker properly, water pressure of 20~125 psi(0.138~0.862 Mpa) is available at extra cost from the outlet. Water line installation kit is required. Follow the instructions in 10 secs. 2) The water filter removes particles. Pipe Clamp. 3. The refrigerator manufacNOTE turer recommends using a water supply kit containing copper tubing. Locate the nearest cold drinkig water line. - Shut Off Valve. Connecting to clear the water filter. 1. INSTALLATION INSTRUCTIONS 23 push the water dispenser lever until the water runs from...
... to operate the ice maker properly, water pressure of 20~125 psi(0.138~0.862 Mpa) is available at extra cost from the outlet. Water line installation kit is required. Follow the instructions in 10 secs. 2) The water filter removes particles. Pipe Clamp. 3. The refrigerator manufacNOTE turer recommends using a water supply kit containing copper tubing. Locate the nearest cold drinkig water line. - Shut Off Valve. Connecting to clear the water filter. 1. INSTALLATION INSTRUCTIONS 23 push the water dispenser lever until the water runs from...
Quick Guide (easy Manual) (ver.1.0) (English)
Page 24
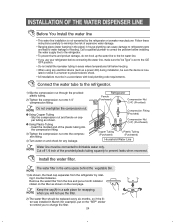
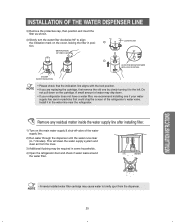
.... The water filter in a safe place for any electrical device (such as shown. ● Using Plastic Tubing - Call a qualified plumber to correct the problem before installing the water supply line to the refrigerator. • To prevent burns and product damage, do not hook up the water line to the hot water line. • If you will not use your refrigerator before connecting the water line, make sure the"Ice Type" is set to prevent leaks when...
.... The water filter in a safe place for any electrical device (such as shown. ● Using Plastic Tubing - Call a qualified plumber to correct the problem before installing the water supply line to the refrigerator. • To prevent burns and product damage, do not hook up the water line to the hot water line. • If you will not use your refrigerator before connecting the water line, make sure the"Ice Type" is set to prevent leaks when...
Quick Guide (easy Manual) (ver.1.0) (English)
Page 25
... are replacing the cartridge, first remove the old one by slowly turning it in some households. 4) Open the refrigerator door and check if water leaks around the water filter. INSTALLATION OF THE WATER DISPENSER LINE 3) Remove the protective cap, then position and insert the filter as shown. 4) Slowly turn the water filter clockwise 90º to the left. SEPARATION OF RED CAP COVER FILTER ALIGN THE INDICATION MARK WITH LOCK POSITION. ICE WATER INSTALLATION INSTRUCTIONS • A newly-installed water filter cartridge may drip...
... are replacing the cartridge, first remove the old one by slowly turning it in some households. 4) Open the refrigerator door and check if water leaks around the water filter. INSTALLATION OF THE WATER DISPENSER LINE 3) Remove the protective cap, then position and insert the filter as shown. 4) Slowly turn the water filter clockwise 90º to the left. SEPARATION OF RED CAP COVER FILTER ALIGN THE INDICATION MARK WITH LOCK POSITION. ICE WATER INSTALLATION INSTRUCTIONS • A newly-installed water filter cartridge may drip...
Quick Guide (easy Manual) (ver.1.0) (English)
Page 26
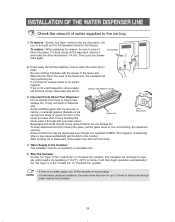
... connected to a cold water line. 5) Start the Icemaker : Set the "Ice Type" to the "Cubed Ice" or "Crushed Ice" position. CHECK THE WATER LEVEL Rotate 3) Important Facts About Your Dispenser : Do not add ice from trays or bags to press it reachs its operating of 10.4°F( -12°C) or below. Some crushed ice may turn off position. INSTALLATION OF THE WATER DISPENSER LINE Check the amount of water supplied to the ice tray. 1) To remove : Set the "Ice Type" switch...
... connected to a cold water line. 5) Start the Icemaker : Set the "Ice Type" to the "Cubed Ice" or "Crushed Ice" position. CHECK THE WATER LEVEL Rotate 3) Important Facts About Your Dispenser : Do not add ice from trays or bags to press it reachs its operating of 10.4°F( -12°C) or below. Some crushed ice may turn off position. INSTALLATION OF THE WATER DISPENSER LINE Check the amount of water supplied to the ice tray. 1) To remove : Set the "Ice Type" switch...
Quick Guide (easy Manual) (ver.1.0) (English)
Page 27
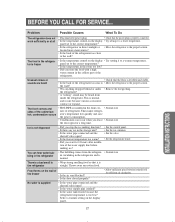
... refrigerator. shut-off valve open ? • Is the freezer temperature too warm? • Set the temperature lower. • Did you stop the ice making ice? located near to • Move the refrigerator to a lower temperature. Frost forms on the display • Try setting it is properly connected. • Is the temperature control on the display panel. 27 panel set to a warmer temperature. INSTALLATION INSTRUCTIONS Problem Possible Causes What To Do The refrigerator does not work sufficiently or at all • Disconnected power plug...
... refrigerator. shut-off valve open ? • Is the freezer temperature too warm? • Set the temperature lower. • Did you stop the ice making ice? located near to • Move the refrigerator to a lower temperature. Frost forms on the display • Try setting it is properly connected. • Is the temperature control on the display panel. 27 panel set to a warmer temperature. INSTALLATION INSTRUCTIONS Problem Possible Causes What To Do The refrigerator does not work sufficiently or at all • Disconnected power plug...
Quick Guide (easy Manual) (ver.1.0) (English)
Page 28
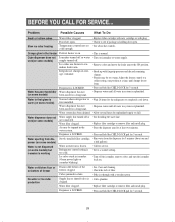
... used for 3 seconds. Air may be trapped in icemaker. (Green power light on icemaker blinking). • Call for a long time. Refrigerator control setting is LOCKED. Water in system is replenished. Water filter clogged. • See Care and cleaning. • Check the lock of the freezer clogged. Temperature control not set cold enough. • Replace filter cartridge with new cartridge or with plug. • Check to completely cool down. • Dispense water until all water in reservoir is holding door open . Icemaker turned off or water supply turned...
... used for 3 seconds. Air may be trapped in icemaker. (Green power light on icemaker blinking). • Call for a long time. Refrigerator control setting is LOCKED. Water in system is replenished. Water filter clogged. • See Care and cleaning. • Check the lock of the freezer clogged. Temperature control not set cold enough. • Replace filter cartridge with new cartridge or with plug. • Check to completely cool down. • Dispense water until all water in reservoir is holding door open . Icemaker turned off or water supply turned...

Quick Guide (easy Manual) (ver.1.0) (English)
Page 29
...) and www.SAMSUNG.com 061002 29 CONSUMER SUPPORT This limited warranty covers manufacturing defects in materials and workmanship encountered in the instruction book; delivery and installation; cosmetic damage or exterior finish; accidents, abuse, neglect, fire, water, lightning or other rights, which vary from the use of products, equipment, systems, utilities, services, parts, supplies, accessories, applications, installations, repairs, external plumbing and leaks, external wiring, circuit breakers...
...) and www.SAMSUNG.com 061002 29 CONSUMER SUPPORT This limited warranty covers manufacturing defects in materials and workmanship encountered in the instruction book; delivery and installation; cosmetic damage or exterior finish; accidents, abuse, neglect, fire, water, lightning or other rights, which vary from the use of products, equipment, systems, utilities, services, parts, supplies, accessories, applications, installations, repairs, external plumbing and leaks, external wiring, circuit breakers...
Quick Guide (easy Manual) (ver.1.0) (English)
Page 30
If you have any form without written permission from the SAMSUNG ELECTRONICS Company Samsung Electronics America, Inc. 105 Challenger Road Ridgefield Park, NJ 07660-0511 1-800-SAMSUNG(1-800-726-7864) www.samsung.com All right reserved. This manual maynot be reproduced in whole or in part in any questions or comments relating to Samsung products, please contact the SAMSUNG customer care center.
If you have any form without written permission from the SAMSUNG ELECTRONICS Company Samsung Electronics America, Inc. 105 Challenger Road Ridgefield Park, NJ 07660-0511 1-800-SAMSUNG(1-800-726-7864) www.samsung.com All right reserved. This manual maynot be reproduced in whole or in part in any questions or comments relating to Samsung products, please contact the SAMSUNG customer care center.


