User Manual (ENGLISH)
Page 3
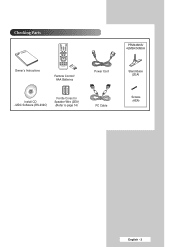
Checking Parts PPM42M5S/ 42M5H/50M5H Owner's Instructions Remote Control/ AAA Batteries Power Cord Install CD - MDC Software (RS-232C) Ferrite Cores for Speaker Wire (2EA) (Refer to page 14) PC Cable Stand-Base (2EA) Screws (4EA) English - 3
Checking Parts PPM42M5S/ 42M5H/50M5H Owner's Instructions Remote Control/ AAA Batteries Power Cord Install CD - MDC Software (RS-232C) Ferrite Cores for Speaker Wire (2EA) (Refer to page 14) PC Cable Stand-Base (2EA) Screws (4EA) English - 3
User Manual (ENGLISH)
Page 4
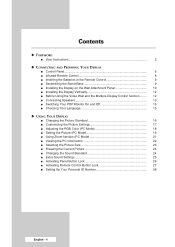
... 2 ◆ CONNECTING AND PREPARING YOUR DISPLAY ■ Control Panel 6 ■ Infrared Remote Control 8 ■ Inserting the Batteries in the Remote Control 9 ■ Assembling the Stand-Base 9 ■ Installing the Display on the Wall Attachment Panel 10 ■ Installing the Display Vertically 12 ■ Before Using...Current Picture 24 ■ Changing the Sound Standard 24 ■ Extra Sound Settings 25 ■ Activating Panel Button Lock 26 ■ Activating Remote Control Button Lock 27 ■ Setting Up Your Personal ID Number 28 English - 4
... 2 ◆ CONNECTING AND PREPARING YOUR DISPLAY ■ Control Panel 6 ■ Infrared Remote Control 8 ■ Inserting the Batteries in the Remote Control 9 ■ Assembling the Stand-Base 9 ■ Installing the Display on the Wall Attachment Panel 10 ■ Installing the Display Vertically 12 ■ Before Using...Current Picture 24 ■ Changing the Sound Standard 24 ■ Extra Sound Settings 25 ■ Activating Panel Button Lock 26 ■ Activating Remote Control Button Lock 27 ■ Setting Up Your Personal ID Number 28 English - 4
User Manual (ENGLISH)
Page 6
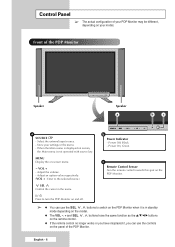
...VOL + - I / Press to switch on the PDP Monitor when it , you can use the controls on the panel of the PDP Monitor. b Power Indicator - Black - Green c Remote Control Sensor Aim the remote control towards this spot on the PDP Monitor. ➢ ◆ You can use the SEL , buttons to turn the.... ◆ If the remote control no longer works or you have misplaced it is not operated with source key. Adjust an option value respectively. (VOL + : Enter to the selected menu.) SEL Control the cursor in the menu. Control Panel ➢ The actual configuration of your PDP Monitor may ...
...VOL + - I / Press to switch on the PDP Monitor when it , you can use the controls on the panel of the PDP Monitor. b Power Indicator - Black - Green c Remote Control Sensor Aim the remote control towards this spot on the PDP Monitor. ➢ ◆ You can use the SEL , buttons to turn the.... ◆ If the remote control no longer works or you have misplaced it is not operated with source key. Adjust an option value respectively. (VOL + : Enter to the selected menu.) SEL Control the cursor in the menu. Control Panel ➢ The actual configuration of your PDP Monitor may ...
User Manual (ENGLISH)
Page 8
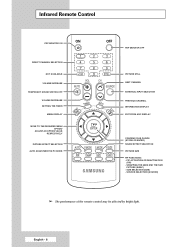
... may be affected by bright light. PIP ACTIVATION OR DEACTIVATION (PIP) - English - 8 SIZE SELECTION (SIZE) - Infrared Remote Control PDP MONITOR ON DIRECT CHANNEL SELECTION NOT AVAILABLE VOLUME INCREASE TEMPORARY SOUND SWITCH-OFF VOLUME DECREASE SETTING THE TIMER MENU DISPLAY MOVE TO THE ...
... may be affected by bright light. PIP ACTIVATION OR DEACTIVATION (PIP) - English - 8 SIZE SELECTION (SIZE) - Infrared Remote Control PDP MONITOR ON DIRECT CHANNEL SELECTION NOT AVAILABLE VOLUME INCREASE TEMPORARY SOUND SWITCH-OFF VOLUME DECREASE SETTING THE TIMER MENU DISPLAY MOVE TO THE ...

User Manual (ENGLISH)
Page 9
.... Assembling the Stand-Base 1 Assemble the PDP Monitor with the base of the remote control and pressing it back into place. Inserting the Batteries in the Remote Control You must insert or replace the batteries in the remote control when you: ◆ Purchase the PDP Monitor ◆ Find that the...and firmly secure the PDP Monitor using 4 screws provided. ➢ Two or more people should carry the PDP Monitor. on the battery against + on the remote control 3 Replace the cover by pressing the symbol ( ) downwards and then pulling firmly to remove it. 2 Insert two R03, UM4, "AAA" 1....
.... Assembling the Stand-Base 1 Assemble the PDP Monitor with the base of the remote control and pressing it back into place. Inserting the Batteries in the Remote Control You must insert or replace the batteries in the remote control when you: ◆ Purchase the PDP Monitor ◆ Find that the...and firmly secure the PDP Monitor using 4 screws provided. ➢ Two or more people should carry the PDP Monitor. on the battery against + on the remote control 3 Replace the cover by pressing the symbol ( ) downwards and then pulling firmly to remove it. 2 Insert two R03, UM4, "AAA" 1....
User Manual (ENGLISH)
Page 12
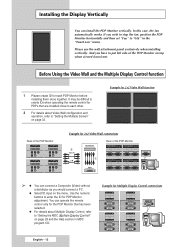
...page 33. And you would connect a PC. ◆ Select ID input on top when viewed from front. Please use the wall attachment panel exclusively when installing vertically. Example for 2x2 Video Wall function Rear of the PDP Monitor Example for 2x2 Video Wall connections Rear of the PDP...on the menu. Example for PDP Monitor adjustment. You can install the PDP Monitor vertically. Installing the Display Vertically You can operate the remote control only for the PDP Monitor that are installed close to each PDP Monitor before installing them close together. In this case, the ...
...page 33. And you would connect a PC. ◆ Select ID input on top when viewed from front. Please use the wall attachment panel exclusively when installing vertically. Example for 2x2 Video Wall function Rear of the PDP Monitor Example for 2x2 Video Wall connections Rear of the PDP...on the menu. Example for PDP Monitor adjustment. You can install the PDP Monitor vertically. Installing the Display Vertically You can operate the remote control only for the PDP Monitor that are installed close to each PDP Monitor before installing them close together. In this case, the ...
User Manual (ENGLISH)
Page 15
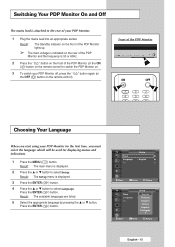
.... 2 Press the " " button on the front of the PDP Monitor (or the ON ( ) button on the remote control) to the rear of the PDP Monitor lights up. ➢ The main voltage is indicated on the remote control). Result: The Standby indicator on the front of your PDP Monitor for displaying menus and...
.... 2 Press the " " button on the front of the PDP Monitor (or the ON ( ) button on the remote control) to the rear of the PDP Monitor lights up. ➢ The main voltage is indicated on the remote control). Result: The Standby indicator on the front of your PDP Monitor for displaying menus and...
User Manual (ENGLISH)
Page 16
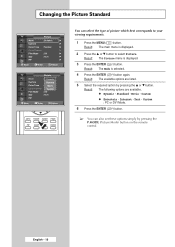
... is displayed. 3 Press the ENTER ( ) button. Result: The following options are listed. 5 Select the required option by pressing the P.MODE (Picture Mode) button on the remote control. Standard - Internet - Custom : PC or DVI Mode. 6 Press the ENTER ( ) button. ➢ You can select the type of picture which best corresponds to select...
... is displayed. 3 Press the ENTER ( ) button. Result: The following options are listed. 5 Select the required option by pressing the P.MODE (Picture Mode) button on the remote control. Standard - Internet - Custom : PC or DVI Mode. 6 Press the ENTER ( ) button. ➢ You can select the type of picture which best corresponds to select...
User Manual (ENGLISH)
Page 23
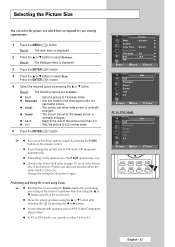
.../S-Video/Component input modes. ◆ In PC or DVI mode, you change the picture size In PIP mode, PIP disappears automatically. ◆ Depending on the remote control. ◆ If you can select the picture size which best corresponds to page 33) is On if the Picture size is displayed. 3 Press the...
.../S-Video/Component input modes. ◆ In PC or DVI mode, you change the picture size In PIP mode, PIP disappears automatically. ◆ Depending on the remote control. ◆ If you can select the picture size which best corresponds to page 33) is On if the Picture size is displayed. 3 Press the...

User Manual (ENGLISH)
Page 24
... is displayed. 2 Press the ▲ or ▼ button to select Sound. Select the required option by simply pressing the S.MODE (Sound Mode) button on the remote control. Result: The following options are available. Music - Freezing the Current Picture You can select the type of special sound effect to be applied to...
... is displayed. 2 Press the ▲ or ▼ button to select Sound. Select the required option by simply pressing the S.MODE (Sound Mode) button on the remote control. Result: The following options are available. Music - Freezing the Current Picture You can select the type of special sound effect to be applied to...
User Manual (ENGLISH)
Page 26
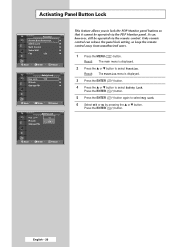
... Safety Lock Key Lock IR Lock Change PIN : Off Off On This feature allows you to lock the PDP Monitor panel buttons so that it cannot be operated via the PDP Monitor panel. Result: The main menu is displayed. 3 Press the ENTER ( ) button. 4 Press the ▲ or... or On by pressing the ▲ or ▼ button. Press the ENTER ( ) button. Move Enter Return English - 26 Only remote control can , however, still be operated via the remote control. It can release the panel lock setting, so keep the remote control away from unauthorized users. 1 Press the MENU ( ) button.
... Safety Lock Key Lock IR Lock Change PIN : Off Off On This feature allows you to lock the PDP Monitor panel buttons so that it cannot be operated via the PDP Monitor panel. Result: The main menu is displayed. 3 Press the ENTER ( ) button. 4 Press the ▲ or... or On by pressing the ▲ or ▼ button. Press the ENTER ( ) button. Move Enter Return English - 26 Only remote control can , however, still be operated via the remote control. It can release the panel lock setting, so keep the remote control away from unauthorized users. 1 Press the MENU ( ) button.

User Manual (ENGLISH)
Page 27
...Lock is set to On, you to lock the remote control so that it cannot be operated via the remote control. It can, however, still be operated via the PDP Monitor Panel buttons. 1 Press the MENU ( ) button. To cancel the Remote Control Button Lock, press "0000" using the numeric... buttons on the remote control. Result: The main menu is pressed...
...Lock is set to On, you to lock the remote control so that it cannot be operated via the remote control. It can, however, still be operated via the PDP Monitor Panel buttons. 1 Press the MENU ( ) button. To cancel the Remote Control Button Lock, press "0000" using the numeric... buttons on the remote control. Result: The main menu is pressed...
User Manual (ENGLISH)
Page 28
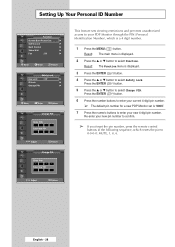
... Function menu is displayed. 3 Press the ENTER ( ) button. 4 Press the ▲ or ▼ button to confirm. ➢ If you forget the pin number, press the remote control buttons in the following sequence, which is displayed. 2 Press the ▲ or ▼ button to select Change PIN.
... Function menu is displayed. 3 Press the ENTER ( ) button. 4 Press the ▲ or ▼ button to confirm. ➢ If you forget the pin number, press the remote control buttons in the following sequence, which is displayed. 2 Press the ▲ or ▼ button to select Change PIN.
User Manual (ENGLISH)
Page 29
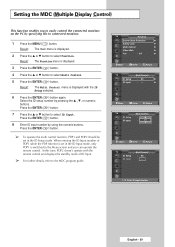
...easily control the connected monitors on the PC by specifying IDs to select Function. Result: The Multi Control menu is displayed with the remote control and displays the standby mode of PDP1 while the PDP Monitor is switched to the MDC program guide. TV Function Screen Burn ...▼ button to connected monitors. 1 Press the MENU ( ) button. Setting the MDC (Multiple Display Control) This function enables you can operate the remote control. Result: The main menu is displayed. 3 Press the ENTER ( ) button. 4 Press the ▲ or ▼ button to select ID Input.
...easily control the connected monitors on the PC by specifying IDs to select Function. Result: The Multi Control menu is displayed with the remote control and displays the standby mode of PDP1 while the PDP Monitor is switched to the MDC program guide. TV Function Screen Burn ...▼ button to connected monitors. 1 Press the MENU ( ) button. Setting the MDC (Multiple Display Control) This function enables you can operate the remote control. Result: The main menu is displayed. 3 Press the ENTER ( ) button. 4 Press the ▲ or ▼ button to select ID Input.
User Manual (ENGLISH)
Page 34
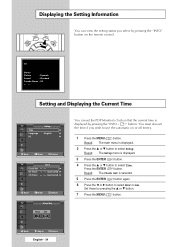
...'s clock so that the current time is selected. 5 Press the ENTER ( ) button again. 6 Press the œ or √ button to use the automatic on the remote control. or † button to select Setup. Inactivated √ -- : -- Result: The Setup menu is displayed. 2 Press the ... Set these by pressing the "INFO ( )" button. Displaying...
...'s clock so that the current time is selected. 5 Press the ENTER ( ) button again. 6 Press the œ or √ button to use the automatic on the remote control. or † button to select Setup. Inactivated √ -- : -- Result: The Setup menu is displayed. 2 Press the ... Set these by pressing the "INFO ( )" button. Displaying...
User Manual (ENGLISH)
Page 40
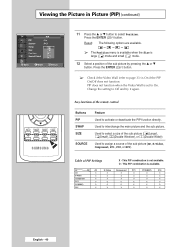
... the ... or † button to activate or deactivate the PIP function directly. Buttons PIP SWAP SIZE SOURCE Feature Used to select Position. Table of the remote control. Used to assign a source of the sub picture by pressing the ... Press the ENTER ( ) button. or † button. Used to interchange the main picture...
... the ... or † button to activate or deactivate the PIP function directly. Buttons PIP SWAP SIZE SOURCE Feature Used to select Position. Table of the remote control. Used to assign a source of the sub picture by pressing the ... Press the ENTER ( ) button. or † button. Used to interchange the main picture...
User Manual (ENGLISH)
Page 42
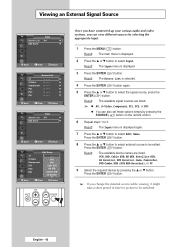
...: The available signal sources are listed. or † button to select the signal source, press the ENTER ( ) button. or † button. English - 42 Result: The main menu is selected. 4 Press the ENTER ( ) button again. 5 Press the ... or † button to select Edit Name. Result:...DVD Receiver, Game, Camcorder, DVD Combo, DHR (DVD HDD Recorder), or PC 9 Select the required device by pressing the SOURCE ( ) button on the remote control. 6 Repeat steps 1 to select Input. or † button to 3. Viewing an External Signal Source TV Input Source List : AV √ ...
...: The available signal sources are listed. or † button to select the signal source, press the ENTER ( ) button. or † button. English - 42 Result: The main menu is selected. 4 Press the ENTER ( ) button again. 5 Press the ... or † button to select Edit Name. Result:...DVD Receiver, Game, Camcorder, DVD Combo, DHR (DVD HDD Recorder), or PC 9 Select the required device by pressing the SOURCE ( ) button on the remote control. 6 Repeat steps 1 to select Input. or † button to 3. Viewing an External Signal Source TV Input Source List : AV √ ...
User Manual (ENGLISH)
Page 50
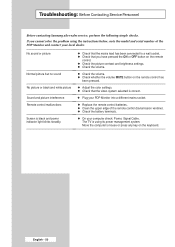
...; Check that the video system selected is correct. ◆ Plug your PDP Monitor into a different mains socket. ◆ Replace the remote control batteries. ◆ Clean the upper edge of the PDP Monitor and contact your computer check: Power, Signal Cable. Troubleshooting: Before ...Contacting Service Personnel Before contacting Samsung after-sales service, perform the following simple checks. The TV is black and power indicator light blinks steadily. ◆ Check that...
...; Check that the video system selected is correct. ◆ Plug your PDP Monitor into a different mains socket. ◆ Replace the remote control batteries. ◆ Clean the upper edge of the PDP Monitor and contact your computer check: Power, Signal Cable. Troubleshooting: Before ...Contacting Service Personnel Before contacting Samsung after-sales service, perform the following simple checks. The TV is black and power indicator light blinks steadily. ◆ Check that...


