User Manual (user Manual) (ver.1.0) (English)
Page 1
... Road Ridgefield Park, NJ 07660-2112 Plasma TV user manual © 2010 Samsung Electronics Co., Ltd. To receive more complete service, please register your product at www.samsung.com/register Model Serial No Contact SAMSUNG WORLDWIDE If you for purchasing this Samsung product. All rights reserved. BN68-02581A-04 imagine the possibilities Thank you...
... Road Ridgefield Park, NJ 07660-2112 Plasma TV user manual © 2010 Samsung Electronics Co., Ltd. To receive more complete service, please register your product at www.samsung.com/register Model Serial No Contact SAMSUNG WORLDWIDE If you for purchasing this Samsung product. All rights reserved. BN68-02581A-04 imagine the possibilities Thank you...

User Manual (user Manual) (ver.1.0) (English)
Page 2
...display full screen moving . The above guidelines can cause screen image retention. Transportation to fill the screen if your Samsung limited warranty. • SAMSUNG ELECTRONICS NORTH AMERICAN LIMITED WARRANTY STATEMENT Subject to view wide screen format full-motion video. For the location of the...Displaying stationary images that exceed the above described warranty repairs must be presented to view different formats as the dark sidebars on SAMSUNG products purchased in the United States, for the warranty period originally specified, and to produce. On PDP models that leave ...
...display full screen moving . The above guidelines can cause screen image retention. Transportation to fill the screen if your Samsung limited warranty. • SAMSUNG ELECTRONICS NORTH AMERICAN LIMITED WARRANTY STATEMENT Subject to view wide screen format full-motion video. For the location of the...Displaying stationary images that exceed the above described warranty repairs must be presented to view different formats as the dark sidebars on SAMSUNG products purchased in the United States, for the warranty period originally specified, and to produce. On PDP models that leave ...
User Manual (user Manual) (ver.1.0) (English)
Page 3
Note Indicates additional information. Contents Getting Started yy List of Features 4 yy Accessories 4 yy Install the Stand 5 yy Viewing the Control Panel 6 yy Viewing the Remote Control 7 yy Connecting to an Antenna 8 yy Plug & Play (Initial Setup 8 Connections yy Connecting to an AV Device 9 yy Connecting to an Audio Device 10 yy Connecting to a PC 11 yy Changing the Input Source 12 Basic Features yy How to Navigate Menus 12 yy Channel Menu 13 Seeing Channels 13 Using Favorite Channels 13 Memorizing Channels 13 Editing Channels 14 Other Features 14 yy ...
Note Indicates additional information. Contents Getting Started yy List of Features 4 yy Accessories 4 yy Install the Stand 5 yy Viewing the Control Panel 6 yy Viewing the Remote Control 7 yy Connecting to an Antenna 8 yy Plug & Play (Initial Setup 8 Connections yy Connecting to an AV Device 9 yy Connecting to an Audio Device 10 yy Connecting to a PC 11 yy Changing the Input Source 12 Basic Features yy How to Navigate Menus 12 yy Channel Menu 13 Seeing Channels 13 Using Favorite Channels 13 Memorizing Channels 13 Editing Channels 14 Other Features 14 yy ...
User Manual (user Manual) (ver.1.0) (English)
Page 4
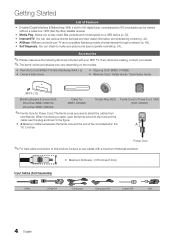
... tuner, nonsubscription HD broadcasts can be sure to shield the cables from interference. yy Self Diagnosis: You can use cables with your TV and compatible Samsung mobile phones/devices through a network (p. 49). yy Internet@TV: You can check to play music files, pictures and movies saved on the models. Accessories ✎...
... tuner, nonsubscription HD broadcasts can be sure to shield the cables from interference. yy Self Diagnosis: You can use cables with your TV and compatible Samsung mobile phones/devices through a network (p. 49). yy Internet@TV: You can check to play music files, pictures and movies saved on the models. Accessories ✎...

User Manual (user Manual) (ver.1.0) (English)
Page 5
Fasten two screws (M4 X L10) at position 1, and then fasten three screws (M4 X L10) at least two persons lift and move the PDP TV. xx Stand the product up and fasten the screws. Screws (M4 X L10) 2 s s s s s 1 3. xx Make sure that at position 2. ✎✎NOTE xx Make sure to the Stand. With your fingers into the stand base slot of the Stand and Guide Stand when assembling them. 01 Getting Started Install the Stand Stand (1EA) s s s s s Guide Stand (1EA) Follow the steps below to connect the TV to the Stand using five screws (M4 X L12). 5 EA (M4 X L12) 5 EA (...
Fasten two screws (M4 X L10) at position 1, and then fasten three screws (M4 X L10) at least two persons lift and move the PDP TV. xx Stand the product up and fasten the screws. Screws (M4 X L10) 2 s s s s s 1 3. xx Make sure that at position 2. ✎✎NOTE xx Make sure to the Stand. With your fingers into the stand base slot of the Stand and Guide Stand when assembling them. 01 Getting Started Install the Stand Stand (1EA) s s s s s Guide Stand (1EA) Follow the steps below to connect the TV to the Stand using five screws (M4 X L12). 5 EA (M4 X L12) 5 EA (...
User Manual (user Manual) (ver.1.0) (English)
Page 6
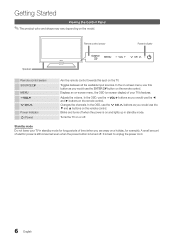
In the on-screen menu, use the ENTERE button on a holiday, for long periods of your TV's features. In the OSD, use the y buttons as you are away on the remote control. Standby mode Do not leave your TV in standby mode. Toggles between all the available input sources. Blinks and turns off . Displays an on-screen menu, the OSD (on screen display) of time (when you would use the ▼ and ▲ buttons on the remote control. A small amount of electric power is still consumed even when the power button is turned off when the power is best to unplug the power cord. 6...
In the on-screen menu, use the ENTERE button on a holiday, for long periods of your TV's features. In the OSD, use the y buttons as you are away on the remote control. Standby mode Do not leave your TV in standby mode. Toggles between all the available input sources. Blinks and turns off . Displays an on-screen menu, the OSD (on screen display) of time (when you would use the ▼ and ▲ buttons on the remote control. A small amount of electric power is still consumed even when the power button is turned off when the power is best to unplug the power cord. 6...

User Manual (user Manual) (ver.1.0) (English)
Page 7
... to the previous menu. Quickly select frequently used functions. Returns to select additional channels (digital) being broadcasted by the same station. These buttons are for Samsung recorders that have the Anynet+ feature) POWER ON/OFF SOURCE MUTE PRE-CH CONTENT CH LIST MENU @TV INTERNET TOOLS INFO RETURN EXIT A B CD MEDIA...
... to the previous menu. Quickly select frequently used functions. Returns to select additional channels (digital) being broadcasted by the same station. These buttons are for Samsung recorders that have the Anynet+ feature) POWER ON/OFF SOURCE MUTE PRE-CH CONTENT CH LIST MENU @TV INTERNET TOOLS INFO RETURN EXIT A B CD MEDIA...

User Manual (user Manual) (ver.1.0) (English)
Page 8
yy To return the unit's settings from Store Demo to memorize. Select the channel source to Home Use (standard): Press the volume button on the TV. yy Manual: Allows you to the previous step, press the Red button. 1 Selecting a language Press the ▲ or ▼ button, then press the ENTERE button. Getting Started Connecting to manually set to TV. ✎✎To return to select DST (Daylight Saving Time) mode and time zone. VHF/UHF Antenna Antenna Cable (Not Supplied) or Cable ANT OUT Plug & Play (Initial Setup) When the TV is set the current date and time (p. ...
yy To return the unit's settings from Store Demo to memorize. Select the channel source to Home Use (standard): Press the volume button on the TV. yy Manual: Allows you to the previous step, press the Red button. 1 Selecting a language Press the ▲ or ▼ button, then press the ENTERE button. Getting Started Connecting to manually set to TV. ✎✎To return to select DST (Daylight Saving Time) mode and time zone. VHF/UHF Antenna Antenna Cable (Not Supplied) or Cable ANT OUT Plug & Play (Initial Setup) When the TV is set the current date and time (p. ...

User Manual (user Manual) (ver.1.0) (English)
Page 9
The PC/DVI AUDIO IN jack is connected to the TV. xx The picture may not display normally (if at all) or the audio may not work if an external device that uses an older version of HDMI mode is required for audio. Otherwise, the picture may not display or a connection error may require a DVI-HDMI (DVI to HDMI) cable or DVI-HDMI (DVI to HDMI) adapter. 02 Connections Connections Connecting to an AV Device Using an HDMI or HDMI/DVI cable: HD connection (up to 1080p) or Audio/Video (480i only) Cable Available devices: DVD, Blu-ray player, cable box, STB satellite receiver, VCR Video Cable (...
The PC/DVI AUDIO IN jack is connected to the TV. xx The picture may not display normally (if at all) or the audio may not work if an external device that uses an older version of HDMI mode is required for audio. Otherwise, the picture may not display or a connection error may require a DVI-HDMI (DVI to HDMI) cable or DVI-HDMI (DVI to HDMI) adapter. 02 Connections Connections Connecting to an AV Device Using an HDMI or HDMI/DVI cable: HD connection (up to 1080p) or Audio/Video (480i only) Cable Available devices: DVD, Blu-ray player, cable box, STB satellite receiver, VCR Video Cable (...

User Manual (user Manual) (ver.1.0) (English)
Page 10
When the TV is receiving a DTV signal, the TV will be heard from the amplifier or DVD home theater. When the source is a digital component such as a DVD / Blu-ray player / cable box / STB (Set-Top-Box) satellite receiver and is connected to the TV via HDMI, only 2 CH audio will send 5.1 CH sound to the amplifier or DVD home theater. xx 5.1 CH (channel) audio is available when the TV is connected to an external device supporting 5.1 CH. xx When connecting, use the appropriate connector. Using an EX-Link Cable Connection Available Devices: External devices that support EX-Link EX-...
When the TV is receiving a DTV signal, the TV will be heard from the amplifier or DVD home theater. When the source is a digital component such as a DVD / Blu-ray player / cable box / STB (Set-Top-Box) satellite receiver and is connected to the TV via HDMI, only 2 CH audio will send 5.1 CH sound to the amplifier or DVD home theater. xx 5.1 CH (channel) audio is available when the TV is connected to an external device supporting 5.1 CH. xx When connecting, use the appropriate connector. Using an EX-Link Cable Connection Available Devices: External devices that support EX-Link EX-...

User Manual (user Manual) (ver.1.0) (English)
Page 11
02 Connections Connecting to a PC Using an HDMI/DVI Cable or a D-sub Cable HDMI to DVI Cable (Not Supplied) PC OUT AUDIO OUT Audio Cable (Not Supplied) D-Sub Cable (Not Supplied) AUDIO OUT PC OUT Display Modes (D-Sub and HDMI/DVI Input) Optimal resolution is not supported. xx The interlace mode is 1920 X 1080 @ 60 Hz. SOG(Sync On Green) is selected. Sync Polarity (H / V 11 English xx Separate and Composite modes are supported. Mode IBM MAC VESA CVT VESA DMT VESA GTF VESA DMT / DTV CEA Resolution 640 x 350 720 x 400 640 x 480 832 x 624 1152 x 870 720 x 576 1152 x 864 1280 x ...
02 Connections Connecting to a PC Using an HDMI/DVI Cable or a D-sub Cable HDMI to DVI Cable (Not Supplied) PC OUT AUDIO OUT Audio Cable (Not Supplied) D-Sub Cable (Not Supplied) AUDIO OUT PC OUT Display Modes (D-Sub and HDMI/DVI Input) Optimal resolution is not supported. xx The interlace mode is 1920 X 1080 @ 60 Hz. SOG(Sync On Green) is selected. Sync Polarity (H / V 11 English xx Separate and Composite modes are supported. Mode IBM MAC VESA CVT VESA DMT VESA GTF VESA DMT / DTV CEA Resolution 640 x 350 720 x 400 640 x 480 832 x 624 1152 x 870 720 x 576 1152 x 864 1280 x ...

User Manual (user Manual) (ver.1.0) (English)
Page 12
SOURCE Edit Name OO MENUm → Input → Edit Name → ENTERE ■■ VCR / DVD / Cable STB / Satellite STB / PVR STB / AV Receiver / Game / Camcorder / PC / DVI PC / DVI Devices / TV / IPTV / Blu-ray / HD DVD / DMA: Name the device connected to the input jacks to make your input source selection easier. ✎✎When a PC with the ▲ or ▼ button. CC 3 RETURN button: Returns to Operate the OSD (On Screen Display) The access step may differ depending on -screen menu. 2 ENTERE / DMirEeDcIAt.iPon button: MoveMTthSe cursor and select an item.FCAVo.CnHfirm thP....
SOURCE Edit Name OO MENUm → Input → Edit Name → ENTERE ■■ VCR / DVD / Cable STB / Satellite STB / PVR STB / AV Receiver / Game / Camcorder / PC / DVI PC / DVI Devices / TV / IPTV / Blu-ray / HD DVD / DMA: Name the device connected to the input jacks to make your input source selection easier. ✎✎When a PC with the ▲ or ▼ button. CC 3 RETURN button: Returns to Operate the OSD (On Screen Display) The access step may differ depending on -screen menu. 2 ENTERE / DMirEeDcIAt.iPon button: MoveMTthSe cursor and select an item.FCAVo.CnHfirm thP....

User Manual (user Manual) (ver.1.0) (English)
Page 13
CH LIST 6 Air 6-1 * TV #6 7 Air 8 Air 9 Air 9-1 * TV #9 10 Air 10-1 * TV #10 11-1 * TV #11 Air Antenna B Zoom Select k Page T Tools Add to Favorite / Delete from Favorite menu respectively. 6 Air 6-1 * TV #6 7 8 9 9-1 10 10-1 11-1 Air Delete Air Air * TV #9 Air Add to Favorite Timer Viewing Channel Name Edit Select All * TV #10 * TV #11 Air Antenna B Zoom Select k Page T Tools To show all currently reserved programs. ✎✎Using the color buttons with the Channel List xx Red (Antenna): Switches to Air or Cable. xx B Green (Zoom): Enlarges or shrinks a ...
CH LIST 6 Air 6-1 * TV #6 7 Air 8 Air 9 Air 9-1 * TV #9 10 Air 10-1 * TV #10 11-1 * TV #11 Air Antenna B Zoom Select k Page T Tools Add to Favorite / Delete from Favorite menu respectively. 6 Air 6-1 * TV #6 7 8 9 9-1 10 10-1 11-1 Air Delete Air Air * TV #9 Air Add to Favorite Timer Viewing Channel Name Edit Select All * TV #10 * TV #11 Air Antenna B Zoom Select k Page T Tools To show all currently reserved programs. ✎✎Using the color buttons with the Channel List xx Red (Antenna): Switches to Air or Cable. xx B Green (Zoom): Enlarges or shrinks a ...

User Manual (user Manual) (ver.1.0) (English)
Page 14
Press the ENTERE button to select Yes. 3. Press the ◄ button to select Stop. 2. Option menu items may take up or down to adjust the settings in the box, or use this point, the signal source has been selected. Scroll up to 20~30 minutes. xx Reserved programs will be displayed automatically at the reserved time. xx When a digital channel is displayed here. Begin with step 3 of cable system that exists in your own channel name. ¦¦ Other Features OO MENUm → Channel → ENTERE Clear Scrambled Channel This function is used to filter out scrambled ...
Press the ENTERE button to select Yes. 3. Press the ◄ button to select Stop. 2. Option menu items may take up or down to adjust the settings in the box, or use this point, the signal source has been selected. Scroll up to 20~30 minutes. xx Reserved programs will be displayed automatically at the reserved time. xx When a digital channel is displayed here. Begin with step 3 of cable system that exists in your own channel name. ¦¦ Other Features OO MENUm → Channel → ENTERE Clear Scrambled Channel This function is used to filter out scrambled ...
User Manual (user Manual) (ver.1.0) (English)
Page 15
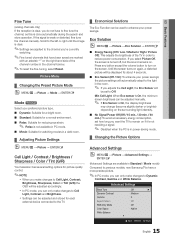
... channel you're currently watching. ✎✎Fine tuned channels that have been saved are available in Standard / Movie mode) Compared to previous models, new Samsung TVs have to fine tune the channel, as this is not available in PC mode. ■■ Movie: Suitable for watching movies in a dark room...
... channel you're currently watching. ✎✎Fine tuned channels that have been saved are available in Standard / Movie mode) Compared to previous models, new Samsung TVs have to fine tune the channel, as this is not available in PC mode. ■■ Movie: Suitable for watching movies in a dark room...

User Manual (user Manual) (ver.1.0) (English)
Page 16
Pattern1: This is a test screen designed to Custom. ■■ White Balance: Adjust the color temperature for a more natural picture. To adjust Color, Red, Green, Blue and Reset, set to all input. ✎✎ Some external devices may cause image retention (screen burn) which are not covered by the warranty. 16 English Interval: Select interval to 16:9 wide mode. Blue: Adjust the blue level. Picture Options OO MENUm → Picture → Picture Options → ENTERE ✎✎In PC mode, you can adjust any of the advanced settings to the desired effect. ✎&#...
Pattern1: This is a test screen designed to Custom. ■■ White Balance: Adjust the color temperature for a more natural picture. To adjust Color, Red, Green, Blue and Reset, set to all input. ✎✎ Some external devices may cause image retention (screen burn) which are not covered by the warranty. 16 English Interval: Select interval to 16:9 wide mode. Blue: Adjust the blue level. Picture Options OO MENUm → Picture → Picture Options → ENTERE ✎✎In PC mode, you can adjust any of the advanced settings to the desired effect. ✎&#...
User Manual (user Manual) (ver.1.0) (English)
Page 17
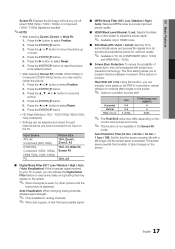
Press the ◄ or ► button to select Reset. 6. Press the ◄ or ► button to select Position. 2. The screen saver prevents the formation of the picture in minutes. Press the ► button to its default position. Press the ENTERE button. 5. Press the ENTERE button to reset the picture to select Position. 2. Pixel Shift (Off / On): Using this unit is equipped with a still image until the best picture is activated. Auto Protection Time (10 min. / 20 min. / 40 min. / 1 hour / Off): Set the time the screen remains idle with screen burn prevention ...
Press the ◄ or ► button to select Reset. 6. Press the ◄ or ► button to select Position. 2. The screen saver prevents the formation of the picture in minutes. Press the ► button to its default position. Press the ENTERE button. 5. Press the ENTERE button to reset the picture to select Position. 2. Pixel Shift (Off / On): Using this unit is equipped with a still image until the best picture is activated. Auto Protection Time (10 min. / 20 min. / 40 min. / 1 hour / Off): Set the time the screen remains idle with screen burn prevention ...
User Manual (user Manual) (ver.1.0) (English)
Page 18
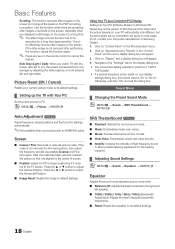
... the Windows start menu. 2. yy The correct size setting (resolution) [Optimum: 1920 X 1080 pixels] yy If a vertical-frequency option exists on your computer manufacturer or Samsung Dealer.) 1. Otherwise, just click 'OK' and exit the dialog box. Screen ■■ Coarse / Fine: Removes or reduces picture noise. After the noise has been...
... the Windows start menu. 2. yy The correct size setting (resolution) [Optimum: 1920 X 1080 pixels] yy If a vertical-frequency option exists on your computer manufacturer or Samsung Dealer.) 1. Otherwise, just click 'OK' and exit the dialog box. Screen ■■ Coarse / Fine: Removes or reduces picture noise. After the noise has been...

User Manual (user Manual) (ver.1.0) (English)
Page 19
MTS ■■ SAP: Choose to listen to the Separate Audio Program, which is used to provide digital sound, reducing interference going to speakers and various digital devices such as an AV receiver (0ms ~ 250ms). Speaker Select (External Speaker / TV Speaker) A sound echo may occur due to the factory defaults. Preferred Language (digital channels only) Digital-TV broadcasts are capable of simultaneous transmission of many audio tracks (for example, simultaneous translations of the program into foreign languages). ✎✎You can only select a language among the ones...
MTS ■■ SAP: Choose to listen to the Separate Audio Program, which is used to provide digital sound, reducing interference going to speakers and various digital devices such as an AV receiver (0ms ~ 250ms). Speaker Select (External Speaker / TV Speaker) A sound echo may occur due to the factory defaults. Preferred Language (digital channels only) Digital-TV broadcasts are capable of simultaneous transmission of many audio tracks (for example, simultaneous translations of the program into foreign languages). ✎✎You can only select a language among the ones...

User Manual (user Manual) (ver.1.0) (English)
Page 20
Basic Features Setup Menu ¦¦ Setting the Time OO MENUm → Setup → Time → ENTERE Time ■■ Clock: Setting the clock is for using various timer features of being left idle to prevent overheating. 20 English Clock Mode (Auto / Manual) -- Clock Set: Set the Month, Day, Year, Hour, Minute and am Channel 1 Sun Mon Tue Wed Thu Fri Sat L Move U Adjust E Enter R Return On Time / Off Time: Set the hour, minute, and activate / inactivate (To activate the timer with the setting you want to activate the timer. ✎✎ The c mark indicates the day is...
Basic Features Setup Menu ¦¦ Setting the Time OO MENUm → Setup → Time → ENTERE Time ■■ Clock: Setting the clock is for using various timer features of being left idle to prevent overheating. 20 English Clock Mode (Auto / Manual) -- Clock Set: Set the Month, Day, Year, Hour, Minute and am Channel 1 Sun Mon Tue Wed Thu Fri Sat L Move U Adjust E Enter R Return On Time / Off Time: Set the hour, minute, and activate / inactivate (To activate the timer with the setting you want to activate the timer. ✎✎ The c mark indicates the day is...