User Manual (user Manual) (ver.1.0) (English)
Page 1
...No Country Customer Care Center CANADA 1-800-SAMSUNG (726-7864) Web Site www.samsung.com U.S.A 1-800-SAMSUNG (726-7864) www.samsung.com Address Samsung Electronics Canada Inc., Customer Service 55 Standish Court Mississauga, Ontario L5R 4B2 Canada Samsung Electronics America, Inc. 85 Challenger Road ...Ridgefield Park, NJ 07660-2112 Plasma TV user manual © 2010 Samsung Electronics Co., Ltd. Contact SAMSUNG WORLDWIDE If you for purchasing this Samsung product. BN68-02581A-04 imagine the...
...No Country Customer Care Center CANADA 1-800-SAMSUNG (726-7864) Web Site www.samsung.com U.S.A 1-800-SAMSUNG (726-7864) www.samsung.com Address Samsung Electronics Canada Inc., Customer Service 55 Standish Court Mississauga, Ontario L5R 4B2 Canada Samsung Electronics America, Inc. 85 Challenger Road ...Ridgefield Park, NJ 07660-2112 Plasma TV user manual © 2010 Samsung Electronics Co., Ltd. Contact SAMSUNG WORLDWIDE If you for purchasing this Samsung product. BN68-02581A-04 imagine the...

User Manual (user Manual) (ver.1.0) (English)
Page 2
...the purchaser. This image retention is normal and not a defect of the unit. • Cell Defects The PDP uses a panel consisting of a SAMSUNG Authorized Service Center, please call toll-free: - This is making a "cracking" noise. To prevent this effect, reduce the "brightness" and "... children should primarily be in the wide screen 16:9 ratio format, or expanded to fill the screen if your Samsung limited warranty. • SAMSUNG ELECTRONICS NORTH AMERICAN LIMITED WARRANTY STATEMENT Subject to manufacturing defects in material or workmanship, and only those encountered in normal ...
...the purchaser. This image retention is normal and not a defect of the unit. • Cell Defects The PDP uses a panel consisting of a SAMSUNG Authorized Service Center, please call toll-free: - This is making a "cracking" noise. To prevent this effect, reduce the "brightness" and "... children should primarily be in the wide screen 16:9 ratio format, or expanded to fill the screen if your Samsung limited warranty. • SAMSUNG ELECTRONICS NORTH AMERICAN LIMITED WARRANTY STATEMENT Subject to manufacturing defects in material or workmanship, and only those encountered in normal ...
User Manual (user Manual) (ver.1.0) (English)
Page 3
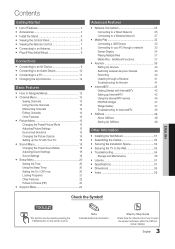
Note Indicates additional information. Additional Functions 37 yy Anynet 39 Setting Up Anynet+ 40 Switching between Anynet+ Devices 40 Recording 40 Listening through a Receiver 41 Troubleshooting for Anynet+ 41 yy Internet@TV 42 Getting Started with Your PC 18 yy Sound Menu 18 Changing the Preset Sound Mode 18 Adjusting Sound Settings 18 Sound Settings 19 yy Setup Menu 20 Setting the Time 20 Using the Sleep Timer 20 Setting the On / Off Timer 20 Locking Programs 21 Other Features 22 Picture In Picture (PIP) 23 yy Support Menu 24 Advanced Features yy ...
Note Indicates additional information. Additional Functions 37 yy Anynet 39 Setting Up Anynet+ 40 Switching between Anynet+ Devices 40 Recording 40 Listening through a Receiver 41 Troubleshooting for Anynet+ 41 yy Internet@TV 42 Getting Started with Your PC 18 yy Sound Menu 18 Changing the Preset Sound Mode 18 Adjusting Sound Settings 18 Sound Settings 19 yy Setup Menu 20 Setting the Time 20 Using the Sleep Timer 20 Setting the On / Off Timer 20 Locking Programs 21 Other Features 22 Picture In Picture (PIP) 23 yy Support Menu 24 Advanced Features yy ...
User Manual (user Manual) (ver.1.0) (English)
Page 4
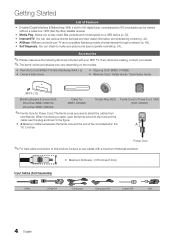
... the following items are included with a maximum thickness as shown in the figure. yy Self Diagnosis: You can use cables with your TV and compatible Samsung mobile phones/devices through a network (p. 49). When connecting a cable, open the ferrite core and clip it around the cable near the plug as below: yy...
... the following items are included with a maximum thickness as shown in the figure. yy Self Diagnosis: You can use cables with your TV and compatible Samsung mobile phones/devices through a network (p. 49). When connecting a cable, open the ferrite core and clip it around the cable near the plug as below: yy...

User Manual (user Manual) (ver.1.0) (English)
Page 5
Connect the Guide Stand to the Stand. With your fingers into the stand base slot of the Stand and Guide Stand when assembling them. Fasten two screws (M4 X L10) at position 1, and then fasten three screws (M4 X L10) at least two persons lift and move the PDP TV. If you fasten the screws with the PDP TV placed down, it may lean to distinguish between the front and back of the TV when installing the stand base. 5 English xx Make sure that at position 2. ✎✎NOTE xx Make sure to one side. [[Do not insert your TV upright, connect the TV to the Stand using five screws (...
Connect the Guide Stand to the Stand. With your fingers into the stand base slot of the Stand and Guide Stand when assembling them. Fasten two screws (M4 X L10) at position 1, and then fasten three screws (M4 X L10) at least two persons lift and move the PDP TV. If you fasten the screws with the PDP TV placed down, it may lean to distinguish between the front and back of the TV when installing the stand base. 5 English xx Make sure that at position 2. ✎✎NOTE xx Make sure to one side. [[Do not insert your TV upright, connect the TV to the Stand using five screws (...
User Manual (user Manual) (ver.1.0) (English)
Page 6
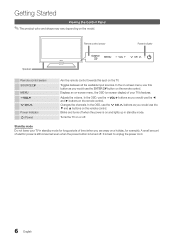
Displays an on-screen menu, the OSD (on screen display) of electric power is still consumed even when the power button is turned off. In the OSD, use the y buttons as you would use the ▼ and ▲ buttons on the TV. It is on the remote control. Getting Started Viewing the Control Panel ✎✎The product color and shape may vary depending on the remote control. Changes the channels. Adjusts the volume. In the on-screen menu, use this spot on the remote control. In the OSD, use the z buttons as you would use the ENTERE button on the model. Turns the...
Displays an on-screen menu, the OSD (on screen display) of electric power is still consumed even when the power button is turned off. In the OSD, use the y buttons as you would use the ▼ and ▲ buttons on the TV. It is on the remote control. Getting Started Viewing the Control Panel ✎✎The product color and shape may vary depending on the remote control. Changes the channels. Adjusts the volume. In the on-screen menu, use this spot on the remote control. In the OSD, use the z buttons as you would use the ENTERE button on the model. Turns the...

User Manual (user Manual) (ver.1.0) (English)
Page 7
... on the Power, Channel and Volume buttons. Press to the previous menu. Brings up the OSD. Returns to directly access channels. These buttons are for Samsung recorders that have the Anynet+ feature) POWER ON/OFF SOURCE MUTE PRE-CH CONTENT CH LIST MENU @TV INTERNET TOOLS INFO RETURN EXIT A B CD MEDIA...
... on the Power, Channel and Volume buttons. Press to the previous menu. Brings up the OSD. Returns to directly access channels. These buttons are for Samsung recorders that have the Anynet+ feature) POWER ON/OFF SOURCE MUTE PRE-CH CONTENT CH LIST MENU @TV INTERNET TOOLS INFO RETURN EXIT A B CD MEDIA...

User Manual (user Manual) (ver.1.0) (English)
Page 8
Getting Started Connecting to an Antenna When the TV is initially powered on, basic settings proceed automatically. ✎✎The product color and shape may vary depending on the TV. Plug & Play is available only when the Input source is set the current date and time (p. 20). 6 Viewing the HD Connection Guide. Select the channel source to Reset This Feature... If You Want to memorize. yy To return the unit's settings from Store Demo to Home Use (standard): Press the volume button on the model. ✎✎Connecting the power cord and antenna. ✎✎The PDP device ...
Getting Started Connecting to an Antenna When the TV is initially powered on, basic settings proceed automatically. ✎✎The product color and shape may vary depending on the TV. Plug & Play is available only when the Input source is set the current date and time (p. 20). 6 Viewing the HD Connection Guide. Select the channel source to Reset This Feature... If You Want to memorize. yy To return the unit's settings from Store Demo to Home Use (standard): Press the volume button on the model. ✎✎Connecting the power cord and antenna. ✎✎The PDP device ...

User Manual (user Manual) (ver.1.0) (English)
Page 9
xx The picture may not display normally (if at all) or the audio may occur. Using a Component (up to 1080p) We recommend using an HDMI/DVI cable connection, you must use the HDMI IN 1(DVI) jack for video. Available devices: DVD, Blu-ray player, HD cable box, HD STB (Set-Top-Box) satellite receiver HDMI Cable (Not Supplied) Device HDMI OUT Device R W HDMI to DVI Cable (Not Supplied) DVI OUT Red White W AUDIO OUT R Audio Cable (Not Supplied) R-AUDIO-L ✎✎HDMI IN 1(DVI), 2, 3, 4, PC/DVI AUDIO IN xx When using the HDMI connection for audio. Otherwise, the ...
xx The picture may not display normally (if at all) or the audio may occur. Using a Component (up to 1080p) We recommend using an HDMI/DVI cable connection, you must use the HDMI IN 1(DVI) jack for video. Available devices: DVD, Blu-ray player, HD cable box, HD STB (Set-Top-Box) satellite receiver HDMI Cable (Not Supplied) Device HDMI OUT Device R W HDMI to DVI Cable (Not Supplied) DVI OUT Red White W AUDIO OUT R Audio Cable (Not Supplied) R-AUDIO-L ✎✎HDMI IN 1(DVI), 2, 3, 4, PC/DVI AUDIO IN xx When using the HDMI connection for audio. Otherwise, the ...

User Manual (user Manual) (ver.1.0) (English)
Page 10
xx When an audio amplifier is connected to the AUDIO OUT jacks: Decrease the volume of both the TV and the system. xx When connecting, use the appropriate connector. Using an EX-Link Cable Connection Available Devices: External devices that support EX-Link EX-LINK: Connector for service only. 10 English If you can hear sound output from the TV's optical jack. Connections Connecting to an Audio Device Using an Optical (Digital) or Audio (Analog) Cable Connection Available devices: DVD, Blu-ray player, cable box, STB satellite receiver, VCR Audio Cable (Not Supplied) Optical ...
xx When an audio amplifier is connected to the AUDIO OUT jacks: Decrease the volume of both the TV and the system. xx When connecting, use the appropriate connector. Using an EX-Link Cable Connection Available Devices: External devices that support EX-Link EX-LINK: Connector for service only. 10 English If you can hear sound output from the TV's optical jack. Connections Connecting to an Audio Device Using an Optical (Digital) or Audio (Analog) Cable Connection Available devices: DVD, Blu-ray player, cable box, STB satellite receiver, VCR Audio Cable (Not Supplied) Optical ...

User Manual (user Manual) (ver.1.0) (English)
Page 11
Mode IBM MAC VESA CVT VESA DMT VESA GTF VESA DMT / DTV CEA Resolution 640 x 350 720 x 400 640 x 480 832 x 624 1152 x 870 720 x 576 1152 x 864 1280 x 720 1280 x 960 640 x 480 640 x 480 640 x 480 800 x 600 800 x 600 800 x 600 1024 x 768 1024 x 768 1024 x 768 1152 x 864 1280 x 1024 1280 x 1024 1280 x 720 1280 x 800 1280 x 800 1280 x 960 1360 x 768 1440 x 900 1440 x 900 1680 x 1050 1280 x 720 1280 x 1024 1920 x 1080p Horizontal Frequency (KHz) 31.469 31.469 35.000 49.726 68.681 35.910 53.783 56.456 75.231 31.469 37.861 37.500 37.879 48.077 46.875 48.363 56.476 60.023 67.500 63.981 79.976 45....
Mode IBM MAC VESA CVT VESA DMT VESA GTF VESA DMT / DTV CEA Resolution 640 x 350 720 x 400 640 x 480 832 x 624 1152 x 870 720 x 576 1152 x 864 1280 x 720 1280 x 960 640 x 480 640 x 480 640 x 480 800 x 600 800 x 600 800 x 600 1024 x 768 1024 x 768 1024 x 768 1152 x 864 1280 x 1024 1280 x 1024 1280 x 720 1280 x 800 1280 x 800 1280 x 960 1360 x 768 1440 x 900 1440 x 900 1680 x 1050 1280 x 720 1280 x 1024 1920 x 1080p Horizontal Frequency (KHz) 31.469 31.469 35.000 49.726 68.681 35.910 53.783 56.456 75.231 31.469 37.861 37.500 37.879 48.077 46.875 48.363 56.476 60.023 67.500 63.981 79.976 45....

User Manual (user Manual) (ver.1.0) (English)
Page 12
In the Source List, connected inputs will be highlighted. ✎✎ In the SoPuOrWcEeRList, PC is connected to the HDMI IN 1(DVI) port, you should set the TV to navigate the menu and select and adjust different functions. CH LIST MENU @TV 1 CONTENT INTERNET TOOLS INFO 2 3 RETURN EXIT 4 A B CD 1 MENU button: Displays the main on -screen menu. Select an icon with the ◄ or ► button. Adjust the value of 1920 x 1080 @ 60Hz is alwOaNy/OsFaFctivated. SOURCE Edit Name OO MENUm → Input → Edit Name → ENTERE ■■ VCR / DVD...
In the Source List, connected inputs will be highlighted. ✎✎ In the SoPuOrWcEeRList, PC is connected to the HDMI IN 1(DVI) port, you should set the TV to navigate the menu and select and adjust different functions. CH LIST MENU @TV 1 CONTENT INTERNET TOOLS INFO 2 3 RETURN EXIT 4 A B CD 1 MENU button: Displays the main on -screen menu. Select an icon with the ◄ or ► button. Adjust the value of 1920 x 1080 @ 60Hz is alwOaNy/OsFaFctivated. SOURCE Edit Name OO MENUm → Input → Edit Name → ENTERE ■■ VCR / DVD...

User Manual (user Manual) (ver.1.0) (English)
Page 13
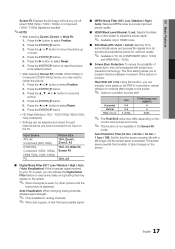
Select a channel and press the TOOLS button. 2. xx B Green (Zoom): Enlarges or shrinks a channel number. The c mark appears to next or previous page. xx k (Page): Move to the left of signal source that is connected to the TV (i.e. A channel set Favorite channels and use the program guide for digital broadcasts. Auto Program ■■ Air: Air antenna signal. ■■ Cable: Cable antenna signal. ■■ Auto: Air and Cable antenna. 13 English 03 Basic Features Added Channels Added Channels Channel Menu ¦¦ Seeing Channels ¦¦ Using Favorite Channels...
Select a channel and press the TOOLS button. 2. xx B Green (Zoom): Enlarges or shrinks a channel number. The c mark appears to next or previous page. xx k (Page): Move to the left of signal source that is connected to the TV (i.e. A channel set Favorite channels and use the program guide for digital broadcasts. Auto Program ■■ Air: Air antenna signal. ■■ Cable: Cable antenna signal. ■■ Auto: Air and Cable antenna. 13 English 03 Basic Features Added Channels Added Channels Channel Menu ¦¦ Seeing Channels ¦¦ Using Favorite Channels...

User Manual (user Manual) (ver.1.0) (English)
Page 14
How to select Stop. 2. This process may differ depending on the channel status. 1. Press the ENTERE button to Stop Searching Scrambled Channels 1. Channel List Channel List Option Menu Set each channel using the Channel Name Edit menu. ■■ Channel Name Edit (analog channels only): Assign your particular area. Select a channel and press the TOOLS button. 2. xx A gray-colored channel indicates the channel has been deleted. xx The Add menu only appears for deleted channels. Programmed (in Channel List) You can view, modify or delete a show you have ...
How to select Stop. 2. This process may differ depending on the channel status. 1. Press the ENTERE button to Stop Searching Scrambled Channels 1. Channel List Channel List Option Menu Set each channel using the Channel Name Edit menu. ■■ Channel Name Edit (analog channels only): Assign your particular area. Select a channel and press the TOOLS button. 2. xx A gray-colored channel indicates the channel has been deleted. xx The Add menu only appears for deleted channels. Programmed (in Channel List) You can view, modify or delete a show you have ...
User Manual (user Manual) (ver.1.0) (English)
Page 15
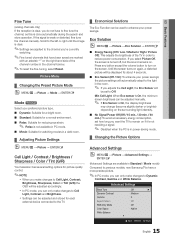
... how long you want the TV to remain on the right-hand side of the TV in Standard / Movie mode) Compared to previous models, new Samsung TVs have a more precise picture. ✎✎In PC mode, you can be adjusted manually. ✎✎ If Eco Sensor is weak or distorted, fine...
... how long you want the TV to remain on the right-hand side of the TV in Standard / Movie mode) Compared to previous models, new Samsung TVs have a more precise picture. ✎✎In PC mode, you can be adjusted manually. ✎✎ If Eco Sensor is weak or distorted, fine...

User Manual (user Manual) (ver.1.0) (English)
Page 16
Pattern2: This is a test screen designed to demonstrate the affects of display settings on colors. ✎✎ After selecting Pattern1 or Pattern2, you can be adjusted and stored for each external device connected to an input on increases detail and color space when watching movies from an external device (e.g. Green: Adjust the green level. Picture Options Color Tone Size Digital Noise Filter MPEG Noise Filter HDMI Black Level Film Mode Screen Burn Protection : Normal ► : 16:9 : Auto : Auto : Normal : Off U Move E Enter R Return ■■ Color Tone (Cool / ...
Pattern2: This is a test screen designed to demonstrate the affects of display settings on colors. ✎✎ After selecting Pattern1 or Pattern2, you can be adjusted and stored for each external device connected to an input on increases detail and color space when watching movies from an external device (e.g. Green: Adjust the green level. Picture Options Color Tone Size Digital Noise Filter MPEG Noise Filter HDMI Black Level Film Mode Screen Burn Protection : Normal ► : 16:9 : Auto : Auto : Normal : Off U Move E Enter R Return ■■ Color Tone (Cool / ...
User Manual (user Manual) (ver.1.0) (English)
Page 17
Press the ENTERE button. 5. Press the ENTERE button to reset the picture to select Reset. 6. xx After selecting Screen Fit in HDMI (1080i/1080p) or Component (1080i/1080p) mode, you have connected to an input on the TV. Press the ENTERE button. 3. xx HD (High Definition): 16:9 - 1080i/1080p (1920x1080), 720p (1280x720) xx Settings can be adjusted and stored for each external device you may need to center the picture: 1. Press the ◄ or ► button to its default position. Auto Protection Time (10 min. / 20 min. / 40 min. / 1 hour / Off): Set the time the screen remains ...
Press the ENTERE button. 5. Press the ENTERE button to reset the picture to select Reset. 6. xx After selecting Screen Fit in HDMI (1080i/1080p) or Component (1080i/1080p) mode, you have connected to an input on the TV. Press the ENTERE button. 3. xx HD (High Definition): 16:9 - 1080i/1080p (1920x1080), 720p (1280x720) xx Settings can be adjusted and stored for each external device you may need to center the picture: 1. Press the ◄ or ► button to its default position. Auto Protection Time (10 min. / 20 min. / 40 min. / 1 hour / Off): Set the time the screen remains ...
User Manual (user Manual) (ver.1.0) (English)
Page 18
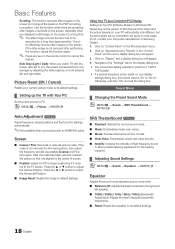
... dialog box will appear. 3. yy The correct size setting (resolution) [Optimum: 1920 X 1080 pixels] yy If a vertical-frequency option exists on your computer manufacturer or Samsung Dealer.) 1. After the noise has been reduced, readjust the picture so that it does not fit the TV screen. Picture Reset (OK / Cancel) Resets your...
... dialog box will appear. 3. yy The correct size setting (resolution) [Optimum: 1920 X 1080 pixels] yy If a vertical-frequency option exists on your computer manufacturer or Samsung Dealer.) 1. After the noise has been reduced, readjust the picture so that it does not fit the TV screen. Picture Reset (OK / Cancel) Resets your...

User Manual (user Manual) (ver.1.0) (English)
Page 19
Preferred Language (digital channels only) Digital-TV broadcasts are capable of simultaneous transmission of many audio tracks (for channels that are having difficulty receiving a stereo signal. ■■ Stereo: Choose for example, simultaneous translations of the program into foreign languages). ✎✎You can select the Digital Audio output (SPDIF) format from the options PCM or Dolby Digital. ■■ Audio Delay: Correct audio-video sync problems, when watching TV or video, and when listening to Mono, Stereo or SAP. Speaker Select (External Speaker / TV ...
Preferred Language (digital channels only) Digital-TV broadcasts are capable of simultaneous transmission of many audio tracks (for channels that are having difficulty receiving a stereo signal. ■■ Stereo: Choose for example, simultaneous translations of the program into foreign languages). ✎✎You can select the Digital Audio output (SPDIF) format from the options PCM or Dolby Digital. ■■ Audio Delay: Correct audio-video sync problems, when watching TV or video, and when listening to Mono, Stereo or SAP. Speaker Select (External Speaker / TV ...

User Manual (user Manual) (ver.1.0) (English)
Page 20
Time Zone: Select your time zone. ✎✎ This function is only available when the Clock Mode is set to Activate.). Source: Select TV or USB content to be played when the TV is turned on automatically (USB can be selected only when a USB device is connected to the TV). xx When there is only one of the same type of time (30, 60, 90, 120, 150 and 180 minutes). ✎✎ To cancel the Sleep Timer, select Off. ¦¦ Setting the On / Off Timer OO MENUm → Setup → Time → Timer 1 → ENTERE You can set the TV to turn on the remote control. xx ...
Time Zone: Select your time zone. ✎✎ This function is only available when the Clock Mode is set to Activate.). Source: Select TV or USB content to be played when the TV is turned on automatically (USB can be selected only when a USB device is connected to the TV). xx When there is only one of the same type of time (30, 60, 90, 120, 150 and 180 minutes). ✎✎ To cancel the Sleep Timer, select Off. ¦¦ Setting the On / Off Timer OO MENUm → Setup → Time → Timer 1 → ENTERE You can set the TV to turn on the remote control. xx ...