User Manual (ENGLISH)
Page 1
...Canada Inc., Customer Service 55 Standish Court Mississauga, Ontario L5R 4B2 Canada Samsung Electronique Canada Inc., Service à la Clientèle 55 Standish Court Mississauga, Ontario L5R 4B2 Canada Plasma TV user manual BN68-850_Eng.indb 1 BN68-02271A-02 imagine the possibilities ...Thank you have any questions or comments relating to Samsung products, please contact the SAMSUNG customer care center. Contact SAMSUNG WORLD-WIDE If you for purchasing this...
...Canada Inc., Customer Service 55 Standish Court Mississauga, Ontario L5R 4B2 Canada Samsung Electronique Canada Inc., Service à la Clientèle 55 Standish Court Mississauga, Ontario L5R 4B2 Canada Plasma TV user manual BN68-850_Eng.indb 1 BN68-02271A-02 imagine the possibilities ...Thank you have any questions or comments relating to Samsung products, please contact the SAMSUNG customer care center. Contact SAMSUNG WORLD-WIDE If you for purchasing this...
User Manual (ENGLISH)
Page 3
...permanent damage to the PDP Panel. This is not covered by the Warranty. However, there may be hot after -images. Avoid operating the TV at heights under 6500ft. Warranty Warranty does not cover any defect or operation failure of the product. Displaying still images from touching the upper ...reduce the degree of brightness and contrast of time may occur when the product contracts or expands due to the screen. Watching the Plasma TV in the upper part of the product. Damages caused by the above effect are not covered by the warranty. To avoid such image retention...
...permanent damage to the PDP Panel. This is not covered by the Warranty. However, there may be hot after -images. Avoid operating the TV at heights under 6500ft. Warranty Warranty does not cover any defect or operation failure of the product. Displaying still images from touching the upper ...reduce the degree of brightness and contrast of time may occur when the product contracts or expands due to the screen. Watching the Plasma TV in the upper part of the product. Damages caused by the above effect are not covered by the warranty. To avoid such image retention...
User Manual (ENGLISH)
Page 4
...;■ Viewing the Connection Panel 7 ■■ Remote Control 9 Connections ■■ Connecting VHF and UHF Antennas 10 ■■ Connecting Cable TV 10 ■■ Connecting a DVD / Blu-ray Player or Cable Box / Satellite receiver (Set-Top Box) via HDMI 12 ■■ Connecting...9632;■ Preparation before installing the Wall-Mount 87 ■■ How to attach the Stand-Base 87 ■■ Securing the TV to the Wall 88 ■■ Wall Mount Kit Specifications (VESA 89 ■■ Specifications 90 ■■ Dimensions (PN50B850Y1F/...
...;■ Viewing the Connection Panel 7 ■■ Remote Control 9 Connections ■■ Connecting VHF and UHF Antennas 10 ■■ Connecting Cable TV 10 ■■ Connecting a DVD / Blu-ray Player or Cable Box / Satellite receiver (Set-Top Box) via HDMI 12 ■■ Connecting...9632;■ Preparation before installing the Wall-Mount 87 ■■ How to attach the Stand-Base 87 ■■ Securing the TV to the Wall 88 ■■ Wall Mount Kit Specifications (VESA 89 ■■ Specifications 90 ■■ Dimensions (PN50B850Y1F/...
User Manual (ENGLISH)
Page 5
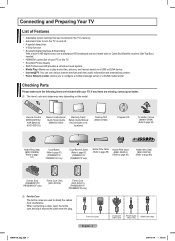
... Owner's Instructions / Quick Setup Guide (BN68-02135A) Warranty Card / Safety Guide Manual (Not available in all locations) Cleaning Cloth (BN63-01798B) Program CD TV-Holder / Screw (BN96-10788A) (Refer to page 88) Holder-Ring (4ea) (BN61-05280A) (Refer to page 87) Cover-Bottom (Refer to page 87...items are used to shield the cables from interference. If any items are missing, contact your dealer. Connecting and Preparing Your TV List of your PC to this TV. •• Excellent Picture Quality •• SRS TruSurround HD provides a virtual surround system. •• Media...
... Owner's Instructions / Quick Setup Guide (BN68-02135A) Warranty Card / Safety Guide Manual (Not available in all locations) Cleaning Cloth (BN63-01798B) Program CD TV-Holder / Screw (BN96-10788A) (Refer to page 88) Holder-Ring (4ea) (BN61-05280A) (Refer to page 87) Cover-Bottom (Refer to page 87...items are used to shield the cables from interference. If any items are missing, contact your dealer. Connecting and Preparing Your TV List of your PC to this TV. •• Excellent Picture Quality •• SRS TruSurround HD provides a virtual surround system. •• Media...
User Manual (ENGLISH)
Page 6
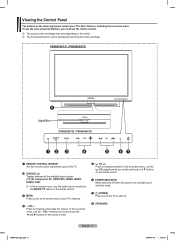
... on the remote control. 6 POWER INDICATOR Blinks and turns off when the power is on and lights up in stand-by touching them with your TV's basic features, including the on-screen menu. VOL + buttons as you would use the ENTERE button on the remote control. 3 MENU Press to change ...channels. NN The product color and shape may vary depending on the TV. 2 SOURCE Toggles between all the available input sources (TV, AV, Component, PC, HDMI1/DVI, HDMI2, HDMI3, HDMI4, USB). NN In the on-screen menu, use the remote control. NN ...
... on the remote control. 6 POWER INDICATOR Blinks and turns off when the power is on and lights up in stand-by touching them with your TV's basic features, including the on-screen menu. VOL + buttons as you would use the ENTERE button on the remote control. 3 MENU Press to change ...channels. NN The product color and shape may vary depending on the TV. 2 SOURCE Toggles between all the available input sources (TV, AV, Component, PC, HDMI1/DVI, HDMI2, HDMI3, HDMI4, USB). NN In the on-screen menu, use the remote control. NN ...
User Manual (ENGLISH)
Page 7
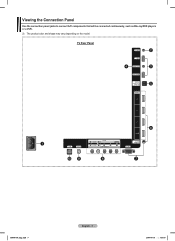
Viewing the Connection Panel Use the connection panel jacks to connect A/V components that will be connected continuously, such as Blu-ray/DVD players or a VCR. NN The product color and shape may vary depending on the model. TV Rear Panel BN68-850_Eng.indb 7 English - 7 2009-06-18 �� 3:55:05
Viewing the Connection Panel Use the connection panel jacks to connect A/V components that will be connected continuously, such as Blu-ray/DVD players or a VCR. NN The product color and shape may vary depending on the model. TV Rear Panel BN68-850_Eng.indb 7 English - 7 2009-06-18 �� 3:55:05
User Manual (ENGLISH)
Page 9
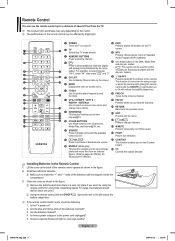
...TV mode directly. % MTS 3 NUMERIC BUTTONS Press to select channel "54-3", press "54", then press " " and "3". For example, to select a channel. control with the ON/OFF( ) light button set to On will reduce the battery usage time.) Use to quickly select frequently used to control recording on Samsung...channels (digital and analog) being broadcast by bright light. NN Remove the batteries and store them in the Remote Control 1. Is the TV power on the TV 2 TV screen. Are the batteries drained? 4. English - 9 BN68-850_Eng.indb 9 2009-06-18 �� 3:55:06 This ...
...TV mode directly. % MTS 3 NUMERIC BUTTONS Press to select channel "54-3", press "54", then press " " and "3". For example, to select a channel. control with the ON/OFF( ) light button set to On will reduce the battery usage time.) Use to quickly select frequently used to control recording on Samsung...channels (digital and analog) being broadcast by bright light. NN Remove the batteries and store them in the Remote Control 1. Is the TV power on the TV 2 TV screen. Are the batteries drained? 4. English - 9 BN68-850_Eng.indb 9 2009-06-18 �� 3:55:06 This ...

User Manual (ENGLISH)
Page 10
... your antenna has a set of the back panel. Plug the combiner into the ANT IN terminal on the back of the TV. Connecting Cable TV To connect to a cable TV system, follow the directions below . ❑❑ Cable without a Cable Box Plug the incoming cable into the ANT IN ... to the combiner. 2. This procedure requires an optional combiner-adaptor (available at most electronics shops). 1. Connect the other end of this TV is connected to the TV. Find the cable that Descrambles All Channels 1. Place the wires from the twin leads under the screws on your antenna has one UHF...
... your antenna has a set of the back panel. Plug the combiner into the ANT IN terminal on the back of the TV. Connecting Cable TV To connect to a cable TV system, follow the directions below . ❑❑ Cable without a Cable Box Plug the incoming cable into the ANT IN ... to the combiner. 2. This procedure requires an optional combiner-adaptor (available at most electronics shops). 1. Connect the other end of this TV is connected to the TV. Find the cable that Descrambles All Channels 1. Place the wires from the twin leads under the screws on your antenna has one UHF...
User Manual (ENGLISH)
Page 11
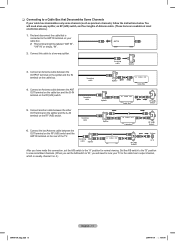
... available at most electronics stores.) 1. Set the A/B switch to the "B" position to view scrambled channels. (When you will need to tune your TV to the cable box's output channel, which is connected to a two-way splitter. Connect an Antenna cable between the OUT terminal on the RF...; Connecting to the "A" position for normal viewing. You will need a two-way splitter, an RF (A/B) switch, and four lengths of the TV. Find and disconnect the cable that Descrambles Some Channels If your cable box. Incoming cable Splitter IN CABLE OUT Cable Box Incoming cable Splitter IN...
... available at most electronics stores.) 1. Set the A/B switch to the "B" position to view scrambled channels. (When you will need to tune your TV to the cable box's output channel, which is connected to a two-way splitter. Connect an Antenna cable between the OUT terminal on the RF...; Connecting to the "A" position for normal viewing. You will need a two-way splitter, an RF (A/B) switch, and four lengths of the TV. Find and disconnect the cable that Descrambles Some Channels If your cable box. Incoming cable Splitter IN CABLE OUT Cable Box Incoming cable Splitter IN...
User Manual (ENGLISH)
Page 12
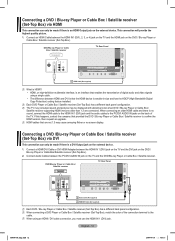
... Box/Satellite receiver (Set-Top Box). 2. NN When using a single cable. •• The difference between the HDMI IN1 (DVI), 2, 3, or 4) jack on the TV and the HDMI jack on the DVD / Blu-ray Player or Cable Box / Satellite receiver (Set-Top Box). English - 12 BN68-850_Eng.indb 12 2009.... 1. NN HDMI cables that are connected. NN When connecting a DVD Player or Cable Box / Satellite receiver (Set-Top Box), match the color of the TV. Connecting a DVD / Blu-ray Player or Cable Box / Satellite receiver (Set-Top Box) via DVI This connection can only be made if there is an...
... Box/Satellite receiver (Set-Top Box). 2. NN When using a single cable. •• The difference between the HDMI IN1 (DVI), 2, 3, or 4) jack on the TV and the HDMI jack on the DVD / Blu-ray Player or Cable Box / Satellite receiver (Set-Top Box). English - 12 BN68-850_Eng.indb 12 2009.... 1. NN HDMI cables that are connected. NN When connecting a DVD Player or Cable Box / Satellite receiver (Set-Top Box), match the color of the TV. Connecting a DVD / Blu-ray Player or Cable Box / Satellite receiver (Set-Top Box) via DVI This connection can only be made if there is an...
User Manual (ENGLISH)
Page 13
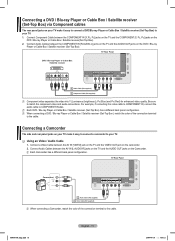
... Box / Satellite receiver (Set-Top Box) has a different back panel configuration. Connect Audio Cables between the COMPONENT IN [Y, PB, PR] jacks on the TV and the COMPONENT [Y, PB, PR] jacks on the DVD / Blu-ray Player or Cable Box / Satellite receiver(Set-Top Box). 2. BN68-850_Eng.indb ...13 English - 13 2009-06-18 �� 3:55:12 TV Rear Panel DVD / Blu-ray Player or Cable Box / Satellite receiver 2 Audio Cable (Not supplied) 1 Component Cable (Not supplied) NN Component video separates the...
... Box / Satellite receiver (Set-Top Box) has a different back panel configuration. Connect Audio Cables between the COMPONENT IN [Y, PB, PR] jacks on the TV and the COMPONENT [Y, PB, PR] jacks on the DVD / Blu-ray Player or Cable Box / Satellite receiver(Set-Top Box). 2. BN68-850_Eng.indb ...13 English - 13 2009-06-18 �� 3:55:12 TV Rear Panel DVD / Blu-ray Player or Cable Box / Satellite receiver 2 Audio Cable (Not supplied) 1 Component Cable (Not supplied) NN Component video separates the...
User Manual (ENGLISH)
Page 14
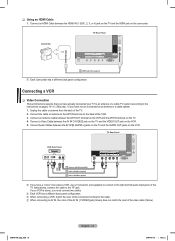
... AV IN [Y/VIDEO] jack (Green) does not match the color of the VCR. 3. Connect an Antenna Cable between the AV IN [R-AUDIO-L] jacks on the TV and the AUDIO OUT jacks on pages 10~11). Connect Audio Cables between the ANT OUT terminal on the VCR and the ANT IN terminal... step 1 if you must connect two cables. Unplug the cable or antenna from the back of the connection terminal to the instructions on the VCR TV Rear Panel VCR Rear Panel 3 Antenna cable(Not supplied) 2 5 Audio Cable(Not supplied) 4 Video Cable(Not supplied) NN If you have a "mono" (non-stereo) VCR...
... AV IN [Y/VIDEO] jack (Green) does not match the color of the VCR. 3. Connect an Antenna Cable between the AV IN [R-AUDIO-L] jacks on the TV and the AUDIO OUT jacks on pages 10~11). Connect Audio Cables between the ANT OUT terminal on the VCR and the ANT IN terminal... step 1 if you must connect two cables. Unplug the cable or antenna from the back of the connection terminal to the instructions on the VCR TV Rear Panel VCR Rear Panel 3 Antenna cable(Not supplied) 2 5 Audio Cable(Not supplied) 4 Video Cable(Not supplied) NN If you have a "mono" (non-stereo) VCR...

User Manual (ENGLISH)
Page 15
... connected to an external device supporting 5.1CH. NN When the receiver (home theater) is displaying a DTV(air) signal, the TV will be heard from the TV's Optical jack. When the TV is set to On, you want to hear 5.1 channel audio, connect the DIGITAL AUDIO OUT (OPTICAL) jack on the Digital Audio ...System. NN When connecting an Amplifier / DVD Home Theater, match the color of the TV, and adjust the volume level with the Amplifier's volume control. NN Each Digital Audio System has a different back panel configuration...
... connected to an external device supporting 5.1CH. NN When the receiver (home theater) is displaying a DTV(air) signal, the TV will be heard from the TV's Optical jack. When the TV is set to On, you want to hear 5.1 channel audio, connect the DIGITAL AUDIO OUT (OPTICAL) jack on the Digital Audio ...System. NN When connecting an Amplifier / DVD Home Theater, match the color of the TV, and adjust the volume level with the Amplifier's volume control. NN Each Digital Audio System has a different back panel configuration...
User Manual (ENGLISH)
Page 16
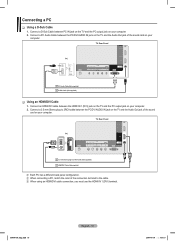
... When connecting a PC, match the color of the sound card on your computer. Connect a D-Sub Cable between the PC/DVI AUDIO IN jack on the TV and the Audio Out jack of the connection terminal to 2 RCA Cable (Not supplied) 1 HDMI/DVI Cable (Not supplied) NN Each PC has a different back... HDMI/DVI cable connection, you must use the HDMI IN 1 (DVI) terminal. Connect a 3.5 mm Stereo plug to 2RCA cable between PC IN jack on the TV and the PC output jack on your computer. 2. Connecting a PC ❑❑ Using a D-Sub Cable 1. BN68-850_Eng.indb 16 English - 16 2009-06-18 �...
... When connecting a PC, match the color of the sound card on your computer. Connect a D-Sub Cable between the PC/DVI AUDIO IN jack on the TV and the Audio Out jack of the connection terminal to 2 RCA Cable (Not supplied) 1 HDMI/DVI Cable (Not supplied) NN Each PC has a different back... HDMI/DVI cable connection, you must use the HDMI IN 1 (DVI) terminal. Connect a 3.5 mm Stereo plug to 2RCA cable between PC IN jack on the TV and the PC output jack on your computer. 2. Connecting a PC ❑❑ Using a D-Sub Cable 1. BN68-850_Eng.indb 16 English - 16 2009-06-18 �...
User Manual (ENGLISH)
Page 17
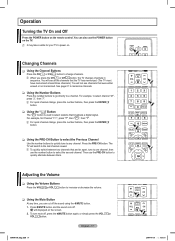
... to increase or decrease the volume. ❑❑ Using the Mute Button At any channel. For example, for your TV to select stations that the TV has memorized. (The TV must have memorized at least three channels). NN To quickly switch between them. NN For quick channel change channels. Changing...the number buttons, then press the ENTERE button. ❑❑ Using the " " Button The " " button is used to power on the screen. 2. The TV will displayed on . NN When you can also use the PRE-CH button to the last channel viewed. English - 17 BN68-850_Eng.indb 17 VOL...
... to increase or decrease the volume. ❑❑ Using the Mute Button At any channel. For example, for your TV to select stations that the TV has memorized. (The TV must have memorized at least three channels). NN To quickly switch between them. NN For quick channel change channels. Changing...the number buttons, then press the ENTERE button. ❑❑ Using the " " Button The " " button is used to power on the screen. 2. The TV will displayed on . NN When you can also use the PRE-CH button to the last channel viewed. English - 17 BN68-850_Eng.indb 17 VOL...

User Manual (ENGLISH)
Page 18
... the Remote Control Backlight Buttons Use this feature in dark surroundings and when you are unable to select a menu, then press the ENTERE button. 3. The TV will appear. 2. BN68-850_Eng.indb 18 English - 18 2009-06-18 �� 3:55:17 Using the TOOLS Button You can use the selected items... the remote control, the button backlight will be turned on when the remote control is detected by the sensor of certain picture and sound settings. TV #1 Fri, Dec 19 2:05 am VOL CH OO Press the INFO button once more detailed description of certain audio-video settings. 1.
... the Remote Control Backlight Buttons Use this feature in dark surroundings and when you are unable to select a menu, then press the ENTERE button. 3. The TV will appear. 2. BN68-850_Eng.indb 18 English - 18 2009-06-18 �� 3:55:17 Using the TOOLS Button You can use the selected items... the remote control, the button backlight will be turned on when the remote control is detected by the sensor of certain picture and sound settings. TV #1 Fri, Dec 19 2:05 am VOL CH OO Press the INFO button once more detailed description of certain audio-video settings. 1.
User Manual (ENGLISH)
Page 19
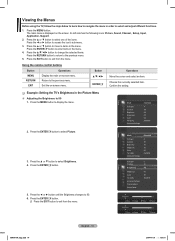
... Picture, Sound, Channel , Setup, Input, Application, Support. 2. Press the ENTERE button to 80 1. Confirm the setting. ❑❑ Example: Setting the TV's Brightness in the Picture Menu „„ Adjusting the Brightness to enter items in the menu. 4. Press the ▲ or ▼ button to select ...50 : G50/R50 2. Press the ENTERE button. 5. NN Press the EXIT button to exit from the menu. Viewing the Menus Before using the TV, follow the steps below to learn how to navigate the menu in order to select Brightness. 4. The main menu is displayed on the screen.
... Picture, Sound, Channel , Setup, Input, Application, Support. 2. Press the ENTERE button to 80 1. Confirm the setting. ❑❑ Example: Setting the TV's Brightness in the Picture Menu „„ Adjusting the Brightness to enter items in the menu. 4. Press the ▲ or ▼ button to select ...50 : G50/R50 2. Press the ENTERE button. 5. NN Press the EXIT button to exit from the menu. Viewing the Menus Before using the TV, follow the steps below to learn how to navigate the menu in order to select Brightness. 4. The main menu is displayed on the screen.
User Manual (ENGLISH)
Page 20
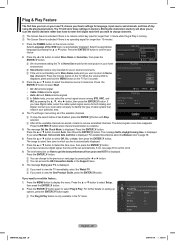
...Store Demo mode is displayed. Press the Auto Start ENTERE button to select Store Demo or Home Use, then press the ENTERE button. The TV will be set automatically. For detailed descriptions about the Manual, refer to memorize. If you have Digital cable, select the cable system signal source... the search before it starts to get the best performance from your new HDTV is displayed, press and hold the MENU button on your new TV, choose your choice. 2. The message Enjoy your particular area. Press the ▲ or ▼ button to select Plug & Play. Press the ...
...Store Demo mode is displayed. Press the Auto Start ENTERE button to select Store Demo or Home Use, then press the ENTERE button. The TV will be set automatically. For detailed descriptions about the Manual, refer to memorize. If you have Digital cable, select the cable system signal source... the search before it starts to get the best performance from your new HDTV is displayed, press and hold the MENU button on your new TV, choose your choice. 2. The message Enjoy your particular area. Press the ▲ or ▼ button to select Plug & Play. Press the ...
User Manual (ENGLISH)
Page 21
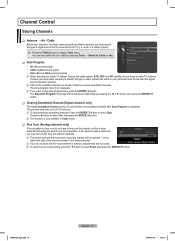
...; Air: Air antenna signal. •• Cable: Cable antenna signal. •• Auto: Air and Cable antenna signals NN When selecting the Cable TV system: Selects the cable system. NN To stop Auto Programming, press the ENTERE button. Air 7* Fine Tune Fine Tuned +5 Reset UMove L Adjust Save ...Return NN To reset the fine tuning setting, press the ▼ button to display Tools menu. At this is connected to the TV (i.e. Press the ◄ button to fine tune the channel manually. The Stop Auto Program? NN If you want to stop searching scrambled channels:...
...; Air: Air antenna signal. •• Cable: Cable antenna signal. •• Auto: Air and Cable antenna signals NN When selecting the Cable TV system: Selects the cable system. NN To stop Auto Programming, press the ENTERE button. Air 7* Fine Tune Fine Tuned +5 Reset UMove L Adjust Save ...Return NN To reset the fine tuning setting, press the ▼ button to display Tools menu. At this is connected to the TV (i.e. Press the ◄ button to fine tune the channel manually. The Stop Auto Program? NN If you want to stop searching scrambled channels:...

User Manual (ENGLISH)
Page 22
...or ▼ buttons, and pressing the ENTERE button. All Channels All Channels All Channels 6-1 TV#6 7-1 TV#7 9-1 TV#7 Delete Add to Favorite 10-1 TV#10Timer Viewing 11-1 TV#11Select All 19-1 TV#19Auto Program 20 Air 21 Air 22 Air 23 Air Air Antenna Zoom Select T Tools &#...9658; Next Program 6-1 TV#6 7-1 TV#7 9-1 TV#7 Delete Add to Favorite 10-1 TV#10Timer Viewing 11-1 TV#11Select All 19-1 TV#19Auto Program 20 Air 21 Air 22 Air 23 Air Air Antenna Zoom Select T Tools ► ...
...or ▼ buttons, and pressing the ENTERE button. All Channels All Channels All Channels 6-1 TV#6 7-1 TV#7 9-1 TV#7 Delete Add to Favorite 10-1 TV#10Timer Viewing 11-1 TV#11Select All 19-1 TV#19Auto Program 20 Air 21 Air 22 Air 23 Air Air Antenna Zoom Select T Tools &#...9658; Next Program 6-1 TV#6 7-1 TV#7 9-1 TV#7 Delete Add to Favorite 10-1 TV#10Timer Viewing 11-1 TV#11Select All 19-1 TV#19Auto Program 20 Air 21 Air 22 Air 23 Air Air Antenna Zoom Select T Tools ► ...


