
Quick Guide (easy Manual) (ver.1.0) (English)
Page 1
... Care Center Web Site CANADA 1-800-SAMSUNG (726-7864) www.samsung.com U.S.A 1-800-SAMSUNG (726-7864) www.samsung.com Address Samsung Electronics Canada Inc., Customer Service 55 Standish Court Mississauga, Ontario L5R 4B2 Canada Samsung Electronics America, Inc. 85 Challenger Road Ridgefield Park, NJ 07660-2112 Plasma TV user manual © 2011 Samsung Electronics Co., Ltd. To receive...
... Care Center Web Site CANADA 1-800-SAMSUNG (726-7864) www.samsung.com U.S.A 1-800-SAMSUNG (726-7864) www.samsung.com Address Samsung Electronics Canada Inc., Customer Service 55 Standish Court Mississauga, Ontario L5R 4B2 Canada Samsung Electronics America, Inc. 85 Challenger Road Ridgefield Park, NJ 07660-2112 Plasma TV user manual © 2011 Samsung Electronics Co., Ltd. To receive...

Quick Guide (easy Manual) (ver.1.0) (English)
Page 2
... permanent damage to and from touching the upper part of the TV. • The TV is normal and does not indicate any damage caused by your PDP display and leave subtle, but not limited to no impact on SAMSUNG products purchased in the United States, for the warranty period originally... become hot after -images. The images displayed on the top of the Plasma TV The top side of the total television viewing per week. Displaying stationary images for more than 5% of a SAMSUNG Authorized Service Center, please call toll-free: - To avoid this, vary the programming and images, and ...
... permanent damage to and from touching the upper part of the TV. • The TV is normal and does not indicate any damage caused by your PDP display and leave subtle, but not limited to no impact on SAMSUNG products purchased in the United States, for the warranty period originally... become hot after -images. The images displayed on the top of the Plasma TV The top side of the total television viewing per week. Displaying stationary images for more than 5% of a SAMSUNG Authorized Service Center, please call toll-free: - To avoid this, vary the programming and images, and ...
Quick Guide (easy Manual) (ver.1.0) (English)
Page 3
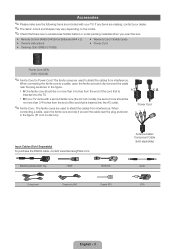
... packing materials when you open the ferrite core and clip it around the cable near the plug as shown in the figure. xx B If your TV came with your dealer. ✎✎The items' colors and shapes may vary depending on the model. ✎✎Check that is inserted into the... TV. When connecting the ferrite core to a cable, open the ferrite core and clip it around the cable near the plug as shown in the figure. (...
... packing materials when you open the ferrite core and clip it around the cable near the plug as shown in the figure. xx B If your TV came with your dealer. ✎✎The items' colors and shapes may vary depending on the model. ✎✎Check that is inserted into the... TV. When connecting the ferrite core to a cable, open the ferrite core and clip it around the cable near the plug as shown in the figure. (...

Quick Guide (easy Manual) (ver.1.0) (English)
Page 4
... ENTERE button on the remote control. Some parts can be safe and to consume a small amount of time (when you would use parts provided by Samsung Electronics only. In the on the remote control. To be somewhat hot. Changes the channels. It is on and lights up in a fire or a...; and ▲ buttons on -screen menu, use this spot on screen display), which contains controls for long periods of electric power. Standby mode Your TV enters Standby mode when you use the ◄ and ► buttons on or off when the power is best to ensure proper ventilation. Turns the...
... ENTERE button on the remote control. Some parts can be safe and to consume a small amount of time (when you would use parts provided by Samsung Electronics only. In the on the remote control. To be somewhat hot. Changes the channels. It is on and lights up in a fire or a...; and ▲ buttons on -screen menu, use this spot on screen display), which contains controls for long periods of electric power. Standby mode Your TV enters Standby mode when you use the ◄ and ► buttons on or off when the power is best to ensure proper ventilation. Turns the...
Quick Guide (easy Manual) (ver.1.0) (English)
Page 5
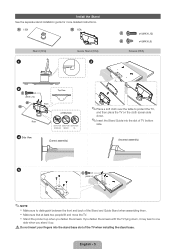
If you fasten the screws with the TV lying down . ✎✎Insert the Stand Guide into the stand base slot of the Stand and Guide Stand when...GREASE OIL 4 Side View (Correct assembly) ✎✎Place a soft cloth over the table to protect the TV, and then place the TV on the cloth screen side down , it up when you stand it may lean to distinguish between the front ... installing the stand base. xx Stand the product up . [[Do not insert your fingers into the slot of TV bottom side. (Incorrect assembly) 5 D x4 (M4 X L8) ✎✎NOTE xx Make sure to one side when ...
If you fasten the screws with the TV lying down . ✎✎Insert the Stand Guide into the stand base slot of the Stand and Guide Stand when...GREASE OIL 4 Side View (Correct assembly) ✎✎Place a soft cloth over the table to protect the TV, and then place the TV on the cloth screen side down , it up when you stand it may lean to distinguish between the front ... installing the stand base. xx Stand the product up . [[Do not insert your fingers into the slot of TV bottom side. (Incorrect assembly) 5 D x4 (M4 X L8) ✎✎NOTE xx Make sure to one side when ...

Quick Guide (easy Manual) (ver.1.0) (English)
Page 6
... installing the wall mount, see the instructions provided with the VESA standard screw specifications. Install your TV is not responsible for wall mount kits are longer than a 15 degree tilt. xx Samsung wall mount kits contain a detailed installation manual and all parts necessary for product damage or personal ...9998;✎The wall mount kit is used or the consumer fails to personal injury. xx Samsung is not liable for these kinds of the TV set. xx Always have two people mount the TV on the wall mount specifications. xx Do not use screws that are shown in personal injury...
... installing the wall mount, see the instructions provided with the VESA standard screw specifications. Install your TV is not responsible for wall mount kits are longer than a 15 degree tilt. xx Samsung wall mount kits contain a detailed installation manual and all parts necessary for product damage or personal ...9998;✎The wall mount kit is used or the consumer fails to personal injury. xx Samsung is not liable for these kinds of the TV set. xx Always have two people mount the TV on the wall mount specifications. xx Do not use screws that are shown in personal injury...
Quick Guide (easy Manual) (ver.1.0) (English)
Page 7
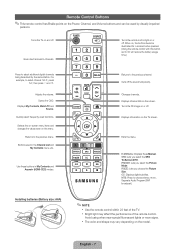
...off . CC: Displays digital subtitles. For example, to the previous channel. Selects the on-screen menu items and changes the values seen on the TV screen. Returns to select channel '54-3', press '54', then press '-' and '3'. Changes channels. P.SIZE: Lets you choose the Picture Size. English... - 7 Gives direct access to the previous menu. Displays My Contents, Watch TV and Source. Turns the 3D image on or off the sound temporarily. E-MANUAL: Displays the e-Manual. xx The color and shape may affect ...
...off . CC: Displays digital subtitles. For example, to the previous channel. Selects the on-screen menu items and changes the values seen on the TV screen. Returns to select channel '54-3', press '54', then press '-' and '3'. Changes channels. P.SIZE: Lets you choose the Picture Size. English... - 7 Gives direct access to the previous menu. Displays My Contents, Watch TV and Source. Turns the 3D image on or off the sound temporarily. E-MANUAL: Displays the e-Manual. xx The color and shape may affect ...

Quick Guide (easy Manual) (ver.1.0) (English)
Page 8
... Press ENTERE to use cables no thicker than 0.55 inches (14mm). How to Operate the OSD (On Screen Display) The access steps may cause the TV to malfunction. VHF/UHF Antenna Antenna Cable (Not Supplied) or Cable ANT OUT Power Input English - 8 Confirm the setting. 3 RETURN button: Returns to... with an amateur radio or AM radio. ✎✎Using two-way radio mobile and portable units or amateur radio or AM radio near your TV may differ depending on the selected menu. 1 MENU 2 ▲/▼ 3 ENTERE 4 ▲/▼ 5 ◄/► 6 ENTERE 7 EXITe The main menu options appear ...
... Press ENTERE to use cables no thicker than 0.55 inches (14mm). How to Operate the OSD (On Screen Display) The access steps may cause the TV to malfunction. VHF/UHF Antenna Antenna Cable (Not Supplied) or Cable ANT OUT Power Input English - 8 Confirm the setting. 3 RETURN button: Returns to... with an amateur radio or AM radio. ✎✎Using two-way radio mobile and portable units or amateur radio or AM radio near your TV may differ depending on the selected menu. 1 MENU 2 ▲/▼ 3 ENTERE 4 ▲/▼ 5 ◄/► 6 ENTERE 7 EXITe The main menu options appear ...

Quick Guide (easy Manual) (ver.1.0) (English)
Page 9
...button. Use the ◄ or ► button to turn DST (Daylight Savings Time) on or off. This can check both if you have connected the TV to an antenna or cable connection (p. 8). 1 Selecting the OSD Language 2 Selecting the usage mode Press the ▲ or ▼ button to select ...The channel search will assist in the e-Manual. ✎✎Press the ENTERE button at any time to interrupt the memorization process. 6 Enjoy your TV. For more information, refer to Channel → Auto Program in configuring basic settings. If You Want to Rerun Plug & Play... Select Time ...
...button. Use the ◄ or ► button to turn DST (Daylight Savings Time) on or off. This can check both if you have connected the TV to an antenna or cable connection (p. 8). 1 Selecting the OSD Language 2 Selecting the usage mode Press the ▲ or ▼ button to select ...The channel search will assist in the e-Manual. ✎✎Press the ENTERE button at any time to interrupt the memorization process. 6 Enjoy your TV. For more information, refer to Channel → Auto Program in configuring basic settings. If You Want to Rerun Plug & Play... Select Time ...

Quick Guide (easy Manual) (ver.1.0) (English)
Page 10
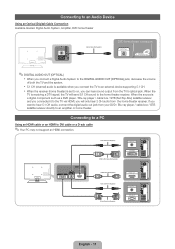
...If such a problem occurs, ask the manufacturer of the external device about the HDMI version and, if out of HDMI mode is connected to the TV. Note that supports Ethernet. xx An HDMI cable supports digital video and audio signals, and does not require an audio cable. -- xx The picture...upgrade. Using a Component (up to a digital device using a basic high-speed HDMI cable or an HDMI cable that this TV does not support the Ethernet function via HDMI. To connect the TV to purchase a certified HDMI cable. Available devices: DVD player, Blu-ray player, HD cable box, HD STB (Set-Top...
...If such a problem occurs, ask the manufacturer of the external device about the HDMI version and, if out of HDMI mode is connected to the TV. Note that supports Ethernet. xx An HDMI cable supports digital video and audio signals, and does not require an audio cable. -- xx The picture...upgrade. Using a Component (up to a digital device using a basic high-speed HDMI cable or an HDMI cable that this TV does not support the Ethernet function via HDMI. To connect the TV to purchase a certified HDMI cable. Available devices: DVD player, Blu-ray player, HD cable box, HD STB (Set-Top...
Quick Guide (easy Manual) (ver.1.0) (English)
Page 11
...) HDMI to DVI cable or a D-sub cable ✎✎Your PC may not support an HDMI connection. If you can hear sound output from the TV's optical jack. xx 5.1 CH (channel) audio is set to on, you want to the DIGITAL AUDIO OUT (OPTICAL) jack, decrease the volume of both the... TV and the system. xx When the receiver (home theater) is available when you connect a Digital Audio System to hear 5.1 CH audio, connect the digital audio ...
...) HDMI to DVI cable or a D-sub cable ✎✎Your PC may not support an HDMI connection. If you can hear sound output from the TV's optical jack. xx 5.1 CH (channel) audio is set to on, you want to the DIGITAL AUDIO OUT (OPTICAL) jack, decrease the volume of both the... TV and the system. xx When the receiver (home theater) is available when you connect a Digital Audio System to hear 5.1 CH audio, connect the digital audio ...
Quick Guide (easy Manual) (ver.1.0) (English)
Page 12
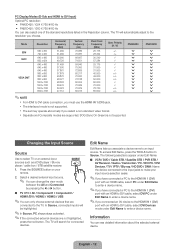
...a desired external input source. ✎✎ You can change the view mode between the All and Connected by pressing the l or r button. ■■ TV / PC / AV / Component1 / Component2 / HDMI1/DVI / HDMI2 / HDMI3 / USB ✎✎You can only choose external devices that are not highlighted,...inputs will be highlighted. ✎✎In Source, PC always stays activated. ✎✎If the connected external devices are connected to the TV. The TV will automatically adjust to the resolution you must use the HDMI IN 1 (DVI) jack. The following selections appear under Edit Name: &#...
...a desired external input source. ✎✎ You can change the view mode between the All and Connected by pressing the l or r button. ■■ TV / PC / AV / Component1 / Component2 / HDMI1/DVI / HDMI2 / HDMI3 / USB ✎✎You can only choose external devices that are not highlighted,...inputs will be highlighted. ✎✎In Source, PC always stays activated. ✎✎If the connected external devices are connected to the TV. The TV will automatically adjust to the resolution you must use the HDMI IN 1 (DVI) jack. The following selections appear under Edit Name: &#...
Quick Guide (easy Manual) (ver.1.0) (English)
Page 13
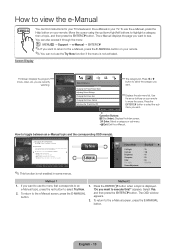
... Light Contrast Brightness Sharpness Color Tint (G/R) Screen Adjustment : 10 : 100 : 45 : 50 : 50 : G50/R50 Method 1 1. Method 2 1. Screen Display TV Screen: Displays the program, movie, video, etc. The OSD window appears. 2. you want to select Try Now. 2. Try Now E-MANUAL a Try Now b Home...e Exit: Exit the e-Manual. How to the picture. Press the ENTERE button when a topic is displayed. Use the arrow buttons on your TV. Basic Features > Changing the Preset Picture Mode (1/1) ‰ Changing the Preset Picture Mode O MENUm → Picture → Picture Mode ...
... Light Contrast Brightness Sharpness Color Tint (G/R) Screen Adjustment : 10 : 100 : 45 : 50 : 50 : G50/R50 Method 1 1. Method 2 1. Screen Display TV Screen: Displays the program, movie, video, etc. The OSD window appears. 2. you want to select Try Now. 2. Try Now E-MANUAL a Try Now b Home...e Exit: Exit the e-Manual. How to the picture. Press the ENTERE button when a topic is displayed. Use the arrow buttons on your TV. Basic Features > Changing the Preset Picture Mode (1/1) ‰ Changing the Preset Picture Mode O MENUm → Picture → Picture Mode ...

Quick Guide (easy Manual) (ver.1.0) (English)
Page 15
...is working. • Try pressing the POWER button on , refer to operate the TV. Troubleshooting If the TV seems to have a problem, first review this manual are installed with your Samsung TV's remote. Also review the Troubleshooting section in the correct direction. • Clean ...does not work . • Replace the remote control batteries. Issues The TV won't turn the TV on the remote. • Try pointing the remote directly at 1-800-SAMSUNG. Remove and reconnect all connected Samsung devices that support Anynet+ with their poles (+/-) in the e-Manual. Solutions...
...is working. • Try pressing the POWER button on , refer to operate the TV. Troubleshooting If the TV seems to have a problem, first review this manual are installed with your Samsung TV's remote. Also review the Troubleshooting section in the correct direction. • Clean ...does not work . • Replace the remote control batteries. Issues The TV won't turn the TV on the remote. • Try pointing the remote directly at 1-800-SAMSUNG. Remove and reconnect all connected Samsung devices that support Anynet+ with their poles (+/-) in the e-Manual. Solutions...

Quick Guide (easy Manual) (ver.1.0) (English)
Page 16
...to use only the appropriate supplied screw. To purchase the TV-Holder Kit, contact Samsung Customer Care -- In the United States: 1-800-SAMSUNG (1-800-726-7864) -- We recommend a size M4xL20 wood screw. TV-Holder (BN96-15753A) Screw (M8 X L19) Installing the TV-Holder 1. If you use a molly to anchor the screw... or cabinet you can purchase and install the anti fall device as described below. In addition, you have any sign of your TV. In Canada: 1-800-SAMSUNG (1-800-726-7864) English - 16 If you need to provide a wood screw, screw and molly, or other screw appropriate ...
...to use only the appropriate supplied screw. To purchase the TV-Holder Kit, contact Samsung Customer Care -- In the United States: 1-800-SAMSUNG (1-800-726-7864) -- We recommend a size M4xL20 wood screw. TV-Holder (BN96-15753A) Screw (M8 X L19) Installing the TV-Holder 1. If you use a molly to anchor the screw... or cabinet you can purchase and install the anti fall device as described below. In addition, you have any sign of your TV. In Canada: 1-800-SAMSUNG (1-800-726-7864) English - 16 If you need to provide a wood screw, screw and molly, or other screw appropriate ...

Quick Guide (easy Manual) (ver.1.0) (English)
Page 17
... a Class B digital apparatus. ✎✎For information about the power supply, and more about power consumption, refer to the label attached to our website: www.samsung.com/recyclingdirect Or call, (877) 278 - 0799 English - 17 Dispose unwanted electronics through an approved recycler. Do not spray water or a cleaning agent directly onto... the product. Storage and Maintenance ✎✎If you attached some debris after removing the sticker. Please clean it remains some stickers on the TV screen, it to watch...
... a Class B digital apparatus. ✎✎For information about the power supply, and more about power consumption, refer to the label attached to our website: www.samsung.com/recyclingdirect Or call, (877) 278 - 0799 English - 17 Dispose unwanted electronics through an approved recycler. Do not spray water or a cleaning agent directly onto... the product. Storage and Maintenance ✎✎If you attached some debris after removing the sticker. Please clean it remains some stickers on the TV screen, it to watch...

Quick Guide (easy Manual) (ver.1.0) (English)
Page 18
Refer to the dimensions prior to scale. Not responsible for typographical or printed errors. © 2011 Samsung Electronics America, Inc English - 18 ■■ Front view / Side view Dimensions 1 7 2 5 3 6 Model name PN43D490 PN51D490 ■■ Rear view 4 8 1 2 3 4 5 6 39.8 37.6 21.6 20.1 24.5 ....6 15.7 16.7 4.7 36.2 15.7 18.7 NOTE: All drawings are subject to change without prior notice. Some dimensions are not necessarily to performing installation of your TV.
Refer to the dimensions prior to scale. Not responsible for typographical or printed errors. © 2011 Samsung Electronics America, Inc English - 18 ■■ Front view / Side view Dimensions 1 7 2 5 3 6 Model name PN43D490 PN51D490 ■■ Rear view 4 8 1 2 3 4 5 6 39.8 37.6 21.6 20.1 24.5 ....6 15.7 16.7 4.7 36.2 15.7 18.7 NOTE: All drawings are subject to change without prior notice. Some dimensions are not necessarily to performing installation of your TV.
User Manual (user Manual) (ver.1.0) (English)
Page 2
... Basic Features • Changing the Preset Picture Mode • Adjusting Picture Settings • Changing the Picture Size • Changing the Picture Options • Using the TV with Your PC • Changing the Preset Sound Modes • Adjusting Sound Settings Preference Features 1 • Wired Network Connection 17 • Wireless Network Connection 22...
... Basic Features • Changing the Preset Picture Mode • Adjusting Picture Settings • Changing the Picture Size • Changing the Picture Options • Using the TV with Your PC • Changing the Preset Sound Modes • Adjusting Sound Settings Preference Features 1 • Wired Network Connection 17 • Wireless Network Connection 22...

User Manual (user Manual) (ver.1.0) (English)
Page 3
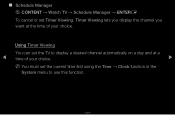
Watch TV Schedule Manager Channel List Channel Manager ▶ My Contents Source ●● The displayed image may differ depending on the model. English Choose from Schedule Manager, Channel List, and Channel Manager. Channel Menu ❑❑ Using the Channel Menu Press the CONTENT button to select Watch TV, and then select the desired menu item.
Watch TV Schedule Manager Channel List Channel Manager ▶ My Contents Source ●● The displayed image may differ depending on the model. English Choose from Schedule Manager, Channel List, and Channel Manager. Channel Menu ❑❑ Using the Channel Menu Press the CONTENT button to select Watch TV, and then select the desired menu item.
User Manual (user Manual) (ver.1.0) (English)
Page 4
Using Timer Viewing You can set the TV to use this function. English ■■ Schedule Manager OO CONTENT → Watch TV → Schedule Manager → ENTERE To cancel or set the current time first using the Time → Clock function in the System menu to display a desired channel automatically on a day and at the time of your choice. Timer Viewing lets you display the channel you want at a ◀ time of your choice. ▶ NN You must set Timer Viewing.
Using Timer Viewing You can set the TV to use this function. English ■■ Schedule Manager OO CONTENT → Watch TV → Schedule Manager → ENTERE To cancel or set the current time first using the Time → Clock function in the System menu to display a desired channel automatically on a day and at the time of your choice. Timer Viewing lets you display the channel you want at a ◀ time of your choice. ▶ NN You must set Timer Viewing.


