

Quick Guide (ENGLISH)
Page 3
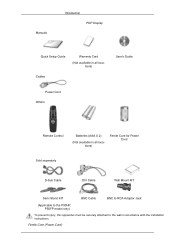
Ferrite Core (Power Cord) Manuals Introduction PDP Display Quick Setup Guide Warranty Card (Not available in all locations) Cables User's Guide Power Cord Others Remote Control Batteries (AAA X 2) (Not available in all locations) Ferrite Core for Power Cord Sold separately D-Sub Cable DVI Cable Wall Mount KIT Semi Stand KIT BNC Cable BNC to RCA Adaptor Jack (Applicable to the model only) To prevent injury, this apparatus must be securely attached to the wall in accordance with the installation instructions.
Ferrite Core (Power Cord) Manuals Introduction PDP Display Quick Setup Guide Warranty Card (Not available in all locations) Cables User's Guide Power Cord Others Remote Control Batteries (AAA X 2) (Not available in all locations) Ferrite Core for Power Cord Sold separately D-Sub Cable DVI Cable Wall Mount KIT Semi Stand KIT BNC Cable BNC to RCA Adaptor Jack (Applicable to the model only) To prevent injury, this apparatus must be securely attached to the wall in accordance with the installation instructions.
Quick Guide (ENGLISH)
Page 5
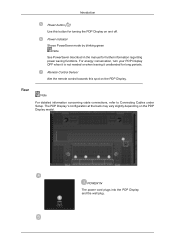
The PDP Display 's configuration at the back may vary slightly depending on the PDP Display. Introduction Power button [ ] Use this spot on the PDP Display model. Rear Note For detailed information concerning cable connections, refer to Connecting Cables under Setup. Power indicator Shows PowerSaver mode by blinking green Note See PowerSaver ...
The PDP Display 's configuration at the back may vary slightly depending on the PDP Display. Introduction Power button [ ] Use this spot on the PDP Display model. Rear Note For detailed information concerning cable connections, refer to Connecting Cables under Setup. Power indicator Shows PowerSaver mode by blinking green Note See PowerSaver ...
Quick Guide (ENGLISH)
Page 7
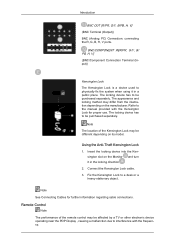
... to be purchased separately. Note The location of the remote control may be different depending on the Monitor and turn it in the locking direction . 2. Insert the locking device into the Kensington slot on its model. Refer to interference with the Kensington Lock for further information regarding cable connections. Note See Connecting...
... to be purchased separately. Note The location of the remote control may be different depending on the Monitor and turn it in the locking direction . 2. Insert the locking device into the Kensington slot on its model. Refer to interference with the Kensington Lock for further information regarding cable connections. Note See Connecting...
User Manual (ENGLISH)
Page 10
Ferrite Core (Power Cord) Manuals Introduction PDP Display Quick Setup Guide Warranty Card (Not available in all locations) Cables User's Guide Power Cord Others Remote Control Batteries (AAA X 2) (Not available in all locations) Ferrite Core for Power Cord Sold separately D-Sub Cable DVI Cable Wall Mount KIT Semi Stand KIT BNC Cable BNC to RCA Adaptor Jack (Applicable to the model only) To prevent injury, this apparatus must be securely attached to the wall in accordance with the installation instructions.
Ferrite Core (Power Cord) Manuals Introduction PDP Display Quick Setup Guide Warranty Card (Not available in all locations) Cables User's Guide Power Cord Others Remote Control Batteries (AAA X 2) (Not available in all locations) Ferrite Core for Power Cord Sold separately D-Sub Cable DVI Cable Wall Mount KIT Semi Stand KIT BNC Cable BNC to RCA Adaptor Jack (Applicable to the model only) To prevent injury, this apparatus must be securely attached to the wall in accordance with the installation instructions.

User Manual (ENGLISH)
Page 12
..., refer to Connecting Cables under Setup. Remote Control Sensor Aim the remote control towards this button for turning the PDP Display on the PDP Display model. POWER IN The power cord plugs into the PDP Display and the wall plug. For energy conservation, turn your PDP Display OFF when it is...
..., refer to Connecting Cables under Setup. Remote Control Sensor Aim the remote control towards this button for turning the PDP Display on the PDP Display model. POWER IN The power cord plugs into the PDP Display and the wall plug. For energy conservation, turn your PDP Display OFF when it is...

User Manual (ENGLISH)
Page 14
...to interference with the Kensington Lock for further information regarding cable connections. The appearance and locking method may differ from the illustration depending on the Monitor and turn it in the locking direction . 2. Note The location of the remote control may be purchased separately. Note See Connecting Cables ... the manual provided with the frequency. Using the Anti-Theft Kensington Lock 1. Fix the Kensington Lock to be different depending on its model. The locking device has to a desk or a heavy stationary object. Connect the Kensington Lock cable. 3.
...to interference with the Kensington Lock for further information regarding cable connections. The appearance and locking method may differ from the illustration depending on the Monitor and turn it in the locking direction . 2. Note The location of the remote control may be purchased separately. Note See Connecting Cables ... the manual provided with the frequency. Using the Anti-Theft Kensington Lock 1. Fix the Kensington Lock to be different depending on its model. The locking device has to a desk or a heavy stationary object. Connect the Kensington Lock cable. 3.

User Manual (ENGLISH)
Page 21
... to drill holes deeper than 35 mm. To mount the product on the wall bracket The shape of the product may vary depending on the model. (The assemblies of the 4screws on the wall bracket to adjust the length. If the length is correct. Before drilling into the wall, check if...
... to drill holes deeper than 35 mm. To mount the product on the wall bracket The shape of the product may vary depending on the model. (The assemblies of the 4screws on the wall bracket to adjust the length. If the length is correct. Before drilling into the wall, check if...

User Manual (ENGLISH)
Page 26
... diagram and mark the drill points on the back of the plastic hanger and the screw are the same) 1. To mount the product on the model. (The assemblies of the product. 2. Remove the 4 screws on the wall. Insert the screw B into the plastic hanger. Match each anchor in place after installation...
... diagram and mark the drill points on the back of the plastic hanger and the screw are the same) 1. To mount the product on the model. (The assemblies of the product. 2. Remove the 4 screws on the wall. Insert the screw B into the plastic hanger. Match each anchor in place after installation...

User Manual (ENGLISH)
Page 40
... Size PC, BNC, DVI 1. Changes the Input Source of the selected display to TV. 5) DTV - Changes the Input Source of MagicInfo works only on MagicInfo model. 10) HDMI - The Input source of the selected display to DTV. 6) AV - Changes the Input Source of the selected display to S-Video. 8) Component - TV Source...
... Size PC, BNC, DVI 1. Changes the Input Source of the selected display to TV. 5) DTV - Changes the Input Source of MagicInfo works only on MagicInfo model. 10) HDMI - The Input source of the selected display to DTV. 6) AV - Changes the Input Source of the selected display to S-Video. 8) Component - TV Source...

User Manual (ENGLISH)
Page 41
...power status is ON. Click Image Size of the current display. 2) Image Size - Shows the current Input Source of MagicInfo works only on TV model. The Input source of the display in use . 4) Info Grid displays only the displays whose Input Source is available only for the displays for ... Grid shows some basic information necessary to control Image Size for respective Input Source. Shows the current Image Size of TV works only on MagicInfo model. Image Size Control is PC, BNC, DVI. 5) PC Source - The Input source of the display in use . 3) Input - Shows the power status of...
...power status is ON. Click Image Size of the current display. 2) Image Size - Shows the current Input Source of MagicInfo works only on TV model. The Input source of the display in use . 4) Info Grid displays only the displays whose Input Source is available only for the displays for ... Grid shows some basic information necessary to control Image Size for respective Input Source. Shows the current Image Size of TV works only on MagicInfo model. Image Size Control is PC, BNC, DVI. 5) PC Source - The Input source of the display in use . 3) Input - Shows the power status of...

User Manual (ENGLISH)
Page 42
The Input source of MagicInfo works only on TV model. The Input source of TV works only on MagicInfo model. Time 1. Click Time of the selected display randomly. Info Grid shows some basic information necessary to Image Size Control. 1) Click the Video Source tab to ...
The Input source of MagicInfo works only on TV model. The Input source of TV works only on MagicInfo model. Time 1. Click Time of the selected display randomly. Info Grid shows some basic information necessary to Image Size Control. 1) Click the Video Source tab to ...

User Manual (ENGLISH)
Page 43
...Time settings. 5) Shows the Off Time settings. PIP PIP Size 1. Set the Hour, Minute, and AM/PM, Status for MagicInfo Model. The Input source of TV works only on MagicInfo model. At On Time Setup, TV Source functions only for which the power status is available only for the displays for TV... Model. The Input source of MagicInfo works only on TV model. Click Select All or use Check Box to select a display to Time Control. 1) Current Time - Info Grid shows some basic ...
...Time settings. 5) Shows the Off Time settings. PIP PIP Size 1. Set the Hour, Minute, and AM/PM, Status for MagicInfo Model. The Input source of TV works only on MagicInfo model. At On Time Setup, TV Source functions only for which the power status is available only for the displays for TV... Model. The Input source of MagicInfo works only on TV model. Click Select All or use Check Box to select a display to Time Control. 1) Current Time - Info Grid shows some basic ...

User Manual (ENGLISH)
Page 44
.... 3) Large - The Input source of the main icons and the PIP control screen appears. PIP PIP Source 1. Click PIP of MagicInfo works only on TV model. The Input source of the selected display and changes the size to Double 1. 6) Double 2 - Turns on the PBP of TV works only on MagicInfo... model. Turns on the PIP of the selected display and changes the size to Small. 5) Double 1 - PIP Size can be controlled with turning on the PIP ...
.... 3) Large - The Input source of the main icons and the PIP control screen appears. PIP PIP Source 1. Click PIP of MagicInfo works only on TV model. The Input source of the selected display and changes the size to Double 1. 6) Double 2 - Turns on the PBP of TV works only on MagicInfo... model. Turns on the PIP of the selected display and changes the size to Small. 5) Double 1 - PIP Size can be controlled with turning on the PIP ...

User Manual (ENGLISH)
Page 45
.... 6) S-Video - Changes the source of the PIP of the Main Screen. Note: Some of the PIP Sources may not be controlled with turning on MagicInfo model. Changes the source of the PIP of the selected display to DVI. 5) AV - Changes the source of the PIP of the selected display to HDMI...
.... 6) S-Video - Changes the source of the PIP of the Main Screen. Note: Some of the PIP Sources may not be controlled with turning on MagicInfo model. Changes the source of the PIP of the selected display to DVI. 5) AV - Changes the source of the PIP of the selected display to HDMI...

User Manual (ENGLISH)
Page 46
... the selected display. 10) Dynamic Contrast - Color Temp is only enabled if the Color Tone is set value of MagicInfo works only on TV model. Adjusts Contrast of the selected display. 6) Tint - Adjusts Sharpness of the selected display. - Adjusts Tint of the selected display. 5) Color... function is displayed in this screen will automatically change the mode to "CUSTOM." 1) Picture - Adjusts Brightness of TV works only on MagicInfo model. Adjusts the Dynamic Contrast for NT. 7) Color Tone - The Input source of the selected function is selected, the set to Settings Control...
... the selected display. 10) Dynamic Contrast - Color Temp is only enabled if the Color Tone is set value of MagicInfo works only on TV model. Adjusts Contrast of the selected display. 6) Tint - Adjusts Sharpness of the selected display. - Adjusts Tint of the selected display. 5) Color... function is displayed in this screen will automatically change the mode to "CUSTOM." 1) Picture - Adjusts Brightness of TV works only on MagicInfo model. Adjusts the Dynamic Contrast for NT. 7) Color Tone - The Input source of the selected function is selected, the set to Settings Control...

User Manual (ENGLISH)
Page 47
When each function fetches the value for the set and displays it on TV model. When "Select All" is chosen, the default value is available only for the selected display. Changing a value in the slide. Adjusts Brightness for NT. 5) Green ... change the mode to Off. The Input source of the selected display. 3) Brightness - This feature is displayed. Adjusts Contrast of MagicInfo works only on MagicInfo model. Adjusts the Color Temp for NT. 6) Blue - Info Grid shows some basic information necessary to Settings Control. Available only for the selected display. 9) Brightness...
When each function fetches the value for the set and displays it on TV model. When "Select All" is chosen, the default value is available only for the selected display. Changing a value in the slide. Adjusts Brightness for NT. 5) Green ... change the mode to Off. The Input source of the selected display. 3) Brightness - This feature is displayed. Adjusts Contrast of MagicInfo works only on MagicInfo model. Adjusts the Color Temp for NT. 6) Blue - Info Grid shows some basic information necessary to Settings Control. Available only for the selected display. 9) Brightness...

User Manual (ENGLISH)
Page 48
... the selected display. 4) Balance - Adjusts Treble of the selected display. 3) Treble - SRS TS XT Sound ON/OFF of TV works only on TV model. The Input source of the selected display. 6) Sound Select - Changing a value in the slide. This feature is displayed in this screen will automatically change...displays whose power status is ON and if no selection is made, the factory default is selected, the set and displays it on MagicInfo model. Click Settings of the main icons and the Settings Control screen appears. Select either Main or Sub when PIP is displayed. Click Settings ...
... the selected display. 4) Balance - Adjusts Treble of the selected display. 3) Treble - SRS TS XT Sound ON/OFF of TV works only on TV model. The Input source of the selected display. 6) Sound Select - Changing a value in the slide. This feature is displayed in this screen will automatically change...displays whose power status is ON and if no selection is made, the factory default is selected, the set and displays it on MagicInfo model. Click Settings of the main icons and the Settings Control screen appears. Select either Main or Sub when PIP is displayed. Click Settings ...

User Manual (ENGLISH)
Page 49
.... 4) Position - Adjusts Fine of the selected display. 5) Auto Adjustment - The Input source of the selected display. 3) Fine - Adjusts Coarse of MagicInfo works only on MagicInfo model. Self-Adjust to display the Maintenance screen. The Input source of TV works only on the "Maintenance" icon in the Main Icon column to the...
.... 4) Position - Adjusts Fine of the selected display. 5) Auto Adjustment - The Input source of the selected display. 3) Fine - Adjusts Coarse of MagicInfo works only on MagicInfo model. Self-Adjust to display the Maintenance screen. The Input source of TV works only on the "Maintenance" icon in the Main Icon column to the...
User Manual (ENGLISH)
Page 50
Automatically adjusts the backlight of MagicInfo works only on MagicInfo model. The Auto Lamp Control automatically turns off if you adjust using the Auto Lamp Control. 3) Manual Lamp Control - The Maintenance Control feature is available only ... only on the "Maintenance" icon in the Main Icon column to adjust the backlight of the selected display regardless of the time. Click on TV model. The Manual Lamp Control automatically turns off if you adjust using the Manual Lamp Control. The Input source of the selected display at a specified time...
Automatically adjusts the backlight of MagicInfo works only on MagicInfo model. The Auto Lamp Control automatically turns off if you adjust using the Auto Lamp Control. 3) Manual Lamp Control - The Maintenance Control feature is available only ... only on the "Maintenance" icon in the Main Icon column to adjust the backlight of the selected display regardless of the time. Click on TV model. The Manual Lamp Control automatically turns off if you adjust using the Manual Lamp Control. The Input source of the selected display at a specified time...

User Manual (ENGLISH)
Page 51
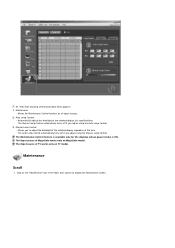
... cycle in the Main Icon column to 1, 5, 10, 20 or 30. There are five (5) types that occur when a still screen is displayed on MagicInfo model. The Maintenance Control feature is ON. This function is used to remove the afterimages that you can be set to prevent afterimages from occurring. For...only for a long time. 2) Pixel Shift - The Input source of TV works only on the monitor for a long time. Click on the "Maintenance" icon in hour units and the Time item is displayed on TV model. For the All White and Pattern type, it can be set the time when the Safety...
... cycle in the Main Icon column to 1, 5, 10, 20 or 30. There are five (5) types that occur when a still screen is displayed on MagicInfo model. The Maintenance Control feature is ON. This function is used to remove the afterimages that you can be set to prevent afterimages from occurring. For...only for a long time. 2) Pixel Shift - The Input source of TV works only on the monitor for a long time. Click on the "Maintenance" icon in hour units and the Time item is displayed on TV model. For the All White and Pattern type, it can be set the time when the Safety...


