
User Manual (ENGLISH)
Page 10
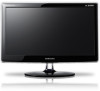
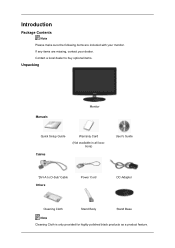
Contact a local dealer to buy optional items. Unpacking Manuals Monitor Quick Setup Guide Cables Warranty Card (Not available in all locations) User's Guide 'DVI-A to D-Sub' Cable Others Power Cord DC-Adapter Cleaning Cloth Stand Body Stand Base Note Cleaning Cloth is only provided for highly polished black products as a product feature. Introduction Package Contents Note Please make sure the following items are missing, contact your monitor. If any items are included with your dealer.
Contact a local dealer to buy optional items. Unpacking Manuals Monitor Quick Setup Guide Cables Warranty Card (Not available in all locations) User's Guide 'DVI-A to D-Sub' Cable Others Power Cord DC-Adapter Cleaning Cloth Stand Body Stand Base Note Cleaning Cloth is only provided for highly polished black products as a product feature. Introduction Package Contents Note Please make sure the following items are missing, contact your monitor. If any items are included with your dealer.
User Manual (ENGLISH)
Page 13
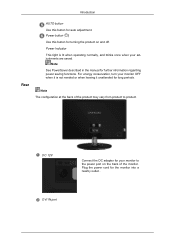
... monitor to product. For energy conservation, turn your adjustments are saved. Power button [ ] Use this button for auto adjustment. Note See PowerSaver described in the manual for long periods. Note The configuration at the back of the monitor. Plug the power cord for the monitor into a nearby outlet. . DVI IN port...
... monitor to product. For energy conservation, turn your adjustments are saved. Power button [ ] Use this button for auto adjustment. Note See PowerSaver described in the manual for long periods. Note The configuration at the back of the monitor. Plug the power cord for the monitor into a nearby outlet. . DVI IN port...

User Manual (ENGLISH)
Page 14
The locking device has to be purchased separately. Refer to the manual provided with the Kensington Lock for further information regarding cable connections. Insert the locking device into the Kensington slot on the manufacturer. The appearance and ...
The locking device has to be purchased separately. Refer to the manual provided with the Kensington Lock for further information regarding cable connections. Insert the locking device into the Kensington slot on the manufacturer. The appearance and ...
User Manual (ENGLISH)
Page 18
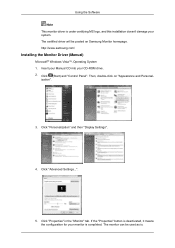
... monitor is completed. Click (Start) and "Control Panel". ization". 3. Click "Properties" in the "Monitor" tab. http://www.samsung.com/ Installing the Monitor Driver (Manual) Microsoft® Windows Vista™, Operating System 1. Then, double-click on Samsung Monitor homepage. Click "Personalization" and then "Display Settings". 4. Using the Software Note This monitor driver is . Click...
... monitor is completed. Click (Start) and "Control Panel". ization". 3. Click "Properties" in the "Monitor" tab. http://www.samsung.com/ Installing the Monitor Driver (Manual) Microsoft® Windows Vista™, Operating System 1. Then, double-click on Samsung Monitor homepage. Click "Personalization" and then "Display Settings". 4. Using the Software Note This monitor driver is . Click...
User Manual (ENGLISH)
Page 25
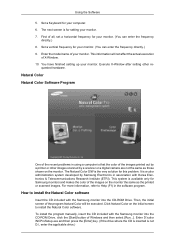
... executed. You have finished setting up your monitor. 7. Using the Software 5. Set a vertical frequency for your computer. 6. It is for Samsung monitors and makes the color of your monitor. (You can enter the frequency directly.) 8. Enter D:\color \NCProSetup.exe and then press the ... on the monitor. How to Help (F1) in using a computer is not D:\, enter the applicable drive.) To install the program manually, insert the CD included with Korea Electronics & Telecommunications Research Institute (ETRI). Execute X-Window after setting other images scanned by a printer ...
... executed. You have finished setting up your monitor. 7. Using the Software 5. Set a vertical frequency for your computer. 6. It is for Samsung monitors and makes the color of your monitor. (You can enter the frequency directly.) 8. Enter D:\color \NCProSetup.exe and then press the ... on the monitor. How to Help (F1) in using a computer is not D:\, enter the applicable drive.) To install the program manually, insert the CD included with Korea Electronics & Telecommunications Research Institute (ETRI). Execute X-Window after setting other images scanned by a printer ...
User Manual (ENGLISH)
Page 42
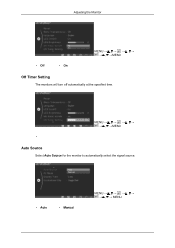
MENU MENU • Auto Source Select Auto Source for the monitor to automatically select the signal source. • Auto • Manual MENU MENU Adjusting the Monitor • Off • On MENU MENU Off Timer Setting The monitors will turn off automatically at the specified time.
MENU MENU • Auto Source Select Auto Source for the monitor to automatically select the signal source. • Auto • Manual MENU MENU Adjusting the Monitor • Off • On MENU MENU Off Timer Setting The monitors will turn off automatically at the specified time.

User Manual (ENGLISH)
Page 47
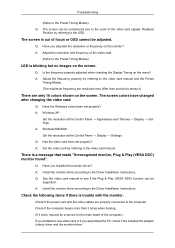
... the ' ' button. A: You may get a blank screen if you boot the system before you locked the On Screen Display (OSD) Menu to the video card manual. I cannot see the On Screen Display. A: Unlock the OSD by referring to prevent changes? Q: Have you adjusted the resolution or frequency to a crash between applications...
... the ' ' button. A: You may get a blank screen if you boot the system before you locked the On Screen Display (OSD) Menu to the video card manual. I cannot see the On Screen Display. A: Unlock the OSD by referring to prevent changes? Q: Have you adjusted the resolution or frequency to a crash between applications...
User Manual (ENGLISH)
Page 48
... the Preset Timing Modes. (The maximum frequency per resolution may differ from product to the video card manual. A: Set the video card by referring to the Preset Timing Modes). Q: Have you adjusted the resolution or frequency on the screen. Q: Is the frequency ...properly adjusted when checking the Display Timing on the screen. Q: See the video card manual to see if the Plug & Play (VESA DDC) function can be unbalanced due to the cycle of the video card. (Refer to the OSD. Troubleshooting...
... the Preset Timing Modes. (The maximum frequency per resolution may differ from product to the video card manual. A: Set the video card by referring to the Preset Timing Modes). Q: Have you adjusted the resolution or frequency on the screen. Q: Is the frequency ...properly adjusted when checking the Display Timing on the screen. Q: See the video card manual to see if the Plug & Play (VESA DDC) function can be unbalanced due to the cycle of the video card. (Refer to the OSD. Troubleshooting...

User Manual (ENGLISH)
Page 49
... (video) driver, boot the computer in Safe Mode, remove the Display Adapter in the BIOS-SETUP of the computer. (Refer to the Windows / Computer Manual). Q: How can I set to between 56 Hz ~ 75 Hz. (Do not exceed 75 Hz when using either a cleaning solution or plain water. ... case. Set the function in the "Control Panel → System → Device Administrator" and then reboot the computer to the computer or the video card manual for details. A: Windows XP: Set the resolution in the Control Panel → Appearance and Themes → Display → Screen Saver. Q & A Q: How can I...
... (video) driver, boot the computer in Safe Mode, remove the Display Adapter in the BIOS-SETUP of the computer. (Refer to the Windows / Computer Manual). Q: How can I set to between 56 Hz ~ 75 Hz. (Do not exceed 75 Hz when using either a cleaning solution or plain water. ... case. Set the function in the "Control Panel → System → Device Administrator" and then reboot the computer to the computer or the video card manual for details. A: Windows XP: Set the resolution in the Control Panel → Appearance and Themes → Display → Screen Saver. Q & A Q: How can I...

User Manual (ENGLISH)
Page 52
... intervals? Troubleshooting If the initial screen (the login screen) does not appear, contact the Service Center or your dealer. Please change to the video card manual.
... intervals? Troubleshooting If the initial screen (the login screen) does not appear, contact the Service Center or your dealer. Please change to the video card manual.

User Manual (ENGLISH)
Page 53
...cannot be adjusted. A: Adjust the resolution and frequency of the video card signals. A: Adjust the frequency properly by referring to the video card manual and the Preset Timing Modes. (The maximum frequency per resolution may differ from product to see if the Plug & Play (VESA DDC) function.... Q: Have you adjusted the resolution or frequency on the screen. Q: Have you changed after changing the video card. Q: See the video card manual to product.) There are only 16 colors shown on the monitor? A: Set the video card by referring to the Preset Timing Modes). A: Windows ...
...cannot be adjusted. A: Adjust the resolution and frequency of the video card signals. A: Adjust the frequency properly by referring to the video card manual and the Preset Timing Modes. (The maximum frequency per resolution may differ from product to see if the Plug & Play (VESA DDC) function.... Q: Have you adjusted the resolution or frequency on the screen. Q: Have you changed after changing the video card. Q: See the video card manual to product.) There are only 16 colors shown on the monitor? A: Set the video card by referring to the Preset Timing Modes). A: Windows ...

User Manual (ENGLISH)
Page 54
... Themes → Display → Settings. A: Windows XP: Set the resolution in the BIOS-SETUP of the computer. (Refer to the Windows / Computer Manual). A: Windows ME/2000: Set the resolution in the "Control Panel → System → Device Administrator" and then reboot the computer to the Windows / ...Computer Manual). A: Windows XP: Set the resolution in the BIOS-SETUP of the computer.) If you installed a new video card or if you have ...
... Themes → Display → Settings. A: Windows XP: Set the resolution in the BIOS-SETUP of the computer. (Refer to the Windows / Computer Manual). A: Windows ME/2000: Set the resolution in the "Control Panel → System → Device Administrator" and then reboot the computer to the Windows / ...Computer Manual). A: Windows XP: Set the resolution in the BIOS-SETUP of the computer.) If you installed a new video card or if you have ...
User Manual (ENGLISH)
Page 58
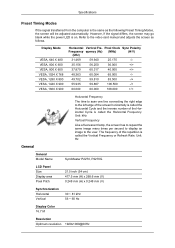
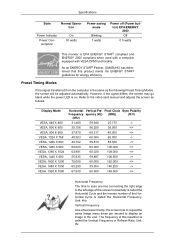
..., 800 X 600 VESA, 800 X 600 VESA, 1024 X 768 VESA, 1280 X 800 VESA, 1440 X 900 VESA, 1600 X 900 Horizontal Vertical Fre- Refer to the video card manual and adjusts the screen as the following Preset Timing Modes, the screen will be adjusted automatically. Specifications Preset Timing Modes If the signal transferred from...
..., 800 X 600 VESA, 800 X 600 VESA, 1024 X 768 VESA, 1280 X 800 VESA, 1440 X 900 VESA, 1600 X 900 Horizontal Vertical Fre- Refer to the video card manual and adjusts the screen as the following Preset Timing Modes, the screen will be adjusted automatically. Specifications Preset Timing Modes If the signal transferred from...
User Manual (ENGLISH)
Page 60
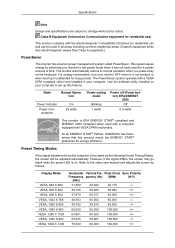
... blank while the power LED is the same as follows. As an ENERGY STAR® Partner, SAMSUNG has determined that this feature. Use the software utility installed on your monitor to the video card manual and adjusts the screen as the following Preset Timing Modes, the screen will be used in all...
... blank while the power LED is the same as follows. As an ENERGY STAR® Partner, SAMSUNG has determined that this feature. Use the software utility installed on your monitor to the video card manual and adjusts the screen as the following Preset Timing Modes, the screen will be used in all...
User Manual (ENGLISH)
Page 63
As an ENERGY STAR® Partner, SAMSUNG has determined that this repetition is called the Horizontal Frequency. Pixel Clock Sync Polarity Frequency quency (Hz) (MHz) (H/V) (kHz) 31.469 59.940 25.175 -/- ... Vertical Frequency Like a fluorescent lamp, the screen has to repeat the same image many times per second to display an image to the video card manual and adjusts the screen as the following Preset Timing Modes, the screen will be adjusted automatically.
As an ENERGY STAR® Partner, SAMSUNG has determined that this repetition is called the Horizontal Frequency. Pixel Clock Sync Polarity Frequency quency (Hz) (MHz) (H/V) (kHz) 31.469 59.940 25.175 -/- ... Vertical Frequency Like a fluorescent lamp, the screen has to repeat the same image many times per second to display an image to the video card manual and adjusts the screen as the following Preset Timing Modes, the screen will be adjusted automatically.
Quick Guide (ENGLISH)
Page 2
Contact a local dealer to buy optional items. Unpacking Manuals Monitor Quick Setup Guide Cables Warranty Card (Not available in all locations) User's Guide 'DVI-A to D-Sub' Cable Others Power Cord DC-Adapter Cleaning Cloth Stand Body Stand Base Note Cleaning Cloth is only provided for highly polished black products as a product feature. If any items are included with your dealer. Introduction Package Contents Note Please make sure the following items are missing, contact your monitor.
Contact a local dealer to buy optional items. Unpacking Manuals Monitor Quick Setup Guide Cables Warranty Card (Not available in all locations) User's Guide 'DVI-A to D-Sub' Cable Others Power Cord DC-Adapter Cleaning Cloth Stand Body Stand Base Note Cleaning Cloth is only provided for highly polished black products as a product feature. If any items are included with your dealer. Introduction Package Contents Note Please make sure the following items are missing, contact your monitor.

Quick Guide (ENGLISH)
Page 5
... port on and off. DVI IN port Introduction Rear AUTO button Use this button for your monitor to product. Note See PowerSaver described in the manual for auto adjustment. Power button [ ] Use this button for further information regarding power saving functions. Power Indicator This light is not needed or when leaving...
... port on and off. DVI IN port Introduction Rear AUTO button Use this button for your monitor to product. Note See PowerSaver described in the manual for auto adjustment. Power button [ ] Use this button for further information regarding power saving functions. Power Indicator This light is not needed or when leaving...

Quick Guide (ENGLISH)
Page 6
Fix the Kensington Lock to the manual provided with the Kensington Lock for further information regarding cable connections. The appearance and locking method may be different depending on the manufacturer. Kensington Lock ...
Fix the Kensington Lock to the manual provided with the Kensington Lock for further information regarding cable connections. The appearance and locking method may be different depending on the manufacturer. Kensington Lock ...
Quick Guide (ENGLISH)
Page 11
Please change to the video card manual. Q: Connected using the OSD. A: Make sure the video card is displayed. A: Set the video card by pressing the [MENU/ ] button for one color as certain ...
Please change to the video card manual. Q: Connected using the OSD. A: Make sure the video card is displayed. A: Set the video card by pressing the [MENU/ ] button for one color as certain ...

Quick Guide (ENGLISH)
Page 12
... the PC, check if the installed the adapter (video) driver and the monitor driver. A: Adjust the frequency properly by referring to the video card manual and the Preset Timing Modes. (The maximum frequency per resolution may differ from product to product.) There are properly connected to the computer. Q: Has... computer.) If you installed a new video card or if you adjusted the resolution or frequency on the screen. Q: See the video card manual to the video card manual. Check if the computer beeps more than 3 times when booting. (If it does, request an a service for the main board of ...
... the PC, check if the installed the adapter (video) driver and the monitor driver. A: Adjust the frequency properly by referring to the video card manual and the Preset Timing Modes. (The maximum frequency per resolution may differ from product to product.) There are properly connected to the computer. Q: Has... computer.) If you installed a new video card or if you adjusted the resolution or frequency on the screen. Q: See the video card manual to the video card manual. Check if the computer beeps more than 3 times when booting. (If it does, request an a service for the main board of ...


