Quick Guide (easy Manual) (ver.1.2) (English)
Page 12
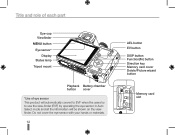
Title and role of each part Eye-cup Viewfinder MENU button Eye sensor* Display Status lamp Tripod mount Playback Battery chamber button cover *Use of eye sensor This product will automatically convert to EVF when the users try to use the view-finder (EVF) by operating the eye sensor in Auto Select mode and all the information will be shown on the viewfinder. Do not cover the eye sensor with your hands or materials. 12 AEL button EV button DISP button Function(Fn) button Direction key Memory card cover Delete/Picture wizard button Memory card slot
Title and role of each part Eye-cup Viewfinder MENU button Eye sensor* Display Status lamp Tripod mount Playback Battery chamber button cover *Use of eye sensor This product will automatically convert to EVF when the users try to use the view-finder (EVF) by operating the eye sensor in Auto Select mode and all the information will be shown on the viewfinder. Do not cover the eye sensor with your hands or materials. 12 AEL button EV button DISP button Function(Fn) button Direction key Memory card cover Delete/Picture wizard button Memory card slot

Quick Guide (easy Manual) (ver.1.2) (English)
Page 13
Push the Eye-cup up as shown in the left/right direction to adjust the viewfinder appropriate for removal. Eye-cup Removal of the camera by blinking the status indicator lamp. • Blinking: When saving photos, recording movies, being read by a ...computer or printer. • Steady: When there is no data transfer or when connecting to the viewfinder. Status lamp Status lamp In the case of saving a picture or shooting a movie, this shows the operating status of Eye-cup When the camera is...
Push the Eye-cup up as shown in the left/right direction to adjust the viewfinder appropriate for removal. Eye-cup Removal of the camera by blinking the status indicator lamp. • Blinking: When saving photos, recording movies, being read by a ...computer or printer. • Steady: When there is no data transfer or when connecting to the viewfinder. Status lamp Status lamp In the case of saving a picture or shooting a movie, this shows the operating status of Eye-cup When the camera is...

User Manual (user Manual) (ver.1.3) (English)
Page 15
...) button (p. 27) Direction key (p. 5) Memory card cover Delete/Picture wizard button (p. 82) Memory card slot Title and role of each part 15 Eye-cup (p. 16) Viewfinder MENU button (p. 26) Eye sensor* Display Status lamp (p. 16) Tripod mount Playback Battery chamber button (p. 79) cover (p. 19) * Use of eye sensor This product will... try to use the view-finder (EVF) by operating the eye sensor in Auto Select mode and all the information will be shown on the viewfinder. Do not cover the eye sensor with your hands or materials.
...) button (p. 27) Direction key (p. 5) Memory card cover Delete/Picture wizard button (p. 82) Memory card slot Title and role of each part 15 Eye-cup (p. 16) Viewfinder MENU button (p. 26) Eye sensor* Display Status lamp (p. 16) Tripod mount Playback Battery chamber button (p. 79) cover (p. 19) * Use of eye sensor This product will... try to use the view-finder (EVF) by operating the eye sensor in Auto Select mode and all the information will be shown on the viewfinder. Do not cover the eye sensor with your hands or materials.

User Manual (user Manual) (ver.1.3) (English)
Page 16
... role of each part Diopter adjustment dial/Eye-cup/ Status lamp Eyesight adjustment dial Use of Diopter adjustment dial It is possible to adjust the viewfinder appropriate for removal. Push the Eye-cup up as shown in the left/right direction to have a clear view. Status lamp In the case... or printer is complete. Status lamp Eye-cup Removal of Eye-cup When the camera is shipped, the eyecup is not shown clearly through the viewfinder, move the eyesight adjustment dial in the figure for the eyesight of the camera by blinking the status indicator lamp • Blinking: When saving...
... role of each part Diopter adjustment dial/Eye-cup/ Status lamp Eyesight adjustment dial Use of Diopter adjustment dial It is possible to adjust the viewfinder appropriate for removal. Push the Eye-cup up as shown in the left/right direction to have a clear view. Status lamp In the case... or printer is complete. Status lamp Eye-cup Removal of Eye-cup When the camera is shipped, the eyecup is not shown clearly through the viewfinder, move the eyesight adjustment dial in the figure for the eyesight of the camera by blinking the status indicator lamp • Blinking: When saving...