User Manual
Page 1
SyncMaster NC190, NC240 LCD Monitor User Manual The color and the appearance may differ depending on the product, and the specifications are subject to change without prior notice to improve the performance.
SyncMaster NC190, NC240 LCD Monitor User Manual The color and the appearance may differ depending on the product, and the specifications are subject to change without prior notice to improve the performance.
User Manual
Page 2
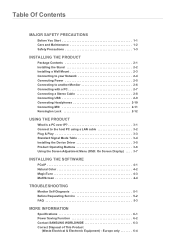
... the Stand 2-2 Installing a Wall Mount 2-3 Connecting to your Network 2-4 Connecting Power 2-5 Connecting to another Monitor 2-6 Connecting with a PC 2-7 Connecting a Stereo Cable 2-8 Connecting USB 2-9 Connecting Headphones 2-10 Connecting MIC...3-7 INSTALLING THE SOFTWARE PCoIP 4-1 Natural Color 4-2 MagicTune 4-3 MultiScreen 4-4 TROUBLESHOOTING Monitor Self-Diagnosis 5-1 Before Requesting Service 5-2 FAQ 5-3 MORE INFORMATION Specifications 6-1 Power Saving Function 6-2 Contact SAMSUNG WORLDWIDE 6-3 Correct Disposal of This Product (Waste Electrical & Electronic Equipment) -...
... the Stand 2-2 Installing a Wall Mount 2-3 Connecting to your Network 2-4 Connecting Power 2-5 Connecting to another Monitor 2-6 Connecting with a PC 2-7 Connecting a Stereo Cable 2-8 Connecting USB 2-9 Connecting Headphones 2-10 Connecting MIC...3-7 INSTALLING THE SOFTWARE PCoIP 4-1 Natural Color 4-2 MagicTune 4-3 MultiScreen 4-4 TROUBLESHOOTING Monitor Self-Diagnosis 5-1 Before Requesting Service 5-2 FAQ 5-3 MORE INFORMATION Specifications 6-1 Power Saving Function 6-2 Contact SAMSUNG WORLDWIDE 6-3 Correct Disposal of This Product (Waste Electrical & Electronic Equipment) -...

User Manual
Page 11
2 Installing the Product 2-1 Package Contents • Unpack the product and check if all of the following contents have been included. • Store the packaging box in case you need to move the Product at a later stage. Monitor CONTENTS Installation Manual Product Warranty User Manual OPTIONAL PARTS Power Cord Keyboard (USB) Mouse (USB) D-Sub Cable 2-2 Installing the Stand Before assembling the product, place the product down on a flat and stable surface so that the screen is facing downwards. 2-1 Installing the Product
2 Installing the Product 2-1 Package Contents • Unpack the product and check if all of the following contents have been included. • Store the packaging box in case you need to move the Product at a later stage. Monitor CONTENTS Installation Manual Product Warranty User Manual OPTIONAL PARTS Power Cord Keyboard (USB) Mouse (USB) D-Sub Cable 2-2 Installing the Stand Before assembling the product, place the product down on a flat and stable surface so that the screen is facing downwards. 2-1 Installing the Product
User Manual
Page 13
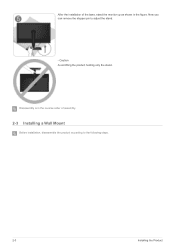
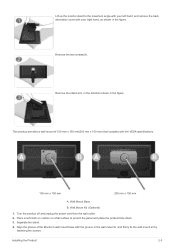
Disassembly is in the reverse order of the base, stand the monitor up as shown in the figure. Caution Avoid lifting the product holding only the stand. After the installation of assembly. 2-3 Installing a Wall Mount Before installation, disassemble the product according to adjust the stand. - Now you can remove the stopper pin to the following steps. 2-3 Installing the Product
Disassembly is in the reverse order of the base, stand the monitor up as shown in the figure. Caution Avoid lifting the product holding only the stand. After the installation of assembly. 2-3 Installing a Wall Mount Before installation, disassemble the product according to adjust the stand. - Now you can remove the stopper pin to the following steps. 2-3 Installing the Product
User Manual
Page 14
... the figure. Wall Mount Kit (Optional) 1. Turn the product off and unplug the power cord from the wall outlet. 2. Installing the Product 2-3 Lift up the monitor stand to protect the panel and place the product face down. 3. Place a soft cloth or cushion on a flat surface to the maximum angle with your...
... the figure. Wall Mount Kit (Optional) 1. Turn the product off and unplug the power cord from the wall outlet. 2. Installing the Product 2-3 Lift up the monitor stand to protect the panel and place the product face down. 3. Place a soft cloth or cushion on a flat surface to the maximum angle with your...

User Manual
Page 17
Connect to the [DVI OUT], [RGB OUT] port to another monitor such as the projector. (For presentation purposes) 2-6 Installing the Product 2-6 Connecting to display the same picture on your monitor using a D-Sub cable. • When using the [DVI OUT] port • Connect between the [DVI OUT] port on the product and the DVI port on another Monitor Please select the right connection method for your monitor. • When using the [RGB OUT] port • Connect between the [RGB OUT] port on the product and the D-Sub port on your monitor using a DVI cable.
Connect to the [DVI OUT], [RGB OUT] port to another monitor such as the projector. (For presentation purposes) 2-6 Installing the Product 2-6 Connecting to display the same picture on your monitor using a D-Sub cable. • When using the [DVI OUT] port • Connect between the [DVI OUT] port on the product and the DVI port on another Monitor Please select the right connection method for your monitor. • When using the [RGB OUT] port • Connect between the [RGB OUT] port on the product and the D-Sub port on your monitor using a DVI cable.

User Manual
Page 18
2-7 Connecting with a PC Connect the [RGB IN] port of your PC with a D-Sub cable. Use the [RGB IN] port to directly connect the monitor to the [D-Sub] port of the product to a PC. Installing the Product 2-7
2-7 Connecting with a PC Connect the [RGB IN] port of your PC with a D-Sub cable. Use the [RGB IN] port to directly connect the monitor to the [D-Sub] port of the product to a PC. Installing the Product 2-7
User Manual
Page 19
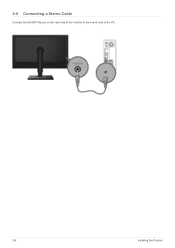
2-8 Connecting a Stereo Cable Connect the [AUDIO IN] port on the rear side of the monitor to the sound card of the PC. 2-8 Installing the Product
2-8 Connecting a Stereo Cable Connect the [AUDIO IN] port on the rear side of the monitor to the sound card of the PC. 2-8 Installing the Product
User Manual
Page 20
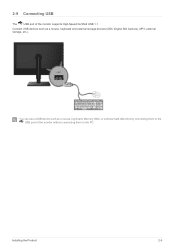
You can use a USB device such as a mouse, keyboard and external storage devices (DSC (Digital Still Camera), MP3, external storage, etc.). 2-9 Connecting USB The USB port of the monitor without connecting them to the USB port of the monitor supports High-Speed Certified USB 1.1. Installing the Product 2-9 Connect USB devices such as a mouse, keyboard, Memory Stick, or external hard disk drive by connecting them to the PC.
You can use a USB device such as a mouse, keyboard and external storage devices (DSC (Digital Still Camera), MP3, external storage, etc.). 2-9 Connecting USB The USB port of the monitor without connecting them to the USB port of the monitor supports High-Speed Certified USB 1.1. Installing the Product 2-9 Connect USB devices such as a mouse, keyboard, Memory Stick, or external hard disk drive by connecting them to the PC.

User Manual
Page 21
You may connect your headphones to the monitor. 2-10 Installing the Product 2-10 Connecting Headphones Connect your headphones to the Headphone connection terminal.
You may connect your headphones to the monitor. 2-10 Installing the Product 2-10 Connecting Headphones Connect your headphones to the Headphone connection terminal.
User Manual
Page 22
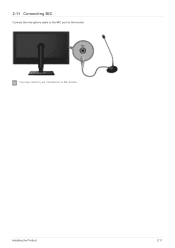
You may connect your microphone to the MIC port on the monitor. 2-11 Connecting MIC Connect the microphone cable to the monitor. Installing the Product 2-11
You may connect your microphone to the MIC port on the monitor. 2-11 Connecting MIC Connect the microphone cable to the monitor. Installing the Product 2-11
User Manual
Page 24
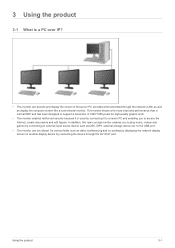
...screen on another display device by connecting the device through the network (LAN) as well as DSC, MP3, external storage device etc. This monitor shows a far more improved performance than a normal RDP and has been designed to support a resolution of the server PC encoded and transmitted ...product 3-1 3 Using the product 3-1 What is used by connecting it is a PC over IP? • This monitor can be utilized for high-quality graphic work. • This monitor enables reinforced security because it to a server PC and enabling you to play music, videos and games by connecting an...
...screen on another display device by connecting the device through the network (LAN) as well as DSC, MP3, external storage device etc. This monitor shows a far more improved performance than a normal RDP and has been designed to support a resolution of the server PC encoded and transmitted ...product 3-1 3 Using the product 3-1 What is used by connecting it is a PC over IP? • This monitor can be utilized for high-quality graphic work. • This monitor enables reinforced security because it to a server PC and enabling you to play music, videos and games by connecting an...
User Manual
Page 25
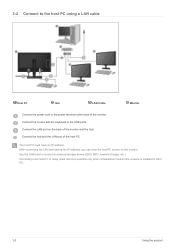
... to the USB ports. After connecting the LAN and setting the IP address, you can view the host PC screen on the back of the monitor and the hub. Connect the mouse and the keyboard to many client device is possible only when virtualization solution like vmware is installed in Host... PC. 3-2 Using the product The host PC must have an IP address. Connect the LAN port on the monitor. Use the USB port to the power terminal at the back of the host PC. 3-2 Connect to the host PC using a LAN cable Host PC...
... to the USB ports. After connecting the LAN and setting the IP address, you can view the host PC screen on the back of the monitor and the hub. Connect the mouse and the keyboard to many client device is possible only when virtualization solution like vmware is installed in Host... PC. 3-2 Using the product The host PC must have an IP address. Connect the LAN port on the monitor. Use the USB port to the power terminal at the back of the host PC. 3-2 Connect to the host PC using a LAN cable Host PC...
User Manual
Page 27
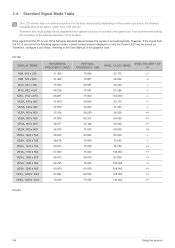
Therefore, the visual quality will be turned on the screen size due to the inherent characteristics of the panel, unlike for a CDT monitor. If the signal from the PC is recommended setting the resolution to the User Manual of the following signal modes, a blank screen may be ... of the product. Therefore, configure it as follows, referring to the optimal resolution of the following standard signal modes, the screen is not set automatically. NC190 DISPLAY MODE IBM, 640 x 350 IBM, 720 x 400 MAC, 640 x 480 MAC, 832 x 624 MAC, 1152 x 870 VESA, 640 x 480 VESA, 640 x 480 VESA, ...
Therefore, the visual quality will be turned on the screen size due to the inherent characteristics of the panel, unlike for a CDT monitor. If the signal from the PC is recommended setting the resolution to the User Manual of the following signal modes, a blank screen may be ... of the product. Therefore, configure it as follows, referring to the optimal resolution of the following standard signal modes, the screen is not set automatically. NC190 DISPLAY MODE IBM, 640 x 350 IBM, 720 x 400 MAC, 640 x 480 MAC, 832 x 624 MAC, 1152 x 870 VESA, 640 x 480 VESA, 640 x 480 VESA, ...
User Manual
Page 54
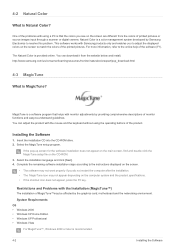
...and install; This software works with the Installation (MagicTune™) The installation of monitor functions and easy-to resolve this problem. http://www.samsung.com/us/consumer/learningresources/monitor/naturalcolorexpert/pop_download.html 4-3 MagicTune What is Natural Color? Insert the installation CD into ...the instructions displayed on the screen. • The software may be affected by Samsung Electronics to -understand guidelines. You can adjust the product with monitor adjustments by providing comprehensive descriptions of MagicTune™may not work properly if you ...
...and install; This software works with the Installation (MagicTune™) The installation of monitor functions and easy-to resolve this problem. http://www.samsung.com/us/consumer/learningresources/monitor/naturalcolorexpert/pop_download.html 4-3 MagicTune What is Natural Color? Insert the installation CD into ...the instructions displayed on the screen. • The software may be affected by Samsung Electronics to -understand guidelines. You can adjust the product with monitor adjustments by providing comprehensive descriptions of MagicTune™may not work properly if you ...
User Manual
Page 55
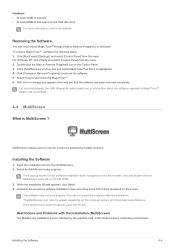
For Windows XP, click [Start], and select [Control Panel] from the menu. MultiScreen enables users to use the monitor by the graphics card, motherboard and the networking environment. The MultiScreen icon may not work properly if you that it is MultiScreen ? If the shortcut ...
For Windows XP, click [Start], and select [Control Panel] from the menu. MultiScreen enables users to use the monitor by the graphics card, motherboard and the networking environment. The MultiScreen icon may not work properly if you that it is MultiScreen ? If the shortcut ...

User Manual
Page 57
If the problem continues, please contact your nearest Samsung Electronics Service Center. Is a blank screen displayed and does the power LED blink at a 1 second interval? Check if the function is set to . Set... 3. Is the graphics card configured correctly? If the product is working properly. 5-2 Before Requesting Service Please check the following before requesting After-Sales service. 5 Troubleshooting 5-1 Monitor Self-Diagnosis • You can check if the product is working properly using the Self-Diagnosis function. • If a blank screen is displayed and the...
If the problem continues, please contact your nearest Samsung Electronics Service Center. Is a blank screen displayed and does the power LED blink at a 1 second interval? Check if the function is set to . Set... 3. Is the graphics card configured correctly? If the product is working properly. 5-2 Before Requesting Service Please check the following before requesting After-Sales service. 5 Troubleshooting 5-1 Monitor Self-Diagnosis • You can check if the product is working properly using the Self-Diagnosis function. • If a blank screen is displayed and the...
User Manual
Page 58
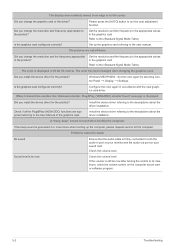
...for the product? Check the volume level. Set the resolution and the frequency to its maximum, check the volume control on your monitor and the audio-out port on the computer sound card or software program. 5-2 Troubleshooting The color has been changed after turning ...manual. Configure the color again in the graphics card Refer to the User Manual of -focus. When I connect the monitor, the 'Unknown monitor, Plug&Play (VESA DDC) monitor found' message is heard when booting the computer. Install the device driver referring to the (Standard Signal Mode Table)...
...for the product? Check the volume level. Set the resolution and the frequency to its maximum, check the volume control on your monitor and the audio-out port on the computer sound card or software program. 5-2 Troubleshooting The color has been changed after turning ...manual. Configure the color again in the graphics card Refer to the User Manual of -focus. When I connect the monitor, the 'Unknown monitor, Plug&Play (VESA DDC) monitor found' message is heard when booting the computer. Install the device driver referring to the (Standard Signal Mode Table)...


