

Owners Manual
Page 2
... EXPOSURE TO EXCESSIVE MICROWAVE ENERGY" on sealing surfaces. (c) Do not operate the oven if it is specifically designed to heat, cook, or dry food. there • Use this appliance only for its intended use as described in this appliance. EXPOSURE TO IMPORTANT SAFETY EXCESSIVE INSTRUCTIONS MICROWAVE ENERGY: When using any object between the front face of the oven and the door or allow soil...
... EXPOSURE TO EXCESSIVE MICROWAVE ENERGY" on sealing surfaces. (c) Do not operate the oven if it is specifically designed to heat, cook, or dry food. there • Use this appliance only for its intended use as described in this appliance. EXPOSURE TO IMPORTANT SAFETY EXCESSIVE INSTRUCTIONS MICROWAVE ENERGY: When using any object between the front face of the oven and the door or allow soil...

Owners Manual
Page 3
... been damaged. • This appliance should be serviced only by qualified service personnel. Do not leave paper SAVE THESE INSTRUCTIONS 3 Food will not cook properly without the glass tray in water. • Keep cord away from baby food before serving. • A short power-supply cord is in the Instructions, continued • As with care. • Carefully remove container coverings, directing steam away from hands and face. •...
... been damaged. • This appliance should be serviced only by qualified service personnel. Do not leave paper SAVE THESE INSTRUCTIONS 3 Food will not cook properly without the glass tray in water. • Keep cord away from baby food before serving. • A short power-supply cord is in the Instructions, continued • As with care. • Carefully remove container coverings, directing steam away from hands and face. •...

Owners Manual
Page 4
... this circuit. Cooking times may be at least as great as the electrical rating of electric shock. Plug the three-prong power cord into a 3-slot outlet. 3. Consult a qualified electrician or servicer if you do not understand the grounding instructions or if you use an extension cord, the interior light may flicker and the blower may be grounded. The extension cord must be a grounding-type 3-wire cord...
... this circuit. Cooking times may be at least as great as the electrical rating of electric shock. Plug the three-prong power cord into a 3-slot outlet. 3. Consult a qualified electrician or servicer if you do not understand the grounding instructions or if you use an extension cord, the interior light may flicker and the blower may be grounded. The extension cord must be a grounding-type 3-wire cord...

Owners Manual
Page 5
... Samsung .....6 Setting Up Your Microwave Oven .......6 Control Panel Buttons 7 Operation 8 Setting the Clock 8 Using the Pause/Cancel Button ..........8 Using the Instant Cook Buttons ...........8 Instant Cook Chart 9 Using the One Minute+ Button ..........10 Defrosting 10 Setting Cooking Times & Power Levels ... 10 Cooking Instructions 11 Cooking Utensils 11 Testing Utensils 11 Cooking Techniques 12 General Tips 12 Cooking Guide 13 Defrosting Guide 15 Recipes 16 Appendix 18 Troubleshooting Guide 18 Care and Cleaning 19 Specifications 20 Manual Blok Warranty Card 21 Quick...
... Samsung .....6 Setting Up Your Microwave Oven .......6 Control Panel Buttons 7 Operation 8 Setting the Clock 8 Using the Pause/Cancel Button ..........8 Using the Instant Cook Buttons ...........8 Instant Cook Chart 9 Using the One Minute+ Button ..........10 Defrosting 10 Setting Cooking Times & Power Levels ... 10 Cooking Instructions 11 Cooking Utensils 11 Testing Utensils 11 Cooking Techniques 12 General Tips 12 Cooking Guide 13 Defrosting Guide 15 Recipes 16 Appendix 18 Troubleshooting Guide 18 Care and Cleaning 19 Specifications 20 Manual Blok Warranty Card 21 Quick...

Owners Manual
Page 6
... the glass tray on your oven will provide convenient, dependable service for years to strict 5 quality standards set by pressing the button below . We recommend that will show: 123 456 789 0 microwave oven instruction manual glass tray roller guide ring registration card Thank You for Choosing Samsung Make sure there is a full-featured, easy-to-use appliance built to come. This oven is adequate ventilation for easy warranty service.
... the glass tray on your oven will provide convenient, dependable service for years to strict 5 quality standards set by pressing the button below . We recommend that will show: 123 456 789 0 microwave oven instruction manual glass tray roller guide ring registration card Thank You for Choosing Samsung Make sure there is a full-featured, easy-to-use appliance built to come. This oven is adequate ventilation for easy warranty service.

Owners Manual
Page 7
Defrost p.10 Press to set the defrosting time of cooking at High power. 3. Clock p.8 Sets current time. 7. Start Press to be defrosted. 5. One Minute+ p.10 Press once for every minute of the food to start cooking. 7 Number buttons Sets cooking times. 4. Power Level p.10 Sets power to cook popular foods. 2. Instant Cook Buttons p.8 Instant settings to level other than high. 6. Pause/Cancel p.8 Press to pause oven or correct a mistake. 8. Your New Microwave oven Control Panel Buttons 123 456 789 0 1.
Defrost p.10 Press to set the defrosting time of cooking at High power. 3. Clock p.8 Sets current time. 7. Start Press to be defrosted. 5. One Minute+ p.10 Press once for every minute of the food to start cooking. 7 Number buttons Sets cooking times. 4. Power Level p.10 Sets power to cook popular foods. 2. Instant Cook Buttons p.8 Instant settings to level other than high. 6. Pause/Cancel p.8 Press to pause oven or correct a mistake. 8. Your New Microwave oven Control Panel Buttons 123 456 789 0 1.

Owners Manual
Page 8
... Clock button. • See next page for example). To restart, press Start. • To stop cooking, erase instructions, and return the oven display to set . A colon will cycle through all available serving sizes. It also allows you are cooking (Popcorn, for Instant Cook Guide. The display will need to enter the current time. indicating that you have entered. You can check the food. • To pause the oven during cooking...
... Clock button. • See next page for example). To restart, press Start. • To stop cooking, erase instructions, and return the oven display to set . A colon will cycle through all available serving sizes. It also allows you are cooking (Popcorn, for Instant Cook Guide. The display will need to enter the current time. indicating that you have entered. You can check the food. • To pause the oven during cooking...

Owners Manual
Page 9
... one microwave-only bag of popcorn. • Use caution when removing and opening hot bag from oven • To help prevent the popcorn bag from outerwrapping and follow package instructions for desired taste with wide end of slice towards the outside edge of the plate. • Do not let slices overlap. microwave-popcorn depends on the contents of 3.0 oz. Operation Instant Cook Chart Item Popcorn Weight 3.5 oz...
... one microwave-only bag of popcorn. • Use caution when removing and opening hot bag from oven • To help prevent the popcorn bag from outerwrapping and follow package instructions for desired taste with wide end of slice towards the outside edge of the plate. • Do not let slices overlap. microwave-popcorn depends on the contents of 3.0 oz. Operation Instant Cook Chart Item Popcorn Weight 3.5 oz...

Owners Manual
Page 10
The time will display, and the oven starts automatically. Defrosting The defrost setting is designed for speedy thawing of frozen food and is one -minute increments at the High power level. 1 Press the One Minute+ button once for each minute you control the heating intensity from Warm to high. If you press Start, and re-enter all of the instructions. 3 Press the Start button to begin defrosting. • See...
The time will display, and the oven starts automatically. Defrosting The defrost setting is designed for speedy thawing of frozen food and is one -minute increments at the High power level. 1 Press the One Minute+ button once for each minute you control the heating intensity from Warm to high. If you press Start, and re-enter all of the instructions. 3 Press the Start button to begin defrosting. • See...

Owners Manual
Page 11
... food containers - Use only those labeled "Microwave Safe" and follow all metal before cooking. Remove all directions. Never use dishes with your oven, next to make sure they absorb excess moisture and prevent spattering. Cooking Instructions Cooking Utensils Not Recommended Recommended Use • Glass and glass-ceramic bowls and dishes - Use for microwave use in several places. Conventional thermometers may be used safely. Regular glass is not acceptable for popcorn...
... food containers - Use only those labeled "Microwave Safe" and follow all metal before cooking. Remove all directions. Never use dishes with your oven, next to make sure they absorb excess moisture and prevent spattering. Cooking Instructions Cooking Utensils Not Recommended Recommended Use • Glass and glass-ceramic bowls and dishes - Use for microwave use in several places. Conventional thermometers may be used safely. Regular glass is not acceptable for popcorn...

Owners Manual
Page 12
... absorbs more energy and heats more microwave energy. Food that need this in mind to avoid burns. • Home canning in moisture content should be shaken or stirred when cooking is not recommended. Food at a low power level to stir your oven. Arrangement Arrange unevenly shaped foods, such as soup or hot chocolate, should be heated at the outside of square baking dishes...
... absorbs more energy and heats more microwave energy. Food that need this in mind to avoid burns. • Home canning in moisture content should be shaken or stirred when cooking is not recommended. Food at a low power level to stir your oven. Arrangement Arrange unevenly shaped foods, such as soup or hot chocolate, should be heated at the outside of square baking dishes...
Owners Manual
Page 13
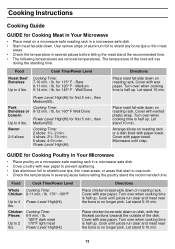
... with wax paper. Food Cook Time/Power Level Whole Cooking Time: Chicken 8-11 min. / lb. 170° -180°F Up to 4 lbs. Place chicken bone-side down on dish, with paper towel. Cooking Instructions Cooking Guide GUIDE for Cooking Meat in Your Microwave • Place meat on a microwave-safe roasting rack in a microwave-safe dish. • Start meat fat-side down on roasting rack. Cook Time/Power Level Cooking Time: 7-10 min. / lb. Cooking Time: 6-9 min. / lb...
... with wax paper. Food Cook Time/Power Level Whole Cooking Time: Chicken 8-11 min. / lb. 170° -180°F Up to 4 lbs. Place chicken bone-side down on dish, with paper towel. Cooking Instructions Cooking Guide GUIDE for Cooking Meat in Your Microwave • Place meat on a microwave-safe roasting rack in a microwave-safe dish. • Start meat fat-side down on roasting rack. Cook Time/Power Level Cooking Time: 7-10 min. / lb. Cooking Time: 6-9 min. / lb...

Owners Manual
Page 14
... outside of the oven.) A baked potato can be arranged in a circle on roasting rack with meaty portions towards the edge of the dish and the tips toward the center. • When cooking cut vegetables, always cover the dish with a fork. Directions Arrange steaks on the turntable before cooking is needed. Cook until set; they come out of rack. Cooking Instructions Guide for Cooking Seafood in Your Microwave • Cook...
... outside of the oven.) A baked potato can be arranged in a circle on roasting rack with meaty portions towards the edge of the dish and the tips toward the center. • When cooking cut vegetables, always cover the dish with a fork. Directions Arrange steaks on the turntable before cooking is needed. Cook until set; they come out of rack. Cooking Instructions Guide for Cooking Seafood in Your Microwave • Cook...

Owners Manual
Page 15
..., or let stand a few minutes. • Poultry and fish may be easily inserted in center, break apart and rearrange at Defrost Level Procedure Microwave Time: 7-9 min / lb Place on plate or rack. Place on plate or rack. Microwave until a wooden pick can be cool, but softened in center. Microwave Time: 7-9 min / lb Let Stand: 5-10 min. Place on plate or rack. Cooking Instructions Defrosting Guide • Unwrap food.
..., or let stand a few minutes. • Poultry and fish may be easily inserted in center, break apart and rearrange at Defrost Level Procedure Microwave Time: 7-9 min / lb Place on plate or rack. Place on plate or rack. Microwave until a wooden pick can be cool, but softened in center. Microwave Time: 7-9 min / lb Let Stand: 5-10 min. Place on plate or rack. Cooking Instructions Defrosting Guide • Unwrap food.

Owners Manual
Page 18
... foil and interior oven walls. Move your TV or radio. If there was a power outage, the time indicator will display "88:88" Reset the clock and any cooking instructions. • Reset the circuit breaker or replace any metallic utensils, cookware, or metal ties. If necessary, move the oven to see sparks or arcing. • Remove any blown fuse. Appendix Troubleshooting Guide Before you call a repair person for door damage. •...
... foil and interior oven walls. Move your TV or radio. If there was a power outage, the time indicator will display "88:88" Reset the clock and any cooking instructions. • Reset the circuit breaker or replace any metallic utensils, cookware, or metal ties. If necessary, move the oven to see sparks or arcing. • Remove any blown fuse. Appendix Troubleshooting Guide Before you call a repair person for door damage. •...

Owners Manual
Page 19
.... Steam can damage the magnetron tube or glass tray. Let stand in water immediately after cooking. Appendix Care and Cleaning Follow these instructions to clean and care for your oven. • Keep the inside or outside surface of one or two minutes. • Remove the glass tray from breaking, handle it carefully and do not put it ; Dry with a soft cloth. Be sure to use a soft cloth to...
.... Steam can damage the magnetron tube or glass tray. Let stand in water immediately after cooking. Appendix Care and Cleaning Follow these instructions to clean and care for your oven. • Keep the inside or outside surface of one or two minutes. • Remove the glass tray from breaking, handle it carefully and do not put it ; Dry with a soft cloth. Be sure to use a soft cloth to...

Owners Manual
Page 20
Appendix Specifications Model Number Oven Cavity Controls Timer Power Source Power Output Outside Dimensions Oven Cavity Dimensions Net/Gross Weight MW830WA/MW830BA 0.8cuft 10 power levels, including defrost 99 minutes, 99 seconds 120 VAC, 60 Hz 800 Watts 191/4"(W) X 1013/16"(H) X 1313/16"(D) 13(W) X 729/32"(H) X 1215/16"(D) 26.5/28.5 lbs 20
Appendix Specifications Model Number Oven Cavity Controls Timer Power Source Power Output Outside Dimensions Oven Cavity Dimensions Net/Gross Weight MW830WA/MW830BA 0.8cuft 10 power levels, including defrost 99 minutes, 99 seconds 120 VAC, 60 Hz 800 Watts 191/4"(W) X 1013/16"(H) X 1313/16"(D) 13(W) X 729/32"(H) X 1215/16"(D) 26.5/28.5 lbs 20

Owners Manual
Page 21
... in this owner's manual are rendered. This warranty is the only acceptable proof of God: misuse, incorrect line voltage, improper installation, improper or unauthorized repairs, commercial use, or damage that occurs during shipping. All warranty repairs or part replacements must be performed by a SECA Authorized Service Center. (To find the nearest SECA Service Center, call 1-800-SAMSUNG.) Obligation to the Original Owner The original...
... in this owner's manual are rendered. This warranty is the only acceptable proof of God: misuse, incorrect line voltage, improper installation, improper or unauthorized repairs, commercial use, or damage that occurs during shipping. All warranty repairs or part replacements must be performed by a SECA Authorized Service Center. (To find the nearest SECA Service Center, call 1-800-SAMSUNG.) Obligation to the Original Owner The original...

Owners Manual
Page 22
... -site services, minimum or maximum repair times, exchanges or replacements, accessories, options, upgrades, or consumables. Transportation to and from the Service Center is the responsibility of Purchase must be presented to the Service Center. Conditions covered are any original specified provisions for the warranty period originally specified, and to the Original Purchaser only. For the locations of a SAMSUNG Authorized Service Center in...
... -site services, minimum or maximum repair times, exchanges or replacements, accessories, options, upgrades, or consumables. Transportation to and from the Service Center is the responsibility of Purchase must be presented to the Service Center. Conditions covered are any original specified provisions for the warranty period originally specified, and to the Original Purchaser only. For the locations of a SAMSUNG Authorized Service Center in...

Owners Manual
Page 24
... Use the Number buttons to select serving size. 1. Quick Reference Feature Set Clock One Minute+ Cooking Instant Cook Buttons Defrost Set Cooking Time and Power Levels Operation 1. Press the buttons(0-9) sequentially to something other than High, press the POWER LEVEL button repeatedly. 2. If you are cooking (for each minute of cooking. 2. Use NUMBER buttons to begin cooking. Press the POWER LEVEL button. Press START to set the power level to enter the desired defrosting time. 3. Press START. 1. April. 2001 Printed in Malaysia The time will display and the oven...
... Use the Number buttons to select serving size. 1. Quick Reference Feature Set Clock One Minute+ Cooking Instant Cook Buttons Defrost Set Cooking Time and Power Levels Operation 1. Press the buttons(0-9) sequentially to something other than High, press the POWER LEVEL button repeatedly. 2. If you are cooking (for each minute of cooking. 2. Use NUMBER buttons to begin cooking. Press the POWER LEVEL button. Press START to set the power level to enter the desired defrosting time. 3. Press START. 1. April. 2001 Printed in Malaysia The time will display and the oven...


