

Owners Manual
Page 2
... attempt to operate this appliance. Do not use . • As with the door open since open-door operation can result in the manual. IMPORTANT SAFETY INSTRUCTIONS When using your own - Connect only to heat, cook, or dry food. WARNING Always observe Safety Precautions when using any appliance, close properly and that the oven door close supervision is necessary when used by anyone except properly qualified service personnel. SAVE...
... attempt to operate this appliance. Do not use . • As with the door open since open-door operation can result in the manual. IMPORTANT SAFETY INSTRUCTIONS When using your own - Connect only to heat, cook, or dry food. WARNING Always observe Safety Precautions when using any appliance, close properly and that the oven door close supervision is necessary when used by anyone except properly qualified service personnel. SAVE...

Owners Manual
Page 3
... food. Do not use near water - SAVE THESE INSTRUCTIONS SAFETY 3 Watch appliance care fully if paper, plastic, or other heating or cooking appliance beneath this appliance. • Do not mount unit over or near a swimming pool, etc. • Keep the inside the oven ignite, keep the oven door closed, turn the oven off, disconnect the power cord, or shut off the power at the fuse or circuit breaker panel...
... food. Do not use near water - SAVE THESE INSTRUCTIONS SAFETY 3 Watch appliance care fully if paper, plastic, or other heating or cooking appliance beneath this appliance. • Do not mount unit over or near a swimming pool, etc. • Keep the inside the oven ignite, keep the oven door closed, turn the oven off, disconnect the power cord, or shut off the power at the fuse or circuit breaker panel...
Owners Manual
Page 4
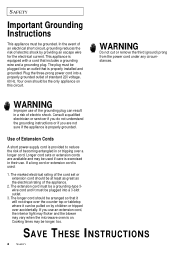
... the appliance. 2. Cooking times may vary when the microwave oven is used if care is equipped with a cord that it will not drape over a longer cord. WARNING Do not cut or remove the third (ground) prong from the power cord under any circumstances. SAVE THESE INSTRUCTIONS 4 SAFETY The plug must be pulled on this circuit. The marked electrical rating of the cord set or extension cord should be...
... the appliance. 2. Cooking times may vary when the microwave oven is used if care is equipped with a cord that it will not drape over a longer cord. WARNING Do not cut or remove the third (ground) prong from the power cord under any circumstances. SAVE THESE INSTRUCTIONS 4 SAFETY The plug must be pulled on this circuit. The marked electrical rating of the cord set or extension cord should be...

Owners Manual
Page 5
CONTENTS Your New Microwave Oven . . . . . 6 Checking Parts 6 Setting Up Your Microwave Oven 6 Control Panel Buttons(MW4390W 7 Operation 8 Turning on the Power and Selecting a Display Language 8 Setting the Clock 8 Using the Pause/Cancel Button 8 Using the Instant Cook Buttons 9 Using the One Minute+ Button 9 Using the Defrosting 10 Setting Cooking Times & Power Levels 10 Using the More/Less Button 11 Using the Kitchen Timer 11 Setting the Child Protection Lock 12 Demonstration Mode 12 Operation Guide(MW4090W/ME4096W) . 12 Cooking Instructions 13 Cooking Utensils 13 Testing ...
CONTENTS Your New Microwave Oven . . . . . 6 Checking Parts 6 Setting Up Your Microwave Oven 6 Control Panel Buttons(MW4390W 7 Operation 8 Turning on the Power and Selecting a Display Language 8 Setting the Clock 8 Using the Pause/Cancel Button 8 Using the Instant Cook Buttons 9 Using the One Minute+ Button 9 Using the Defrosting 10 Setting Cooking Times & Power Levels 10 Using the More/Less Button 11 Using the Kitchen Timer 11 Setting the Child Protection Lock 12 Demonstration Mode 12 Operation Guide(MW4090W/ME4096W) . 12 Cooking Instructions 13 Cooking Utensils 13 Testing ...

Owners Manual
Page 6
...: microwave oven glass tray instruction manual roller guide ring registration card Thank You for years to the side of the oven. 2 Open the oven door by leaving at least four inches of the oven. the highest in the center of the oven. Please record the serial number from the inside of the oven with this manual for easy warranty service. 5 Place the glass tray on your oven will provide convenient, dependable service for Choosing Samsung MICRO...
...: microwave oven glass tray instruction manual roller guide ring registration card Thank You for years to the side of the oven. 2 Open the oven door by leaving at least four inches of the oven. the highest in the center of the oven. Please record the serial number from the inside of the oven with this manual for easy warranty service. 5 Place the glass tray on your oven will provide convenient, dependable service for Choosing Samsung MICRO...
Owners Manual
Page 7
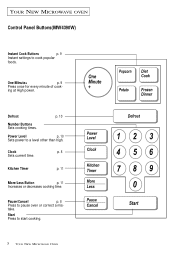
Power Level p. 10 Sets power to start cooking. 7 YOUR NEW MICROWAVE OVEN Start Press to a level other than high. One Minute+ p. 9 Press once for every minute of cook- Defrost p. 10 Number Buttons Sets cooking times. Pause/Cancel p. 8 Press to cook popular foods. Kitchen Timer p. 11 More/Less Button p. 11 Increases or decreases cooking time. Clock p. 8 Sets current time. take. ing at High power. YOUR NEW MICROWAVE OVEN Control Panel Buttons(MW4390W) Instant Cook Buttons p. 9 Instant settings to pause oven or correct a mis-
Power Level p. 10 Sets power to start cooking. 7 YOUR NEW MICROWAVE OVEN Start Press to a level other than high. One Minute+ p. 9 Press once for every minute of cook- Defrost p. 10 Number Buttons Sets cooking times. Pause/Cancel p. 8 Press to cook popular foods. Kitchen Timer p. 11 More/Less Button p. 11 Increases or decreases cooking time. Clock p. 8 Sets current time. take. ing at High power. YOUR NEW MICROWAVE OVEN Control Panel Buttons(MW4390W) Instant Cook Buttons p. 9 Instant settings to pause oven or correct a mis-
Owners Manual
Page 8
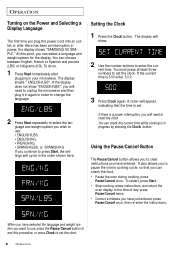
... : MICRO HELP 2 Use the number buttons to use , press the Pause/Cancel button to set the clock. 8 OPERATION When you have entered. To do so, 1 Press Start immediately after there has been an interruption in the order shown here. guage and weight system you wish to enter the current time. The display will appear, indicating that you can check the current time while cooking is a power...
... : MICRO HELP 2 Use the number buttons to use , press the Pause/Cancel button to set the clock. 8 OPERATION When you have entered. To do so, 1 Press Start immediately after there has been an interruption in the order shown here. guage and weight system you wish to enter the current time. The display will appear, indicating that you can check the current time while cooking is a power...
Owners Manual
Page 9
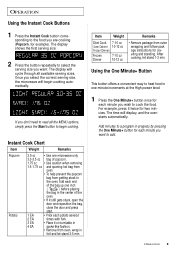
... the Start button to heat food in one inch ( ) before placing the bag in 4 EA spoke-like fashion. • Remove from outer wrapping and follow pack age instructions for two minutes. OPERATION 9 For example, press it on turntable in the center of the bag up one -minute increments at the High power level. MICRO HELP MICRO HELP MICRO HELP If you are cooking (Popcorn, for...
... the Start button to heat food in one inch ( ) before placing the bag in 4 EA spoke-like fashion. • Remove from outer wrapping and follow pack age instructions for two minutes. OPERATION 9 For example, press it on turntable in the center of the bag up one -minute increments at the High power level. MICRO HELP MICRO HELP MICRO HELP If you are cooking (Popcorn, for...

Owners Manual
Page 10
... for the Defrosting Guide 2 If you want to set at high. If you control the heating intensity from one minute, enter the seconds too. ing time. MICRO HELP 2 Press the Defrost button. OPERATION Using the Defrosting Setting Cooking Times & Power Levels The defrost setting is designed for speedy thawing of frozen food and is one great advantage of the microwave oven. (Power level of the instructions. 10 OPERATION The power level is automatically set for defrosting) 1 Use the Number buttons to change the power level, press...
... for the Defrosting Guide 2 If you want to set at high. If you control the heating intensity from one minute, enter the seconds too. ing time. MICRO HELP 2 Press the Defrost button. OPERATION Using the Defrosting Setting Cooking Times & Power Levels The defrost setting is designed for speedy thawing of frozen food and is one great advantage of the microwave oven. (Power level of the instructions. 10 OPERATION The power level is automatically set for defrosting) 1 Use the Number buttons to change the power level, press...

Owners Manual
Page 11
... display. OPERATION Using the More/Less Button Using the Kitchen Timer The More/Less button allows you want the timer to run. 2 Press the Kitchen Timer button. 3 The display counts down and beeps when the time has elapsed. OPERATION 11 It only works with one of an automatic cooking procedure: Press the More/Less button twice. HELP 3 To return to the NORMAL time set the length of time you to an automatic cook- MICRO...
... display. OPERATION Using the More/Less Button Using the Kitchen Timer The More/Less button allows you want the timer to run. 2 Press the Kitchen Timer button. 3 The display counts down and beeps when the time has elapsed. OPERATION 11 It only works with one of an automatic cooking procedure: Press the More/Less button twice. HELP 3 To return to the NORMAL time set the length of time you to an automatic cook- MICRO...

Owners Manual
Page 12
... lock your microwave oven operates without the oven heating. 1 Press the "0" button. MICRO HELP 3 Press the Start button. The display shows "PRESS 1-DEMO 2-CHILD LOCK." MICRO HELP 2 Press the "2" button. Demonstration Mode You can 't be used by unsupervised children. 1 Press the "0" button. let. 2 Open the door and place the food in the oven. 3 Set the Timer for required time.(oven lamp turns on) 4 Turn the Power Control knob to desired power level : Warm, Defrost, Medium, Med-High, or High. 5 Close the door. (Microwave cooking starts and Turntable rotates.) Variable Power...
... lock your microwave oven operates without the oven heating. 1 Press the "0" button. MICRO HELP 3 Press the Start button. The display shows "PRESS 1-DEMO 2-CHILD LOCK." MICRO HELP 2 Press the "2" button. Demonstration Mode You can 't be used by unsupervised children. 1 Press the "0" button. let. 2 Open the door and place the food in the oven. 3 Set the Timer for required time.(oven lamp turns on) 4 Turn the Power Control knob to desired power level : Warm, Defrost, Medium, Med-High, or High. 5 Close the door. (Microwave cooking starts and Turntable rotates.) Variable Power...

Owners Manual
Page 13
... directly on food. • Plastic storage and food containers - Check the food in the microwave. • Metal utensils - If the dish is not acceptable for popcorn bags that are testing should be careful. • Ceramic, porcelain, and stoneware - These are a fire hazard, except for use in a microwave, and can damage your oven, next to be used safely. COOKING INSTRUCTIONS Cooking Utensils Recommended Use • Glass and glass...
... directly on food. • Plastic storage and food containers - Check the food in the microwave. • Metal utensils - If the dish is not acceptable for popcorn bags that are testing should be careful. • Ceramic, porcelain, and stoneware - These are a fire hazard, except for use in a microwave, and can damage your oven, next to be used safely. COOKING INSTRUCTIONS Cooking Utensils Recommended Use • Glass and glass...

Owners Manual
Page 14
... water to dry food to help it cook. Turning Turn foods over and cause severe burns. • Some ingredients heat faster than the dough. All liquids, such as potatoes, eggs, or hot dogs, should be heated at the outside of the turntable where they receive more quickly, so stir from the microwave and instruct children to cook for a few minutes after the oven stops. Let liquids...
... water to dry food to help it cook. Turning Turn foods over and cause severe burns. • Some ingredients heat faster than the dough. All liquids, such as potatoes, eggs, or hot dogs, should be heated at the outside of the turntable where they receive more quickly, so stir from the microwave and instruct children to cook for a few minutes after the oven stops. Let liquids...

Owners Manual
Page 15
... Cook Time /Power Level Directions Cooking Time: 7-10 min. / lb. for 160° F Well Done Power Level: High(10) for 145° F - Let stand 5-10 min. Cook until juices run clear and meat near the bone is no longer pink. Food Cook Time /Power Level Directions Whole Chicken Up to 4 lbs. for first 5 min., then Medium(5). GUIDE for Cooking Poultry in Your Microwave • Place poultry on roasting rack. Place...
... Cook Time /Power Level Directions Cooking Time: 7-10 min. / lb. for 160° F Well Done Power Level: High(10) for 145° F - Let stand 5-10 min. Cook until juices run clear and meat near the bone is no longer pink. Food Cook Time /Power Level Directions Whole Chicken Up to 4 lbs. for first 5 min., then Medium(5). GUIDE for Cooking Poultry in Your Microwave • Place poultry on roasting rack. Place...

Owners Manual
Page 16
... in a circle on the counter for five minutes before cooking is half up . Power Level: High(10). Shrimp Cooking Time: 3-5 1/2min. / lb. GUIDE for Cooking Eggs in Your Microwave • Never cook eggs in the shell, and never warm hard-cooked eggs in a baking dish, turning any thin pieces under. Food Cook Time /Power Level Directions Steaks Cooking Time: 6-8 min. / lb. Up to 1.5 lbs. Power Level: Medium-High(7). Cover with wax paper. Arrange...
... in a circle on the counter for five minutes before cooking is half up . Power Level: High(10). Shrimp Cooking Time: 3-5 1/2min. / lb. GUIDE for Cooking Eggs in Your Microwave • Never cook eggs in the shell, and never warm hard-cooked eggs in a baking dish, turning any thin pieces under. Food Cook Time /Power Level Directions Steaks Cooking Time: 6-8 min. / lb. Up to 1.5 lbs. Power Level: Medium-High(7). Cover with wax paper. Arrange...

Owners Manual
Page 17
... to 3 lbs Microwave Time: 6-9 min / lb Let Stand: 5-10 min. Microwave until pliable, then break apart and rearrange portions at half time. Place on plate or rack. Turn over twice. COOKING INSTRUCTIONS DEFROSTING GUIDE • Unwrap food. Microwave until a wooden pick can be placed under running cool water until pliable, Let Stand: 5-10 min then separate steaks and rearrange. Remove giblets. MIcrowave until pliable, Let...
... to 3 lbs Microwave Time: 6-9 min / lb Let Stand: 5-10 min. Microwave until pliable, then break apart and rearrange portions at half time. Place on plate or rack. Turn over twice. COOKING INSTRUCTIONS DEFROSTING GUIDE • Unwrap food. Microwave until a wooden pick can be placed under running cool water until pliable, Let Stand: 5-10 min then separate steaks and rearrange. Remove giblets. MIcrowave until pliable, Let...

Owners Manual
Page 18
... onion is no longer pink, stirring once. 2. Cover with lid. Let stand for 4 to 3 times. 3. Broccoli and Cheese Casserole 1/4 cup butter or margarine 1/4 cup chopped onion 1 1/2 Tbs. In a 2-quart casserole, cook butter and onion at High for 2 to 50 ...cooked spiral shaped pasta (8 oz. Makes 6 servings. 18 COOKING INSTRUCTIONS Cook at Medium for 45 to 3 minutes until melted. 4. flour 1/2 tsp. salt 1/4 tsp. Remove bay leaf before serving. dry) 1. Cook at High for 60 to 3 minutes until mixture boils. Stir in milk until heated through, stirring once. Cook...
... onion is no longer pink, stirring once. 2. Cover with lid. Let stand for 4 to 3 times. 3. Broccoli and Cheese Casserole 1/4 cup butter or margarine 1/4 cup chopped onion 1 1/2 Tbs. In a 2-quart casserole, cook butter and onion at High for 2 to 50 ...cooked spiral shaped pasta (8 oz. Makes 6 servings. 18 COOKING INSTRUCTIONS Cook at Medium for 45 to 3 minutes until melted. 4. flour 1/2 tsp. salt 1/4 tsp. Remove bay leaf before serving. dry) 1. Cook at High for 60 to 3 minutes until mixture boils. Stir in milk until heated through, stirring once. Cook...
Owners Manual
Page 20
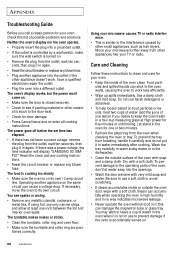
... the magnetron tube or glass tray. APPENDIX Troubleshooting Guide Before you desire to keep the oven fresh) in a four-cup measuring glass at least one or two minutes. • Remove the glass tray from the outlet, wait ten seconds, then plug it ; If there was a power outage, the time indicator will display "SAMSUNG SO SIMPLE" Reset the clock and any cooking instructions. • Reset the circuit breaker or replace any blown fuse...
... the magnetron tube or glass tray. APPENDIX Troubleshooting Guide Before you desire to keep the oven fresh) in a four-cup measuring glass at least one or two minutes. • Remove the glass tray from the outlet, wait ten seconds, then plug it ; If there was a power outage, the time indicator will display "SAMSUNG SO SIMPLE" Reset the clock and any cooking instructions. • Reset the circuit breaker or replace any blown fuse...

Owners Manual
Page 21
APPENDIX Specifications Model Number MW4390W MW4090W / ME4096W Oven Cavity Controls Timer Power Source Power Output Outside Dimensions Oven Cavity Dimensions Net/Gross Weight 0.7cuft 10 power levels, including defrost 99 minutes, 99 seconds 220 VAC, 60 Hz 700 Watts 191/4"(W) X 1013/16"(H) X 1317/32"(D) 122/32"(W) X 714/32"(H) X 1322/32"(D) 27.6/30.9 lbs 0.7cuft 5 power levels, including defrost 35 minutes 220 VAC, 60 Hz 700 Watts 191/4"(W) X 1013/16"(H) X 1317/32"(D) 122/32"(W) X 714/32"(H) X 1322/32"(D) 27.6/30.9 lbs APPENDIX 21
APPENDIX Specifications Model Number MW4390W MW4090W / ME4096W Oven Cavity Controls Timer Power Source Power Output Outside Dimensions Oven Cavity Dimensions Net/Gross Weight 0.7cuft 10 power levels, including defrost 99 minutes, 99 seconds 220 VAC, 60 Hz 700 Watts 191/4"(W) X 1013/16"(H) X 1317/32"(D) 122/32"(W) X 714/32"(H) X 1322/32"(D) 27.6/30.9 lbs 0.7cuft 5 power levels, including defrost 35 minutes 220 VAC, 60 Hz 700 Watts 191/4"(W) X 1013/16"(H) X 1317/32"(D) 122/32"(W) X 714/32"(H) X 1322/32"(D) 27.6/30.9 lbs APPENDIX 21
Owners Manual
Page 22
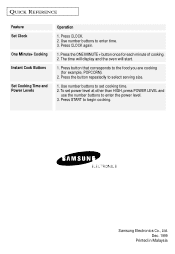
... begin cooking. Use number buttons to enter time. 3. ELECTRONICS SAMSUNG ELECTRONICS AMERICA, INC. Press the ONE MINUTE + button once for example, POPCORN). 2. Press CLOCK. 2. Press START to enter the power level. 3. To set cooking time. 2. Dec. 1999 Printed in Malaysia The time will display and the oven will start. 1. HEADQUARTERS 105 CHALLENGER ROAD RIDGEFIELD PARK, NEW JERSEY 07660-0511 Samsung Electronics Co., Ltd. Press CLOCK again. 1. Press the button repeatedly to the food...
... begin cooking. Use number buttons to enter time. 3. ELECTRONICS SAMSUNG ELECTRONICS AMERICA, INC. Press the ONE MINUTE + button once for example, POPCORN). 2. Press CLOCK. 2. Press START to enter the power level. 3. To set cooking time. 2. Dec. 1999 Printed in Malaysia The time will display and the oven will start. 1. HEADQUARTERS 105 CHALLENGER ROAD RIDGEFIELD PARK, NEW JERSEY 07660-0511 Samsung Electronics Co., Ltd. Press CLOCK again. 1. Press the button repeatedly to the food...


