User Manual (ENGLISH)
Page 5
... Paper Jams ...7.4 In the Paper Feed Area (Paper Jam 0 7.4 Around the Toner Cartridge (Paper Jam 1 7.6 In the Paper Exit Area (Paper Jam 2 7.7 In the Duplex Area (Duplex Jam 1,2 7.7 Tips for Paper and Special Materials 4.1 Loading Paper ...4.2 Using the Tray 1 or the Optional Tray 4.2 Using the Multi-Purpose Tray 4.2 Using the Manual Feed...
... Paper Jams ...7.4 In the Paper Feed Area (Paper Jam 0 7.4 Around the Toner Cartridge (Paper Jam 1 7.6 In the Paper Exit Area (Paper Jam 2 7.7 In the Duplex Area (Duplex Jam 1,2 7.7 Tips for Paper and Special Materials 4.1 Loading Paper ...4.2 Using the Tray 1 or the Optional Tray 4.2 Using the Multi-Purpose Tray 4.2 Using the Manual Feed...

User Manual (ENGLISH)
Page 6
... the Memory DIMM 9.3 Installing a Network Card ...9.3 Using the Hard Disk ...9.4 Installing the Hard Disk ...9.4 Printing with the Optional Hard Disk 9.5 Installing an Optional Tray 2 ...9.7 Installing a Duplex Unit ...9.9 Printing on the Control Panel 8.2 9. 8. Using Your Printer on a Network About Sharing the Printer on a Network 8.1 Setting Up a Network-Connected Printer 8.1 Configuring Network Parameters...
... the Memory DIMM 9.3 Installing a Network Card ...9.3 Using the Hard Disk ...9.4 Installing the Hard Disk ...9.4 Printing with the Optional Hard Disk 9.5 Installing an Optional Tray 2 ...9.7 Installing a Duplex Unit ...9.9 Printing on the Control Panel 8.2 9. 8. Using Your Printer on a Network About Sharing the Printer on a Network 8.1 Setting Up a Network-Connected Printer 8.1 Configuring Network Parameters...

User Manual (ENGLISH)
Page 12
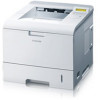
.... • Your printer is compatible with Linux and Macintosh. • Your printer comes with your printer. (S: Standard, O: Option) Features ML-3560 ML-3561N ML-3561ND IEEE 1284 S S S USB 2.0 S S S Network Interface O S S Wireless LAN O O O PostScript Emulation S S S Hard Disk O O O Duplex Unit O O S Optional Tray 2 O O O 1.2 Introduction For details, see page 9.1. • A Network interface enables network printing. You can also use...
.... • Your printer is compatible with Linux and Macintosh. • Your printer comes with your printer. (S: Standard, O: Option) Features ML-3560 ML-3561N ML-3561ND IEEE 1284 S S S USB 2.0 S S S Network Interface O S S Wireless LAN O O O PostScript Emulation S S S Hard Disk O O O Duplex Unit O O S Optional Tray 2 O O O 1.2 Introduction For details, see page 9.1. • A Network interface enables network printing. You can also use...
User Manual (ENGLISH)
Page 13
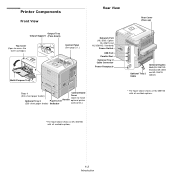
... Output Support (Face down) Top Cover (Open to access the toner cartridge.) Control Panel (See page 3.1.) Network Port (ML-3560: Option ML-3561N and ML-3561ND: Standard) Power Switch USB Port Parallel Port Optional Tray 2 Cable Connector Power Receptacle Multi-Purpose Tray Tray 1 Control Board ... Optional Tray 2 Paper Level Handle optional printer (500-sheet paper feeder) Indicator accessories.) Optional Tray 2 Cable Optional Duplex Unit (ML-3561ND: Standard ML-3560 and ML-3561N: Option) * The figure above shows an ML-3561ND with all available options. * The figure above shows an...
... Output Support (Face down) Top Cover (Open to access the toner cartridge.) Control Panel (See page 3.1.) Network Port (ML-3560: Option ML-3561N and ML-3561ND: Standard) Power Switch USB Port Parallel Port Optional Tray 2 Cable Connector Power Receptacle Multi-Purpose Tray Tray 1 Control Board ... Optional Tray 2 Paper Level Handle optional printer (500-sheet paper feeder) Indicator accessories.) Optional Tray 2 Cable Optional Duplex Unit (ML-3561ND: Standard ML-3560 and ML-3561N: Option) * The figure above shows an ML-3561ND with all available options. * The figure above shows an...

User Manual (ENGLISH)
Page 24
The control panel provides access to check if your printer. (ML-3561N or ML-3561ND, or ML-3560 with an optional network card) Information Menu This menu contains printer information pages that give details about the printer and its configuration. ... Job*** PS3 Font List PCL Font List EPSON Fonts IBM Fonts Graphics (See page 3.6.) Resolution Image Quality Toner Save Density Layout (See page 3.5.) Orientation Duplex**** Duplex Margin**** Simplex Margin Copies Paper (See page 3.4.) Tray Source Media Size Custom Width Custom Height Media Type Tray Chaining Printer (See page 3.6.) Default Set ...
The control panel provides access to check if your printer. (ML-3561N or ML-3561ND, or ML-3560 with an optional network card) Information Menu This menu contains printer information pages that give details about the printer and its configuration. ... Job*** PS3 Font List PCL Font List EPSON Fonts IBM Fonts Graphics (See page 3.6.) Resolution Image Quality Toner Save Density Layout (See page 3.5.) Orientation Duplex**** Duplex Margin**** Simplex Margin Copies Paper (See page 3.4.) Tray Source Media Size Custom Width Custom Height Media Type Tray Chaining Printer (See page 3.6.) Default Set ...

User Manual (ENGLISH)
Page 26
... Portrait*, Landscape Choose the default orientation of print materials for double-sided printing. Item Explanation Values: Top/Left:5.0*, Short/Long: 0* Duplex Margin In this menu, you can set the margin of print image on one side of print materials for onesided printing. You can...3.5 Using the Control Panel Simplex Margin Copies Values: 0.0* Set the margin of paper. NOTE: This menu item is available only when you install an optional duplex unit. Prints pages to read by selecting any number from 1 to read like a note pad. 2 3 2 5 Long Edge in the Portrait orientation...
... Portrait*, Landscape Choose the default orientation of print materials for double-sided printing. Item Explanation Values: Top/Left:5.0*, Short/Long: 0* Duplex Margin In this menu, you can set the margin of print image on one side of print materials for onesided printing. You can...3.5 Using the Control Panel Simplex Margin Copies Values: 0.0* Set the margin of paper. NOTE: This menu item is available only when you install an optional duplex unit. Prints pages to read by selecting any number from 1 to read like a note pad. 2 3 2 5 Long Edge in the Portrait orientation...

User Manual (ENGLISH)
Page 42
... printer. 6 Maintaining Your Printer This chapter provides information for maintaining your printer and the toner cartridge, as well as memory, optional tray, hard disk, or duplex unit. They can print a configuration page from the printer's control panel. Printing a Configuration Page You can be help troubleshoot problems, or to access the menu...
... printer. 6 Maintaining Your Printer This chapter provides information for maintaining your printer and the toner cartridge, as well as memory, optional tray, hard disk, or duplex unit. They can print a configuration page from the printer's control panel. Printing a Configuration Page You can be help troubleshoot problems, or to access the menu...
User Manual (ENGLISH)
Page 51
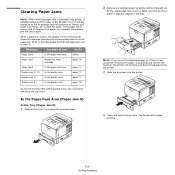
... to the table below Paper Jam1 Around the toner cartridge page 7.6 Paper Jam2 In the paper exit area page 7.7 Duplex Jam (1, 2) In the duplex area page 7.7 Duplex Jam 1 In the duplex area page 7.7 Duplex Jam 2 In the duplex area page 7.8 To resume printing after clearing paper jams, you cannot find jammed paper, or if there is...
... to the table below Paper Jam1 Around the toner cartridge page 7.6 Paper Jam2 In the paper exit area page 7.7 Duplex Jam (1, 2) In the duplex area page 7.7 Duplex Jam 1 In the duplex area page 7.7 Duplex Jam 2 In the duplex area page 7.8 To resume printing after clearing paper jams, you cannot find jammed paper, or if there is...

User Manual (ENGLISH)
Page 54
In the Duplex Area (Duplex Jam 1,2) In the Duplex Area (Duplex Jam 1) 1 Open the rear cover. The printer will resume printing. 7.7 Solving Problems If you cannot find jammed paper, or if there is any resistance removing ...
In the Duplex Area (Duplex Jam 1,2) In the Duplex Area (Duplex Jam 1) 1 Open the rear cover. The printer will resume printing. 7.7 Solving Problems If you cannot find jammed paper, or if there is any resistance removing ...

User Manual (ENGLISH)
Page 55
...that the printer needs cleaning. Solving Print Quality Problems Dirt inside of the printer. 2 Locate the jammed paper and remove it. 3 Insert the duplex unit into the slot. 4 Open and close the top cover. Try a different kind or brand of the Printer" on . See "Vertical ...the page: • A single sheet of the paper is on page 6.5. The manufacturing processes can be defective. In the Duplex Area (Duplex Jam 2) 1 Pull the duplex unit out of the printer or improper paper loading may reduce print quality. The printer will resume printing. See "Paper Specifications" ...
...that the printer needs cleaning. Solving Print Quality Problems Dirt inside of the printer. 2 Locate the jammed paper and remove it. 3 Insert the duplex unit into the slot. 4 Open and close the top cover. Try a different kind or brand of the Printer" on . See "Vertical ...the page: • A single sheet of the paper is on page 6.5. The manufacturing processes can be defective. In the Duplex Area (Duplex Jam 2) 1 Pull the duplex unit out of the printer or improper paper loading may reduce print quality. The printer will resume printing. See "Paper Specifications" ...

User Manual (ENGLISH)
Page 57
... be installed properly. Check Cartridge A toner cartridge is not installed or your printer. Cleaning Now An OPC or fuser cleaning Wait until deleting is open . Duplex Jam (1, 2) A paper jam occurs while printing on the paper. Remove the cartridge and reinsert. • The toner cartridge may be normal. • You may require...
... be installed properly. Check Cartridge A toner cartridge is not installed or your printer. Cleaning Now An OPC or fuser cleaning Wait until deleting is open . Duplex Jam (1, 2) A paper jam occurs while printing on the paper. Remove the cartridge and reinsert. • The toner cartridge may be normal. • You may require...
User Manual (ENGLISH)
Page 66
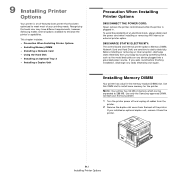
...of an electrical shock, always disconnect the power cord when installing or removing ANY internal or external printer option. Use only the Samsung-approved DIMM. Before installing or removing an internal option, discharge static electricity from the back of the printer. To avoid the ...laser printer that each user may have different requirements, however, Samsung makes several options available to meet most of your Samsung dealer. 1 Turn the printer power off and unplug all cables from the printer. 2 Remove the duplex-slot cover from your body by touching something metal, such as...
...of an electrical shock, always disconnect the power cord when installing or removing ANY internal or external printer option. Use only the Samsung-approved DIMM. Before installing or removing an internal option, discharge static electricity from the back of the printer. To avoid the ...laser printer that each user may have different requirements, however, Samsung makes several options available to meet most of your Samsung dealer. 1 Turn the printer power off and unplug all cables from the printer. 2 Remove the duplex-slot cover from your body by touching something metal, such as...

User Manual (ENGLISH)
Page 67
...and select Properties. 16 For Windows 95/98/Me, select Device Options tab. For Windows XP/2003, select Printers and Faxes. 14 Select the Samsung ML-3560 Series PS printer. 15 Click the right mouse button on the PS printer driver. Locate the alignment notches on either side of the PostScript... printer driver so that you need to select it in from its antistatic package. Groove Notch 9 Reinstall the duplex-slot cover or the optional duplex unit. 10 Reconnect the power cord and printer cable, and turn the printer on the memory DIMM slot. Make sure the ...
...and select Properties. 16 For Windows 95/98/Me, select Device Options tab. For Windows XP/2003, select Printers and Faxes. 14 Select the Samsung ML-3560 Series PS printer. 15 Click the right mouse button on the PS printer driver. Locate the alignment notches on either side of the PostScript... printer driver so that you need to select it in from its antistatic package. Groove Notch 9 Reinstall the duplex-slot cover or the optional duplex unit. 10 Reconnect the power cord and printer cable, and turn the printer on the memory DIMM slot. Make sure the ...

User Manual (ENGLISH)
Page 68
... wired/wireless network interface card in the ML-3560, ML-3561N and ML-3561ND. 9.3 Installing Printer Options Push the card firmly into the connector on the control board until it in your printer. 1 Turn the printer power off and unplug all cables from the printer. 2 Remove the duplex-slot cover from step 8 on page 9.2. Installing...
... wired/wireless network interface card in the ML-3560, ML-3561N and ML-3561ND. 9.3 Installing Printer Options Push the card firmly into the connector on the control board until it in your printer. 1 Turn the printer power off and unplug all cables from the printer. 2 Remove the duplex-slot cover from step 8 on page 9.2. Installing...

User Manual (ENGLISH)
Page 69
...network card. 7 Replace the control board cover. see page 8.2. 4 Insert a hard disk and push it in until it . 8 Reinstall the duplex-slot cover or the optional duplex unit. 9 Connect the network cable, reconnect the power cord, and then turn the printer on. If you removed in step 4 or supplied ...with the network interface card. Unplug the power cord and all of the cables. 2 Remove the duplex-slot cover from the back of the computer. NOTE: For information about configuring and using the printer on the control panel; You can also configure...
...network card. 7 Replace the control board cover. see page 8.2. 4 Insert a hard disk and push it in until it . 8 Reinstall the duplex-slot cover or the optional duplex unit. 9 Connect the network cable, reconnect the power cord, and then turn the printer on. If you removed in step 4 or supplied ...with the network interface card. Unplug the power cord and all of the cables. 2 Remove the duplex-slot cover from the back of the computer. NOTE: For information about configuring and using the printer on the control panel; You can also configure...

User Manual (ENGLISH)
Page 70
... optional duplex unit. 8 Reconnect the power cord and printer cable, and turn the printer on. 9 Print a configuration page from the File menu. For Windows 9x/Me/NT4.0/2000, select Settings and then Printers. 12 For Windows XP/2003, select Printers and Faxes. 13 Select the Samsung ML-3560 Series PCL 6 printer icon or Samsung ML...
... optional duplex unit. 8 Reconnect the power cord and printer cable, and turn the printer on. 9 Print a configuration page from the File menu. For Windows 9x/Me/NT4.0/2000, select Settings and then Printers. 12 For Windows XP/2003, select Printers and Faxes. 13 Select the Samsung ML-3560 Series PCL 6 printer icon or Samsung ML...

User Manual (ENGLISH)
Page 71
... selected file. 1 Press the Menu button ( ) on the control panel until you want to print on both sides of paper, press the Enter button ( ) when "Duplex" appears on the display. Deleting a Stored Job You can delete jobs currently stored in the same way. 5 When "Func Print" appears, press the Enter button... appears on the display and then press the Enter button ( ). 4 If the job is secured with a password, "Input PIN" displays. If you installed the optional duplex unit and want to change its print order so that it can be printed are listed in the Active Job Queue in the order you...
... selected file. 1 Press the Menu button ( ) on the control panel until you want to print on both sides of paper, press the Enter button ( ) when "Duplex" appears on the display. Deleting a Stored Job You can delete jobs currently stored in the same way. 5 When "Func Print" appears, press the Enter button... appears on the display and then press the Enter button ( ). 4 If the job is secured with a password, "Input PIN" displays. If you installed the optional duplex unit and want to change its print order so that it can be printed are listed in the Active Job Queue in the order you...
User Manual (ENGLISH)
Page 74
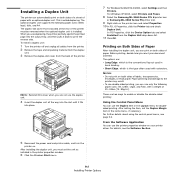
.... When you can use duplexing, the printer partially ejects the printed page into place. 7 For Windows 9x/Me/NT4.0/2000, select Settings and then Printers. For Windows XP/2003, select Printers and Faxes. 8 Select the Samsung ML-3560 Series PCL 6 printer icon or Samsung ML-3560 Series PS printer icon.... 9 Right-click on . Before printing, decide how you must be removed when the optional duplex unit is the type often used in book binding. •...
.... When you can use duplexing, the printer partially ejects the printed page into place. 7 For Windows 9x/Me/NT4.0/2000, select Settings and then Printers. For Windows XP/2003, select Printers and Faxes. 8 Select the Samsung ML-3560 Series PCL 6 printer icon or Samsung ML-3560 Series PS printer icon.... 9 Right-click on . Before printing, decide how you must be removed when the optional duplex unit is the type often used in book binding. •...
User Manual (ENGLISH)
Page 75
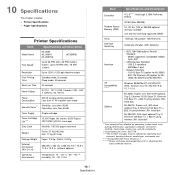
... • Printer Specifications • Paper Specifications Printer Specifications Item Model Name Specifications and Description ML-3560 ML-3561N ML-3561ND (KT35MPB) Print Speed* Up to 33 PPM (A4); 35 PPM (Letter) Duplex: Up to 18 IPM (A4); 19 IPM (Letter) Resolution Up to download the latest... Random Access Memory (RAM) 32 MB (Max 288 MB) 16, 32, 64, 128, or 256 MB optional memory available Use only the Samsung-approved DIMM. Fonts 1 bitmap, 45 scalable, 136 PS3 fonts Interface Switching Automatic (Parallel, USB, Network) Interface • IEEE 1284 Bidirectional Parallel...
... • Printer Specifications • Paper Specifications Printer Specifications Item Model Name Specifications and Description ML-3560 ML-3561N ML-3561ND (KT35MPB) Print Speed* Up to 33 PPM (A4); 35 PPM (Letter) Duplex: Up to 18 IPM (A4); 19 IPM (Letter) Resolution Up to download the latest... Random Access Memory (RAM) 32 MB (Max 288 MB) 16, 32, 64, 128, or 256 MB optional memory available Use only the Samsung-approved DIMM. Fonts 1 bitmap, 45 scalable, 136 PS3 fonts Interface Switching Automatic (Parallel, USB, Network) Interface • IEEE 1284 Bidirectional Parallel...
User Manual (ENGLISH)
Page 80
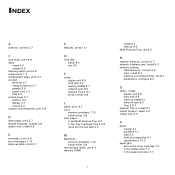
...-Purpose Tray, use 4.2 N network antenna, connect 2.7 network interface card, install 9.3 network printing cable/antenna, connect 2.6 card, install 9.3 network-connected printer, set 8.1 parameters, configure 8.2 O option, install duplex unit 9.9 hard disk 9.4 memory DIMM 9.1 network card 9.3 Tray 2 9.7 optional Tray 2, install 9.7 output location, select 4.5 output tray 4.5 P paper choose 4.1 guideline 4.1 load 2.4 sizes and capacities 4.1 specifications 10...
...-Purpose Tray, use 4.2 N network antenna, connect 2.7 network interface card, install 9.3 network printing cable/antenna, connect 2.6 card, install 9.3 network-connected printer, set 8.1 parameters, configure 8.2 O option, install duplex unit 9.9 hard disk 9.4 memory DIMM 9.1 network card 9.3 Tray 2 9.7 optional Tray 2, install 9.7 output location, select 4.5 output tray 4.5 P paper choose 4.1 guideline 4.1 load 2.4 sizes and capacities 4.1 specifications 10...


