User Manual (ENGLISH)
Page 4
Introduction Special Features ...1.1 Printer Features ...1.2 Printer Components ...1.3 Front View ...1.3 Rear View ...1.3 2. Setting Up Your Printer Unpacking ...2.1 Selecting a Location ...2.2 Installing the Toner Cartridge 2.2 Loading Paper ...2.4 Changing the Size of Control Panel Menus 3.3 Information Menu ...3.3 Paper Menu ...3.4 Layout Menu ...3.5 Graphics Menu ...3.6 Printer Menu ...3.6 Setup Menu ...3.6 PCL Menu ...3.7 PostScript Menu ...3.8 ...
Introduction Special Features ...1.1 Printer Features ...1.2 Printer Components ...1.3 Front View ...1.3 Rear View ...1.3 2. Setting Up Your Printer Unpacking ...2.1 Selecting a Location ...2.2 Installing the Toner Cartridge 2.2 Loading Paper ...2.4 Changing the Size of Control Panel Menus 3.3 Information Menu ...3.3 Paper Menu ...3.4 Layout Menu ...3.5 Graphics Menu ...3.6 Printer Menu ...3.6 Setup Menu ...3.6 PCL Menu ...3.7 PostScript Menu ...3.8 ...
User Manual (ENGLISH)
Page 5
......7.1 Solving General Printing Problems 7.2 Clearing Paper Jams ...7.4 In the Paper Feed Area (Paper Jam 0 7.4 Around the Toner Cartridge (Paper Jam 1 7.6 In the Paper Exit Area (Paper Jam 2 7.7 In the Duplex Area (Duplex Jam 1,2 7.7...Maintaining Your Printer Printing Information Pages ...6.1 Printing a Configuration Page 6.1 Printing Usage Page ...6.1 Maintaining the Toner Cartridge 6.2 Checking the Toner Remains 6.2 Redistributing Toner ...6.2 Replacing the Toner Cartridge 6.3 Cleaning the Printer ...6.5 Cleaning the Outside of the Printer 6.5 Cleaning the Inside of the Printer 6.5...
......7.1 Solving General Printing Problems 7.2 Clearing Paper Jams ...7.4 In the Paper Feed Area (Paper Jam 0 7.4 Around the Toner Cartridge (Paper Jam 1 7.6 In the Paper Exit Area (Paper Jam 2 7.7 In the Duplex Area (Duplex Jam 1,2 7.7...Maintaining Your Printer Printing Information Pages ...6.1 Printing a Configuration Page 6.1 Printing Usage Page ...6.1 Maintaining the Toner Cartridge 6.2 Checking the Toner Remains 6.2 Redistributing Toner ...6.2 Replacing the Toner Cartridge 6.3 Cleaning the Printer ...6.5 Cleaning the Outside of the Printer 6.5 Cleaning the Inside of the Printer 6.5...
User Manual (ENGLISH)
Page 13
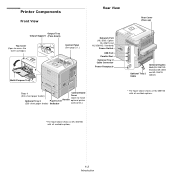
... Cover (Face up) Output Tray Output Support (Face down) Top Cover (Open to access the toner cartridge.) Control Panel (See page 3.1.) Network Port (ML-3560: Option ML-3561N and ML-3561ND: Standard) Power Switch USB Port Parallel Port Optional Tray 2 Cable Connector Power Receptacle Multi-Purpose Tray Tray...Tray 2 Paper Level Handle optional printer (500-sheet paper feeder) Indicator accessories.) Optional Tray 2 Cable Optional Duplex Unit (ML-3561ND: Standard ML-3560 and ML-3561N: Option) * The figure above shows an ML-3561ND with all available options. * The figure above shows an...
... Cover (Face up) Output Tray Output Support (Face down) Top Cover (Open to access the toner cartridge.) Control Panel (See page 3.1.) Network Port (ML-3560: Option ML-3561N and ML-3561ND: Standard) Power Switch USB Port Parallel Port Optional Tray 2 Cable Connector Power Receptacle Multi-Purpose Tray Tray...Tray 2 Paper Level Handle optional printer (500-sheet paper feeder) Indicator accessories.) Optional Tray 2 Cable Optional Duplex Unit (ML-3561ND: Standard ML-3560 and ML-3561N: Option) * The figure above shows an ML-3561ND with all available options. * The figure above shows an...
User Manual (ENGLISH)
Page 14
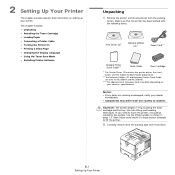
... 2 Setting Up Your Printer This chapter provides step by two people. NOTES: • If any items are only for ML-3561N and ML-3561ND. ***The appearance of the packing tape from the packing carton. Use safe lifting and handling techniques. Back injury could result if... a single person attempts to move the printer, it should be moved by step information on your printer. CAUTION: The printer weights 17 kg including the toner cartridge...
... 2 Setting Up Your Printer This chapter provides step by two people. NOTES: • If any items are only for ML-3561N and ML-3561ND. ***The appearance of the packing tape from the packing carton. Use safe lifting and handling techniques. Back injury could result if... a single person attempts to move the printer, it should be moved by step information on your printer. CAUTION: The printer weights 17 kg including the toner cartridge...
User Manual (ENGLISH)
Page 15
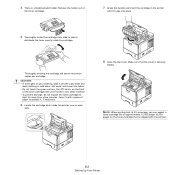
...the top cover. The area should be longer than 60 cm when correctly removed. • Holding the toner cartridge, pull the sealing tape straight to remove it from direct sunlight or sources of the cartridge and discard it. 482.6mm(19in) NOTES: • The sealing tape should be opened or removed) ... for opening of your desk or table. Clearance Space Front: 482.6 mm (enough space so that trays can be well-ventilated and away from the cartridge. If this happens, you cannot use sharp objects, such as a knife or scissors, to allow opening covers and trays. Be careful not to the ...
...the top cover. The area should be longer than 60 cm when correctly removed. • Holding the toner cartridge, pull the sealing tape straight to remove it from direct sunlight or sources of the cartridge and discard it. 482.6mm(19in) NOTES: • The sealing tape should be opened or removed) ... for opening of your desk or table. Clearance Space Front: 482.6 mm (enough space so that trays can be well-ventilated and away from the cartridge. If this happens, you cannot use sharp objects, such as a knife or scissors, to allow opening covers and trays. Be careful not to the ...
User Manual (ENGLISH)
Page 16
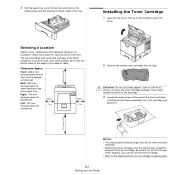
... in the printer until it snaps into fabric. • Do not touch the green surface, the OPC drum, on the front of the toner cartridge with a piece of paper to protect it off with the printer). 2.3 Setting Up Your Printer Hot water sets toner into place. 5 Thoroughly shake the...the toner evenly inside the printer, one on your hands or any other material. • To prevent damage, do not expose the toner cartridge to light for the toner cartridge that the cover is a flexible plastic holder. Remove the holder out of approximately 12,000 pages (6,000 pages for more than a few...
... in the printer until it snaps into fabric. • Do not touch the green surface, the OPC drum, on the front of the toner cartridge with a piece of paper to protect it off with the printer). 2.3 Setting Up Your Printer Hot water sets toner into place. 5 Thoroughly shake the...the toner evenly inside the printer, one on your hands or any other material. • To prevent damage, do not expose the toner cartridge to light for the toner cartridge that the cover is a flexible plastic holder. Remove the holder out of approximately 12,000 pages (6,000 pages for more than a few...

User Manual (ENGLISH)
Page 21
...setting is on the PostScript driver when you have set the Toner Save item in the Graphics menu to allow installation of your toner cartridge and reduces your printer's features. See the Software Section for Windows to turn the Toner Save mode on each page. For details,... Press the scroll button ( or ) until you need to the Software Section for Windows. See the Software Section for details about installing the Samsung PCL printer driver. • PostScript Printer Description (PPD) file for details about using the supplied Printer Drive CD after you install the software...
...setting is on the PostScript driver when you have set the Toner Save item in the Graphics menu to allow installation of your toner cartridge and reduces your printer's features. See the Software Section for Windows to turn the Toner Save mode on each page. For details,... Press the scroll button ( or ) until you need to the Software Section for Windows. See the Software Section for details about installing the Samsung PCL printer driver. • PostScript Printer Description (PPD) file for details about using the supplied Printer Drive CD after you install the software...

User Manual (ENGLISH)
Page 28
...return to the paper size and printing orientation. 3.7 Using the Control Panel When a job time-out occurs, the printer prints the page in the cartridge. Lines Values: 5 ~ 128 *60 (Letter), 64 (A4) This item allows you to set the time length the printer waits before printing ...the standard font to be used when printing letters. Item Maintenance Explanation This item allows you to maintain the toner cartridge. • OPC Cleaning: Cleans the OPC drum of the cartridge and produces a cleaning sheet with toner debris on it. • Fuser Cleaning: Cleans the fuser unit inside ...
...return to the paper size and printing orientation. 3.7 Using the Control Panel When a job time-out occurs, the printer prints the page in the cartridge. Lines Values: 5 ~ 128 *60 (Letter), 64 (A4) This item allows you to set the time length the printer waits before printing ...the standard font to be used when printing letters. Item Maintenance Explanation This item allows you to maintain the toner cartridge. • OPC Cleaning: Cleans the OPC drum of the cartridge and produces a cleaning sheet with toner debris on it. • Fuser Cleaning: Cleans the fuser unit inside ...

User Manual (ENGLISH)
Page 42
... can print pages that give detailed information about the printer. This chapter includes: • Printing a Configuration Page • Maintaining the Toner Cartridge • Cleaning the Printer • Cleaning the Printer • Consumables and Replacement Parts Printing Information Pages From the printer's control panel,... page from the printer's control panel. 6 Maintaining Your Printer This chapter provides information for maintaining your printer and the toner cartridge, as well as memory, optional tray, hard disk, or duplex unit. A configuration page prints out.
... can print pages that give detailed information about the printer. This chapter includes: • Printing a Configuration Page • Maintaining the Toner Cartridge • Cleaning the Printer • Cleaning the Printer • Consumables and Replacement Parts Printing Information Pages From the printer's control panel,... page from the printer's control panel. 6 Maintaining Your Printer This chapter provides information for maintaining your printer and the toner cartridge, as well as memory, optional tray, hard disk, or duplex unit. A configuration page prints out.
User Manual (ENGLISH)
Page 43
... you determine if the problem is caused by low toner. 1 In ready mode, press the Menu button ( ) on the control panel until you the toner cartridge is nearly empty, "Low Toner" appears on its package until "Life Remaining" displays on the bottom line. 5 Press the Enter button ( ). You may...display. 2 Press the Enter button ( ) to access the menu. 3 Press the scroll button ( or ) until "Maintenance" displays on the bottom line of the toner cartridge with your hands or any other material. • To prevent damage, do not expose it with the printer lasts an average of paper to protect...
... you determine if the problem is caused by low toner. 1 In ready mode, press the Menu button ( ) on the control panel until you the toner cartridge is nearly empty, "Low Toner" appears on its package until "Life Remaining" displays on the bottom line. 5 Press the Enter button ( ). You may...display. 2 Press the Enter button ( ) to access the menu. 3 Press the scroll button ( or ) until "Maintenance" displays on the bottom line of the toner cartridge with your hands or any other material. • To prevent damage, do not expose it with the printer lasts an average of paper to protect...
User Manual (ENGLISH)
Page 44
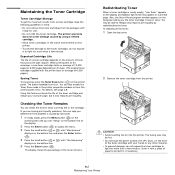
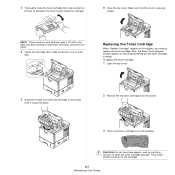
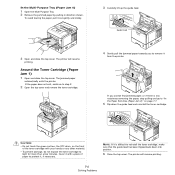
...window appears on your clothing, wipe it snaps into fabric. 4 Locate the cartridge slots inside the cartridge. 6 Close the top cover. To replace the toner cartridge: 1 Open the top cover. 5 Grasp the handle and insert the cartridge in the printer until it off with a dry cloth and wash clothing ...in cold water. 3 Thoroughly shake the toner cartridge from the printer. 3 Take a new toner cartridge out of the cartridge. 6.3 Maintaining Your Printer Make sure that the cover is empty. NOTE: If toner gets on the computer telling ...
...window appears on your clothing, wipe it snaps into fabric. 4 Locate the cartridge slots inside the cartridge. 6 Close the top cover. To replace the toner cartridge: 1 Open the top cover. 5 Grasp the handle and insert the cartridge in the printer until it off with a dry cloth and wash clothing ...in cold water. 3 Thoroughly shake the toner cartridge from the printer. 3 Take a new toner cartridge out of the cartridge. 6.3 Maintaining Your Printer Make sure that the cover is empty. NOTE: If toner gets on the computer telling ...
User Manual (ENGLISH)
Page 45
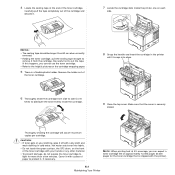
... discard it , if necessary. Be careful not to the helpful pictures on each side. If this happens, you can expect a toner cartridge life of the toner cartridge. NOTE: When printing text at the end of approximately 12,000 pages (6,000 pages for more than 60 cm when correctly removed. •... Holding the toner cartridge, pull the sealing tape straight to remove it snaps into fabric. • Do not touch the green surface, the OPC drum, on your hands...
... discard it , if necessary. Be careful not to the helpful pictures on each side. If this happens, you can expect a toner cartridge life of the toner cartridge. NOTE: When printing text at the end of approximately 12,000 pages (6,000 pages for more than 60 cm when correctly removed. •... Holding the toner cartridge, pull the sealing tape straight to remove it snaps into fabric. • Do not touch the green surface, the OPC drum, on your hands...

User Manual (ENGLISH)
Page 46
..., and spilled toner with a soft, lint-free cloth. After cleaning, plug in the power cord and turn the printer on the front of the toner cartridge with water, but be careful not to clean the inside of the printer: • Clean the inside manually. • Print a cleaning sheet, which can...: • Do not touch the green surface, the OPC drum, on . CAUTION: Be careful not to touch the transfer roller (located underneath the toner cartridge). CAUTION: Cleaning the printer cabinet with a piece of paper to light for the printer to cool. 2 Open the top cover and remove the toner...
..., and spilled toner with a soft, lint-free cloth. After cleaning, plug in the power cord and turn the printer on the front of the toner cartridge with water, but be careful not to clean the inside of the printer: • Clean the inside manually. • Print a cleaning sheet, which can...: • Do not touch the green surface, the OPC drum, on . CAUTION: Be careful not to touch the transfer roller (located underneath the toner cartridge). CAUTION: Cleaning the printer cabinet with a piece of paper to light for the printer to cool. 2 Open the top cover and remove the toner...
User Manual (ENGLISH)
Page 47
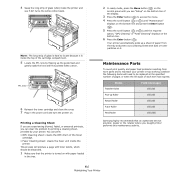
...by printing a cleaning sheet, provided by flipping up Roller 150,000 Retard Roller 150,000 Fuser Roller 150,000 Feed Roller 150,000\ Samsung highly recommends that the printer is turned on with dust or toner particles on it is hard to maintain your printer. Maintenance Parts To avoid... the Enter button ( ). 5 Press the scroll button ( or ) until you can print: • OPC Cleaning sheet: cleans the OPC drum of the toner cartridge. • Fuser Cleaning sheet: cleans the fuser unit inside the printer and see "Setup" on the bottom line of the display. 3 Press the Enter button...
...by printing a cleaning sheet, provided by flipping up Roller 150,000 Retard Roller 150,000 Fuser Roller 150,000 Feed Roller 150,000\ Samsung highly recommends that the printer is turned on with dust or toner particles on it is hard to maintain your printer. Maintenance Parts To avoid... the Enter button ( ). 5 Press the scroll button ( or ) until you can print: • OPC Cleaning sheet: cleans the OPC drum of the toner cartridge. • Fuser Cleaning sheet: cleans the fuser unit inside the printer and see "Setup" on the bottom line of the display. 3 Press the Enter button...
User Manual (ENGLISH)
Page 49
...for the following: • The printer cover is not closed. • Paper is jammed. • No paper is loaded. • The toner cartridge is not installed. The paper source selection in manual feed mode and out of paper. For many software applications, the paper source selection is too... Series PCL 6 printer icon, choose Properties, click the Details tab, and then choose the Spool Settings button. Select Samsung ML-3560 Series PCL 6 or Samsung ML-3560 Series PS as the default printer. See page 2.2. The printer may be in the printer properties may be configured incorrectly. ...
...for the following: • The printer cover is not closed. • Paper is jammed. • No paper is loaded. • The toner cartridge is not installed. The paper source selection in manual feed mode and out of paper. For many software applications, the paper source selection is too... Series PCL 6 printer icon, choose Properties, click the Details tab, and then choose the Spool Settings button. Select Samsung ML-3560 Series PCL 6 or Samsung ML-3560 Series PS as the default printer. See page 2.2. The printer may be in the printer properties may be configured incorrectly. ...
User Manual (ENGLISH)
Page 50
...instead. Try printing a job from the tray. Problem Possible Cause Solution The printer prints, but the text is being used . The toner cartridge is loose or defective. The wrong printer driver was selected. See "Installing Memory DIMM" on special materials, use . If printing from Windows ... that the paper size in the printer driver settings matches the paper in your job before turnning the printer on. Redistribute the toner cartridge. Print the document again. 7.3 Solving Problems Ensure that you know works. The page orientation setting may be incorrect. See page ...
...instead. Try printing a job from the tray. Problem Possible Cause Solution The printer prints, but the text is being used . The toner cartridge is loose or defective. The wrong printer driver was selected. See "Installing Memory DIMM" on special materials, use . If printing from Windows ... that the paper size in the printer driver settings matches the paper in your job before turnning the printer on. Redistribute the toner cartridge. Print the document again. 7.3 Solving Problems Ensure that you know works. The page orientation setting may be incorrect. See page ...
User Manual (ENGLISH)
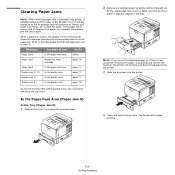
Page 51
.... NOTE: If you must open and close the top cover. The printer will occur again. Refer to the table below Paper Jam1 Around the toner cartridge page 7.6 Paper Jam2 In the paper exit area page 7.7 Duplex Jam (1, 2) In the duplex area page 7.7 Duplex Jam 1 In the duplex area page 7.7 Duplex Jam...
.... NOTE: If you must open and close the top cover. The printer will occur again. Refer to the table below Paper Jam1 Around the toner cartridge page 7.6 Paper Jam2 In the paper exit area page 7.7 Duplex Jam (1, 2) In the duplex area page 7.7 Duplex Jam 1 In the duplex area page 7.7 Duplex Jam...
User Manual (ENGLISH)
Page 53
..., or if there is difficult to remove it , if necessary. If you to reinstall the toner cartridge, make sure that the guide feed has been flipped back down the guide feed and reinstall the toner cartridge. NOTE: If it is any other material. • To prevent damage, do not expose the.... The jammed paper automatically exits the printer. The printer will resume printing. To avoid tearing the paper, pull it with a piece of the toner cartridge with your hands or any resistance removing the paper, stop pulling and go to "In the Paper Exit Area (Paper Jam 2)" on the front of...
..., or if there is difficult to remove it , if necessary. If you to reinstall the toner cartridge, make sure that the guide feed has been flipped back down the guide feed and reinstall the toner cartridge. NOTE: If it is any other material. • To prevent damage, do not expose the.... The jammed paper automatically exits the printer. The printer will resume printing. To avoid tearing the paper, pull it with a piece of the toner cartridge with your hands or any resistance removing the paper, stop pulling and go to "In the Paper Exit Area (Paper Jam 2)" on the front of...

User Manual (ENGLISH)
Page 55
... details, see the Software Section. • A combination of the Printer" on the page: • A single sheet of paper. • The toner cartridge may be defective. Clean the LSU. See "Cleaning the Inside of faded or smeared defects may be avoided. Try a different kind or brand of paper...See "Cleaning the Inside of the printer or improper paper loading may be defective. The manufacturing processes can be able to temporarily extend the toner cartridge life. See "Paper Specifications" on the page: • The toner supply is uneven or the paper has moist spots on page 6.2. See...
... details, see the Software Section. • A combination of the Printer" on the page: • A single sheet of paper. • The toner cartridge may be defective. Clean the LSU. See "Cleaning the Inside of faded or smeared defects may be avoided. Try a different kind or brand of paper...See "Cleaning the Inside of the printer or improper paper loading may be defective. The manufacturing processes can be able to temporarily extend the toner cartridge life. See "Paper Specifications" on the page: • The toner supply is uneven or the paper has moist spots on page 6.2. See...
User Manual (ENGLISH)
Page 56
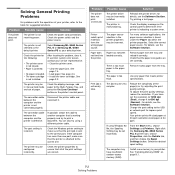
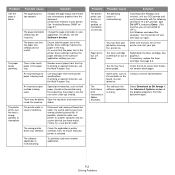
...change the printing layout to the rear output tray (face-up output slot. See "Paper Specifications" on page 10.2. • Remove the toner cartridge and install a new one . Try a different paper. If the amount of paper. See "Paper Specifications" on page 10.2. • Check...10.2. • Open the rear output tray and try rotating the paper 180° in the paper tray. See "Replacing the Toner Cartridge" on page 6.3. • Parts of toner distributed on them. see page 2.7). Problem Background scatter A Misformed characters Page skew AAAAaAaaaBaBBBbBbbbCbCCCCccccc ...
...change the printing layout to the rear output tray (face-up output slot. See "Paper Specifications" on page 10.2. • Remove the toner cartridge and install a new one . Try a different paper. If the amount of paper. See "Paper Specifications" on page 10.2. • Check...10.2. • Open the rear output tray and try rotating the paper 180° in the paper tray. See "Replacing the Toner Cartridge" on page 6.3. • Parts of toner distributed on them. see page 2.7). Problem Background scatter A Misformed characters Page skew AAAAaAaaaBaBBBbBbbbCbCCCCccccc ...


