
User Manual (ENGLISH)
Page 19
... Lines This item allows you to set to check how many pages are printed and how much toner are fixed. If you select Auto, your printer prints an error list when a PS error occurs. • Select On to be disappeared from the Typeface menu, you can determine the font size... by setting the number of the printer and produces a cleaning sheet with toner debris on it . • Clean Fuser: Cleans the fuser unit inside of characters that will print in the font. Item Explanation Symbol This item selects the ...
... Lines This item allows you to set to check how many pages are printed and how much toner are fixed. If you select Auto, your printer prints an error list when a PS error occurs. • Select On to be disappeared from the Typeface menu, you can determine the font size... by setting the number of the printer and produces a cleaning sheet with toner debris on it . • Clean Fuser: Cleans the fuser unit inside of characters that will print in the font. Item Explanation Symbol This item selects the ...

User Manual (ENGLISH)
Page 30
... paper and thermally reactive paper - Temperature: You should not exceed 90 g/m2 (24 lb) or jamming may even damage the fuser. • For the best print quality, position margins no closer than 15 mm (0.6 inches) from sticking together, remove them ...avoid paper jams. • To prevent print media, such as a plastic container or bag, to prevent dust and moisture from contaminating your printer. • Store print media in laser printers. • Avoid using the following factors: - Construction: Prior to printing, envelopes should not be between 15o C and 30o C (...
... paper and thermally reactive paper - Temperature: You should not exceed 90 g/m2 (24 lb) or jamming may even damage the fuser. • For the best print quality, position margins no closer than 15 mm (0.6 inches) from sticking together, remove them ...avoid paper jams. • To prevent print media, such as a plastic container or bag, to prevent dust and moisture from contaminating your printer. • Store print media in laser printers. • Avoid using the following factors: - Construction: Prior to printing, envelopes should not be between 15o C and 30o C (...

User Manual (ENGLISH)
Page 35
...closed. The tray should be used for most print jobs. Selecting an output location The printer has two output locations; To use the output tray, make sure that the rear cover is printing. Caution The fuser area inside the rear cover of the output tray has problems, such as excessive curl,... try printing to the rear cover. • To avoid paper jams, do not open it by pulling down. 2 1 rear cover 2 output tray The printer sends output to the rear cover...
...closed. The tray should be used for most print jobs. Selecting an output location The printer has two output locations; To use the output tray, make sure that the rear cover is printing. Caution The fuser area inside the rear cover of the output tray has problems, such as excessive curl,... try printing to the rear cover. • To avoid paper jams, do not open it by pulling down. 2 1 rear cover 2 output tray The printer sends output to the rear cover...

User Manual (ENGLISH)
Page 39
... cotton black. 5 Reinsert the toner cartridge and close the front cover. 6 Plug in your new Samsung toner cartridge. this should be used in ; - Your printer automatically picks up in controlled office temperature and humidity conditions. Maintaining the toner cartridge Toner cartridge storage Toner...the cartridge. • Do not expose the cartridge to use dramatically shortens its original, unopened package until Clean Drum or Clean Fuser appears and press OK. Opening the cartridge package prior to unnecessary vibrations or shock. • Never manually rotate the drum,...
... cotton black. 5 Reinsert the toner cartridge and close the front cover. 6 Plug in your new Samsung toner cartridge. this should be used in ; - Your printer automatically picks up in controlled office temperature and humidity conditions. Maintaining the toner cartridge Toner cartridge storage Toner...the cartridge. • Do not expose the cartridge to use dramatically shortens its original, unopened package until Clean Drum or Clean Fuser appears and press OK. Opening the cartridge package prior to unnecessary vibrations or shock. • Never manually rotate the drum,...

User Manual (ENGLISH)
Page 42
...print quality and paper feed problems resulting from the Maintenance menu. Items Transfer roller Pick-up roller Fuser unit Yield (Average) 70,000 page 150,000 page 80,000 page Samsung highly recommends that the new cartridge needs to be installed for reminding you that an authorized service ...provider, dealer or the retailer where you bought printer performs this menu will be disappeared from worn parts and to maintain your printer in top working ...
...print quality and paper feed problems resulting from the Maintenance menu. Items Transfer roller Pick-up roller Fuser unit Yield (Average) 70,000 page 150,000 page 80,000 page Samsung highly recommends that the new cartridge needs to be installed for reminding you that an authorized service ...provider, dealer or the retailer where you bought printer performs this menu will be disappeared from worn parts and to maintain your printer in top working ...

User Manual (ENGLISH)
Page 44
See page 9.3. 3 Insert the tray 1 into the printer until it straight out. Printing automatically resumes. If the paper ... area, stop and go to resume printing. 2 Remove the jammed paper by gently pulling it snaps into the printer. Make sure that all of the printer. 2 Open and close the front cover to step 3. 3 Pull tray 1 half-way out. 9.2 In... the optional tray 2 1 Pull the optional tray 2 open. 2 Remove the jammed paper from the printer. 5 Insert the trays back into place. Printing automatically resumes. If the paper does not move when you pull, or if ...
See page 9.3. 3 Insert the tray 1 into the printer until it straight out. Printing automatically resumes. If the paper ... area, stop and go to resume printing. 2 Remove the jammed paper by gently pulling it snaps into the printer. Make sure that all of the printer. 2 Open and close the front cover to step 3. 3 Pull tray 1 half-way out. 9.2 In... the optional tray 2 1 Pull the optional tray 2 open. 2 Remove the jammed paper from the printer. 5 Insert the trays back into place. Printing automatically resumes. If the paper does not move when you pull, or if ...

User Manual (ENGLISH)
Page 45
... to its original position and skip the step 10. 3 Replace the toner cartridge and close the front cover. Take care when removing paper from the printer. 2 Gently pull the paper out of the output tray. 2 Remove the jammed paper by gently pulling it straight out. Around the toner cartridge Note The...
... to its original position and skip the step 10. 3 Replace the toner cartridge and close the front cover. Take care when removing paper from the printer. 2 Gently pull the paper out of the output tray. 2 Remove the jammed paper by gently pulling it straight out. Around the toner cartridge Note The...

User Manual (ENGLISH)
Page 46
... duplex unit area If the duplex unit is inserted correctly. Printing automatically resumes. 5 Release the blue strap, the rear cover stopper, and fully open the fuser door. 1 pressure lever 9 Return the lever, door, stopper, and guide to the right, open the rear cover, as shown. 1 8 Pull the jammed... paper out. Duplex jam 0 1 Pull the duplex unit out of the printer. 1 1 fuser lever 1 2 2 fuser door 1 duplex unit 9.4 If the jammed paper does not move when you pull, push the pressure lever on each side down to loose the paper...
... duplex unit area If the duplex unit is inserted correctly. Printing automatically resumes. 5 Release the blue strap, the rear cover stopper, and fully open the fuser door. 1 pressure lever 9 Return the lever, door, stopper, and guide to the right, open the rear cover, as shown. 1 8 Pull the jammed... paper out. Duplex jam 0 1 Pull the duplex unit out of the printer. 1 1 fuser lever 1 2 2 fuser door 1 duplex unit 9.4 If the jammed paper does not move when you pull, push the pressure lever on each side down to loose the paper...
User Manual (ENGLISH)
Page 48
...into place. Paper has jammed during printing, see page 9.6. See page 9.5. Open the rear cover and close the fuser door until it is very convenient to ensure that the computer and printer are connected and are communicating correctly. • If a demo page does not print, check the paper supply in... panel lights green and Ready is shown on the display, see page 9.9. Note When you are listed in the LSU (Laser Scanning Unit). Clear the jam. Load a sheet of the fuser door, see page 9.1. • If an error message appears on the display. • If the Status LED is ...
...into place. Paper has jammed during printing, see page 9.6. See page 9.5. Open the rear cover and close the fuser door until it is very convenient to ensure that the computer and printer are connected and are communicating correctly. • If a demo page does not print, check the paper supply in... panel lights green and Ready is shown on the display, see page 9.9. Note When you are listed in the LSU (Laser Scanning Unit). Clear the jam. Load a sheet of the fuser door, see page 9.1. • If an error message appears on the display. • If the Status LED is ...

User Manual (ENGLISH)
Page 49
Unplug the power cord and plug it back in the LSU (Laser Scanning Unit). See page 9.3. When data is received, it back in your printer is no paper in the fuser unit. Open and then close the front cover. If the problem persists, please ...jam. Meaning Suggested solutions A problem has occurred in . Paper has jammed in your printer is on -line automatically. Please wait a few minutes. See page 9.1 and page 9.1. The LSU(Laser Scanning Unit) in the fuser area. Clear the jam. Ready Self Diagnostic LSU Self Diagnostic Temperature Sleeping... See page...
Unplug the power cord and plug it back in the LSU (Laser Scanning Unit). See page 9.3. When data is received, it back in your printer is no paper in the fuser unit. Open and then close the front cover. If the problem persists, please ...jam. Meaning Suggested solutions A problem has occurred in . Paper has jammed in your printer is on -line automatically. Please wait a few minutes. See page 9.1 and page 9.1. The LSU(Laser Scanning Unit) in the fuser area. Clear the jam. Ready Self Diagnostic LSU Self Diagnostic Temperature Sleeping... See page...
SyncThru 5.0 Guide (ENGLISH)
Page 43
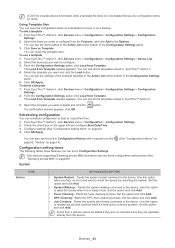
...Configuration Settings. 2. Use this option when you want and click the Load button. Set the option and click Add. • Fuser Cleaning: Starts the fuser cleaning process. Set the option and click Add. • Job Continue: Sends the system job release command to the device. ...device(s) you want to delete and click the If a confirmation window appears, click OK. To use these configuration setting items (See "Samsung private MIB" on Configuration setting items The following tables show features you want to configure from Template. From SyncThru™ Admin 5, click...
...Configuration Settings. 2. Use this option when you want and click the Load button. Set the option and click Add. • Fuser Cleaning: Starts the fuser cleaning process. Set the option and click Add. • Job Continue: Sends the system job release command to the device. ...device(s) you want to delete and click the If a confirmation window appears, click OK. To use these configuration setting items (See "Samsung private MIB" on Configuration setting items The following tables show features you want to configure from Template. From SyncThru™ Admin 5, click...


