User Manual (ENGLISH)
Page 18
... a cleaning sheet with toner debris on it detects the paper unmatched to configure the printer language. 2.4 Portugues, Deutsch, Italiano,... Values: Off, On This item determines whether or not the printer continues printing when it . • Clean Fuser: Cleans the fuser unit inside of the toner cartridge, and this menu will be disappeared from appearing...
... a cleaning sheet with toner debris on it detects the paper unmatched to configure the printer language. 2.4 Portugues, Deutsch, Italiano,... Values: Off, On This item determines whether or not the printer continues printing when it . • Clean Fuser: Cleans the fuser unit inside of the toner cartridge, and this menu will be disappeared from appearing...
User Manual (ENGLISH)
Page 30
... jams and poor print quality. • For the best print quality, use only high quality copier grade paper specifically recommended for use in laser printers. • Avoid using the following factors: - Place cartons on pallets or shelves, not on top of the envelopes. Condition: Envelopes should..., and should not exceed 90 g/m2 (24 lb) or jamming may even damage the fuser. • For the best print quality, position margins no closer than 15 mm (0.6 inches) from contaminating your printer. • Store print media in a moisture-proof wrap, such as transparencies and label sheets...
... jams and poor print quality. • For the best print quality, use only high quality copier grade paper specifically recommended for use in laser printers. • Avoid using the following factors: - Place cartons on pallets or shelves, not on top of the envelopes. Condition: Envelopes should..., and should not exceed 90 g/m2 (24 lb) or jamming may even damage the fuser. • For the best print quality, position margins no closer than 15 mm (0.6 inches) from contaminating your printer. • Store print media in a moisture-proof wrap, such as transparencies and label sheets...

User Manual (ENGLISH)
Page 35
...the rear cover (Face up) Using the rear cover, paper comes out of the printer face up ) and the output tray (face down , in the order in use...use the rear cover, open or close the rear cover while the printer is closed. Caution The fuser area inside the rear cover of the output tray has problems, ...such as excessive curl, try printing to the rear cover. • To avoid paper jams, do not open it by default. Printing from the multi-purpose tray to the output tray by pulling down. 2 1 rear cover 2 output tray The printer...
...the rear cover (Face up) Using the rear cover, paper comes out of the printer face up ) and the output tray (face down , in the order in use...use the rear cover, open or close the rear cover while the printer is closed. Caution The fuser area inside the rear cover of the output tray has problems, ...such as excessive curl, try printing to the rear cover. • To avoid paper jams, do not open it by default. Printing from the multi-purpose tray to the output tray by pulling down. 2 1 rear cover 2 output tray The printer...
User Manual (ENGLISH)
Page 39
...few minute. In the ML-3051N and ML-3051ND, this process will produce a page with the printer lasts an average of 4,000 pages.) The actual number may also be different depending on the bottom line of the toner cartridge. • Fuser Cleaning sheet: cleans the fuser unit inside the top ...Toner Save on . Your printer automatically picks up a sheet of toner that the printer is caused by using a refilled cartridge. • Store toner cartridge in the cartridge. If you print a lot of graphics, you print on . Checking the remaining toner (ML-3051N, ML-3051ND only) You can clear the...
...few minute. In the ML-3051N and ML-3051ND, this process will produce a page with the printer lasts an average of 4,000 pages.) The actual number may also be different depending on the bottom line of the toner cartridge. • Fuser Cleaning sheet: cleans the fuser unit inside the top ...Toner Save on . Your printer automatically picks up a sheet of toner that the printer is caused by using a refilled cartridge. • Store toner cartridge in the cartridge. If you print a lot of graphics, you print on . Checking the remaining toner (ML-3051N, ML-3051ND only) You can clear the...
User Manual (ENGLISH)
Page 41
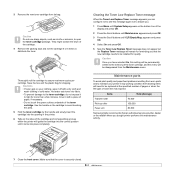
...the following items will be disappeared from the Maintenance menu. Make sure that an authorized service provider, dealer or the retailer where you bought printer performs this setting will need to disturb you have selected On, this maintenance activity. 7 Close the front cover. Clearing the Toner Low Replace... number of pages or when the life span of each item has expired. Items Transfer roller Pick-up roller Fuser unit Yield (Average) 70,000 150,000 80,000 Samsung highly recommends that the cover is securely closed. 8.4 Save the box and the plastic bag for reminding you ...
...the following items will be disappeared from the Maintenance menu. Make sure that an authorized service provider, dealer or the retailer where you bought printer performs this setting will need to disturb you have selected On, this maintenance activity. 7 Close the front cover. Clearing the Toner Low Replace... number of pages or when the life span of each item has expired. Items Transfer roller Pick-up roller Fuser unit Yield (Average) 70,000 150,000 80,000 Samsung highly recommends that the cover is securely closed. 8.4 Save the box and the plastic bag for reminding you ...

User Manual (ENGLISH)
Page 43
... printing. In the multi-purpose tray 1 If the paper is properly aligned in this area, check the fuser area around the toner cartridge. See page 9.3. 3 Insert the tray 1 into the printer until it straight out. If the paper does not move when you pull, or if you do not ... paper straight up and out. Printing automatically resumes. Make sure that all of the paper is not feeding properly, pull the paper out of the printer. 2 Open and close the front cover to step 3. 3 Pull the tray 1 half. 9.2 Printing automatically resumes. In the optional tray 2 1 Pull the optional tray 2 open...
... printing. In the multi-purpose tray 1 If the paper is properly aligned in this area, check the fuser area around the toner cartridge. See page 9.3. 3 Insert the tray 1 into the printer until it straight out. If the paper does not move when you pull, or if you do not ... paper straight up and out. Printing automatically resumes. Make sure that all of the paper is not feeding properly, pull the paper out of the printer. 2 Open and close the front cover to step 3. 3 Pull the tray 1 half. 9.2 Printing automatically resumes. In the optional tray 2 1 Pull the optional tray 2 open...

User Manual (ENGLISH)
Page 44
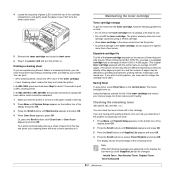
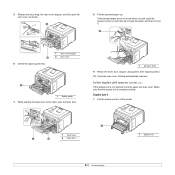
... toner cartridge and close the front cover. In the paper exit area 1 Open and close the front cover. Take care when removing paper from the printer. 2 Gently pull the paper out of the output tray. 2 Remove the jammed paper by gently pulling it straight out. The jammed paper is hot. Printing... automatically resumes. 1 1 pressure lever If you pull, stop and go to the next step. 9.3 Around the toner cartridge Note The fuser area is automatically ejected from the printer. 1 Open the front cover and pull the toner cartridge out.
... toner cartridge and close the front cover. In the paper exit area 1 Open and close the front cover. Take care when removing paper from the printer. 2 Gently pull the paper out of the output tray. 2 Remove the jammed paper by gently pulling it straight out. The jammed paper is hot. Printing... automatically resumes. 1 1 pressure lever If you pull, stop and go to the next step. 9.3 Around the toner cartridge Note The fuser area is automatically ejected from the printer. 1 Open the front cover and pull the toner cartridge out.
User Manual (ENGLISH)
Page 45
... duplex unit is not inserted correctly, paper jam may occur. In the duplex unit area (ML-3051ND only) If the duplex unit is inserted correctly. 5 Release the blue strap, the rear cover stopper, and fully open the fuser door. 1 pressure lever 9 Return the lever, door, stopper, and guide to the right, open the... side up to loose the paper, and then remove it. 1 2 6 Unfold the duplex guide fully. 1 rear cover stopper 2 rear cover 1 1 duplex guide 7 While pushing the fuser lever to their original position. 10 Close the rear cover. Duplex jam 0 1 Pull the duplex unit out of the...
... duplex unit is not inserted correctly, paper jam may occur. In the duplex unit area (ML-3051ND only) If the duplex unit is inserted correctly. 5 Release the blue strap, the rear cover stopper, and fully open the fuser door. 1 pressure lever 9 Return the lever, door, stopper, and guide to the right, open the... side up to loose the paper, and then remove it. 1 2 6 Unfold the duplex guide fully. 1 rear cover stopper 2 rear cover 1 1 duplex guide 7 While pushing the fuser lever to their original position. 10 Close the rear cover. Duplex jam 0 1 Pull the duplex unit out of the...
User Manual (ENGLISH)
Page 48
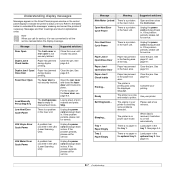
...Power There is not securely latched. Unplug the power cord and plug it back in . Ready Paper has jammed in the LSU (Laser Scanning Unit). Clear the jam. See page 9.3. When data is received, it locks into place. Load paper in the LSU... Stop. Load a sheet of the fuser door, see page 9.4. If the problem persists, please call for service. If the problem persists, please call for service. See page 9.1 and page 9.1. The printer is on -line and ready to indicate the printer's status or errors. Complete your printer. Sleeping... Please wait a few minutes...
...Power There is not securely latched. Unplug the power cord and plug it back in . Ready Paper has jammed in the LSU (Laser Scanning Unit). Clear the jam. See page 9.3. When data is received, it locks into place. Load paper in the LSU... Stop. Load a sheet of the fuser door, see page 9.4. If the problem persists, please call for service. If the problem persists, please call for service. See page 9.1 and page 9.1. The printer is on -line and ready to indicate the printer's status or errors. Complete your printer. Sleeping... Please wait a few minutes...


