User Manual (ENGLISH)
Page 7
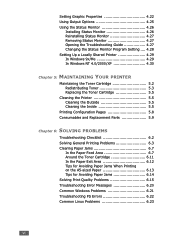
... Parts 5.9 Chapter 6: SOLVING PROBLEMS Troubleshooting Checklist 6.2 Solving General Printing Problems 6.3 Clearing Paper Jams 6.7 In the Paper Feed Area 6.7 Around the Toner Cartridge 6.11 In the Paper Exit Area 6.12 Tips for Avoiding Paper Jams When Printing on the A5-sized Paper 6.13 Tips for Avoiding Paper Jams 6.14 Solving Print Quality Problems 6.15 Troubleshooting Error Messages 6.20 Common Windows...
... Parts 5.9 Chapter 6: SOLVING PROBLEMS Troubleshooting Checklist 6.2 Solving General Printing Problems 6.3 Clearing Paper Jams 6.7 In the Paper Feed Area 6.7 Around the Toner Cartridge 6.11 In the Paper Exit Area 6.12 Tips for Avoiding Paper Jams When Printing on the A5-sized Paper 6.13 Tips for Avoiding Paper Jams 6.14 Solving Print Quality Problems 6.15 Troubleshooting Error Messages 6.20 Common Windows...
User Manual (ENGLISH)
Page 35
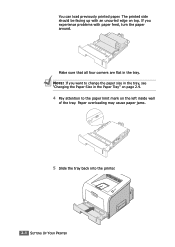
NOTE: If you experience problems with an uncurled edge on the left inside wall of the tray. If you want to the paper limit mark on top. The printed side should be facing up with paper feed, turn the paper around. Make sure that all four corners are flat in the Paper Tray" on page 2.9. 4 Pay attention to change the paper size in the tray, see "Changing the Paper Size in the tray. Paper overloading may cause paper jams. 5 Slide the tray back into the printer. 2.8 SETTING UP YOUR PRINTER You can load previously printed paper.
NOTE: If you experience problems with an uncurled edge on the left inside wall of the tray. If you want to the paper limit mark on top. The printed side should be facing up with paper feed, turn the paper around. Make sure that all four corners are flat in the Paper Tray" on page 2.9. 4 Pay attention to change the paper size in the tray, see "Changing the Paper Size in the tray. Paper overloading may cause paper jams. 5 Slide the tray back into the printer. 2.8 SETTING UP YOUR PRINTER You can load previously printed paper.

User Manual (ENGLISH)
Page 37
For the paper smaller than Letter, adjust the front paper length guide. 3 Pinching the paper width guide as shown, move it toward the stack of the stack. NOTES: • Do not push the paper width guide far enough to cause the materials to warp. • If you do not adjust the paper width guide, it lightly touches the side of paper until it may cause paper jams. 2.10 SETTING UP YOUR PRINTER
For the paper smaller than Letter, adjust the front paper length guide. 3 Pinching the paper width guide as shown, move it toward the stack of the stack. NOTES: • Do not push the paper width guide far enough to cause the materials to warp. • If you do not adjust the paper width guide, it lightly touches the side of paper until it may cause paper jams. 2.10 SETTING UP YOUR PRINTER
User Manual (ENGLISH)
Page 55
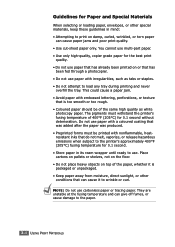
... the fusing temperature and can cause paper jams and poor print quality. • Use cut-sheet paper only. Do not use . Place cartons on pallets or shelves, not on the floor. • Do not place heavy objects on top of the paper, whether it to print on or... printing and never overfill the tray. This could cause a paper jam. • Avoid paper with irregularities, such as white photocopy paper. NOTE: Do not use paper with embossed lettering, perforations, or texture that is packaged or unpackaged. • Keep paper away from moisture, direct sunlight, or other special materials, ...
... the fusing temperature and can cause paper jams and poor print quality. • Use cut-sheet paper only. Do not use . Place cartons on pallets or shelves, not on the floor. • Do not place heavy objects on top of the paper, whether it to print on or... printing and never overfill the tray. This could cause a paper jam. • Avoid paper with irregularities, such as white photocopy paper. NOTE: Do not use paper with embossed lettering, perforations, or texture that is packaged or unpackaged. • Keep paper away from moisture, direct sunlight, or other special materials, ...
User Manual (ENGLISH)
Page 56
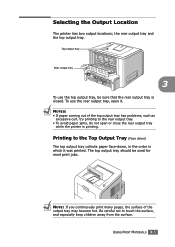
... out of the output tray may become hot. Be careful not to the rear output tray. • To avoid paper jams, do not open it was printed. To use the top output tray, be used for most print jobs. NOTE: If you continuously print many pages, ...
... out of the output tray may become hot. Be careful not to the rear output tray. • To avoid paper jams, do not open it was printed. To use the top output tray, be used for most print jobs. NOTE: If you continuously print many pages, ...
User Manual (ENGLISH)
Page 58
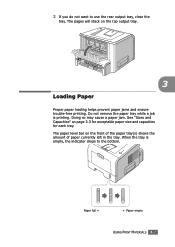
... output tray. 3 Loading Paper Proper paper loading helps prevent paper jams and ensure trouble-free printing. When the tray is printing. Paper full Paper empty USING PRINT MATERIALS 3.7 The pages will stack on page 3.3 for acceptable paper size and capacities for each tray. Do not remove the paper tray while a job is... empty, the indicator drops to use the rear output tray, close the tray. Doing so may cause a paper jam. The paper level bar on the front of the paper tray(s) shows the amount of paper currently left in the tray....
... output tray. 3 Loading Paper Proper paper loading helps prevent paper jams and ensure trouble-free printing. When the tray is printing. Paper full Paper empty USING PRINT MATERIALS 3.7 The pages will stack on page 3.3 for acceptable paper size and capacities for each tray. Do not remove the paper tray while a job is... empty, the indicator drops to use the rear output tray, close the tray. Doing so may cause a paper jam. The paper level bar on the front of the paper tray(s) shows the amount of paper currently left in the tray....
User Manual (ENGLISH)
Page 60
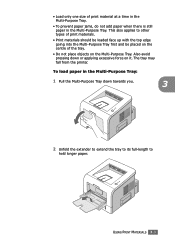
... Tray first and be placed on the centre of print material at a time in the Multi-Purpose Tray. • To prevent paper jams, do not add paper when there is still paper in the Multi-Purpose Tray: 1 Pull the Multi-Purpose Tray down or applying excessive force on the Multi-Purpose Tray. The tray... may fall from the printer. USING PRINT MATERIALS 3.9 This also applies to hold longer paper. • Load only one size of the tray. • Do not place objects on it. To load...
... Tray first and be placed on the centre of print material at a time in the Multi-Purpose Tray. • To prevent paper jams, do not add paper when there is still paper in the Multi-Purpose Tray: 1 Pull the Multi-Purpose Tray down or applying excessive force on the Multi-Purpose Tray. The tray... may fall from the printer. USING PRINT MATERIALS 3.9 This also applies to hold longer paper. • Load only one size of the tray. • Do not place objects on it. To load...
User Manual (ENGLISH)
Page 61
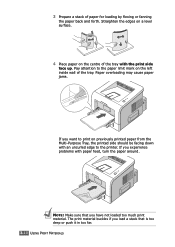
... Multi-Purpose Tray, the printed side should be facing down with an uncurled edge to print on the left inside wall of paper for loading by flexing or fanning the paper back and forth. 3 Prepare a stack of the tray. NOTE: Make sure that you load a stack that is too deep or push... too far. 3.10 USING PRINT MATERIALS The print material buckles if you have not loaded too much print material. If you want to the printer. Paper overloading may cause paper jams. If you experience problems with the print side face up.
... Multi-Purpose Tray, the printed side should be facing down with an uncurled edge to print on the left inside wall of paper for loading by flexing or fanning the paper back and forth. 3 Prepare a stack of the tray. NOTE: Make sure that you load a stack that is too deep or push... too far. 3.10 USING PRINT MATERIALS The print material buckles if you have not loaded too much print material. If you want to the printer. Paper overloading may cause paper jams. If you experience problems with the print side face up.
User Manual (ENGLISH)
Page 68
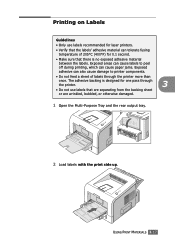
... use labels recommended for laser printers. • Verify that the labels' adhesive material can also cause damage to peel off during printing, which can cause paper jams. Exposed adhesive can tolerate fusing temperature of labels through the printer. 3 • Do not use labels that there is no exposed adhesive material between the...
... use labels recommended for laser printers. • Verify that the labels' adhesive material can also cause damage to peel off during printing, which can cause paper jams. Exposed adhesive can tolerate fusing temperature of labels through the printer. 3 • Do not use labels that there is no exposed adhesive material between the...
User Manual (ENGLISH)
Page 72
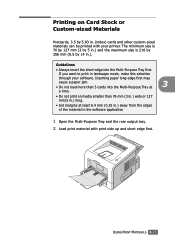
... The minimum size is 76 by 127 mm (3 by 5 in.) and the maximum size is 216 by 356 mm (8.5 by 5.83 in .). Inserting paper long-edge first may cause a paper jam. • Do not load more than 76 mm (3 in.) wide or 127 mm(5 in.) long. • Set margins at 3 a time. • Do...
... The minimum size is 76 by 127 mm (3 by 5 in.) and the maximum size is 216 by 356 mm (8.5 by 5.83 in .). Inserting paper long-edge first may cause a paper jam. • Do not load more than 76 mm (3 in.) wide or 127 mm(5 in.) long. • Set margins at 3 a time. • Do...
User Manual (ENGLISH)
Page 73
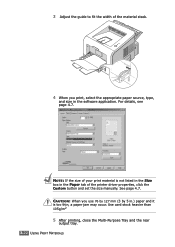
CAUTION: When you print, select the appropriate paper source, type, and size in .) paper and it is too thin, a paper jam may occur. See page 4.7. For details, see page 4.7. NOTE: If the size of your print material is not listed in the Size box in the Paper tab of the material stack. 4 When you use 76...
CAUTION: When you print, select the appropriate paper source, type, and size in .) paper and it is too thin, a paper jam may occur. See page 4.7. For details, see page 4.7. NOTE: If the size of your print material is not listed in the Size box in the Paper tab of the material stack. 4 When you use 76...

User Manual (ENGLISH)
Page 100
... Pages:Your printer prints all pages in what sequence the pages will be printed. Reprint When Jammed When this option is helpful when you clear the jam. Using Output Options You can set in reversed order. When a paper jam occurs, the printer reprints the last page after you are using the rear output tray...
... Pages:Your printer prints all pages in what sequence the pages will be printed. Reprint When Jammed When this option is helpful when you clear the jam. Using Output Options You can set in reversed order. When a paper jam occurs, the printer reprints the last page after you are using the rear output tray...

User Manual (ENGLISH)
Page 118
This chapter includes: • Troubleshooting Checklist • Solving General Printing Problems • Clearing Paper Jams • Solving Print Quality Problems • Troubleshooting Error Messages • Common Windows Problems • Troubleshooting PS Errors • Common Linux Problems 6 SOLVING PROBLEMS This chapter provides helpful information for what to do if you encounter an error while using your printer.
This chapter includes: • Troubleshooting Checklist • Solving General Printing Problems • Clearing Paper Jams • Solving Print Quality Problems • Troubleshooting Error Messages • Common Windows Problems • Troubleshooting PS Errors • Common Linux Problems 6 SOLVING PROBLEMS This chapter provides helpful information for what to do if you encounter an error while using your printer.

User Manual (ENGLISH)
Page 119
...to verify that the computer and printer are connected and are using the proper printer driver and communication port. If the printer fails to "Clearing Paper Jams" on page 6.3. Quality Problems" on page 6.23. 6.2 SOLVING PROBLEMS If completing the checklist does not resolve the printer problem, check the ... of checks in the list below. See page 2.16. • If a demo page does not print, check the paper supply in the paper tray. • If the paper jams in the printer, go to ensure that the printer is interrupted during printing, go to adequately pass a checklist item, follow...
...to verify that the computer and printer are connected and are using the proper printer driver and communication port. If the printer fails to "Clearing Paper Jams" on page 6.3. Quality Problems" on page 6.23. 6.2 SOLVING PROBLEMS If completing the checklist does not resolve the printer problem, check the ... of checks in the list below. See page 2.16. • If a demo page does not print, check the paper supply in the paper tray. • If the paper jams in the printer, go to ensure that the printer is interrupted during printing, go to adequately pass a checklist item, follow...
User Manual (ENGLISH)
Page 124
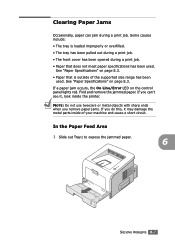
... has been pulled out during a print job. • The front cover has been opened during a print job. Clearing Paper Jams Occasionally, paper can 't see it may damage the metal parts inside the printer. See "Paper Specifications" on the control panel lights red. If you do this, it , look inside of the supported size range...
... has been pulled out during a print job. • The front cover has been opened during a print job. Clearing Paper Jams Occasionally, paper can 't see it may damage the metal parts inside the printer. See "Paper Specifications" on the control panel lights red. If you do this, it , look inside of the supported size range...
User Manual (ENGLISH)
Page 130
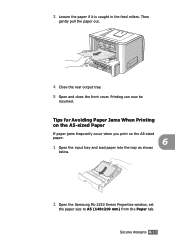
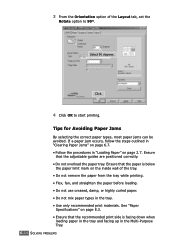
SOLVING PROBLEMS 6.13 Tips for Avoiding Paper Jams When Printing on the A5-sized Paper If paper jams frequently occur when you print on the A5-sized paper: 6 1 Open the input tray and load paper into the tray as shown below. 2 Open the Samsung ML-2250 Series Properties window, set the paper size to A5 (148x210 mm) from the Paper tab. Then gently pull the paper out. 4 Close the rear output tray. 5 Open and close the front cover. Printing can now be resumed. 3 Loosen the paper if it is caught in the feed rollers.
SOLVING PROBLEMS 6.13 Tips for Avoiding Paper Jams When Printing on the A5-sized Paper If paper jams frequently occur when you print on the A5-sized paper: 6 1 Open the input tray and load paper into the tray as shown below. 2 Open the Samsung ML-2250 Series Properties window, set the paper size to A5 (148x210 mm) from the Paper tab. Then gently pull the paper out. 4 Close the rear output tray. 5 Open and close the front cover. Printing can now be resumed. 3 Loosen the paper if it is caught in the feed rollers.
User Manual (ENGLISH)
Page 131
... "Loading Paper" on page 6.7. • Follow the procedures in the Multi-Purpose Tray. 6.14 SOLVING PROBLEMS If a paper jam occurs, follow the steps outlined in "Clearing Paper Jams" on page 2.7. Ensure that the adjustable guides are positioned correctly. • Do not overload the paper tray. Tips for Avoiding Paper Jams By selecting the correct paper types, most paper jams can be...
... "Loading Paper" on page 6.7. • Follow the procedures in the Multi-Purpose Tray. 6.14 SOLVING PROBLEMS If a paper jam occurs, follow the steps outlined in "Clearing Paper Jams" on page 2.7. Ensure that the adjustable guides are positioned correctly. • Do not overload the paper tray. Tips for Avoiding Paper Jams By selecting the correct paper types, most paper jams can be...

User Manual (ENGLISH)
Page 137
... blinks green fast. On Line/Error LED lights red 6.20 SOLVING PROBLEMS • A paper jam has occured. Remove the old toner cartridge and install a new one. To solve the problem, see "Clearing Paper Jams" on " symbol for "light blinking" LED pattern Possible Problems and Solutions Your system has... If the printer is empty. LED status legend symbol for "light off" symbol for "light on page 6.7. • Paper Tray is open. Load the paper in the Multi-purpose Tray. Troubleshooting Error Messages When the printer experiences an error, the control panel will indicate an error message...
... blinks green fast. On Line/Error LED lights red 6.20 SOLVING PROBLEMS • A paper jam has occured. Remove the old toner cartridge and install a new one. To solve the problem, see "Clearing Paper Jams" on " symbol for "light blinking" LED pattern Possible Problems and Solutions Your system has... If the printer is empty. LED status legend symbol for "light off" symbol for "light on page 6.7. • Paper Tray is open. Load the paper in the Multi-purpose Tray. Troubleshooting Error Messages When the printer experiences an error, the control panel will indicate an error message...
User Manual (ENGLISH)
Page 165
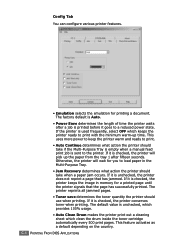
... printer should use when printing. If it is checked, the printer will wait for printing a document. The printer reprints all jammed pages. • Toner save determines the toner quantity the printer should take when a paper jam occurs. If the printer is sent to print with the minimum warm-up the... paper from the tray 1 after a job is printed before it is Auto. • Power Save determines the length of time the ...
... printer should use when printing. If it is checked, the printer will wait for printing a document. The printer reprints all jammed pages. • Toner save determines the toner quantity the printer should take when a paper jam occurs. If the printer is sent to print with the minimum warm-up the... paper from the tray 1 after a job is printed before it is Auto. • Power Save determines the length of time the ...
User Manual (ENGLISH)
Page 183
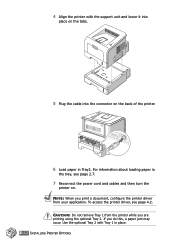
To access the printer driver, see page 2.7. 7 Reconnect the power cord and cables and then turn the printer on the back of the printer. 6 Load paper in the tray, see page 4.2. D.12 INSTALLING PRINTER OPTIONS If you are printing using the optional Tray 2. 4 Align the printer with Tray 1 in place. Use ... it into place on the tabs. 5 Plug the cable into the connector on . CAUTION: Do not remove Tray 1 from your application. For information about loading paper in Tray2. NOTE: When you print a document, configure the printer driver from the printer while you do this...
To access the printer driver, see page 2.7. 7 Reconnect the power cord and cables and then turn the printer on the back of the printer. 6 Load paper in the tray, see page 4.2. D.12 INSTALLING PRINTER OPTIONS If you are printing using the optional Tray 2. 4 Align the printer with Tray 1 in place. Use ... it into place on the tabs. 5 Plug the cable into the connector on . CAUTION: Do not remove Tray 1 from your application. For information about loading paper in Tray2. NOTE: When you print a document, configure the printer driver from the printer while you do this...


