User Manual (ENGLISH)
Page 5
... Cancel button 1.8 Chapter 2: SETTING UP YOUR PRINTER Unpacking 2.2 Selecting a Location 2.3 Installing the Toner Cartridge 2.4 Loading Paper 2.7 Changing the Paper Size in the Paper Tray ......... 2.9 Connecting a Printer Cable 2.11 For Local Printing 2.11 For ...Network Printing 2.13 Turning the Printer On 2.15 Printing a Demo Page 2.16 Installing Printer Software 2.17 Printer Driver Features 2.18 Installing Printer Software in Windows 2.19 Changing the Display Language 2.21 Reinstalling Printer Software 2.22 Removing Printer...
... Cancel button 1.8 Chapter 2: SETTING UP YOUR PRINTER Unpacking 2.2 Selecting a Location 2.3 Installing the Toner Cartridge 2.4 Loading Paper 2.7 Changing the Paper Size in the Paper Tray ......... 2.9 Connecting a Printer Cable 2.11 For Local Printing 2.11 For ...Network Printing 2.13 Turning the Printer On 2.15 Printing a Demo Page 2.16 Installing Printer Software 2.17 Printer Driver Features 2.18 Installing Printer Software in Windows 2.19 Changing the Display Language 2.21 Reinstalling Printer Software 2.22 Removing Printer...
User Manual (ENGLISH)
Page 7
... In Windows 9x/Me 4.29 In Windows NT 4.0/2000/XP 4.30 Chapter 5: MAINTAINING YOUR PRINTER Maintaining the Toner Cartridge 5.2 Redistributing Toner 5.3 Replacing the Toner Cartridge 5.5 Cleaning the Printer 5.5 Cleaning the Outside 5.5 Cleaning the Inside 5.5 Printing Configuration Pages 5.8 Consumables and Replacement Parts 5.9 Chapter 6: SOLVING PROBLEMS Troubleshooting Checklist 6.2 Solving General Printing Problems 6.3 Clearing Paper...
... In Windows 9x/Me 4.29 In Windows NT 4.0/2000/XP 4.30 Chapter 5: MAINTAINING YOUR PRINTER Maintaining the Toner Cartridge 5.2 Redistributing Toner 5.3 Replacing the Toner Cartridge 5.5 Cleaning the Printer 5.5 Cleaning the Outside 5.5 Cleaning the Inside 5.5 Printing Configuration Pages 5.8 Consumables and Replacement Parts 5.9 Chapter 6: SOLVING PROBLEMS Troubleshooting Checklist 6.2 Solving General Printing Problems 6.3 Clearing Paper...

User Manual (ENGLISH)
Page 8
... PS Drivers A.3 Using PS Printer Driver Features A.4 Accessing Printer Properties A.4 Appendix B: USING YOUR PRINTER IN LINUX Installing the Printer Driver B.2 System Requirements B.2 Installing the Printer Driver B.2 Changing the Printer Connection Method B.6 Uninstalling the Printer Driver B.7 Using the Configuration Tool... C.4 Starting the Remote Control Panel C.4 Using the Remote Control Panel Tabs C.5 Appendix D: INSTALLING PRINTER OPTIONS Precautions When Installing Printer Options D.2 Installing Memory and PostScript DIMMs D.3 Removing the Memory or PS DIMM D.6 Installing a ...
... PS Drivers A.3 Using PS Printer Driver Features A.4 Accessing Printer Properties A.4 Appendix B: USING YOUR PRINTER IN LINUX Installing the Printer Driver B.2 System Requirements B.2 Installing the Printer Driver B.2 Changing the Printer Connection Method B.6 Uninstalling the Printer Driver B.7 Using the Configuration Tool... C.4 Starting the Remote Control Panel C.4 Using the Remote Control Panel Tabs C.5 Appendix D: INSTALLING PRINTER OPTIONS Precautions When Installing Printer Options D.2 Installing Memory and PostScript DIMMs D.3 Removing the Memory or PS DIMM D.6 Installing a ...

User Manual (ENGLISH)
Page 9
Appendix E: SPECIFICATIONS Printer Specifications E.2 Paper Specifications E.3 Overview E.3 Supported Sizes of Paper E.4 Guidelines for Using Paper E.5 Paper Specifications E.6 Paper Output Capacity E.6 Printer and Paper Storage Environment E.7 Envelopes E.8 Labels E.10 Transparencies E.10 viii
Appendix E: SPECIFICATIONS Printer Specifications E.2 Paper Specifications E.3 Overview E.3 Supported Sizes of Paper E.4 Guidelines for Using Paper E.5 Paper Specifications E.6 Paper Output Capacity E.6 Printer and Paper Storage Environment E.7 Envelopes E.8 Labels E.10 Transparencies E.10 viii

User Manual (ENGLISH)
Page 12
... designed so there is certified as a Class I level during normal operation, user maintenance, or prescribed service condition. The laser system and printer are not considered to be followed to reduce risk of fire, electric shock, and injury to the requirements of DHHS 21 CFR, chapter ... damage your eyes. When using this product, these basic safety precautions should always be hazardous. WARNING Never operate or service the printer with the protective cover removed from Laser/ Scanner assembly. to conform to the requirements of IEC 825. Environmental and Safety Consideration ...
... designed so there is certified as a Class I level during normal operation, user maintenance, or prescribed service condition. The laser system and printer are not considered to be followed to reduce risk of fire, electric shock, and injury to the requirements of DHHS 21 CFR, chapter ... damage your eyes. When using this product, these basic safety precautions should always be hazardous. WARNING Never operate or service the printer with the protective cover removed from Laser/ Scanner assembly. to conform to the requirements of IEC 825. Environmental and Safety Consideration ...

User Manual (ENGLISH)
Page 13
If you need additional information about ozone, please contact your nearest Samsung dealer. Radio Frequency Emissions FCC regulations This device has been tested and found to comply with the instructions, may cause harmful interference ... a well ventilated area. However, there is no guarantee that reduces power consumption when it is advisable that to operate the equipment. Power Saver This printer contains advanced energy conservation technology that interference will not occur in a particular installation. Connect the equipment into an outlet on , the user is connected....
If you need additional information about ozone, please contact your nearest Samsung dealer. Radio Frequency Emissions FCC regulations This device has been tested and found to comply with the instructions, may cause harmful interference ... a well ventilated area. However, there is no guarantee that reduces power consumption when it is advisable that to operate the equipment. Power Saver This printer contains advanced energy conservation technology that interference will not occur in a particular installation. Connect the equipment into an outlet on , the user is connected....
User Manual (ENGLISH)
Page 14
... cause undesired operation of the Industry and Science Canada. This transmitter must maintain a minimum distance of 1mW/cm2 may be in your printer, is on . Modification to a wireless device will void the authorization to verify the presence of America Federal Communications Commission (FCC) ...embedded) in your system are present. Do not modify them in the 2.4 GHz Band, may be collocated or operated in your printer system. Canadian Radio Interference Regulations This digital apparatus does not exceed the Class B limits for radio noise emissions from digital apparatus as...
... cause undesired operation of the Industry and Science Canada. This transmitter must maintain a minimum distance of 1mW/cm2 may be in your printer, is on . Modification to a wireless device will void the authorization to verify the presence of America Federal Communications Commission (FCC) ...embedded) in your system are present. Do not modify them in the 2.4 GHz Band, may be collocated or operated in your printer system. Canadian Radio Interference Regulations This digital apparatus does not exceed the Class B limits for radio noise emissions from digital apparatus as...
User Manual (ENGLISH)
Page 15
... 201 121) which contains notes and additional requirements to ensure network compatibility of TBR21 terminals. To assist in this product symbolises Samsung Electronics Co., Ltd. xiv Declaration of Conformity with the national PSTNs and compatible PBXs of European countries. March 9, 1999: ...Council Directive 1999/5/EC on radio equipment and telecommunications terminal equipment and the mutual recognition of Samsung Electronics Co., Ltd. This section is a printer; The product has been designed to work with the following applicable 93/68/EEC Directives of the European ...
... 201 121) which contains notes and additional requirements to ensure network compatibility of TBR21 terminals. To assist in this product symbolises Samsung Electronics Co., Ltd. xiv Declaration of Conformity with the national PSTNs and compatible PBXs of European countries. March 9, 1999: ...Council Directive 1999/5/EC on radio equipment and telecommunications terminal equipment and the mutual recognition of Samsung Electronics Co., Ltd. This section is a printer; The product has been designed to work with the following applicable 93/68/EEC Directives of the European ...
User Manual (ENGLISH)
Page 16
... listed, please contact your local Radio Approval agency for use of the wireless device or devices that may be embedded in your printer is restricted to minimize human contact during normal operation. Additional limitations, cautions, and concerns for use in the countries identified by the...for specific countries are listed in the specific country sections (or country group sections). Because the wireless devices (which may be embedded your printer) emit less energy than 20 cm (8 inches) from the body when wireless devices are on the system label. The following section is ...
... listed, please contact your local Radio Approval agency for use of the wireless device or devices that may be embedded in your printer is restricted to minimize human contact during normal operation. Additional limitations, cautions, and concerns for use in the countries identified by the...for specific countries are listed in the specific country sections (or country group sections). Because the wireless devices (which may be embedded your printer) emit less energy than 20 cm (8 inches) from the body when wireless devices are on the system label. The following section is ...
User Manual (ENGLISH)
Page 20
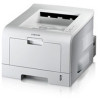
This chapter includes: • Special Features • Printer Components • Understanding the Control Panel 1 INTRODUCTION Congratulations on the purchase of your printer!
This chapter includes: • Special Features • Printer Components • Understanding the Control Panel 1 INTRODUCTION Congratulations on the purchase of your printer!
User Manual (ENGLISH)
Page 21
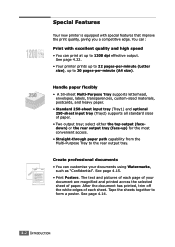
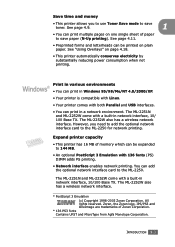
Special Features Your new printer is equipped with excellent quality and high speed • You can customise your Regards WORLD BEST document are magnified and printed across the selected sheet ...-through paper path capability from the Multi-Purpose Tray to 22 pages-per -minute (A4 size). See page 4.14. 1.2 INTRODUCTION See page 4.22. • Your printer prints up to the rear output tray. See page 4.15. Dear ABC • Print Posters. Tape the sheets together to 1200 dpi effective output. The...
Special Features Your new printer is equipped with excellent quality and high speed • You can customise your Regards WORLD BEST document are magnified and printed across the selected sheet ...-through paper path capability from the Multi-Purpose Tray to 22 pages-per -minute (A4 size). See page 4.14. 1.2 INTRODUCTION See page 4.22. • Your printer prints up to the rear output tray. See page 4.15. Dear ABC • Print Posters. Tape the sheets together to 1200 dpi effective output. The...
User Manual (ENGLISH)
Page 22
... and USB interfaces. • You can print in a network environment. The ML-2251N and ML-2252W come with a built-in Windows 95/98/Me/NT 4.0/2000/XP. • Your printer is compatible with Linux. • Your printer comes with 136 fonts (PS) DIMM adds PS printing. • Network interface... to save paper (N-Up printing). Expand printer capacity • This printer has 16 MB of Zoran Corporation. * 136 PS3 fonts Contains UFST and MicroType from Agfa Monotype Corporation. You can print in network interface, 10/100 Base TX. The ML-2251N and ML-2252W come with a built-in various ...
... and USB interfaces. • You can print in a network environment. The ML-2251N and ML-2252W come with a built-in Windows 95/98/Me/NT 4.0/2000/XP. • Your printer is compatible with Linux. • Your printer comes with 136 fonts (PS) DIMM adds PS printing. • Network interface... to save paper (N-Up printing). Expand printer capacity • This printer has 16 MB of Zoran Corporation. * 136 PS3 fonts Contains UFST and MicroType from Agfa Monotype Corporation. You can print in network interface, 10/100 Base TX. The ML-2251N and ML-2252W come with a built-in various ...

User Manual (ENGLISH)
Page 23
Printer Features The table below lists a general overview of features supported by your printer. (S: Standard, O: Option) Features IEEE 1284 Parallel USB 2.0 Network Interface (Ethernet 10/100 Base TX) Wireless LAN (802.11b Wireless LAN) PostScript Emulation ML-2250 S S ML-2251N ML-2252W S S S S O S S O O S O O O 1.4 INTRODUCTION
Printer Features The table below lists a general overview of features supported by your printer. (S: Standard, O: Option) Features IEEE 1284 Parallel USB 2.0 Network Interface (Ethernet 10/100 Base TX) Wireless LAN (802.11b Wireless LAN) PostScript Emulation ML-2250 S S ML-2251N ML-2252W S S S S O S S O O S O O O 1.4 INTRODUCTION
User Manual (ENGLISH)
Page 24
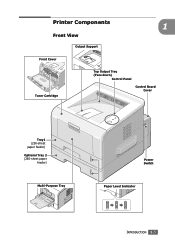
Printer Components 1 Front View Output Support Front Cover Toner Cartridge Top Output Tray (Face down) Control Panel Control Board Cover Tray1 (250-sheet paper feeder) Optional Tray 2 (250-sheet paper feeder) Multi-Purpose Tray Power Switch Paper Level Indicator INTRODUCTION 1.5
Printer Components 1 Front View Output Support Front Cover Toner Cartridge Top Output Tray (Face down) Control Panel Control Board Cover Tray1 (250-sheet paper feeder) Optional Tray 2 (250-sheet paper feeder) Multi-Purpose Tray Power Switch Paper Level Indicator INTRODUCTION 1.5
User Manual (ENGLISH)
Page 26
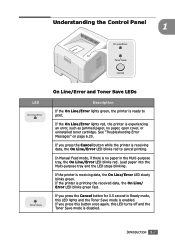
... printing the received data, the On Line/ Error LED blinks green fast. If the printer is receiving data, the On Line/Error LED blinks red to print. If you press the Cancel button for 0.5 second in the Multi-purpose tray, ...the On Line/Error LED blinks red. If the On Line/Error lights red, the printer is enabled. Load paper into the Multi-purpose tray and the LED stops blinking. INTRODUCTION 1.7 If the printer is ready to cancel printing. See "Troubleshooting Error Messages" on page 6.20. In Manual Feed mode...
... printing the received data, the On Line/ Error LED blinks green fast. If the printer is receiving data, the On Line/Error LED blinks red to print. If you press the Cancel button for 0.5 second in the Multi-purpose tray, ...the On Line/Error LED blinks red. If the On Line/Error lights red, the printer is enabled. Load paper into the Multi-purpose tray and the LED stops blinking. INTRODUCTION 1.7 If the printer is ready to cancel printing. See "Troubleshooting Error Messages" on page 6.20. In Manual Feed mode...
User Manual (ENGLISH)
Page 27
... of the network configuration. In Ready mode, press and hold this button for about 2 seconds until all LEDs blink fast, and release. After cleaning the printer, one "cleaning sheet" (see "Using the Toner Save Mode" on , and release. The On Line/Error LED blinks while the print job is printed.... button each time you load paper in the Multi-purpose tray, when you have selected Manual Feed for Source from both the printer and the computer, and then the printer returns to turn on page 4.9. 1.8 INTRODUCTION In Ready mode, press and hold this button for about 20 seconds until all ...
... of the network configuration. In Ready mode, press and hold this button for about 2 seconds until all LEDs blink fast, and release. After cleaning the printer, one "cleaning sheet" (see "Using the Toner Save Mode" on , and release. The On Line/Error LED blinks while the print job is printed.... button each time you load paper in the Multi-purpose tray, when you have selected Manual Feed for Source from both the printer and the computer, and then the printer returns to turn on page 4.9. 1.8 INTRODUCTION In Ready mode, press and hold this button for about 20 seconds until all ...
User Manual (ENGLISH)
Page 28
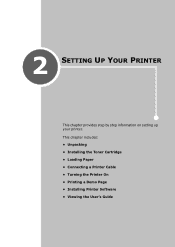
2 SETTING UP YOUR PRINTER This chapter provides step by step information on setting up your printer. This chapter includes: • Unpacking • Installing the Toner Cartridge • Loading Paper • Connecting a Printer Cable • Turning the Printer On • Printing a Demo Page • Installing Printer Software • Viewing the User's Guide
2 SETTING UP YOUR PRINTER This chapter provides step by step information on setting up your printer. This chapter includes: • Unpacking • Installing the Toner Cartridge • Loading Paper • Connecting a Printer Cable • Turning the Printer On • Printing a Demo Page • Installing Printer Software • Viewing the User's Guide
User Manual (ENGLISH)
Page 29
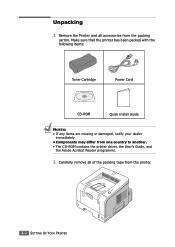
Unpacking 1 Remove the Printer and all of the packing tape from the packing carton. Make sure that the printer has been packed with the following items: Toner Cartridge Power Cord CD-ROM Quick Install Guide NOTES: • If any items are missing or damaged, notify your dealer immediately. • Components may differ from one country to another. • The CD-ROM contains the printer driver, the User's Guide, and the Adobe Acrobat Reader programme. 2 Carefully remove all accessories from the printer. 2.2 SETTING UP YOUR PRINTER
Unpacking 1 Remove the Printer and all of the packing tape from the packing carton. Make sure that the printer has been packed with the following items: Toner Cartridge Power Cord CD-ROM Quick Install Guide NOTES: • If any items are missing or damaged, notify your dealer immediately. • Components may differ from one country to another. • The CD-ROM contains the printer driver, the User's Guide, and the Adobe Acrobat Reader programme. 2 Carefully remove all accessories from the printer. 2.2 SETTING UP YOUR PRINTER
User Manual (ENGLISH)
Page 30
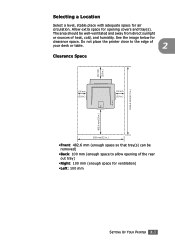
Selecting a Location Select a level, stable place with adequate space for clearance space. See the image below for air circulation. Do not place the printer close to allow opening covers and tray(s). The area should be removed) •Back: 100 mm (enough space to the edge of your desk or ...) •Right: 100 mm (enough space for opening of heat, cold, and humidity. Allow extra space for ventilation) •Left: 100 mm SETTING UP YOUR PRINTER 2.3
Selecting a Location Select a level, stable place with adequate space for clearance space. See the image below for air circulation. Do not place the printer close to allow opening covers and tray(s). The area should be removed) •Back: 100 mm (enough space to the edge of your desk or ...) •Right: 100 mm (enough space for opening of heat, cold, and humidity. Allow extra space for ventilation) •Left: 100 mm SETTING UP YOUR PRINTER 2.3
User Manual (ENGLISH)
Page 31
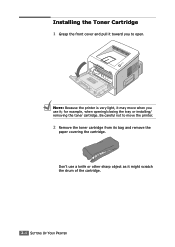
for example, when opening/closing the tray or installing/ removing the toner cartridge. Don't use it; Be careful not to open. Installing the Toner Cartridge 1 Grasp the front cover and pull it toward you use a knife or other sharp object as it might scratch the drum of the cartridge. 2.4 SETTING UP YOUR PRINTER NOTE: Because the printer is very light, it may move when you to move the printer. 2 Remove the toner cartridge from its bag and remove the paper covering the cartridge.
for example, when opening/closing the tray or installing/ removing the toner cartridge. Don't use it; Be careful not to open. Installing the Toner Cartridge 1 Grasp the front cover and pull it toward you use a knife or other sharp object as it might scratch the drum of the cartridge. 2.4 SETTING UP YOUR PRINTER NOTE: Because the printer is very light, it may move when you to move the printer. 2 Remove the toner cartridge from its bag and remove the paper covering the cartridge.


