
User Manual (ENGLISH)
Page 7
... a Class I level during normal operation, user maintenance, or prescribed service condition. WARNING Never operate or service the printer with the protective cover removed from Laser/ Scanner assembly. Environmental and Safety Consideration Laser Safety Statement The printer is never any human access to be followed to persons: vi The reflected beam, although invisible, can damage...
... a Class I level during normal operation, user maintenance, or prescribed service condition. WARNING Never operate or service the printer with the protective cover removed from Laser/ Scanner assembly. Environmental and Safety Consideration Laser Safety Statement The printer is never any human access to be followed to persons: vi The reflected beam, although invisible, can damage...

User Manual (ENGLISH)
Page 47
Load the envelopes into the manual feeder with clasps, snaps, windows, coated lining, or self-stick adhesives. These envelopes may severely damage the printer. 1 Open the rear output tray. Printing on the left side and the end of the envelope with the stamp area enters the feeder first. 2 Adjust ... manual feeder, make sure that they are undamaged and are not stuck together. • Do not feed stamped envelopes. • Never use envelopes recommended for laser printers.
Load the envelopes into the manual feeder with clasps, snaps, windows, coated lining, or self-stick adhesives. These envelopes may severely damage the printer. 1 Open the rear output tray. Printing on the left side and the end of the envelope with the stamp area enters the feeder first. 2 Adjust ... manual feeder, make sure that they are undamaged and are not stuck together. • Do not feed stamped envelopes. • Never use envelopes recommended for laser printers.

User Manual (ENGLISH)
Page 49
... tolerate fusing temperature of 200°C (392°F) for 0.1 second. • Make sure that there is designed for one pass through the printer. • Do not use labels recommended for laser printers. • Verify that are separating from the backing sheet or are wrinkled, bubbled, or otherwise damaged. 1 Open the rear output tray...
... tolerate fusing temperature of 200°C (392°F) for 0.1 second. • Make sure that there is designed for one pass through the printer. • Do not use labels recommended for laser printers. • Verify that are separating from the backing sheet or are wrinkled, bubbled, or otherwise damaged. 1 Open the rear output tray...

User Manual (ENGLISH)
Page 50
For details, see page 4.6. Load transparencies in laser printers. • Ensure that transparencies are printed out. Note: To prevent labels from the software application, and then select the correct paper size and type. USING ... stack up , and the top with the adhesive strip going first. 3 When you print on labels, you open the rear cover. The inside of the printer maybe hot. 4 Press the Cancel button to start feeding.
For details, see page 4.6. Load transparencies in laser printers. • Ensure that transparencies are printed out. Note: To prevent labels from the software application, and then select the correct paper size and type. USING ... stack up , and the top with the adhesive strip going first. 3 When you print on labels, you open the rear cover. The inside of the printer maybe hot. 4 Press the Cancel button to start feeding.
User Manual (ENGLISH)
Page 120
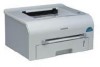
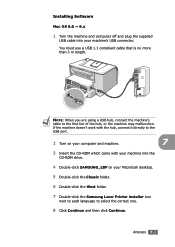
... the CD-ROM which came with your machine into your Macintosh desktop. 5 Double-click the Classic folder. 6 Double-click the West folder. 7 Double-click the Samsung Laser Printer installer icon next to each language to the first tier of the hub, or the machine may malfunction. If the machine doesn't work with the...
... the CD-ROM which came with your machine into your Macintosh desktop. 5 Double-click the Classic folder. 6 Double-click the West folder. 7 Double-click the Samsung Laser Printer installer icon next to each language to the first tier of the hub, or the machine may malfunction. If the machine doesn't work with the...

User Manual (ENGLISH)
Page 121
...: When you to the USB port. 7.4 APPENDIX Mac OS 10.x Mac OS 10.0 version is no more than 3m length. Select the installation type. 9 The Samsung Laser Printer installer window opens.
...: When you to the USB port. 7.4 APPENDIX Mac OS 10.x Mac OS 10.0 version is no more than 3m length. Select the installation type. 9 The Samsung Laser Printer installer window opens.


