User Manual (ENGLISH)
Page 3
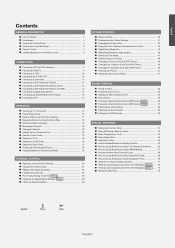
... Panel 4 Viewing the Connection Panel 5 Remote Control 7 Installing Batteries in the Remote Control 8 CONNECTIONS Connecting VHF and UHF Antennas 8 Connecting Cable TV 9 Connecting a VCR 10 Connecting an S-VHS VCR 10 Connecting a Camcorder 11 Connecting a DVD Player/Set-Top Box 11 Connecting a DVD Player...Analog Channels Analog 38 Checking the Digital-Signal Strength Digital 39 LNA (Low Noise Amplifier 39 PICTURE CONTROL Picture Control 40 Customizing the Picture Settings 41 Changing the Picture Size 43 Using the Color Weakness Enhancement Feature 44 Digital Noise Reduction 45...
... Panel 4 Viewing the Connection Panel 5 Remote Control 7 Installing Batteries in the Remote Control 8 CONNECTIONS Connecting VHF and UHF Antennas 8 Connecting Cable TV 9 Connecting a VCR 10 Connecting an S-VHS VCR 10 Connecting a Camcorder 11 Connecting a DVD Player/Set-Top Box 11 Connecting a DVD Player...Analog Channels Analog 38 Checking the Digital-Signal Strength Digital 39 LNA (Low Noise Amplifier 39 PICTURE CONTROL Picture Control 40 Customizing the Picture Settings 41 Changing the Picture Size 43 Using the Color Weakness Enhancement Feature 44 Digital Noise Reduction 45...
User Manual (ENGLISH)
Page 42
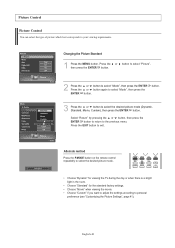
English-40 button. 3 Press the or button to personal preference (see "Customizing the Picture Settings", page 41). Alternate method Press the P.MODE button on the remote control repeatedly to select the desired picture mode. • Choose "Dynamic" for viewing the TV during the day or when there is a bright light in the room...
English-40 button. 3 Press the or button to personal preference (see "Customizing the Picture Settings", page 41). Alternate method Press the P.MODE button on the remote control repeatedly to select the desired picture mode. • Choose "Dynamic" for viewing the TV during the day or when there is a bright light in the room...
User Manual (ENGLISH)
Page 78
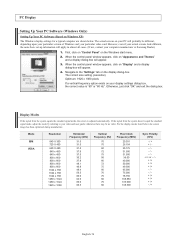
..., depending upon your particular version of Windows and your display settings dialog box, the correct value is adjusted automatically. Navigate to your computer manufacturer or Samsung Dealer.) 1. Display Modes If the signal from the system doesn't equal the standard signal mode, adjust the mode by referring to the "Settings" tab on... 60 72 75 60 70 75 60 75 60 Pixel Clock Frequency (MHz) 20.031 26.154 25.175 31.500 31.500 36.00 40.000 50.000 49.500 65.000 75.000 78.750 108.883 135.000 138.500 Sync Polarity (H/V) - / + + / - When the control panel window appears...
..., depending upon your particular version of Windows and your display settings dialog box, the correct value is adjusted automatically. Navigate to your computer manufacturer or Samsung Dealer.) 1. Display Modes If the signal from the system doesn't equal the standard signal mode, adjust the mode by referring to the "Settings" tab on... 60 72 75 60 70 75 60 75 60 Pixel Clock Frequency (MHz) 20.031 26.154 25.175 31.500 31.500 36.00 40.000 50.000 49.500 65.000 75.000 78.750 108.883 135.000 138.500 Sync Polarity (H/V) - / + + / - When the control panel window appears...
User Manual (ENGLISH)
Page 90
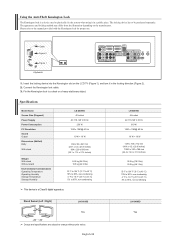
... Resolution Sound Output Dimensions (WxDxH) Body With stand Weight With stand Without stand Environmental Considerations Operating Temperature Operating Humidity Storage Temperature Storage Humidity LN-S4095D 40 inches AC 110-120 V 60 Hz 250 W 1920 x 1080@ 60 Hz 10 W + 10 W 994 x 92 x 647 mm (39.1 x ...refer to be purchased separately. English-88 LN-S4695D Yes The appearance and locking method may differ from the illustration depending on the LCD TV (Figure 1), and turn it in the locking direction (Figure 2). 2. Insert the locking device into the Kensington slot on the ...
... Resolution Sound Output Dimensions (WxDxH) Body With stand Weight With stand Without stand Environmental Considerations Operating Temperature Operating Humidity Storage Temperature Storage Humidity LN-S4095D 40 inches AC 110-120 V 60 Hz 250 W 1920 x 1080@ 60 Hz 10 W + 10 W 994 x 92 x 647 mm (39.1 x ...refer to be purchased separately. English-88 LN-S4695D Yes The appearance and locking method may differ from the illustration depending on the LCD TV (Figure 1), and turn it in the locking direction (Figure 2). 2. Insert the locking device into the Kensington slot on the ...


