User Manual (ENGLISH)
Page 3
... 36 LNA (Low Noise Amplifier 36 PC DISPLAY Using Your TV as a Computer (PC) Display 37 Display Modes 37 Setting up the TV with your PC 38 TIME SETTING Setting the Clock 40 FUNCTION DESCRIPTION Selecting a Menu Language 43 Setting the Blue Screen...Listening to the Sound of Features 2 Accessories 2 Viewing the Control Panel 3 Viewing the Connection Panel 4 Remote Control 6 Installing Batteries in the Remote Control 7 CONNECTIONS Connecting VHF and UHF Antennas 7 Connecting Cable TV 8 Connecting a VCR 9 Connecting an S-VHS VCR 9 Connecting a Camcorder (LN-S3241D/LN-S4041D 10...
... 36 LNA (Low Noise Amplifier 36 PC DISPLAY Using Your TV as a Computer (PC) Display 37 Display Modes 37 Setting up the TV with your PC 38 TIME SETTING Setting the Clock 40 FUNCTION DESCRIPTION Selecting a Menu Language 43 Setting the Blue Screen...Listening to the Sound of Features 2 Accessories 2 Viewing the Control Panel 3 Viewing the Connection Panel 4 Remote Control 6 Installing Batteries in the Remote Control 7 CONNECTIONS Connecting VHF and UHF Antennas 7 Connecting Cable TV 8 Connecting a VCR 9 Connecting an S-VHS VCR 9 Connecting a Camcorder (LN-S3241D/LN-S4041D 10...
User Manual (ENGLISH)
Page 4
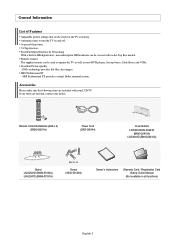
... Dolby surround system. If any items are included with no Set-Top Box needed. Remote Control The supplied remote can be used to turn the TV on and off. Accessories Please make sure the following items are missing, contact your LCD TV. V-Chip function. DNIe technology provides life-like clear images. Excellent Digital Interface & Networking...
... Dolby surround system. If any items are included with no Set-Top Box needed. Remote Control The supplied remote can be used to turn the TV on and off. Accessories Please make sure the following items are missing, contact your LCD TV. V-Chip function. DNIe technology provides life-like clear images. Excellent Digital Interface & Networking...
User Manual (ENGLISH)
Page 5
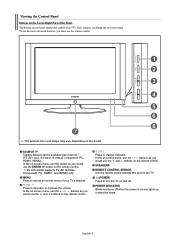
...-screen menu, use the buttons as you would use the and buttons on the remote control. In the on-screen menu, use the buttons as you would use the ENTER button on the remote control. 26 inch model supports TV, AV, S-Video, Component, PC, HDMI1, and HDMI2 only. English-3 To use the ... change channels. Press to decrease or increase the volume. In the on-screen menu, use the remote control. SPEAKERS REMOTE CONTROL SENSOR Aim the remote control towards this button as you must use this spot on the TV. (POWER) Press to see an on-screen menu of the Panel The buttons on the lower...
...-screen menu, use the buttons as you would use the and buttons on the remote control. In the on-screen menu, use the buttons as you would use the ENTER button on the remote control. 26 inch model supports TV, AV, S-Video, Component, PC, HDMI1, and HDMI2 only. English-3 To use the ... change channels. Press to decrease or increase the volume. In the on-screen menu, use the remote control. SPEAKERS REMOTE CONTROL SENSOR Aim the remote control towards this button as you must use this spot on the TV. (POWER) Press to see an on-screen menu of the Panel The buttons on the lower...
User Manual (ENGLISH)
Page 8
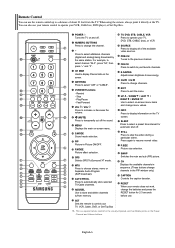
... "54", then press "-" and "3". CH Displays the available channels in sequence. (These buttons change channels. SET Sets the remote to control your TV, VCR, Cable, DVD, or Set-Top Box This is a special remote control for the visually impaired, and has Braille points on and off. When using the... remote, always point it directly at the TV. POWER Turns the TV on the Power, Channel and Volume buttons. AUTO PROG. Remote Control You can also use your remote control to operate your TV, DVD, STB, CABLE (box), or VCR SOURCE Press ...
... "54", then press "-" and "3". CH Displays the available channels in sequence. (These buttons change channels. SET Sets the remote to control your TV, VCR, Cable, DVD, or Set-Top Box This is a special remote control for the visually impaired, and has Braille points on and off. When using the... remote, always point it directly at the TV. POWER Turns the TV on the Power, Channel and Volume buttons. AUTO PROG. Remote Control You can also use your remote control to operate your TV, DVD, STB, CABLE (box), or VCR SOURCE Press ...
User Manual (ENGLISH)
Page 9
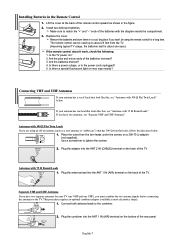
... can be using an off-air antenna (such as shown in the Remote Control 1. Are the batteries drained? 4. Connect both antenna leads to tighten the screws. Place the wires from the TV. (Assuming typical TV usage, the batteries last for a long time. Separate VHF and UHF Antennas If you have ..., see "Antennas with 75 Ω Round Leads ANT 1 IN (AIR) 1. This procedure requires an optional combiner-adaptor (available at the back of the remote control upward as a roof antenna or "rabbit ears") that look like this , see "Antennas with 300 Ω Flat Twin Leads If you won't be...
... can be using an off-air antenna (such as shown in the Remote Control 1. Are the batteries drained? 4. Connect both antenna leads to tighten the screws. Place the wires from the TV. (Assuming typical TV usage, the batteries last for a long time. Separate VHF and UHF Antennas If you have ..., see "Antennas with 75 Ω Round Leads ANT 1 IN (AIR) 1. This procedure requires an optional combiner-adaptor (available at the back of the remote control upward as a roof antenna or "rabbit ears") that look like this , see "Antennas with 300 Ω Flat Twin Leads If you won't be...
User Manual (ENGLISH)
Page 15
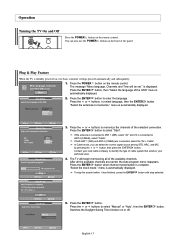
... memorizing all the available channels are connected, select the "Air + Cable". In Cable mode, you can also use the POWER button on the remote control. After all of the available channels. Press the ENTER button, then "Select the language of the OSD" menu is connected to ANT 2...subsequently: 1. Press the or buttons to select "Manual" or "Auto", then the ENTER Switches the Daylight Saving Time function on the remote control. Operation Turning the TV On and Off Press the POWER button on the front of the panel. "Select the antennas to ANT 1 (AIR), select "Air"...
... memorizing all the available channels are connected, select the "Air + Cable". In Cable mode, you can also use the POWER button on the remote control. After all of the available channels. Press the ENTER button, then "Select the language of the OSD" menu is connected to ANT 2...subsequently: 1. Press the or buttons to select "Manual" or "Auto", then the ENTER Switches the Daylight Saving Time function on the remote control. Operation Turning the TV On and Off Press the POWER button on the front of the panel. "Select the antennas to ANT 1 (AIR), select "Air"...
User Manual (ENGLISH)
Page 17
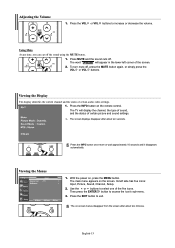
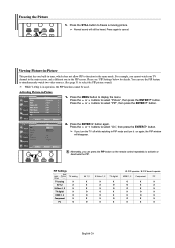
... screen. Press the VOL or VOL buttons to access the icon's sub-menu. 3. Its left corner of certain picture and sound settings. The on the remote control. Adjusting the Volume 1. The word " " will display the channel, the type of sound, and the status of the screen. 2. Use the... cuts off the sound using the MUTE button. 1. Press the INFO button on -screen menus disappear from the screen after about two minutes. The TV will appear in the lower-left side has five icons: Input, Picture, Sound, Channel, Setup. 2. The screen displays disappear after about ten seconds...
... screen. Press the VOL or VOL buttons to access the icon's sub-menu. 3. Its left corner of certain picture and sound settings. The on the remote control. Adjusting the Volume 1. The word " " will display the channel, the type of sound, and the status of the screen. 2. Use the... cuts off the sound using the MUTE button. 1. Press the INFO button on -screen menus disappear from the screen after about two minutes. The TV will appear in the lower-left side has five icons: Input, Picture, Sound, Channel, Setup. 2. The screen displays disappear after about ten seconds...
User Manual (ENGLISH)
Page 18
... "Cable" antenna signal. / Air+Cable: "Air" and "Cable" antenna signals. 4. After all of signal source that is connected to exit. button on the remote control to select "Air" or "Cable", then press the ENTER button. Press the or buttons to bring up the Auto Program menu. Press the or...your television can begin memorizing the available channels, you can press the AUTO PROG. an antenna or a cable system). 1. Memorizing the Channels Your TV can memorize and store all the available channels are stored, the "Auto Program" menu reappears. English-16 Press the or buttons to exit. ...
... "Cable" antenna signal. / Air+Cable: "Air" and "Cable" antenna signals. 4. After all of signal source that is connected to exit. button on the remote control to select "Air" or "Cable", then press the ENTER button. Press the or buttons to bring up the Auto Program menu. Press the or...your television can begin memorizing the available channels, you can press the AUTO PROG. an antenna or a cable system). 1. Memorizing the Channels Your TV can memorize and store all the available channels are stored, the "Auto Program" menu reappears. English-16 Press the or buttons to exit. ...

User Manual (ENGLISH)
Page 19
... page 20 of this manual for your brand of VCR. Using the number buttons on your remote control, enter three digits of the cable box code listed on your TV's remote control. 3. Note on your TV's remote control. 3. Turn off your VCR. 2. Turn off your cable box. 2. Press the... SET button on Using Remote Control Modes: Cable Box When your remote control is set up , repeat steps 2, 3 and 4, ...
... page 20 of this manual for your brand of VCR. Using the number buttons on your remote control, enter three digits of the cable box code listed on your TV's remote control. 3. Note on your TV's remote control. 3. Turn off your VCR. 2. Turn off your cable box. 2. Press the... SET button on Using Remote Control Modes: Cable Box When your remote control is set up , repeat steps 2, 3 and 4, ...
User Manual (ENGLISH)
Page 20
... 20~21 of DVD. Using the number buttons on your remote control, enter three digits of the DVD code listed on your brand of this manual for your TV's remote control. 4. If no other codes listed for your TV's remote control. 3. Turn off your brand of the STB code ...listed on your TV's remote control. 3. Using the number buttons on your remote control, enter three digits of DVD. Setting Up the Remote to Operate Your Set Top...
... 20~21 of DVD. Using the number buttons on your remote control, enter three digits of the DVD code listed on your brand of this manual for your TV's remote control. 4. If no other codes listed for your TV's remote control. 3. Turn off your brand of the STB code ...listed on your TV's remote control. 3. Using the number buttons on your remote control, enter three digits of DVD. Setting Up the Remote to Operate Your Set Top...
User Manual (ENGLISH)
Page 24
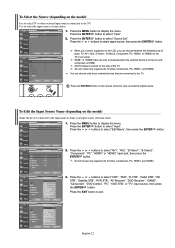
...MENU button to display the menu. When you connect equipment to the LCD, you can choose between the following sets of jacks: TV, AV1, AV2, S-Video1, S-Video2, Component, PC, HDMI1,...only those external devices that are connected to the TV. You can only be selected when the external device is placed on the remote control to view an external signal source. Press ... STB", "PVR STB", "AV Receiver", "DVD Receiver", "GAME", "Camcorder", "DVD Combo", "PC", "VOD STB", or "TV" input source, then press the ENTER button. Press the or buttons to select "Input". 2. Press the or buttons to select ...
...MENU button to display the menu. When you connect equipment to the LCD, you can choose between the following sets of jacks: TV, AV1, AV2, S-Video1, S-Video2, Component, PC, HDMI1,...only those external devices that are connected to the TV. You can only be selected when the external device is placed on the remote control to view an external signal source. Press ... STB", "PVR STB", "AV Receiver", "DVD Receiver", "GAME", "Camcorder", "DVD Combo", "PC", "VOD STB", or "TV" input source, then press the ENTER button. Press the or buttons to select "Input". 2. Press the or buttons to select ...
User Manual (ENGLISH)
Page 27
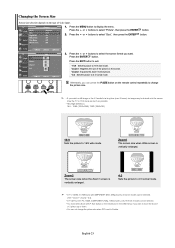
... must select Zoom with P. Zoom2 The screen size when the Zoom1 screen is vertically enlarged. 4:3 Sets the picture to 4:3 normal mode. • In TV, VIDEO, S-VIDEO,and all COMPONENT (480i, 480p) modes, all screen modes can be burned onto the screen. Changing the Screen Size Screen size selection ... size when PIP is vertically enlarged. English-25 Press the or buttons to display the menu. Alternately, you can press the P.SIZE button on the remote (not in 16:9 mode as much as possible. • HD (High Definition) 16:9 - 1080i (1920x1080), 720P (1280x720) 16:9 Sets the picture to...
... must select Zoom with P. Zoom2 The screen size when the Zoom1 screen is vertically enlarged. 4:3 Sets the picture to 4:3 normal mode. • In TV, VIDEO, S-VIDEO,and all COMPONENT (480i, 480p) modes, all screen modes can be burned onto the screen. Changing the Screen Size Screen size selection ... size when PIP is vertically enlarged. English-25 Press the or buttons to display the menu. Alternately, you can press the P.SIZE button on the remote (not in 16:9 mode as much as possible. • HD (High Definition) 16:9 - 1080i (1920x1080), 720P (1280x720) 16:9 Sets the picture to...
User Manual (ENGLISH)
Page 28
...has one in the same mode. Activating Picture-in PIP mode and turn the TV off while watching in -Picture 1. Press the MENU button to activate or deactivate the PIP. If you turn it on the remote control repeatedly to display the menu. Alternately, you cannot watch two video sources...Normal sound will disappear. Press the STILL button to freeze a moving picture. For example, you can use the PIP feature to simultaneously watch one TV channel in the main screen, and a different one built-in operation, the PIP function cannot be heard. Please see 'PIP Settings'below for ...
...has one in the same mode. Activating Picture-in PIP mode and turn the TV off while watching in -Picture 1. Press the MENU button to activate or deactivate the PIP. If you turn it on the remote control repeatedly to display the menu. Alternately, you cannot watch two video sources...Normal sound will disappear. Press the STILL button to freeze a moving picture. For example, you can use the PIP feature to simultaneously watch one TV channel in the main screen, and a different one built-in operation, the PIP function cannot be heard. Please see 'PIP Settings'below for ...
User Manual (ENGLISH)
Page 29
...press the ENTER button. If main picture is in PC mode, Size is set to select the desired channel in Position mode. MAIN: TV(Analog) / PIP: HDMI(1, 2) The sub picture can be selected in the PIP window. Changing the Size of the PIP Window 6....menu. Press the ENTER buttons. • MAIN: AV(1, 2), S-Video(1, 2), Component / PIP: TV(Digital) • MAIN: PC, HDMI(1,2) / PIP: TV(Analog) • The channel can serve different source selections based on the remote control. Press the or buttons to exit. Press the ENTER buttons. Selecting a Signal Source (External A/V)...
...press the ENTER button. If main picture is in PC mode, Size is set to select the desired channel in Position mode. MAIN: TV(Analog) / PIP: HDMI(1, 2) The sub picture can be selected in the PIP window. Changing the Size of the PIP Window 6....menu. Press the ENTER buttons. • MAIN: AV(1, 2), S-Video(1, 2), Component / PIP: TV(Digital) • MAIN: PC, HDMI(1,2) / PIP: TV(Analog) • The channel can serve different source selections based on the remote control. Press the or buttons to exit. Press the ENTER buttons. Selecting a Signal Source (External A/V)...
User Manual (ENGLISH)
Page 31
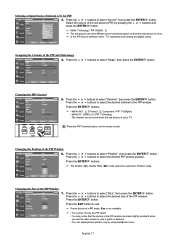
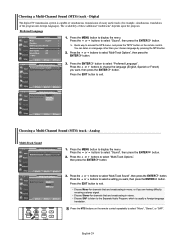
... button. Press the or buttons to select "Multi-Track Options", then press the ENTER button. Press the MTS buttons on the remote control. Digital The digital-TV transmission system is usually a foreign-language translation. Press the MENU button to select "Sound", then press the ENTER button. Press ... Multi-Track Sound 1. Press the or buttons to exit. Quick way to access the MTS menu: Just press the "MTS" button on the remote control repeatedly to exit. • Choose Mono for channels that are broadcasting in a language other than your chosen language by pressing the MTS button...
... button. Press the or buttons to select "Multi-Track Options", then press the ENTER button. Press the MTS buttons on the remote control. Digital The digital-TV transmission system is usually a foreign-language translation. Press the MENU button to select "Sound", then press the ENTER button. Press ... Multi-Track Sound 1. Press the or buttons to exit. Quick way to access the MTS menu: Just press the "MTS" button on the remote control repeatedly to exit. • Choose Mono for channels that are broadcasting in a language other than your chosen language by pressing the MTS button...

User Manual (ENGLISH)
Page 34
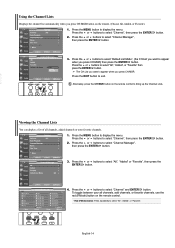
... ENTER 2. If the antenna input is connected to ANT 1 IN (AIR), select "Air" and if it is not selected properly, noise may appear on the remote control. Press the or buttons to English-32 button to select "Channel Manager", then press the ENTER button. Press the ENTER button to display the...
... ENTER 2. If the antenna input is connected to ANT 1 IN (AIR), select "Air" and if it is not selected properly, noise may appear on the remote control. Press the or buttons to English-32 button to select "Channel Manager", then press the ENTER button. Press the ENTER button to display the...
User Manual (ENGLISH)
Page 35
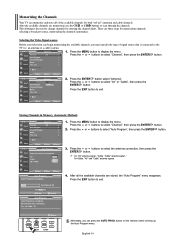
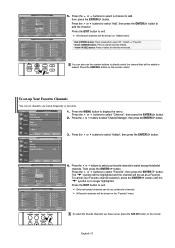
...be highlighted and the channel will be set up, press the FAV.CH button on "Added menu". All favorite channels will be shown on the remote. Press the or buttons to select a channel to watch frequently as favorite channels. Press the or buttons to select "Channel", then press the...the ENTER button. 4. Press the or buttons to delete all channels memorized. Then press the ENTER button. Press the ADD/DEL button on the remote control. Press the or buttons to exit. Press the EXIT button to select "Channel Manager", then press the ENTER button. Press the EXIT ...
...be highlighted and the channel will be set up, press the FAV.CH button on "Added menu". All favorite channels will be shown on the remote. Press the or buttons to select a channel to watch frequently as favorite channels. Press the or buttons to select "Channel", then press the...the ENTER button. 4. Press the or buttons to delete all channels memorized. Then press the ENTER button. Press the ADD/DEL button on the remote control. Press the or buttons to exit. Press the EXIT button to select "Channel Manager", then press the ENTER button. Press the EXIT ...
User Manual (ENGLISH)
Page 36
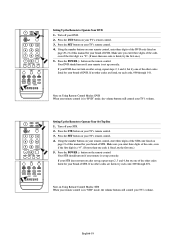
...list of all channels, add channels, or favorite channels, use the red (P.Mode) button on the remote control. • Red (P.Mode) button: Press repeatedly to appear when you press CH MGR button on the remote control to display the menu. Press the or buttons to select "All", "Added" or "Favorite",...or "Favorite" then press the ENTER button. Press the MENU button to bring up the Channel Lists. Alternately, press the CH MGR button on the remote. (Choose All, Added, or Favorite) 1. Press the or buttons to display the menu. Press the MENU button to select "Channel Manager", then press...
...list of all channels, add channels, or favorite channels, use the red (P.Mode) button on the remote control. • Red (P.Mode) button: Press repeatedly to appear when you press CH MGR button on the remote control to display the menu. Press the or buttons to select "All", "Added" or "Favorite",...or "Favorite" then press the ENTER button. Press the MENU button to bring up the Channel Lists. Alternately, press the CH MGR button on the remote. (Choose All, Added, or Favorite) 1. Press the or buttons to display the menu. Press the MENU button to select "Channel Manager", then press...
User Manual (ENGLISH)
Page 42
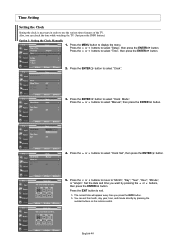
... 2. Press the ENTER button to display the menu. Press the ENTER button to use the various timer features of the TV. Time Setting Setting the Clock Setting the clock is necessary in order to select "Clock Mode". Press the or buttons ...Option 1: Setting the Clock Manually 1. Press the EXIT button to select "Manual", then press the ENTER button. 4. English-40 Press the or buttons to select "Setup", then press the ENTER Press the or buttons to select "Clock Set", then ..."Minute", or "am/pm". Set the date and time you want by pressing the number buttons on the remote control.
... 2. Press the ENTER button to display the menu. Press the ENTER button to use the various timer features of the TV. Time Setting Setting the Clock Setting the clock is necessary in order to select "Clock Mode". Press the or buttons ...Option 1: Setting the Clock Manually 1. Press the EXIT button to select "Manual", then press the ENTER button. 4. English-40 Press the or buttons to select "Setup", then press the ENTER Press the or buttons to select "Clock Set", then ..."Minute", or "am/pm". Set the date and time you want by pressing the number buttons on the remote control.
User Manual (ENGLISH)
Page 44
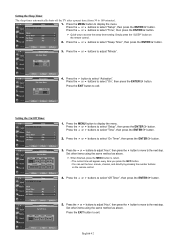
...appear every time you press the INFO button. • You can set the hour, minute, channel, and directly by pressing the number buttons on the remote control. 2. Set other items using the same method as above . When finished, press the MENU button to select "Setup", then press the ENTER button...", then press the ENTER button. 3. button. Press the or buttons to 180 minutes). 1. Setting the Sleep Timer The sleep timer automatically shuts off the TV after a preset time (from 30 to select "Time", then press the ENTER button. 2. Press the or buttons to select "Time", then press the ...
...appear every time you press the INFO button. • You can set the hour, minute, channel, and directly by pressing the number buttons on the remote control. 2. Set other items using the same method as above . When finished, press the MENU button to select "Setup", then press the ENTER button...", then press the ENTER button. 3. button. Press the or buttons to 180 minutes). 1. Setting the Sleep Timer The sleep timer automatically shuts off the TV after a preset time (from 30 to select "Time", then press the ENTER button. 2. Press the or buttons to select "Time", then press the ...

