User Manual (ENGLISH)
Page 4
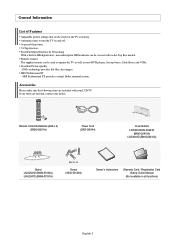
... provides life-like clear images. Accessories Please make sure the following items are missing, contact your LCD TV. V-Chip function. SRS TruSurround XT - Remote Control & Batteries (AAA x 2) (BN59-00511A) Power Cord (3903-000144) Cover-Bottom LN-S2641D/LN-S3241D (BN63-02415A) LN-S4041D (BN63-02416A... digital tuner, non-subscription HD broadcasts can be viewed with your dealer. Remote Control The supplied remote can be stored in the TV's memory. Excellent Digital Interface & Networking With a built-in all locations) English-2 SRS TruSurround XT provides a virtual Dolby surround ...
... provides life-like clear images. Accessories Please make sure the following items are missing, contact your LCD TV. V-Chip function. SRS TruSurround XT - Remote Control & Batteries (AAA x 2) (BN59-00511A) Power Cord (3903-000144) Cover-Bottom LN-S2641D/LN-S3241D (BN63-02415A) LN-S4041D (BN63-02416A... digital tuner, non-subscription HD broadcasts can be viewed with your dealer. Remote Control The supplied remote can be stored in the TV's memory. Excellent Digital Interface & Networking With a built-in all locations) English-2 SRS TruSurround XT provides a virtual Dolby surround ...
User Manual (ENGLISH)
Page 5
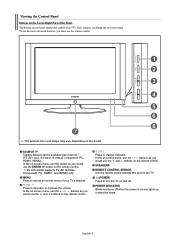
... volume. Press to see an on-screen menu of the Panel The buttons on the lower-right panel control your TV's features. Press to turn the TV on and off when the power is on and lights up in stand-by mode. The product color and shape may vary depending on the remote... the on-screen menu, use the buttons as you would use the and buttons on the remote control. POWER INDICATOR Blinks and turns off . English-3 In the on-screen menu, use this spot on the TV. (POWER) Press to change channels. Viewing the Control Panel Buttons on the Lower-Right Part of your...
... volume. Press to see an on-screen menu of the Panel The buttons on the lower-right panel control your TV's features. Press to turn the TV on and off when the power is on and lights up in stand-by mode. The product color and shape may vary depending on the remote... the on-screen menu, use the buttons as you would use the and buttons on the remote control. POWER INDICATOR Blinks and turns off . English-3 In the on-screen menu, use this spot on the TV. (POWER) Press to change channels. Viewing the Control Panel Buttons on the Lower-Right Part of your...
User Manual (ENGLISH)
Page 6
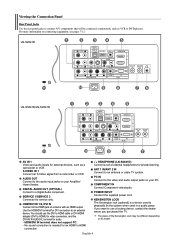
...a device with an HDMI output. English-4 DIGITAL AUDIO OUT (OPTICAL) Connect to an external device. POWER INPUT Connect the supplied power cord. HDMI/DVI IN terminal does not support PC. - If you purchased the TV. PC IN Connect to use the DVI to HDMI cable or DVI-HDMI adapter (DVI to an... antenna or cable TV system. COMPONENT IN Connect Component video/audio. Viewing the Connection Panel Rear ...
...a device with an HDMI output. English-4 DIGITAL AUDIO OUT (OPTICAL) Connect to an external device. POWER INPUT Connect the supplied power cord. HDMI/DVI IN terminal does not support PC. - If you purchased the TV. PC IN Connect to use the DVI to HDMI cable or DVI-HDMI adapter (DVI to an... antenna or cable TV system. COMPONENT IN Connect Component video/audio. Viewing the Connection Panel Rear ...
User Manual (ENGLISH)
Page 8
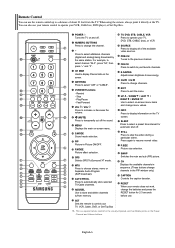
... can also use your remote control to operate your VCR, Cable box, DVD player, or Set-Top Box. POWER Turns the TV on the screen. CH MGR Used to /from the TV. ADD/DEL Use to store and delete channels to display Channel Lists on and off the sound. STILL Press ...in Picture ON/OFF. P.MODE Picture effect selection. E.SAVING Adjusts screen brightness to stop the action during a particular scene. MENU Displays the main on the Power, Channel and Volume buttons. CH / CH Press to choose stereo, mono or Separate Audio Program (SAP broadcast). English-6 You can use the remote control...
... can also use your remote control to operate your VCR, Cable box, DVD player, or Set-Top Box. POWER Turns the TV on the screen. CH MGR Used to /from the TV. ADD/DEL Use to store and delete channels to display Channel Lists on and off the sound. STILL Press ...in Picture ON/OFF. P.MODE Picture effect selection. E.SAVING Adjusts screen brightness to stop the action during a particular scene. MENU Displays the main on the Power, Channel and Volume buttons. CH / CH Press to choose stereo, mono or Separate Audio Program (SAP broadcast). English-6 You can use the remote control...
User Manual (ENGLISH)
Page 9
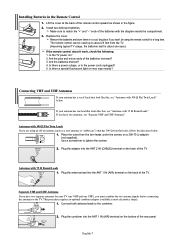
..., follow the directions below . Antennas with 300 Ω Flat Twin Leads" below . 1. Make sure to the TV. Install two AAA size batteries. Installing Batteries in the figure. 2. Is the TV power on? 2. Antennas with the diagram inside the compartment. 3. Connecting VHF and UHF Antennas If your... TV (one VHF and one UHF), you are using the remote control for your antenna has a set of...
..., follow the directions below . Antennas with 300 Ω Flat Twin Leads" below . 1. Make sure to the TV. Install two AAA size batteries. Installing Batteries in the figure. 2. Is the TV power on? 2. Antennas with the diagram inside the compartment. 3. Connecting VHF and UHF Antennas If your... TV (one VHF and one UHF), you are using the remote control for your antenna has a set of...
User Manual (ENGLISH)
Page 15
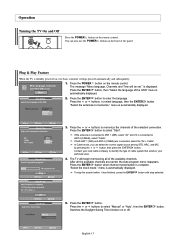
...the ENTER button to memorize." menu is displayed. Press the ENTER button. Press the POWER button on the remote control. "Select the antennas to enter the language. Press the...reappears. In Cable mode, you can also use the POWER button on , two basic customer settings proceed automatically and subsequently: 1. English-13 Operation Turning the TV On and Off Press the POWER button on the remote control. Press the ENTER button... button to ANT 2 (CABLE), select "Cable". Plug & Play Feature When the TV is initially powered on the front of the available channels. The...
...the ENTER button to memorize." menu is displayed. Press the ENTER button. Press the POWER button on the remote control. "Select the antennas to enter the language. Press the...reappears. In Cable mode, you can also use the POWER button on , two basic customer settings proceed automatically and subsequently: 1. English-13 Operation Turning the TV On and Off Press the POWER button on the remote control. Press the ENTER button... button to ANT 2 (CABLE), select "Cable". Plug & Play Feature When the TV is initially powered on the front of the available channels. The...
User Manual (ENGLISH)
Page 17
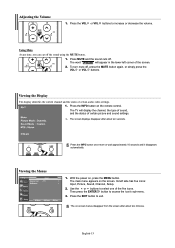
... buttons to access the icon's sub-menu. 3. With the power on the screen. Then press the ENTER button to increase or decrease the volume. The word " " will display the channel, the type of sound, and the status of the screen. 2. The TV will appear in the lower-left side has five icons...
... buttons to access the icon's sub-menu. 3. With the power on the screen. Then press the ENTER button to increase or decrease the volume. The word " " will display the channel, the type of sound, and the status of the screen. 2. The TV will appear in the lower-left side has five icons...

User Manual (ENGLISH)
Page 19
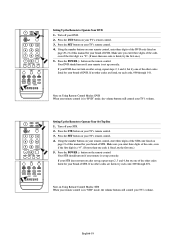
..., and control whichever piece of equipment you enter three digits of cable box. Make sure you enter three digits of VCR. Press the POWER button on the remote control. Turn off your TV's remote control. 3. Make sure you choose. Pressing the corresponding button on page 19 of this manual for your... through 046. English-17 Your VCR should turn on page 20 of VCR. Setting Up the Remote to Operate Your Cable Box 1. Press the POWER button on the remote control. If no other codes are listed, try one of the other codes listed for your brand of this manual for...
..., and control whichever piece of equipment you enter three digits of cable box. Make sure you enter three digits of VCR. Press the POWER button on the remote control. Turn off your TV's remote control. 3. Make sure you choose. Pressing the corresponding button on page 19 of this manual for your... through 046. English-17 Your VCR should turn on page 20 of VCR. Setting Up the Remote to Operate Your Cable Box 1. Press the POWER button on the remote control. If no other codes are listed, try one of the other codes listed for your brand of this manual for...
User Manual (ENGLISH)
Page 20
... the STB button on if your brand of this manual for your remote is set -up correctly. Press the POWER button on the remote control. If your DVD does not turn on your TV's remote control. 3. Press the DVD button on after set up , repeat steps 2, 3 and 4, but try one of... the other codes are listed, try each code, 000 through 074. Press the POWER button on the remote control. If your STB does not turn on Using Remote Control Modes: STB When your TV's volume. Turn off your TV's remote control. 4. Setting Up the Remote to Operate Your Set Top Box 1....
... the STB button on if your brand of this manual for your remote is set -up correctly. Press the POWER button on the remote control. If your DVD does not turn on your TV's remote control. 3. Press the DVD button on after set up , repeat steps 2, 3 and 4, but try one of... the other codes are listed, try each code, 000 through 074. Press the POWER button on the remote control. If your STB does not turn on Using Remote Control Modes: STB When your TV's volume. Turn off your TV's remote control. 4. Setting Up the Remote to Operate Your Set Top Box 1....
User Manual (ENGLISH)
Page 33
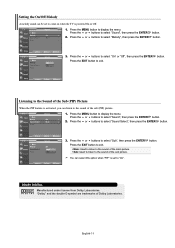
... of the Sub (PIP) Picture When the PIP feature is activated, you can select this option when "PIP" is set to come on when the TV is powered On or Off. 1. Press the EXIT button to display the menu. You can listen to the sound of the sub (PIP) picture. 1. Listening to...
... of the Sub (PIP) Picture When the PIP feature is activated, you can select this option when "PIP" is set to come on when the TV is powered On or Off. 1. Press the EXIT button to display the menu. You can listen to the sound of the sub (PIP) picture. 1. Listening to...
User Manual (ENGLISH)
Page 49
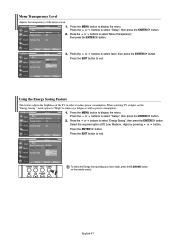
... " mode option to "High" to select "Setup", then press the ENTER button. 2. Press the or buttons to reduce eye fatigue as well as power consumption. 1. Press the ENTER button. Press the MENU button to select "Energy Saving", then press the ENTER button. Select the required option (Off, ...button to select "Setup", then press the ENTER 2. Press the or buttons to exit. Menu Transparency Level Adjusts the transparency of the TV in order to reduce power consumption. Using the Energy Saving Feature This feature adjusts the brightness of the menu screen. 1. English-47
... " mode option to "High" to select "Setup", then press the ENTER button. 2. Press the or buttons to reduce eye fatigue as well as power consumption. 1. Press the ENTER button. Press the MENU button to select "Energy Saving", then press the ENTER button. Select the required option (Off, ...button to select "Setup", then press the ENTER 2. Press the or buttons to exit. Menu Transparency Level Adjusts the transparency of the TV in order to reduce power consumption. Using the Energy Saving Feature This feature adjusts the brightness of the menu screen. 1. English-47
User Manual (ENGLISH)
Page 50
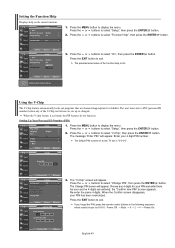
... to exit. Setting Up Your Personal ID Number (PIN) 1. Press the EXIT button to display the menu. The predetermined value of a new TV set up or changed. Press the MENU button to exit. The default PIN number of the function help on the menu functions. 1. button. ... Function Help Displays help is "0-0-0-0". 3. The "V-Chip" screen will appear. The message "Enter PIN" will appear. Press the MENU button to 0-0-0-0 : Power Off. → Mute → 8 → 2 → 4 → Power On. As soon as the 4 digits are deemed inappropriate for your PIN and enter them.
... to exit. Setting Up Your Personal ID Number (PIN) 1. Press the EXIT button to display the menu. The predetermined value of a new TV set up or changed. Press the MENU button to exit. The default PIN number of the function help on the menu functions. 1. button. ... Function Help Displays help is "0-0-0-0". 3. The "V-Chip" screen will appear. The message "Enter PIN" will appear. Press the MENU button to 0-0-0-0 : Power Off. → Mute → 8 → 2 → 4 → Power On. As soon as the 4 digits are deemed inappropriate for your PIN and enter them.
User Manual (ENGLISH)
Page 56
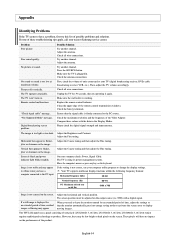
... is firmly connected to flicker, jitter or shimmer on the image. On your nearest Samsung service center. The screen position must be few bright or dark pixels on the screen...have a computer connected to display moving images. The TV won't turn on the output source (i.e. Make sure the TV is using its power management system. Check the antenna connections. First, check... Adjust the horizontal and vertical position. If a still image is black and power indicator light blinks steadily. The TFT LCD panel uses a panel consisting of these values with a digital signal. These ...
... is firmly connected to flicker, jitter or shimmer on the image. On your nearest Samsung service center. The screen position must be few bright or dark pixels on the screen...have a computer connected to display moving images. The TV won't turn on the output source (i.e. Make sure the TV is using its power management system. Check the antenna connections. First, check... Adjust the horizontal and vertical position. If a still image is black and power indicator light blinks steadily. The TFT LCD panel uses a panel consisting of these values with a digital signal. These ...
User Manual (ENGLISH)
Page 58
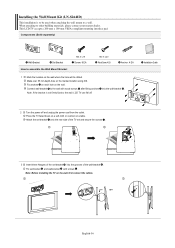
... grooves of the wall-bracket . Fix set -bracket into the wall-bracket . Note: Before installing the TV on a table. When attaching to the wall, LCD TV can fall off and unplug the power cord from the outlet. This LCD TV accepts a 200 mm x 100 mm VESA-compliant mounting interface pad. English-56 Fix anchors on each...
... grooves of the wall-bracket . Fix set -bracket into the wall-bracket . Note: Before installing the TV on a table. When attaching to the wall, LCD TV can fall off and unplug the power cord from the outlet. This LCD TV accepts a 200 mm x 100 mm VESA-compliant mounting interface pad. English-56 Fix anchors on each...
User Manual (ENGLISH)
Page 59
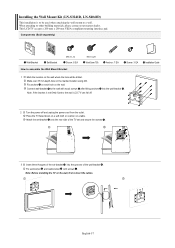
... wall where the hole will be used when attaching the wall mount to the wall, LCD TV can fall off and unplug the power cord from the outlet. Attach the set-bracket onto the rear side of the TV set and secure the screws . 3 Insert three Hangers of the set -bracket and wall-...down on a soft cloth or cushion on the wall. Fix set -bracket into the wall-bracket . This LCD TV accepts a 200 mm x 200 mm VESA-compliant mounting interface pad. Note: Before installing the TV on the marked location using drill. English-57 When attaching to other building materials, please contact your nearest dealer...
... wall where the hole will be used when attaching the wall mount to the wall, LCD TV can fall off and unplug the power cord from the outlet. Attach the set-bracket onto the rear side of the TV set and secure the screws . 3 Insert three Hangers of the set -bracket and wall-...down on a soft cloth or cushion on the wall. Fix set -bracket into the wall-bracket . This LCD TV accepts a 200 mm x 200 mm VESA-compliant mounting interface pad. Note: Before installing the TV on the marked location using drill. English-57 When attaching to other building materials, please contact your nearest dealer...
User Manual (ENGLISH)
Page 60
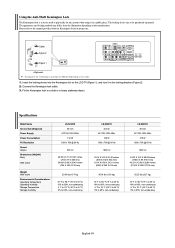
...place of the Kensington Lock may differ from the illustration depending on the manufacturer. Specifications Model Name Screen Size (Diagonal) Power Supply Power Consumption PC Resolution Sound Output Dimensions (WxDxH) Body With stand Weight With stand Environmental Considerations Operating Temperature Operating Humidity Storage ...23.7 kg) 50 °F to 104 °F (10 °C to 40 °C) 10% to 80%, non-condensing -4 °F to 113 °F (-20 °C to 45 °C) 5% to be different depending on the LCD TV (Figure 1), and turn it in the locking direction (Figure 2). 2. Please ...
...place of the Kensington Lock may differ from the illustration depending on the manufacturer. Specifications Model Name Screen Size (Diagonal) Power Supply Power Consumption PC Resolution Sound Output Dimensions (WxDxH) Body With stand Weight With stand Environmental Considerations Operating Temperature Operating Humidity Storage ...23.7 kg) 50 °F to 104 °F (10 °C to 40 °C) 10% to 80%, non-condensing -4 °F to 113 °F (-20 °C to 45 °C) 5% to be different depending on the LCD TV (Figure 1), and turn it in the locking direction (Figure 2). 2. Please ...


