
Open Source Guide (ENGLISH)
Page 1
...'s free use the GPL(version 2) and LGPL (version 2.1). The precise terms and conditions for questions regarding open sources, contact Samsung via Email (vdswmanager@samsung. they are not derived from the Program, and can get the source code. Whether that version or of any work based ... and reuse of software generally. ❑ NO WARRANTY 11. This General Public License applies to most ordinary way, to print or display an announcement including an appropriate copyright notice and a notice that is permitted only in detail to apply in other pertinent obligations, then ...
...'s free use the GPL(version 2) and LGPL (version 2.1). The precise terms and conditions for questions regarding open sources, contact Samsung via Email (vdswmanager@samsung. they are not derived from the Program, and can get the source code. Whether that version or of any work based ... and reuse of software generally. ❑ NO WARRANTY 11. This General Public License applies to most ordinary way, to print or display an announcement including an appropriate copyright notice and a notice that is permitted only in detail to apply in other pertinent obligations, then ...

Open Source Guide (ENGLISH)
Page 2
16. How to Apply These Terms to where the full notice is safest to attach them to the start of each file should have at least the "copyright" line and a pointer to Your New Libraries If you develop a new library, and you want it free software that everyone can do so by permitting redistribution under these terms, attach the following notices to be of warranty; It is found. To apply these terms (or, alternatively, under the terms of the ordinary General Public License). You can redistribute and change. IN NO EVENT UNLESS REQUIRED BY APPLICABLE LAW OR AGREED TO IN WRITING ...
16. How to Apply These Terms to where the full notice is safest to attach them to the start of each file should have at least the "copyright" line and a pointer to Your New Libraries If you develop a new library, and you want it free software that everyone can do so by permitting redistribution under these terms, attach the following notices to be of warranty; It is found. To apply these terms (or, alternatively, under the terms of the ordinary General Public License). You can redistribute and change. IN NO EVENT UNLESS REQUIRED BY APPLICABLE LAW OR AGREED TO IN WRITING ...
User Manual (ENGLISH)
Page 3
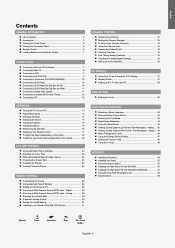
...32 To set-up Your Favorite Channels 33 Using the Channel Lists 34 Viewing the Channel Lists 34 Labeling Channels 35 Fine Tuning Analog Channels 35 Checking the Digital-Signal Strength 36 LNA (Low Noise Amplifier 36 PC DISPLAY Using Your TV as a Computer (PC) Display 37 Display Modes 37 Setting up the TV...11 Connecting an Amplifier/DVD Home Theater 12 Connecting a PC 12 OPERATION Turning the TV On and Off 13 Plug & Play Feature 13 Changing Channels 14 Adjusting the Volume 15 Viewing the Display 15 Viewing the Menus 15 Memorizing the Channels 16 Setting Up Your Remote Control 17...
...32 To set-up Your Favorite Channels 33 Using the Channel Lists 34 Viewing the Channel Lists 34 Labeling Channels 35 Fine Tuning Analog Channels 35 Checking the Digital-Signal Strength 36 LNA (Low Noise Amplifier 36 PC DISPLAY Using Your TV as a Computer (PC) Display 37 Display Modes 37 Setting up the TV...11 Connecting an Amplifier/DVD Home Theater 12 Connecting a PC 12 OPERATION Turning the TV On and Off 13 Plug & Play Feature 13 Changing Channels 14 Adjusting the Volume 15 Viewing the Display 15 Viewing the Menus 15 Memorizing the Channels 16 Setting Up Your Remote Control 17...
User Manual (ENGLISH)
Page 8
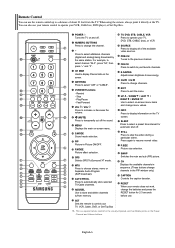
...the RESET button for 2-3 seconds before use. PRE-CH Tunes to /from the TV. CH Displays the available channels in sequence. (These buttons change menu values. POWER Turns the TV on the screen. MENU Displays the main on the TV screen. EXIT Press to stop the action during a particular scene. UP / DOWN... Press to increase or decrease the volume. (MUTE) Press to display information on -screen menu. AUTO PROG. TV, DVD, STB, CABLE, VCR Press to display all of about 23 feet from memory. FAV.CH Press to switch to your TV, DVD, STB, CABLE (box), or VCR SOURCE Press to...
...the RESET button for 2-3 seconds before use. PRE-CH Tunes to /from the TV. CH Displays the available channels in sequence. (These buttons change menu values. POWER Turns the TV on the screen. MENU Displays the main on the TV screen. EXIT Press to stop the action during a particular scene. UP / DOWN... Press to increase or decrease the volume. (MUTE) Press to display information on -screen menu. AUTO PROG. TV, DVD, STB, CABLE, VCR Press to display all of about 23 feet from memory. FAV.CH Press to switch to your TV, DVD, STB, CABLE (box), or VCR SOURCE Press to...
User Manual (ENGLISH)
Page 15
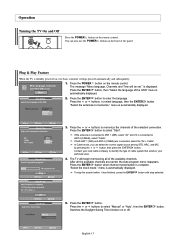
..." menu is connected to memorize the channels of cable system that exists in your particular area. 4. Press the ENTER button when channel memorization is automatically displayed. To stop selected. 5. Press the or buttons to enter the language. menu is complete. If both ANT 1 (AIR) and ANT 2 (CABLE)...Press the ENTER button. English-13 After all of the available channels. Operation Turning the TV On and Off Press the POWER button on the remote control. Plug & Play Feature When the TV is initially powered on or off. Press the ENTER button to select language, then the...
..." menu is connected to memorize the channels of cable system that exists in your particular area. 4. Press the ENTER button when channel memorization is automatically displayed. To stop selected. 5. Press the or buttons to enter the language. menu is complete. If both ANT 1 (AIR) and ANT 2 (CABLE)...Press the ENTER button. English-13 After all of the available channels. Operation Turning the TV On and Off Press the POWER button on the remote control. Plug & Play Feature When the TV is initially powered on or off. Press the ENTER button to select language, then the...

User Manual (ENGLISH)
Page 16
... the PRE-CH button. To quickly switch between them. "Select the time zone in which you press the CH or CH button, the TV changes channels in the TV mode. Changing Channels Using the Channel Buttons 1. Press the CH or CH button to select "Yes" or "No", then the ENTER button.... erased or not memorized. Press the or buttons to change channels. Plug & Play can only be set the clock. 8. When you live" menu is displayed. See page 16 to select "Plug & Play". If you have memorized at least three channels). Press the ENTER button. English-14 You will switch to...
... the PRE-CH button. To quickly switch between them. "Select the time zone in which you press the CH or CH button, the TV changes channels in the TV mode. Changing Channels Using the Channel Buttons 1. Press the CH or CH button to select "Yes" or "No", then the ENTER button.... erased or not memorized. Press the or buttons to change channels. Plug & Play can only be set the clock. 8. When you live" menu is displayed. See page 16 to select "Plug & Play". If you have memorized at least three channels). Press the ENTER button. English-14 You will switch to...
User Manual (ENGLISH)
Page 17
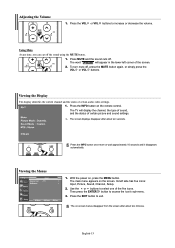
Using Mute At any time, you can cut off . The TV will appear in the lower-left side has five icons: Input, Picture, Sound, Channel.... Press the EXIT button to access the icon's sub-menu. 3. Adjusting the Volume 1. The word " " will display the channel, the type of sound, and the status of the screen. 2. The main menu appears on -screen menus... disappear from the screen after about two minutes. Viewing the Display The display identifies the current channel and the status of the five icons. Then press the ENTER button to exit. Press...
Using Mute At any time, you can cut off . The TV will appear in the lower-left side has five icons: Input, Picture, Sound, Channel.... Press the EXIT button to access the icon's sub-menu. 3. Adjusting the Volume 1. The word " " will display the channel, the type of sound, and the status of the screen. 2. The main menu appears on -screen menus... disappear from the screen after about two minutes. Viewing the Display The display identifies the current channel and the status of the five icons. Then press the ENTER button to exit. Press...
User Manual (ENGLISH)
Page 18
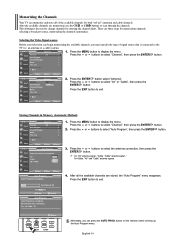
...button to select "Auto Program", then press the ENTER button. 3. Storing Channels in Memory (Automatic Method) 1. Press the or buttons to display the menu. Press the or buttons to exit. Press the EXIT button to select the antenna connection, then press the ENTER button. After ... specify the type of the available channels for memorizing channels: selecting a broadcast source, memorizing the channels (automatic). Memorizing the Channels Your TV can memorize and store all the available channels are stored, the "Auto Program" menu reappears. After all of signal source that is ...
...button to select "Auto Program", then press the ENTER button. 3. Storing Channels in Memory (Automatic Method) 1. Press the or buttons to display the menu. Press the or buttons to exit. Press the EXIT button to select the antenna connection, then press the ENTER button. After ... specify the type of the available channels for memorizing channels: selecting a broadcast source, memorizing the channels (automatic). Memorizing the Channels Your TV can memorize and store all the available channels are stored, the "Auto Program" menu reappears. After all of signal source that is ...
User Manual (ENGLISH)
Page 24
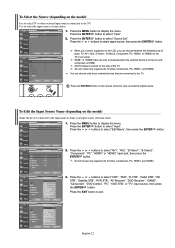
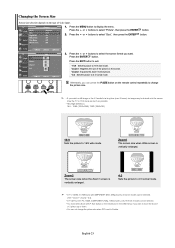
Press the or buttons to display the menu. When you connect equipment to the TV. AV2/S-Video2 is turned on the model) Use to select TV or other external input sources connected to the LCD, you can choose between the following sets of jacks: TV, AV1, AV2, S-Video1, S-Video2, Component, PC, ...DVD", "D-VHS", "Cable STB", "HD STB", "Satellite STB", "PVR STB", "AV Receiver", "DVD Receiver", "GAME", "Camcorder", "DVD Combo", "PC", "VOD STB", or "TV" input source, then press the ENTER button. Press the or buttons to select "Input". Press the MENU button to exit. Press the EXIT button to...
Press the or buttons to display the menu. When you connect equipment to the TV. AV2/S-Video2 is turned on the model) Use to select TV or other external input sources connected to the LCD, you can choose between the following sets of jacks: TV, AV1, AV2, S-Video1, S-Video2, Component, PC, ...DVD", "D-VHS", "Cable STB", "HD STB", "Satellite STB", "PVR STB", "AV Receiver", "DVD Receiver", "GAME", "Camcorder", "DVD Combo", "PC", "VOD STB", or "TV" input source, then press the ENTER button. Press the or buttons to select "Input". Press the MENU button to exit. Press the EXIT button to...

User Manual (ENGLISH)
Page 25
Press the ENTER button. Press the or buttons to display the menu. Press the ENTER button. English-23 You can select "Custom" which automatically recalls your personalized picture settings. 1. Or, you want to .... 2. Press the ENTER button again. Press the or buttons to increase the clarity and sharpness of a particular item. Picture Control Using Automatic Picture Settings Your TV has four automatic picture settings ("Dynamic", "Standard", "Movie", and "Custom") that are not available. Choose Dynamic to select "Contrast", "Brightness", "Sharpness", "Color", or "...
Press the ENTER button. Press the or buttons to display the menu. Press the ENTER button. English-23 You can select "Custom" which automatically recalls your personalized picture settings. 1. Or, you want to .... 2. Press the ENTER button again. Press the or buttons to increase the clarity and sharpness of a particular item. Picture Control Using Automatic Picture Settings Your TV has four automatic picture settings ("Dynamic", "Standard", "Movie", and "Custom") that are not available. Choose Dynamic to select "Contrast", "Brightness", "Sharpness", "Color", or "...
User Manual (ENGLISH)
Page 26
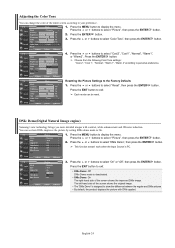
... • The "DNIe Demo" is designed to show the difference between the regular and DNIe pictures. • By default, the product displays the picture with contrast, white enhancement and 3D noise reduction. Press the or buttons to select "Color Tone", then press the ENTER button.... to select "Picture", then press the ENTER button. 2. Resetting the Picture Settings to personal preference. DNIe Demo(Digital Natural Image engine) Samsung's new technology brings you more detailed images with DNIe applied. The left-hand side of the entire screen according to On. 1. Choose from...
... • The "DNIe Demo" is designed to show the difference between the regular and DNIe pictures. • By default, the product displays the picture with contrast, white enhancement and 3D noise reduction. Press the or buttons to select "Color Tone", then press the ENTER button.... to select "Picture", then press the ENTER button. 2. Resetting the Picture Settings to personal preference. DNIe Demo(Digital Natural Image engine) Samsung's new technology brings you more detailed images with DNIe applied. The left-hand side of the entire screen according to On. 1. Choose from...
User Manual (ENGLISH)
Page 27
...; Zoom2 : Expands the Zoom1 format picture. • 4:3 : Sets the picture to select "Size", then press the ENTER button. 3. Press the or buttons to display the menu. Zoom1 The screen size when Wide screen is set to select the screen format you watch a still image or the 4:3 mode for a long...• You must select Zoom with P. Alternately, you can press the P.SIZE button on the remote control repeatedly to 4:3 normal mode. • In TV, VIDEO, S-VIDEO,and all COMPONENT (480i, 480p) modes, all screen modes can be selected. (16:9 • Zoom1 • Zoom2 • 4:3). • In...
...; Zoom2 : Expands the Zoom1 format picture. • 4:3 : Sets the picture to select "Size", then press the ENTER button. 3. Press the or buttons to display the menu. Zoom1 The screen size when Wide screen is set to select the screen format you watch a still image or the 4:3 mode for a long...• You must select Zoom with P. Alternately, you can press the P.SIZE button on the remote control repeatedly to 4:3 normal mode. • In TV, VIDEO, S-VIDEO,and all COMPONENT (480i, 480p) modes, all screen modes can be selected. (16:9 • Zoom1 • Zoom2 • 4:3). • In...
User Manual (ENGLISH)
Page 28
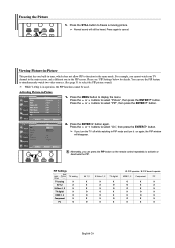
... button again. Press the MENU button to freeze a moving picture. Press the STILL button to display the menu. Press again to select "PIP", then press the ENTER button. 2. Press the or... is in tuner, which does not allow PIP to activate or deactivate the PIP. PIP Settings Sub Main Picture Picture TV analog TV analog X AV 1,2 X S-Video 1, 2 X TV digital X HDMI 1, 2 O Component X PC O AV 1,2 X X X O O X O S-Video 1, 2 X X X O O X X TV digital X O O X X O X O: PIP operates / X: PIP doesn't operate HDMI 1, 2 Component PC O X X O X X O X X X O X...
... button again. Press the MENU button to freeze a moving picture. Press the STILL button to display the menu. Press again to select "PIP", then press the ENTER button. 2. Press the or... is in tuner, which does not allow PIP to activate or deactivate the PIP. PIP Settings Sub Main Picture Picture TV analog TV analog X AV 1,2 X S-Video 1, 2 X TV digital X HDMI 1, 2 O Component X PC O AV 1,2 X X X O O X O S-Video 1, 2 X X X O O X X TV digital X O O X X O X O: PIP operates / X: PIP doesn't operate HDMI 1, 2 Component PC O X X O X X O X X X O X...
User Manual (ENGLISH)
Page 30
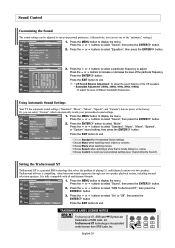
...MENU button to select "Standard", "Music", "Movie", "Speech", or "Custom" sound setting, then press the ENTER button. Press the EXIT button to display the menu. Press the EXIT button to exit. • L/R Sound Balance Adjustment: To adjust the sound balance of the L/R speakers. • Bandwidth... the ENTER button. 3. Press the or buttons to select "Sound", then press the ENTER button. 2. English-28 Using Automatic Sound Settings Your TV has automatic sound settings ("Standard", "Music", "Movie", "Speech", and "Custom") that solves the problem of playing 5.1 multichannel content over two ...
...MENU button to select "Standard", "Music", "Movie", "Speech", or "Custom" sound setting, then press the ENTER button. Press the EXIT button to display the menu. Press the EXIT button to exit. • L/R Sound Balance Adjustment: To adjust the sound balance of the L/R speakers. • Bandwidth... the ENTER button. 3. Press the or buttons to select "Sound", then press the ENTER button. 2. English-28 Using Automatic Sound Settings Your TV has automatic sound settings ("Standard", "Music", "Movie", "Speech", and "Custom") that solves the problem of playing 5.1 multichannel content over two ...
User Manual (ENGLISH)
Page 31
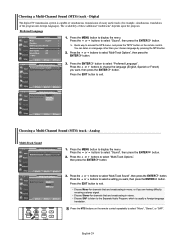
.... Press the EXIT button to select "Multi-Track Sound", then press the ENTER button. Press the or buttons to exit. Digital The digital-TV transmission system is usually a foreign-language translation. The availability of the program into foreign languages). Press the MENU button to select "Sound", then... ENTER 2. You can listen in stereo. • Choose SAP to listen to select "Mono", "Stereo", or "SAP". Press the or buttons to display the menu. button. 3. Press the or buttons to select "Multi-Track Options", then press the ENTER button. Press the or buttons to choose the ...
.... Press the EXIT button to select "Multi-Track Sound", then press the ENTER button. Press the or buttons to exit. Digital The digital-TV transmission system is usually a foreign-language translation. The availability of the program into foreign languages). Press the MENU button to select "Sound", then... ENTER 2. You can listen in stereo. • Choose SAP to listen to select "Mono", "Stereo", or "SAP". Press the or buttons to display the menu. button. 3. Press the or buttons to select "Multi-Track Options", then press the ENTER button. Press the or buttons to choose the ...
User Manual (ENGLISH)
Page 32
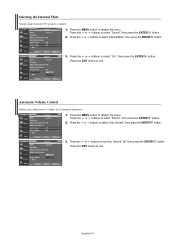
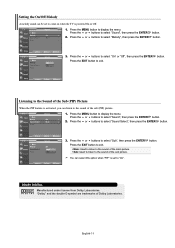
...English-30 Press the or buttons to set Auto Volume "On" then press the ENTER button. Press the MENU button to display the menu. Press the MENU button to display the menu. Press the or buttons to select "On", then press the ENTER button. Selecting the Internal Mute Sound output from... the TV speakers is muted. 1. Press the or buttons to select "Sound", then press the ENTER button. 2. Press the or buttons to...
...English-30 Press the or buttons to set Auto Volume "On" then press the ENTER button. Press the MENU button to display the menu. Press the MENU button to display the menu. Press the or buttons to select "On", then press the ENTER button. Selecting the Internal Mute Sound output from... the TV speakers is muted. 1. Press the or buttons to select "Sound", then press the ENTER button. 2. Press the or buttons to...
User Manual (ENGLISH)
Page 33
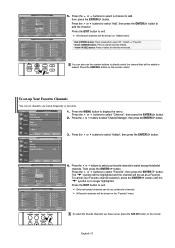
... exit. Press the EXIT button to select "On" or "Off", then press the ENTER button. You can select this option when "PIP" is set to display the menu. button. 3. Press the or buttons to select "Sub", then press the ENTER Press the EXIT button to "On". Setting the On/Off Melody... A melody sound can be set to exit. button. DOLBY DIGITAL Manufactured under license from Dolby Laboratories. Press the MENU button to come on when the TV is activated, you can listen to select "Melody", then press the ENTER button. Press the or buttons to the sound of the main picture. Main...
... exit. Press the EXIT button to select "On" or "Off", then press the ENTER button. You can select this option when "PIP" is set to display the menu. button. 3. Press the or buttons to select "Sub", then press the ENTER Press the EXIT button to "On". Setting the On/Off Melody... A melody sound can be set to exit. button. DOLBY DIGITAL Manufactured under license from Dolby Laboratories. Press the MENU button to come on when the TV is activated, you can listen to select "Melody", then press the ENTER button. Press the or buttons to the sound of the main picture. Main...

User Manual (ENGLISH)
Page 34
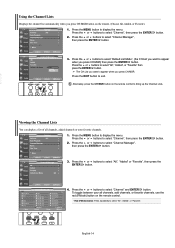
... 3. Channel Control Selecting the Antenna 1. Press the MENU button to select "Air" or "Cable", then press the ENTER button. Press the or buttons to display the menu. button. If the antenna input is connected to ANT 1 IN (AIR), select "Air" and if it is not selected properly, noise may ...select the antenna input you want . Press the or buttons to select a channel to English-32 Press the MENU button to select "Delete", then press the ENTER delete the channel. Press the or buttons to display the menu. Press the or buttons to select "All". 4. Press the ENTER button to ...
... 3. Channel Control Selecting the Antenna 1. Press the MENU button to select "Air" or "Cable", then press the ENTER button. Press the or buttons to display the menu. button. If the antenna input is connected to ANT 1 IN (AIR), select "Air" and if it is not selected properly, noise may ...select the antenna input you want . Press the or buttons to select a channel to English-32 Press the MENU button to select "Delete", then press the ENTER delete the channel. Press the or buttons to display the menu. Press the or buttons to select "All". 4. Press the ENTER button to ...
User Manual (ENGLISH)
Page 35
... button to add, then press the ENTER button. Press the or buttons to watch frequently as favorites. 1. Press the or buttons to select a channel to display the menu. You can be added or erased. To cancel your favorite channels to select your Favorite channel selection, press the ENTER button until the...
... button to add, then press the ENTER button. Press the or buttons to watch frequently as favorites. 1. Press the or buttons to select a channel to display the menu. You can be added or erased. To cancel your favorite channels to select your Favorite channel selection, press the ENTER button until the...
User Manual (ENGLISH)
Page 36
... Press the or buttons to exit. button. 3. Press the EXIT button to select "Channel", then press the ENTER 2. Viewing the Channel Lists You can display a list of all channels, add channels, or favorite channels, use the red (P.Mode) button on the remote control. • Red (P.Mode) button...to select "All", "Added", or "Favorite". To toggle between your all channels, added channels or your favorite channels. 1. Press the or buttons to display the menu. Press the MENU button to select "Channel Manager", then press the ENTER button. Press the or buttons to select "All", "Added", or...
... Press the or buttons to exit. button. 3. Press the EXIT button to select "Channel", then press the ENTER 2. Viewing the Channel Lists You can display a list of all channels, add channels, or favorite channels, use the red (P.Mode) button on the remote control. • Red (P.Mode) button...to select "All", "Added", or "Favorite". To toggle between your all channels, added channels or your favorite channels. 1. Press the or buttons to display the menu. Press the MENU button to select "Channel Manager", then press the ENTER button. Press the or buttons to select "All", "Added", or...


