User Manual (ENGLISH)
Page 3
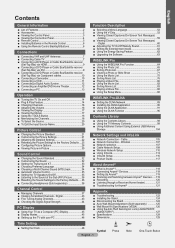
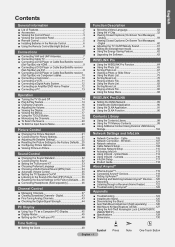
...Listening through a Receiver (Home theater 121 ■ Troubleshooting for Anynet 121 Appendix ■ Troubleshooting 122 ■ Installing the Stand 124 ■ Disconnecting the Stand 124 ■ Auto Wall-Mount Adjustment (Sold separately 125 ■ Wall Mount Kit Specifications (VESA 126 ■ Using ... Strength 44 PC Display ■ Using Your TV as a Computer (PC) Display 45 ■ Display Modes 45 ■ Setting up the TV with your PC 46 Function Description ■ Selecting a Menu Language 52 ■ Using the V-Chip 52 ■ Viewing Closed Captions (On-Screen Text...
...Listening through a Receiver (Home theater 121 ■ Troubleshooting for Anynet 121 Appendix ■ Troubleshooting 122 ■ Installing the Stand 124 ■ Disconnecting the Stand 124 ■ Auto Wall-Mount Adjustment (Sold separately 125 ■ Wall Mount Kit Specifications (VESA 126 ■ Using ... Strength 44 PC Display ■ Using Your TV as a Computer (PC) Display 45 ■ Display Modes 45 ■ Setting up the TV with your PC 46 Function Description ■ Selecting a Menu Language 52 ■ Using the V-Chip 52 ■ Viewing Closed Captions (On-Screen Text...
User Manual (ENGLISH)
Page 5
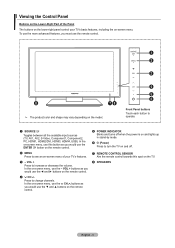
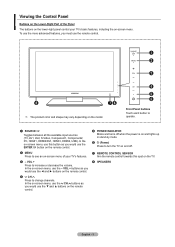
... you must use the - To use the more advanced features, you would use the ENTER button on the remote control. 2 MENU Press to turn the TV on and off. 7 REMOTE CONTROL SENSOR Aim the remote control towards this button as you would use the ▼ and ▲ buttons on the remote... control. 5 POWER INDICATOR Blinks and turns off when the power is on and lights up in stand-by mode. 6 (Power) Press to see an on the model. 4 5 6 Front Panel buttons Touch each button to increase or decrease the volume.
... you must use the - To use the more advanced features, you would use the ENTER button on the remote control. 2 MENU Press to turn the TV on and off. 7 REMOTE CONTROL SENSOR Aim the remote control towards this button as you would use the ▼ and ▲ buttons on the remote... control. 5 POWER INDICATOR Blinks and turns off when the power is on and lights up in stand-by mode. 6 (Power) Press to see an on the model. 4 5 6 Front Panel buttons Touch each button to increase or decrease the volume.
User Manual (ENGLISH)
Page 68
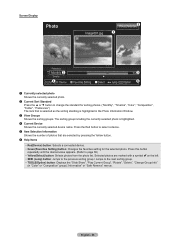
...; Green(Favorites Setting) button: Changes the favorites setting for sorting photos. ("Monthly", "Timeline", "Color", "Composition", "Folder", "Preference") The item that is selected as the sorting standing is highlighted. 4 Current Device Shows the currently selected device name. English - 66 Screen Display Photo Image001.jpg 1File(s) Selected5 1 Preference Monthly 2 Timeline SUM4 Device...
...; Green(Favorites Setting) button: Changes the favorites setting for sorting photos. ("Monthly", "Timeline", "Color", "Composition", "Folder", "Preference") The item that is selected as the sorting standing is highlighted. 4 Current Device Shows the currently selected device name. English - 66 Screen Display Photo Image001.jpg 1File(s) Selected5 1 Preference Monthly 2 Timeline SUM4 Device...
User Manual (ENGLISH)
Page 126
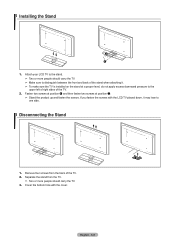
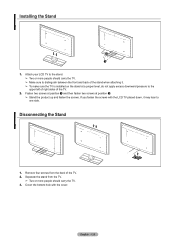
... the back of the TV. 2. Cover the bottom hole with the LCD TV placed down, it . ➣ To make sure the TV is installed on the stand at position 2. ➣ Stand the product up and fasten the screws. English - 124 If you fasten the screws with the cover. Fasten two ... of the stand when attaching it may lean to distinguish between the front and back of the TV. 2. Disconnecting the Stand 1. Attach your LCD TV to the stand. ➣ Two or more people should carry the TV. ➣ Make sure to one side. Installing the Stand 1. Remove four screws from the TV. ➣...
... the back of the TV. 2. Cover the bottom hole with the LCD TV placed down, it . ➣ To make sure the TV is installed on the stand at position 2. ➣ Stand the product up and fasten the screws. English - 124 If you fasten the screws with the cover. Fasten two ... of the stand when attaching it may lean to distinguish between the front and back of the TV. 2. Disconnecting the Stand 1. Attach your LCD TV to the stand. ➣ Two or more people should carry the TV. ➣ Make sure to one side. Installing the Stand 1. Remove four screws from the TV. ➣...
User Manual (ENGLISH)
Page 130
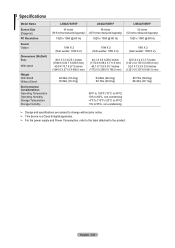
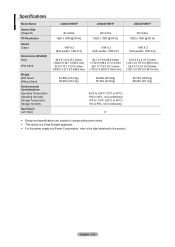
... Screen Size (Diagonal) PC Resolution Sound Output Dimensions (WxDxH) Body With stand Weight With Stand Without Stand Environmental Considerations Operating Temperature Operating Humidity Storage Temperature Storage Humidity LN40A750R1F LN46A750R1F 40 ...inches 46 inches (39.9 inches measured diagonally) (45.9 inches measured diagonally) 1920 x 1080 @ 60 Hz 1920 x 1080 @ 60 Hz LN52A750R1F 52 inches (52 inches measured diagonally...
... Screen Size (Diagonal) PC Resolution Sound Output Dimensions (WxDxH) Body With stand Weight With Stand Without Stand Environmental Considerations Operating Temperature Operating Humidity Storage Temperature Storage Humidity LN40A750R1F LN46A750R1F 40 ...inches 46 inches (39.9 inches measured diagonally) (45.9 inches measured diagonally) 1920 x 1080 @ 60 Hz 1920 x 1080 @ 60 Hz LN52A750R1F 52 inches (52 inches measured diagonally...
User Manual (ENGLISH)
Page 3
... Strength 44 PC Display ■ Using Your TV as a Computer (PC) Display 45 ■ Display Modes 45 ■ Setting up the TV with your PC 46 Function Description ■ Selecting a Menu Language 52 ■ Using the V-Chip 52 ■ Viewing Closed Captions (On-Screen Text...Listening through a Receiver (Home theater 122 ■ Troubleshooting for Anynet 122 Appendix ■ Troubleshooting 123 ■ Installing the Stand 125 ■ Disconnecting the Stand 125 ■ Auto Wall-Mount Adjustment (Sold separately 126 ■ Wall Mount Kit Specifications (VESA 127 ■ Using ...
... Strength 44 PC Display ■ Using Your TV as a Computer (PC) Display 45 ■ Display Modes 45 ■ Setting up the TV with your PC 46 Function Description ■ Selecting a Menu Language 52 ■ Using the V-Chip 52 ■ Viewing Closed Captions (On-Screen Text...Listening through a Receiver (Home theater 122 ■ Troubleshooting for Anynet 122 Appendix ■ Troubleshooting 123 ■ Installing the Stand 125 ■ Disconnecting the Stand 125 ■ Auto Wall-Mount Adjustment (Sold separately 126 ■ Wall Mount Kit Specifications (VESA 127 ■ Using ...
User Manual (ENGLISH)
Page 5
... the remote control. 5 POWER INDICATOR Blinks and turns off when the power is on and lights up in stand-by mode. 6 (Power) Press to operate. 1 SOURCE Toggles between all the available input sources (TV, AV1, AV2, S-Video, Component1, Component2, PC, HDMI1, HDMI2/DVI, HDMI3, HDMI4, USB). Viewing the Control.... 1 2 3 8 78 ➣ The product color and shape may vary depending on the model. 4 5 6 Front Panel buttons Touch each button to turn the TV on and off. 7 REMOTE CONTROL SENSOR Aim the remote control towards this button as you must use the - In the on -screen menu. To use...
... the remote control. 5 POWER INDICATOR Blinks and turns off when the power is on and lights up in stand-by mode. 6 (Power) Press to operate. 1 SOURCE Toggles between all the available input sources (TV, AV1, AV2, S-Video, Component1, Component2, PC, HDMI1, HDMI2/DVI, HDMI3, HDMI4, USB). Viewing the Control.... 1 2 3 8 78 ➣ The product color and shape may vary depending on the model. 4 5 6 Front Panel buttons Touch each button to turn the TV on and off. 7 REMOTE CONTROL SENSOR Aim the remote control towards this button as you must use the - In the on -screen menu. To use...

User Manual (ENGLISH)
Page 68
...; Green(Favorites Setting) button: Changes the favorites setting for sorting photos. ("Monthly", "Timeline", "Color", "Composition", "Folder", "Preference") The item that is selected as the sorting standing is highlighted. 4 Current Device Shows the currently selected device name. The sorting group including the currently selected photo is highlighted in "Color" or "Composition" group...
...; Green(Favorites Setting) button: Changes the favorites setting for sorting photos. ("Monthly", "Timeline", "Color", "Composition", "Folder", "Preference") The item that is selected as the sorting standing is highlighted. 4 Current Device Shows the currently selected device name. The sorting group including the currently selected photo is highlighted in "Color" or "Composition" group...
User Manual (ENGLISH)
Page 127
... and fasten the screws. English - 125 Disconnecting the Stand 1. Installing the Stand 1. Separate the stand from the back of the TV. 2. Remove four screws from the TV. ➣ Two or more people should carry the TV. 3. Attach your LCD TV to the stand. ➣ Two or more people should carry the TV. ➣ Make sure to distinguish between the front...
... and fasten the screws. English - 125 Disconnecting the Stand 1. Installing the Stand 1. Separate the stand from the back of the TV. 2. Remove four screws from the TV. ➣ Two or more people should carry the TV. 3. Attach your LCD TV to the stand. ➣ Two or more people should carry the TV. ➣ Make sure to distinguish between the front...
User Manual (ENGLISH)
Page 131
... (WxDxH) Body With stand Weight With Stand Without Stand Environmental Considerations Operating Temperature Operating Humidity Storage Temperature Storage Humidity Stand Swivel (Left / Right) LN40A750R1F LN46A750R1F LN52A750R1F 40 inches 1920 x 1080 @ 60 Hz 46 inches 1920 x 1080 @ 60 Hz 52 inches 1920 x 1080 ... 686.0 mm) 46.1 X 3.9 X 28.0 inches (1172.0 X 98.0 X 711.5 mm) 46.1 X 11.8 X 30.1 inches (1172.0 X 299.9 X 765.5 mm) 52.0 X 4.2 X 31.7 inches (1321.4 X 107.0 X 805.0 mm) 52.0 X 13.3 X 33.9 inches (1321.4 X 337.8 X 861.0 mm) 42.8lbs (19.4 kg) 35.9lbs (16.3 kg) 64.8lbs (29.4 kg...
... (WxDxH) Body With stand Weight With Stand Without Stand Environmental Considerations Operating Temperature Operating Humidity Storage Temperature Storage Humidity Stand Swivel (Left / Right) LN40A750R1F LN46A750R1F LN52A750R1F 40 inches 1920 x 1080 @ 60 Hz 46 inches 1920 x 1080 @ 60 Hz 52 inches 1920 x 1080 ... 686.0 mm) 46.1 X 3.9 X 28.0 inches (1172.0 X 98.0 X 711.5 mm) 46.1 X 11.8 X 30.1 inches (1172.0 X 299.9 X 765.5 mm) 52.0 X 4.2 X 31.7 inches (1321.4 X 107.0 X 805.0 mm) 52.0 X 13.3 X 33.9 inches (1321.4 X 337.8 X 861.0 mm) 42.8lbs (19.4 kg) 35.9lbs (16.3 kg) 64.8lbs (29.4 kg...


