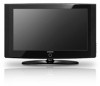
User Manual (user Manual) (ver.1.0) (English)
Page 3
... Appendix ■ Troubleshooting 52 ■ Installing the Stand 54 ■ Disconnecting the Stand 54 ■ Auto Wall-Mount Adjustment (Sold separately 55 ■ Wall Mount Kit Specifications (VESA 56 ■ Using the Anti-Theft Kensington Lock 57 ■ Securing the TV to the... the Picture Standard 19 ■ Customizing the Picture Settings 19 ■ Configuring Picture Options 20 ■ Resetting the Picture Settings to the Wall 58 ■ Specifications 59 ■ Dimensions 60 Symbol Press Note One-Touch Button English - Digital 25 ■ Choosing a Multi...
User Manual (user Manual) (ver.1.0) (English)
Page 6
... IN 2 jack. 7 POWER INPUT Connects the supplied power cord. 8 COMPONENT IN 1, 2 / AV 1 The COMPONENT IN 1 jack is a device used to the jack on the optional wall mount bracket.
User Manual (user Manual) (ver.1.0) (English)
Page 57
... your remote control. If you adjust the position after moving of the 3 pre-set position, the position display will disappear. Wall-Mount Adjusment Position1 Position Adjust 1 Save 2 INFO Center For installation, refer to the desired position using the buttons. Adjust to...Yellow (Position 3) buttons. Complete Step 1 of the OSD. Pressing a Color (Red, Green, Yellow) button moves the auto wall mount to a wall. TV Rear Panel Auto Wall-Mount Ex-LINK Cable (Not supplied) Entering the menu 1. The saved Position appears on the TV screen, the Adjustment screen appears. ...
User Manual (user Manual) (ver.1.0) (English)
Page 58
...6 4 Standard dimensions for wall mount kits are shown in the table above. When purchasing our wall mount kit, a detailed installation manual and all parts necessary for assembly are provided. Do not use fasten the screws too strongly, this TV. When attaching to electric shock. Samsung is not liable for product ...damage or personal injury when a non-VESA or non-specified wall mount is turned on a ceiling or slanted wall, it may cause damage to the inside of the TV set. For wall mounts that do not comply with the...