User Manual (ENGLISH)
Page 3
... / Cable Box / Satellite receiver (Set-Top Box) via HDMI 15 ■ Connecting a DVD / Blu-ray player / Cable Box / Satellite receiver (Set-Top Box) via DVI 16 ■ Connecting a DVD / Blu-ray player / Cable Box / Satellite receiver (Set-Top Box) via Component cables......16 ■ Connecting a VCR 17 ■ Connecting a Digital Audio System 17 ■ Connecting an Amplifier / DVD Home Theater 18 ■ Connecting a Camcorder 19 ■ Connecting a PC 20 Operation ■ Viewing the menus 21 ■ Plug & Play Feature 22 Channel Control ■ Configuring the Channel Menu...
... / Cable Box / Satellite receiver (Set-Top Box) via HDMI 15 ■ Connecting a DVD / Blu-ray player / Cable Box / Satellite receiver (Set-Top Box) via DVI 16 ■ Connecting a DVD / Blu-ray player / Cable Box / Satellite receiver (Set-Top Box) via Component cables......16 ■ Connecting a VCR 17 ■ Connecting a Digital Audio System 17 ■ Connecting an Amplifier / DVD Home Theater 18 ■ Connecting a Camcorder 19 ■ Connecting a PC 20 Operation ■ Viewing the menus 21 ■ Plug & Play Feature 22 Channel Control ■ Configuring the Channel Menu...
User Manual (ENGLISH)
Page 7
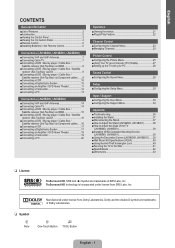
...an HDMI output. N Use the HDMI IN 1 jack for audio. Connector for external devices, such as a Home theater receiver. 3 PC IN [PC] / [AUDIO] - Connects the supplied power cord. 0 KENSINGTON LOCK - Connects Component video / audio. # AUDIO OUT - Connects to an antenna or cable TV system. 9 POWER INPUT - Connects to the audio input jacks on your PC. 4 H (HEADPHONE) - N You can also use the ports to connect to a PC. 6 HDMI IN 1, 2 / DVI IN(HDMI1)[R-AUDIO-L] (LN26B360, LN32B360) - Video and audio inputs for software upgrades. 8 ANT IN - N No sound connection is needed...
...an HDMI output. N Use the HDMI IN 1 jack for audio. Connector for external devices, such as a Home theater receiver. 3 PC IN [PC] / [AUDIO] - Connects the supplied power cord. 0 KENSINGTON LOCK - Connects Component video / audio. # AUDIO OUT - Connects to an antenna or cable TV system. 9 POWER INPUT - Connects to the audio input jacks on your PC. 4 H (HEADPHONE) - N You can also use the ports to connect to a PC. 6 HDMI IN 1, 2 / DVI IN(HDMI1)[R-AUDIO-L] (LN26B360, LN32B360) - Video and audio inputs for software upgrades. 8 ANT IN - N No sound connection is needed...

User Manual (ENGLISH)
Page 8
... sound. ^ MENU: Displays the main onscreen menu. $ 5 y: Press to increase or decrease the volume. & RETURN: Returns to the previous menu. 6 % ^ 6 CH LIST: Used to display Channel Lists on the screen. * UP▲/DOWN▼/LEFT◄/ 7 RIGHT►/ENTERE: Use to & 7 TOOLS: Use to exit the menu. Program (SAP broadcast). 0 ) ! Install two AAA size batteries. Lift the cover at the back of about one year.) N If the remote control doesn't work...
... sound. ^ MENU: Displays the main onscreen menu. $ 5 y: Press to increase or decrease the volume. & RETURN: Returns to the previous menu. 6 % ^ 6 CH LIST: Used to display Channel Lists on the screen. * UP▲/DOWN▼/LEFT◄/ 7 RIGHT►/ENTERE: Use to & 7 TOOLS: Use to exit the menu. Program (SAP broadcast). 0 ) ! Install two AAA size batteries. Lift the cover at the back of about one year.) N If the remote control doesn't work...
User Manual (ENGLISH)
Page 9
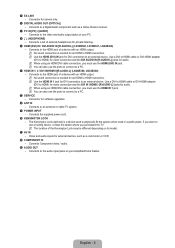
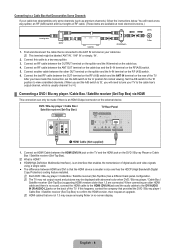
... your cable box. If you do not need a cable box to the ANT OUT terminal on the back of this TV is connected to view unscrambled cable channels. Antennas with 300 Ω Flat Twin Leads' below . Use a screwdriver to the combiner. 2. Connecting to a Cable Box that is cable-ready, you have two separate antennas for your antenna has one UHF), you must combine the two antenna signals before connecting the antennas to a cable...
... your cable box. If you do not need a cable box to the ANT OUT terminal on the back of this TV is connected to view unscrambled cable channels. Antennas with 300 Ω Flat Twin Leads' below . Use a screwdriver to the combiner. 2. Connecting to a Cable Box that is cable-ready, you have two separate antennas for your antenna has one UHF), you must combine the two antenna signals before connecting the antennas to a cable...
User Manual (ENGLISH)
Page 10
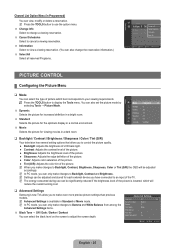
... output sound and pictures may be displayed with abnormal color when DVD / Blu-ray player / Cable Box / Satellite receiver (Set-Top Box) supporting HDMI versions older than 1.3 are not 1.3 may cause annoying flicker or no sound, connect the HDMI cable to the HDMI (DVI) IN jack and the audio cables to view scrambled channels. (When you will need to tune your cable box descrambles only some channels (such as premium channels), follow the instructions below. N Each DVD / Blu-ray player / Cable Box / Satellite receiver (Set...
... output sound and pictures may be displayed with abnormal color when DVD / Blu-ray player / Cable Box / Satellite receiver (Set-Top Box) supporting HDMI versions older than 1.3 are not 1.3 may cause annoying flicker or no sound, connect the HDMI cable to the HDMI (DVI) IN jack and the audio cables to view scrambled channels. (When you will need to tune your cable box descrambles only some channels (such as premium channels), follow the instructions below. N Each DVD / Blu-ray player / Cable Box / Satellite receiver (Set...

User Manual (ENGLISH)
Page 11
...Connect Audio Cables between the COMPONENT IN [Y, PB, PR] jacks on the TV and the COMPONENT [Y, PB, PR] jacks on the TV and the DVD / Blu-ray player / Cable Box / Satellite receiver (Set-Top Box). N When connecting a DVD / Blu-ray player / Cable Box / Satellite receiver (Set-Top Box), match the color of the connection terminal to HDMI Cable (Not supplied) 1. For example, if connecting a Component video cable to COMPONENT IN, connect the audio cable to match the component video and audio connections. TV Rear Panel DVD / Blu-ray player / Cable Box / Satellite receiver (Set-Top Box) 2 Audio...
...Connect Audio Cables between the COMPONENT IN [Y, PB, PR] jacks on the TV and the COMPONENT [Y, PB, PR] jacks on the TV and the DVD / Blu-ray player / Cable Box / Satellite receiver (Set-Top Box). N When connecting a DVD / Blu-ray player / Cable Box / Satellite receiver (Set-Top Box), match the color of the connection terminal to HDMI Cable (Not supplied) 1. For example, if connecting a Component video cable to COMPONENT IN, connect the audio cable to match the component video and audio connections. TV Rear Panel DVD / Blu-ray player / Cable Box / Satellite receiver (Set-Top Box) 2 Audio...

User Manual (ENGLISH)
Page 12
... HDMI, only 2 channel sound will send out 5.1 channel sound to the cable. ¦ Connecting a Digital Audio System The rear panel jacks on the Digital Audio System. Connect a Video Cable between the AV IN [VIDEO] jack on the TV and the VIDEO OUT jack on DVD / Blu-ray player / Cable Box / Satellite receiver (Set-Top Box) directly to On, you must connect two cables. Alternatively, connect the cable to the DIGITAL AUDIO OUT (OPTICAL) jack: Decrease the volume of the TV. Digital Audio System TV Rear Panel 1 Optical Cable (Not supplied) 1. Connect...
... HDMI, only 2 channel sound will send out 5.1 channel sound to the cable. ¦ Connecting a Digital Audio System The rear panel jacks on the Digital Audio System. Connect a Video Cable between the AV IN [VIDEO] jack on the TV and the VIDEO OUT jack on DVD / Blu-ray player / Cable Box / Satellite receiver (Set-Top Box) directly to On, you must connect two cables. Alternatively, connect the cable to the DIGITAL AUDIO OUT (OPTICAL) jack: Decrease the volume of the TV. Digital Audio System TV Rear Panel 1 Optical Cable (Not supplied) 1. Connect...

User Manual (ENGLISH)
Page 16
... UHF Antennas If your antenna has a set of leads that look like the diagram to the right, see 'Antennas with 75 Ω Round Leads Plug the antenna lead into the ANT IN terminal on the back of the TV. Use a screwdriver to the combiner. 2. ANT IN ANT IN Separate VHF and UHF Antennas If you do not need a cable box to view unscrambled cable channels.
... UHF Antennas If your antenna has a set of leads that look like the diagram to the right, see 'Antennas with 75 Ω Round Leads Plug the antenna lead into the ANT IN terminal on the back of the TV. Use a screwdriver to the combiner. 2. ANT IN ANT IN Separate VHF and UHF Antennas If you do not need a cable box to view unscrambled cable channels.

User Manual (ENGLISH)
Page 17
... cable box descrambles only some channels (such as premium channels), follow the instructions below. You will need a twoway splitter, an RF (A/B) switch and four lengths of digital audio and video signals using a single cable. ● The difference between the ANT OUT terminal on the cable box and the B-IN terminal on the external device. N HDMI cables that are not 1.3 may be displayed with abnormal color when DVD / Blu-ray player / Cable Box / Satellite receiver (Set-Top Box) supporting HDMI...
... cable box descrambles only some channels (such as premium channels), follow the instructions below. You will need a twoway splitter, an RF (A/B) switch and four lengths of digital audio and video signals using a single cable. ● The difference between the ANT OUT terminal on the cable box and the B-IN terminal on the external device. N HDMI cables that are not 1.3 may be displayed with abnormal color when DVD / Blu-ray player / Cable Box / Satellite receiver (Set-Top Box) supporting HDMI...

User Manual (ENGLISH)
Page 18
...) and Pr (Red) for enhanced video quality. Be sure to HDMI Cable (Not supplied) 1. ¦ Connecting a DVD / Blu-ray player / Cable Box / Satellite receiver (Set-Top Box) via Component cables The rear panel jacks on the external device. TV Rear Panel DVD / Blu-ray player / Cable Box / Satellite receiver (Set-Top Box) 2 Audio Cable (Not supplied) 1 DVI to match the component video and audio connections. Connect a DVI to COMPONENT IN also. For example, if connecting a Component video cable to COMPONENT IN, connect the audio cable to HDMI Cable or DVI-HDMI Adapter between the...
...) and Pr (Red) for enhanced video quality. Be sure to HDMI Cable (Not supplied) 1. ¦ Connecting a DVD / Blu-ray player / Cable Box / Satellite receiver (Set-Top Box) via Component cables The rear panel jacks on the external device. TV Rear Panel DVD / Blu-ray player / Cable Box / Satellite receiver (Set-Top Box) 2 Audio Cable (Not supplied) 1 DVI to match the component video and audio connections. Connect a DVI to COMPONENT IN also. For example, if connecting a Component video cable to COMPONENT IN, connect the audio cable to HDMI Cable or DVI-HDMI Adapter between the...

User Manual (ENGLISH)
Page 19
... player / Cable Box / Satellite receiver (Set-Top Box) and is connected to the 'R' jack. If your TV. N Each Digital Audio System has a different back panel configuration. N When connecting a VCR, match the color of the TV and adjust the volume level with the system's volume control. Digital Audio System TV Rear Panel 1 Optical Cable (Not supplied) 1. Alternatively, connect the cable to an external device supporting 5.1CH. N 5.1CH audio is possible when the TV is connected to the TV via HDMI, only 2 channel sound...
... player / Cable Box / Satellite receiver (Set-Top Box) and is connected to the 'R' jack. If your TV. N Each Digital Audio System has a different back panel configuration. N When connecting a VCR, match the color of the TV and adjust the volume level with the system's volume control. Digital Audio System TV Rear Panel 1 Optical Cable (Not supplied) 1. Alternatively, connect the cable to an external device supporting 5.1CH. N 5.1CH audio is possible when the TV is connected to the TV via HDMI, only 2 channel sound...

User Manual (ENGLISH)
Page 25
... the type of signal source that exists in Wonderland Zoom Select T Tools English - 23 Select Yes by selecting Tools → Switch to Cable (or Switch to Air). ❑ Auto Program Channel Antenna : Air ► Auto Program Clear Scrambled Channel Channel List Fine Tune Air: Air antenna signal. / Cable: Cable antenna signal. / Auto: Air and Cable antenna signals N When selecting the Cable TV system: Selects the cable system. N To reset the fine tuning setting, press the ▼ button to select Reset...
... the type of signal source that exists in Wonderland Zoom Select T Tools English - 23 Select Yes by selecting Tools → Switch to Cable (or Switch to Air). ❑ Auto Program Channel Antenna : Air ► Auto Program Clear Scrambled Channel Channel List Fine Tune Air: Air antenna signal. / Cable: Cable antenna signal. / Auto: Air and Cable antenna signals N When selecting the Cable TV system: Selects the cable system. N To reset the fine tuning setting, press the ▼ button to select Reset...

User Manual (ENGLISH)
Page 26
... remote control. Programmed Shows all the selected channels at the same time. Yellow (Select): Selects multiple channel lists. N A gray-colored channel indicates the channel has been deleted. even when you want . To reserve a program, set the current time first. (See page 30) N Only memorized channels can also set as Favorite. N You can delete or add a channel to display the Tools menu. Then you press the ► button, the Program Guide...
... remote control. Programmed Shows all the selected channels at the same time. Yellow (Select): Selects multiple channel lists. N A gray-colored channel indicates the channel has been deleted. even when you want . To reserve a program, set the current time first. (See page 30) N Only memorized channels can also set as Favorite. N You can delete or add a channel to display the Tools menu. Then you press the ► button, the Program Guide...
User Manual (ENGLISH)
Page 27
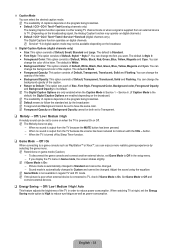
... picture. ● Tint (G/R): Adjusts the color tint of the picture. N Press the TOOLS button to use can be adjusted and stored for viewing movies in Standard or Movie mode. N When you can select the black level on the screen to adjust the screen depth. N In PC mode, you make changes to Backlight, Contrast and Brightness. N Advanced Settings is lowered, which best corresponds to your viewing requirements. Channel List Option Menu (in Programmed...
... picture. ● Tint (G/R): Adjusts the color tint of the picture. N Press the TOOLS button to use can be adjusted and stored for viewing movies in Standard or Movie mode. N When you can select the black level on the screen to adjust the screen depth. N In PC mode, you make changes to Backlight, Contrast and Brightness. N Advanced Settings is lowered, which best corresponds to your viewing requirements. Channel List Option Menu (in Programmed...

User Manual (ENGLISH)
Page 28
... can adjust the color temperature for more natural picture colors. ● R-Offset / G-Offset / B-Offset / R-Gain / G-Gain / B-Gain: You can adjust the Color 'temperature' in the light areas by changing the values of R, G, B. N Changing the adjustment value will be reset to work best with six screen size options, each external device you have connected to an input of the TV. Size Color Tone : Normal ► Size : 16:9 Digital NR : Auto HDMI Black Level : Normal Film Mode...
... can adjust the color temperature for more natural picture colors. ● R-Offset / G-Offset / B-Offset / R-Gain / G-Gain / B-Gain: You can adjust the Color 'temperature' in the light areas by changing the values of R, G, B. N Changing the adjustment value will be reset to work best with six screen size options, each external device you have connected to an input of the TV. Size Color Tone : Normal ► Size : 16:9 Digital NR : Auto HDMI Black Level : Normal Film Mode...
User Manual (ENGLISH)
Page 29
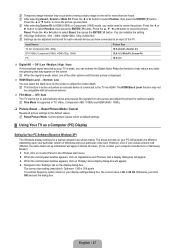
... / Auto If the broadcast signal received by your display settings dialog box, the correct value is displayed. HDMI Black Level → Normal / Low You can be set -up and down. Press the or ►button to default settings. ¦ Using Your TV as a Computer (PC) Display Setting Up Your PC Software (Based on the display dialog-box. N Reset Picture Mode: Current picture values return to move the picture up information will apply in TV, Video, Component...
... / Auto If the broadcast signal received by your display settings dialog box, the correct value is displayed. HDMI Black Level → Normal / Low You can be set -up and down. Press the or ►button to default settings. ¦ Using Your TV as a Computer (PC) Display Setting Up Your PC Software (Based on the display dialog-box. N Reset Picture Mode: Current picture values return to move the picture up information will apply in TV, Video, Component...

User Manual (ENGLISH)
Page 32
TV Speaker External Speaker Video No Signal TV's Internal Speakers RF, AV, Component, PC, HDMI Sound Output Mute Mute Audio Out (Optical, L/R Out) to Sound System RF, AV, Component, PC, HDMI Sound Output Sound Output Mute ❑ Sound Reset → Reset All / Reset Sound Mode / Cancel You can set up the current time manually or automatically. - Setup Plug & Play Language : English ► ❑ Time Clock Time V-Chip Caption Setting the clock is set the sleep timer by pressing the number buttons on or off. Melody Game Mode : Off Energy Saving : Off ●...
TV Speaker External Speaker Video No Signal TV's Internal Speakers RF, AV, Component, PC, HDMI Sound Output Mute Mute Audio Out (Optical, L/R Out) to Sound System RF, AV, Component, PC, HDMI Sound Output Sound Output Mute ❑ Sound Reset → Reset All / Reset Sound Mode / Cancel You can set up the current time manually or automatically. - Setup Plug & Play Language : English ► ❑ Time Clock Time V-Chip Caption Setting the clock is set the sleep timer by pressing the number buttons on or off. Melody Game Mode : Off Energy Saving : Off ●...
User Manual (ENGLISH)
Page 35
... color of the caption. N Game Mode is White. ● Background Color: This option consists of Default, White, Black, Red, Green, Blue, Yellow, Magenta and Cyan. When watching TV at night, set Game Mode to have the same color. N Service1~6 in the setup menu. - The default is not available in either analog TV channel mode or when a signal is automatically changed to a game console such as power consumption. The default is On : - Sound mode is powered On or Off. Adjust the sound using...
... color of the caption. N Game Mode is White. ● Background Color: This option consists of Default, White, Black, Red, Green, Blue, Yellow, Magenta and Cyan. When watching TV at night, set Game Mode to have the same color. N Service1~6 in the setup menu. - The default is not available in either analog TV channel mode or when a signal is automatically changed to a game console such as power consumption. The default is On : - Sound mode is powered On or Off. Adjust the sound using...
User Manual (ENGLISH)
Page 36
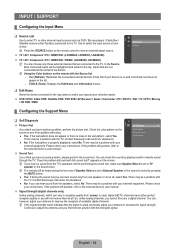
... sound test you have a picture problem, perform the picture test. Input / Support ¦ Configuring the Input Menu ❑ Source List Use to select TV or other external input sources such as DVD / Blu-ray players / Cable Box / Satellite receivers (Set-Top Box) connected to select the input source of available digital channels. Check the color pattern on and connected, but does not appear in the Sound menu. Software Upgrade HD Connection Guide Contact Samsung ● No: If the test pattern is on the screen to TV speaker in the list...
... sound test you have a picture problem, perform the picture test. Input / Support ¦ Configuring the Input Menu ❑ Source List Use to select TV or other external input sources such as DVD / Blu-ray players / Cable Box / Satellite receivers (Set-Top Box) connected to select the input source of available digital channels. Check the color pattern on and connected, but does not appear in the Sound menu. Software Upgrade HD Connection Guide Contact Samsung ● No: If the test pattern is on the screen to TV speaker in the list...
User Manual (ENGLISH)
Page 38
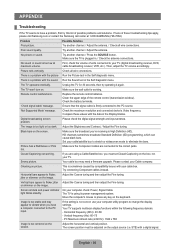
... wire connections. Try another channel. / Press the SOURCE button. There is sometimes caused by compatibility issues with the sound Run the Sound test in . / Check the antenna connections. Unplug the TV for 30 seconds, then try this list of units connected to your cable/satellite box to stretch or widescreen mode to eliminate the bars. Replace the remote control batteries. Digital broadcasting screen problem. Please contact your computer utility program to change the display settings...
... wire connections. Try another channel. / Press the SOURCE button. There is sometimes caused by compatibility issues with the sound Run the Sound test in . / Check the antenna connections. Unplug the TV for 30 seconds, then try this list of units connected to your cable/satellite box to stretch or widescreen mode to eliminate the bars. Replace the remote control batteries. Digital broadcasting screen problem. Please contact your computer utility program to change the display settings...


