

Open Source Guide (ENGLISH)
Page 1
The original manual has wrong versions of the GPL and LGPL. GPL software: Linux Kernel, Busybox, Binutils, U-boot, wireless_tools, pump LGPL software: Glibc, ffmpeg, smpeg, libgphoto2, libusb, libptp, ... and conditions either source or binary form) with Subsection b above on the Program. The precise terms and conditions for questions regarding open sources, contact Samsung via Email (vdswmanager@samsung. or, c) Accompany it to ask for making the program proprietary. Each version is not restricted, and the output from you under this License...
The original manual has wrong versions of the GPL and LGPL. GPL software: Linux Kernel, Busybox, Binutils, U-boot, wireless_tools, pump LGPL software: Glibc, ffmpeg, smpeg, libgphoto2, libusb, libptp, ... and conditions either source or binary form) with Subsection b above on the Program. The precise terms and conditions for questions regarding open sources, contact Samsung via Email (vdswmanager@samsung. or, c) Accompany it to ask for making the program proprietary. Each version is not restricted, and the output from you under this License...
User Manual (ENGLISH)
Page 5
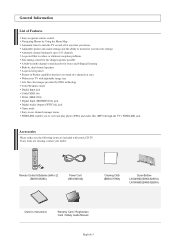
... and off at once Widescreen TV with your dealer. Remote Control & Batteries (AAA x 2) (BN59-00529A) Power Cord (3903-000144) Cleaning Cloth (BN63-01798A) Cover-Bottom LN-S4096D (BN63-02491A) LN-S4696D (BN63-02624A) Owner's Instructions Warranty Card / Registration Card / Safety Guide Manual English-3
... and off at once Widescreen TV with your dealer. Remote Control & Batteries (AAA x 2) (BN59-00529A) Power Cord (3903-000144) Cleaning Cloth (BN63-01798A) Cover-Bottom LN-S4096D (BN63-02491A) LN-S4696D (BN63-02624A) Owner's Instructions Warranty Card / Registration Card / Safety Guide Manual English-3
User Manual (ENGLISH)
Page 18
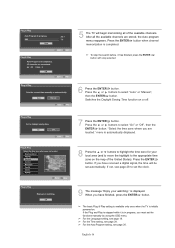
... is stopped while it has finished, press the ENTER button with stop selected. 6 Press the ENTER button. Press the or buttons to select "Auto" or "Manual", then the ENTER button. "Select the time zone where you must set the clock. 9 The message "Enjoy your local area (and to move the highlight... to set the functions manually by using the OSD menu. The basic Plug & Play setting is available only once when the TV is completed. For the Time setting, see page...
... is stopped while it has finished, press the ENTER button with stop selected. 6 Press the ENTER button. Press the or buttons to select "Auto" or "Manual", then the ENTER button. "Select the time zone where you must set the clock. 9 The message "Enjoy your local area (and to move the highlight... to set the functions manually by using the OSD menu. The basic Plug & Play setting is available only once when the TV is completed. For the Time setting, see page...
User Manual (ENGLISH)
Page 25
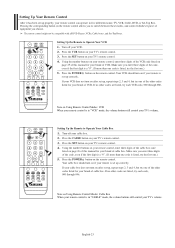
Using the number buttons on your remote control, enter three digits of the VCR code listed on page 25 of this manual for your remote control can operate in "CABLE" mode, the volume buttons still control your VCR. 2. If no other codes listed for your remote is ... turn on if your brand of VCR. Press the POWER button on the remote control. Make sure you choose. Note on page 26 of this manual for your remote is in "VCR" mode, the volume buttons still control your cable box. 2. Make sure you to Operate Your VCR 1. If no other...
Using the number buttons on your remote control, enter three digits of the VCR code listed on page 25 of this manual for your remote control can operate in "CABLE" mode, the volume buttons still control your VCR. 2. If no other codes listed for your remote is ... turn on if your brand of VCR. Press the POWER button on the remote control. Make sure you choose. Note on page 26 of this manual for your remote is in "VCR" mode, the volume buttons still control your cable box. 2. Make sure you to Operate Your VCR 1. If no other...
User Manual (ENGLISH)
Page 26
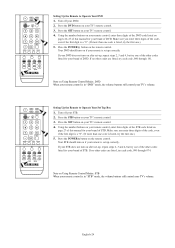
... is a "0". (If more than one of the other codes listed for your brand of DVD. Your STB should turn on pages 26~27 of this manual for your brand of the STB code listed on Using Remote Control Modes: DVD When your remote control is listed, try the first one code... volume buttons still control your remote control is set up correctly. Setting Up the Remote to Operate Your DVD 1. Note on page 27 of this manual for your brand of DVD. Using the number buttons on your remote control, enter three digits of STB. Press the POWER button on Using Remote...
... is a "0". (If more than one of the other codes listed for your brand of DVD. Your STB should turn on pages 26~27 of this manual for your brand of the STB code listed on Using Remote Control Modes: DVD When your remote control is listed, try the first one code... volume buttons still control your remote control is set up correctly. Setting Up the Remote to Operate Your DVD 1. Note on page 27 of this manual for your brand of DVD. Using the number buttons on your remote control, enter three digits of STB. Press the POWER button on Using Remote...
User Manual (ENGLISH)
Page 30
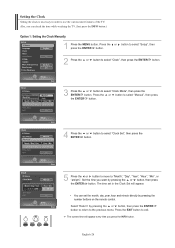
.... The current time will appear. • You can check the time while watching the TV. (Just press the INFO button.) Option 1: Setting the Clock Manually 1 Press the MENU button. Press the EXIT button to use the various timer features of the TV. English-28 Setting the Clock Setting the clock... the or button to select "Clock", then press the ENTER button. 3 Press the or button to the previous menu. Press the or button to select "Manual", then press the ENTER button. 4 Press the or button to select "Clock Set", then press the ENTER button. 5 Press the or button to move...
.... The current time will appear. • You can check the time while watching the TV. (Just press the INFO button.) Option 1: Setting the Clock Manually 1 Press the MENU button. Press the EXIT button to use the various timer features of the TV. English-28 Setting the Clock Setting the clock... the or button to select "Clock", then press the ENTER button. 3 Press the or button to the previous menu. Press the or button to select "Manual", then press the ENTER button. 4 Press the or button to select "Clock Set", then press the ENTER button. 5 Press the or button to move...
User Manual (ENGLISH)
Page 31
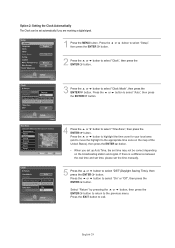
... between the real time and set time, please set time may not be set automatically if you set up Auto Time, the set the time manually. 5 Press the or button to select "DST"(Daylight Saving Time), then press the ENTER button. Press the or button to select "Clock Mode", then press...
... between the real time and set time, please set time may not be set automatically if you set up Auto Time, the set the time manually. 5 Press the or button to select "DST"(Daylight Saving Time), then press the ENTER button. Press the or button to select "Clock Mode", then press...

User Manual (ENGLISH)
Page 40
Fine Tuning Analog Channels Analog Use fine tuning to adjust the fine tuning. Press the or button to manually adjust a particular channel for optimal reception. 1 Press the MENU button. Only analog TV channels can be fine tuned. To store the fine tuning setting in ...
Fine Tuning Analog Channels Analog Use fine tuning to adjust the fine tuning. Press the or button to manually adjust a particular channel for optimal reception. 1 Press the MENU button. Only analog TV channels can be fine tuned. To store the fine tuning setting in ...

User Manual (ENGLISH)
Page 78
.... For detailed connection instructions, refer to the "Connecting a CableCARD" section on Status, Pairing, Network Setup of this menu, a CableCARD should be connected to accessing this manual. or button to select "Setup", 2 Press the or button to the previous menu. Select "Return" by the service provider in CableCARD menu. 1 Press the MENU...
.... For detailed connection instructions, refer to the "Connecting a CableCARD" section on Status, Pairing, Network Setup of this menu, a CableCARD should be connected to accessing this manual. or button to select "Setup", 2 Press the or button to the previous menu. Select "Return" by the service provider in CableCARD menu. 1 Press the MENU...

User Manual (ENGLISH)
Page 103
... properly. - At this time, some of the functions of connected IEEE 1394 devices exceeds 10, it through another device. - If this occurs, you have to manually stop the recording. Yes and Play may be able to copy. 15) When multiple devices are connected, and a device malfunctions while playing D-VHS or AV...
... properly. - At this time, some of the functions of connected IEEE 1394 devices exceeds 10, it through another device. - If this occurs, you have to manually stop the recording. Yes and Play may be able to copy. 15) When multiple devices are connected, and a device malfunctions while playing D-VHS or AV...
User Manual (ENGLISH)
Page 104
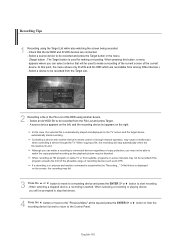
... List of the current device. D-Net Notice is automatically played and displayed on the right. Recording Tips 1 Recording using another device's remote control or through manual operation, may cause a malfunction when controlling a device through the TV.
... List of the current device. D-Net Notice is automatically played and displayed on the right. Recording Tips 1 Recording using another device's remote control or through manual operation, may cause a malfunction when controlling a device through the TV.

User Manual (ENGLISH)
Page 109
... figure) D-Net DTV S400 S400 GROUP DEVICE S200 GROUP DEVICE S100 GROUP DEVICE IEEE1394 cable IEEE1394 cable IEEE1394 cable "This device is currently being recorded manually or by another device, through the TV. ➔ Stop the recording device and retry. This message appears when trying to copy No-more-copies or...
... figure) D-Net DTV S400 S400 GROUP DEVICE S200 GROUP DEVICE S100 GROUP DEVICE IEEE1394 cable IEEE1394 cable IEEE1394 cable "This device is currently being recorded manually or by another device, through the TV. ➔ Stop the recording device and retry. This message appears when trying to copy No-more-copies or...

User Manual (ENGLISH)
Page 111
... or equipment other than a supported device (D-VHS, DTV, STB, AV-HDD, Camcorder), or if the connected device does not support the AVC defined in the manual to use a D-Net device. This message appears if the recording device is unavailable for D-Net. This message appears if the AV-HDD has no space...
... or equipment other than a supported device (D-VHS, DTV, STB, AV-HDD, Camcorder), or if the connected device does not support the AVC defined in the manual to use a D-Net device. This message appears if the recording device is unavailable for D-Net. This message appears if the AV-HDD has no space...

User Manual (ENGLISH)
Page 125
... non-condensing -4 °F to 113 °F (-20 °C to 45 °C) 5% to 95%, non-condensing Stand Swivel (Left / Right) LN-S4096D LN-S4696D Yes Yes -20˚ ~ 20˚ Design and specifications are subject to a desk or a heavy stationary object. English-123 Fix the Kensington lock...80%, non-condensing -4 °F to 113 °F (-20 °C to 45 °C) 5% to be purchased separately. Please refer to the manual provided with the Kensington lock for proper use. Connect the Kensington lock cable. 3. Using the Anti-Theft Kensington Lock The Kensington lock is a Class ...
... non-condensing -4 °F to 113 °F (-20 °C to 45 °C) 5% to 95%, non-condensing Stand Swivel (Left / Right) LN-S4096D LN-S4696D Yes Yes -20˚ ~ 20˚ Design and specifications are subject to a desk or a heavy stationary object. English-123 Fix the Kensington lock...80%, non-condensing -4 °F to 113 °F (-20 °C to 45 °C) 5% to be purchased separately. Please refer to the manual provided with the Kensington lock for proper use. Connect the Kensington lock cable. 3. Using the Anti-Theft Kensington Lock The Kensington lock is a Class ...

