
Open Source Guide (ENGLISH)
Page 2
To apply these terms, attach the following notices to the public, we recommend making it to be of the ordinary General Public License). 16. How to Apply These Terms to Your New Libraries If you develop a new library, and you want it free software that everyone can do so by permitting redistribution under these terms (or, alternatively, under the terms of the greatest possible use to the library. and each file should have at least the "copyright" line and a pointer to most effectively convey the exclusion of each source file to where the full notice is safest to attach them ...
To apply these terms, attach the following notices to the public, we recommend making it to be of the ordinary General Public License). 16. How to Apply These Terms to Your New Libraries If you develop a new library, and you want it free software that everyone can do so by permitting redistribution under these terms (or, alternatively, under the terms of the greatest possible use to the library. and each file should have at least the "copyright" line and a pointer to most effectively convey the exclusion of each source file to where the full notice is safest to attach them ...
Quick Guide (easy Manual) (ver.1.0) (English)
Page 3
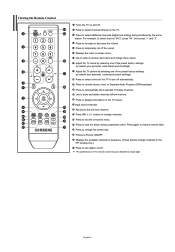
... UHF Antennas 6 Connecting Cable TV 7 Connecting a VCR 8 Connecting an S-VHS VCR 8 Connecting a DVD Player 9 Connecting a DVD Player/Set-Top Box via DVI 9 Connecting a DVD Player/Set-Top Box via HDMI 10 Connecting a PC 10 OPERATION Turning the TV On and Off 11 Plug and Play Feature 11 Changing... Auto Volume 17 Listening to the Sound of the Sub (PIP) Picture 17 Resetting the Sound Settings to the Factory defaults 17 TIME SETTING Setting the Clock 18 Setting the Sleep Timer 18 Setting the On/Off Timer 18 FUNCTION DESCRIPTION Using the V-Chip 19 Selecting a Menu Language 21 Using...
... UHF Antennas 6 Connecting Cable TV 7 Connecting a VCR 8 Connecting an S-VHS VCR 8 Connecting a DVD Player 9 Connecting a DVD Player/Set-Top Box via DVI 9 Connecting a DVD Player/Set-Top Box via HDMI 10 Connecting a PC 10 OPERATION Turning the TV On and Off 11 Plug and Play Feature 11 Changing... Auto Volume 17 Listening to the Sound of the Sub (PIP) Picture 17 Resetting the Sound Settings to the Factory defaults 17 TIME SETTING Setting the Clock 18 Setting the Sleep Timer 18 Setting the On/Off Timer 18 FUNCTION DESCRIPTION Using the V-Chip 19 Selecting a Menu Language 21 Using...
Quick Guide (easy Manual) (ver.1.0) (English)
Page 4
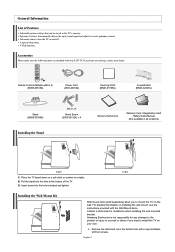
...Place the TV faced down on a soft cloth or cushion on the wall. General Information List of the TV. 3. English-2 V-Chip function. Samsung Electronics is not responsible for any items are included with the Wall Mount items. Contact a technician for assistance when installing the wall mounted bracket....injury to yourself or others if you to create optimum contrast. Insert screw into the hole at the bottom of Features Adjustable picture settings that can be stored in all locations) < 2 > 1. Dynamic Contrast: Automatically detects the input visual signal and adjusts to mount the...
...Place the TV faced down on a soft cloth or cushion on the wall. General Information List of the TV. 3. English-2 V-Chip function. Samsung Electronics is not responsible for any items are included with the Wall Mount items. Contact a technician for assistance when installing the wall mounted bracket....injury to yourself or others if you to create optimum contrast. Insert screw into the hole at the bottom of Features Adjustable picture settings that can be stored in all locations) < 2 > 1. Dynamic Contrast: Automatically detects the input visual signal and adjusts to mount the...
Quick Guide (easy Manual) (ver.1.0) (English)
Page 6
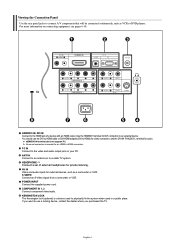
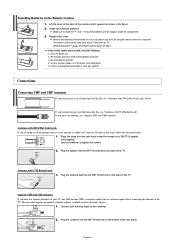
... supplied power cord. English-4 HDMI/DVI IN, DVI IN Connect to the HDMI jack of external headphones for an HDMI to HDMI connection. HEADPHONE Connect a set of a device with an HDMI output. COMPONENT IN 1, 2 Connect component video/audio. No sound connection is a device used to physically fix the system when used...
... supplied power cord. English-4 HDMI/DVI IN, DVI IN Connect to the HDMI jack of external headphones for an HDMI to HDMI connection. HEADPHONE Connect a set of a device with an HDMI output. COMPONENT IN 1, 2 Connect component video/audio. No sound connection is a device used to physically fix the system when used...
Quick Guide (easy Manual) (ver.1.0) (English)
Page 7
...English-5 Displays the available channels in sequence. (These buttons change the screen size. The performance of the preset factory settings. (or selects your personal, customized sound settings) Adjust the TV picture by selecting one of the remote control may be affected by the same station. Press to...channels directly on -screen menu items and change channels. Adjust the TV sound by selecting one of the preset factory settings. (or selects your personal, customized picture settings) Press to select a time for the TV to stop the action during a particular scene. Use to store and...
...English-5 Displays the available channels in sequence. (These buttons change the screen size. The performance of the preset factory settings. (or selects your personal, customized sound settings) Adjust the TV picture by selecting one of the remote control may be affected by the same station. Press to...channels directly on -screen menu items and change channels. Adjust the TV sound by selecting one of the preset factory settings. (or selects your personal, customized picture settings) Press to select a time for the TV to stop the action during a particular scene. Use to store and...
Quick Guide (easy Manual) (ver.1.0) (English)
Page 8
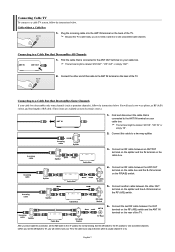
... leads that looks like this , see "Antennas with 75 Ω Round Leads". Is there a special fluorescent light or neon sign nearby? If your antenna has a set of the rear panel. Antennas with 300 Ω Flat Twin Leads" below . 1. Plug the adaptor into the ANT IN terminal on the back of the...
... leads that looks like this , see "Antennas with 75 Ω Round Leads". Is there a special fluorescent light or neon sign nearby? If your antenna has a set of the rear panel. Antennas with 300 Ω Flat Twin Leads" below . 1. Plug the adaptor into the ANT IN terminal on the back of the...
Quick Guide (easy Manual) (ver.1.0) (English)
Page 9
...RF (A/B) Switch Incoming cable Splitter Cable Box RF (A/B) Switch ANT IN TV Rear 6. Incoming cable Splitter Incoming cable Splitter Cable Box 3. After you set the A/B switch to the "A" position for normal viewing. Connect the other OUT terminal on the splitter and the A-IN terminal on the RF(A/B) ... the ANT IN terminal on the back of RF cable. (These items are available at most electronics stores.) ANT IN 1. Because this connection, set the A/B switch to "B", you do not need a cable box to view unscrambled cable channels. This terminal might be labeled "ANT OUT", "VHF...
...RF (A/B) Switch Incoming cable Splitter Cable Box RF (A/B) Switch ANT IN TV Rear 6. Incoming cable Splitter Incoming cable Splitter Cable Box 3. After you set the A/B switch to the "A" position for normal viewing. Connect the other OUT terminal on the splitter and the A-IN terminal on the RF(A/B) ... the ANT IN terminal on the back of RF cable. (These items are available at most electronics stores.) ANT IN 1. Because this connection, set the A/B switch to "B", you do not need a cable box to view unscrambled cable channels. This terminal might be labeled "ANT OUT", "VHF...
Quick Guide (easy Manual) (ver.1.0) (English)
Page 11
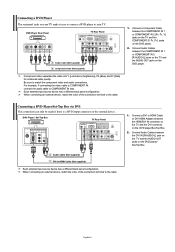
...jacks on the external device. Be sure to HDMI Cable (Not supplied) Each external input source device has a different back panel configuration. DVD Player / Set-Top Box TV Rear Panel 2 Audio Cable (Not supplied) 1 DVI to match the component video and audio connections. Connect a DVI to HDMI Cable...Cable (Not supplied) Component video separates the video into Y (Luminance (brightness)), Pb (Blue) and Pr (Red) for enhanced video quality. Connecting a DVD Player/Set-Top Box via DVI This connection can only be made if there is a DVI Output connector on your TV make it easy to connect a DVD...
...jacks on the external device. Be sure to HDMI Cable (Not supplied) Each external input source device has a different back panel configuration. DVD Player / Set-Top Box TV Rear Panel 2 Audio Cable (Not supplied) 1 DVI to match the component video and audio connections. Connect a DVI to HDMI Cable...Cable (Not supplied) Component video separates the video into Y (Luminance (brightness)), Pb (Blue) and Pr (Red) for enhanced video quality. Connecting a DVD Player/Set-Top Box via DVI This connection can only be made if there is a DVI Output connector on your TV make it easy to connect a DVD...

Quick Guide (easy Manual) (ver.1.0) (English)
Page 12
...audio and video signals using a single cable without compression. • "Multimedia interface" is an HDMI Output connector on your computer. 2. Connecting a DVD Player/Set-Top Box via HDMI This connection can only be made if there is a more accurate name for it especially because it allows multiple channels of...your computer. Connect an HDMI Cable between PC IN [PC] connector on the TV and the PC output connector on the DVD player/Set-Top Box. DVD Player Rear Panel TV Rear Panel 1. Each external input source device has a different back panel configuration. English-10
...audio and video signals using a single cable without compression. • "Multimedia interface" is an HDMI Output connector on your computer. 2. Connecting a DVD Player/Set-Top Box via HDMI This connection can only be made if there is a more accurate name for it especially because it allows multiple channels of...your computer. Connect an HDMI Cable between PC IN [PC] connector on the TV and the PC output connector on the DVD player/Set-Top Box. DVD Player Rear Panel TV Rear Panel 1. Each external input source device has a different back panel configuration. English-10

Quick Guide (easy Manual) (ver.1.0) (English)
Page 13
... automatically. The message "Plug & Play" is displayed with "OK" selected. is displayed. 2. Press the ENTER button to two minutes. • Clock Set: Sets the current time for the TV clock. Press the or button to move to the "Hour", "Minute" or "am /pm" by pressing the or... the ENTER button to select "Setup", then press the ENTER 2. Please check that the antenna cable is connected correctly. 4. The message "Enjoy your setting. If you want to interrupt the memorization process. 6. The message "Check antenna input." Operation Turning the TV On and Off Press the POWER button ...
... automatically. The message "Plug & Play" is displayed with "OK" selected. is displayed. 2. Press the ENTER button to two minutes. • Clock Set: Sets the current time for the TV clock. Press the or button to move to the "Hour", "Minute" or "am /pm" by pressing the or... the ENTER button to select "Setup", then press the ENTER 2. Please check that the antenna cable is connected correctly. 4. The message "Enjoy your setting. If you want to interrupt the memorization process. 6. The message "Check antenna input." Operation Turning the TV On and Off Press the POWER button ...

Quick Guide (easy Manual) (ver.1.0) (English)
Page 14
... MUTE button: At any time, you press the CH or CH button, the TV changes channels in the lower-left corner of certain audio-video settings. Viewing the Display Press the INFO button on the remote control to view current channel and the status of the screen. 2. To quickly switch between...
... MUTE button: At any time, you press the CH or CH button, the TV changes channels in the lower-left corner of certain audio-video settings. Viewing the Display Press the INFO button on the remote control to view current channel and the status of the screen. 2. To quickly switch between...

Quick Guide (easy Manual) (ver.1.0) (English)
Page 16
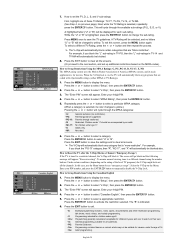
...8226; Custom: Select to decrease or increase the value of a particular item. Press the o button to view your favorite display settings (see "Resetting the Picture Settings to the Factory Defaults", page 15). Press the EXIT button to exit. • Contrast: Adjusts the lightness and darkness between objects...14 Press the MENU button to select "Mode". 4. Press the ENTER button again, to display the menu. The Picture mode must be set has several settings which allow you to the selected Picture mode. You can be adjusted separately for a more natural look. Press the ENTER button. 3. ...
...8226; Custom: Select to decrease or increase the value of a particular item. Press the o button to view your favorite display settings (see "Resetting the Picture Settings to the Factory Defaults", page 15). Press the EXIT button to exit. • Contrast: Adjusts the lightness and darkness between objects...14 Press the MENU button to select "Mode". 4. Press the ENTER button again, to display the menu. The Picture mode must be set has several settings which allow you to the selected Picture mode. You can be adjusted separately for a more natural look. Press the ENTER button. 3. ...

Quick Guide (easy Manual) (ver.1.0) (English)
Page 17
...the picture size to 16:9 appropriate for DVDs or wide broadcasting. • Zoom: Magnifies the 16:9 wide picture (in the vertical direction. Setting the Digital Noise Reduction (Digital NR) If the broadcast signal received by pressing the or button. Press the EXIT button to fit the screen size... "On" or "Off". Press the or button to 4 on the screen. 1. To select the desired picture effect, follow the "Using Automatic Picture Settings " instructions number 1 to select "Digital NR", then press the ENTER button. 3. This function don't work in PC mode. Press the EXIT button ...
...the picture size to 16:9 appropriate for DVDs or wide broadcasting. • Zoom: Magnifies the 16:9 wide picture (in the vertical direction. Setting the Digital Noise Reduction (Digital NR) If the broadcast signal received by pressing the or button. Press the EXIT button to fit the screen size... "On" or "Off". Press the or button to 4 on the screen. 1. To select the desired picture effect, follow the "Using Automatic Picture Settings " instructions number 1 to select "Digital NR", then press the ENTER button. 3. This function don't work in PC mode. Press the EXIT button ...
Quick Guide (easy Manual) (ver.1.0) (English)
Page 18
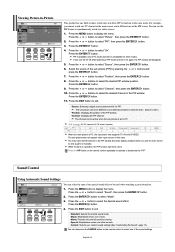
... PC HDMI O O O X X X X When the main picture is available only in operation, the PIP function cannot be active when the sub picture is set to select one of the special sound effect to select "Source", then press the ENTER button. 6. The sub picture does not support other sounds. •...; Custom: Selects your custom sound settings (See "Customizing the Sound", page 17). You may notice that the picture in this case. Press the MENU button to select the desired sound...
... PC HDMI O O O X X X X When the main picture is available only in operation, the PIP function cannot be active when the sub picture is set to select one of the special sound effect to select "Source", then press the ENTER button. 6. The sub picture does not support other sounds. •...; Custom: Selects your custom sound settings (See "Customizing the Sound", page 17). You may notice that the picture in this case. Press the MENU button to select the desired sound...
Quick Guide (easy Manual) (ver.1.0) (English)
Page 19
... you can listen to select "Sub". Press the or button to the sound of the particular frequency. Press the or button to change the MTS settings. English-17 Press the ENTER button. 4. You can also press the MTS button on the particular program being broadcast, you make any changes to the... broadcast in mono, or if you can use one of the main picture. • Sub: Used to listen to adjust. Customizing the Sound The sound settings can be adjusted to select "Sound", then press the ENTER button. 2. Press the EXIT button to exit. • Mono: Select for channels that are ...
... you can listen to select "Sub". Press the or button to the sound of the particular frequency. Press the or button to change the MTS settings. English-17 Press the ENTER button. 4. You can also press the MTS button on the particular program being broadcast, you make any changes to the... broadcast in mono, or if you can use one of the main picture. • Sub: Used to listen to adjust. Customizing the Sound The sound settings can be adjusted to select "Sound", then press the ENTER button. 2. Press the EXIT button to exit. • Mono: Select for channels that are ...
Quick Guide (easy Manual) (ver.1.0) (English)
Page 20
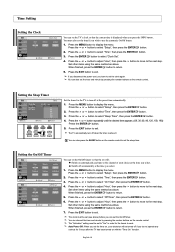
...button to move to display the menu. Press the EXIT button to the next step. 5. Press the or button to return. You can also set the hour and minute by pressing the number buttons on the remote control. When finished, press the ENTER button to select "Sleep Timer", then press... the ENTER button. 4. Press the MENU button to select "Clock Set". 4. Time Setting Setting the Clock You can set the TV's clock so that the set will be turned off if you do not operate any controls for 3 hours after the TV has been turned on...
...button to move to display the menu. Press the EXIT button to the next step. 5. Press the or button to return. You can also set the hour and minute by pressing the number buttons on the remote control. When finished, press the ENTER button to select "Sleep Timer", then press... the ENTER button. 4. Press the MENU button to select "Clock Set". 4. Time Setting Setting the Clock You can set the TV's clock so that the set will be turned off if you do not operate any controls for 3 hours after the TV has been turned on...
Quick Guide (easy Manual) (ver.1.0) (English)
Page 21
...that are entered, the "Enter new PIN" screen appears. Press the or button to exit. The default PIN number for a new TV set is deemed inappropriate for your PIN has been memorized. 6. Press the EXIT button to select "Setup", then press the ENTER button. 2.... Adult Language / S: Sexual situation / V: Violence The V-Chip will be highlighted. (U= Unblocked, B= Blocked) When the color of the V-Chip restrictions can be set up or changed. 1. Press the or button to change any of the "U" or "B" is selected. The "Enter PIN" screen will appear. Enter your existing setup...
...that are entered, the "Enter new PIN" screen appears. Press the or button to exit. The default PIN number for a new TV set is deemed inappropriate for your PIN has been memorized. 6. Press the EXIT button to select "Setup", then press the ENTER button. 2.... Adult Language / S: Sexual situation / V: Violence The V-Chip will be highlighted. (U= Unblocked, B= Blocked) When the color of the V-Chip restrictions can be set up or changed. 1. Press the or button to change any of the "U" or "B" is selected. The "Enter PIN" screen will appear. Enter your existing setup...
Quick Guide (easy Manual) (ver.1.0) (English)
Page 22
... Adult programming. 7. First, highlight one of the local TV programs) the V-Chip might lock out all the screens. (Or proceed to Set up Restrictions Using the MPAA Ratings: G, PG, PG-13, R, NC-17, X, NR The MPAA rating system uses the Motion Picture ... activate the restriction selected. Programming generally considered acceptable for all screens. General programming, suitable for children 8 years and over to Set up additional restrictions based on , the TV will automatically block any programs that are "More restrictive". Parental Guidance. Programming contains ...
... Adult programming. 7. First, highlight one of the local TV programs) the V-Chip might lock out all the screens. (Or proceed to Set up Restrictions Using the MPAA Ratings: G, PG, PG-13, R, NC-17, X, NR The MPAA rating system uses the Motion Picture ... activate the restriction selected. Programming generally considered acceptable for all screens. General programming, suitable for children 8 years and over to Set up additional restrictions based on , the TV will automatically block any programs that are "More restrictive". Parental Guidance. Programming contains ...
Quick Guide (easy Manual) (ver.1.0) (English)
Page 23
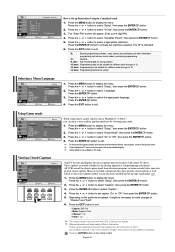
...to select "Canadian French", then press the ENTER button. 5. Enter your television schedule and on the remote control. Press the or button to Set up Restrictions Using the Canadian French 1. Press the EXIT button to exit. • E: Exempt programming includes...news, sports, documentaries and other...the menu. English-21 Press the or button to select "Caption", then press the ENTER button. 3. These captions are broadcast with DVD or Set-top box signals. Press the or button to select "Setup", then press the ENTER button. 2. Press the CAPTION button on the tape's ...
...to select "Canadian French", then press the ENTER button. 5. Enter your television schedule and on the remote control. Press the or button to Set up Restrictions Using the Canadian French 1. Press the EXIT button to exit. • E: Exempt programming includes...news, sports, documentaries and other...the menu. English-21 Press the or button to select "Caption", then press the ENTER button. 3. These captions are broadcast with DVD or Set-top box signals. Press the or button to select "Setup", then press the ENTER button. 2. Press the CAPTION button on the tape's ...

Quick Guide (easy Manual) (ver.1.0) (English)
Page 24
... button to select the "Source List". 3. Press the ENTER button. 4. If you wish to continue viewing the poor picture, you watching TV at night, set the "Blue Screen" mode to select "Blue Screen", then press the ENTER button. 3. Press the or button to "Off". 1. Press the or button... 5. Press the MENU button to exit. Select the required option (Off, Low, Medium, High) by pressing the or button. DVD - AV Receiver - Setting the Blue Screen Mode If no signal is being received or the signal is selected, press the ENTER button. Press the EXIT button to display...
... button to select the "Source List". 3. Press the ENTER button. 4. If you wish to continue viewing the poor picture, you watching TV at night, set the "Blue Screen" mode to select "Blue Screen", then press the ENTER button. 3. Press the or button to "Off". 1. Press the or button... 5. Press the MENU button to exit. Select the required option (Off, Low, Medium, High) by pressing the or button. DVD - AV Receiver - Setting the Blue Screen Mode If no signal is being received or the signal is selected, press the ENTER button. Press the EXIT button to display...


