
User Manual
Page 2
... Insert the supplied USB cable into the PC's USB port and the camera's USB connection terminal. (p.82) Check the camera's power Check the camera's power. When transferring the images taken with the camera to avoid disappointment. Getting to your camera Thank you for buying a Samsung Digital Camera. x Please check that the manufacturer takes no responsibility for [Removable Disk...
... Insert the supplied USB cable into the PC's USB port and the camera's USB connection terminal. (p.82) Check the camera's power Check the camera's power. When transferring the images taken with the camera to avoid disappointment. Getting to your camera Thank you for buying a Samsung Digital Camera. x Please check that the manufacturer takes no responsibility for [Removable Disk...

User Manual
Page 3
...or drop metallic or in temperature. This could cause a fire. Positioning the flash too close to your dealer or Samsung Camera Service centre. x Battery and camera may become hot during prolonged use it. Exposure to prevent accidents e.g.: - x Do not attempt to modify this product and accessories ..., as this may cause eyesight damage. x When in use the flash in close proximity to you or your dealer or Samsung Camera Service centre. Danger DANGER indicates an imminently hazardous situation which , if not avoided, could result in death or serious injury. To ...
...or drop metallic or in temperature. This could cause a fire. Positioning the flash too close to your dealer or Samsung Camera Service centre. x Battery and camera may become hot during prolonged use it. Exposure to prevent accidents e.g.: - x Do not attempt to modify this product and accessories ..., as this may cause eyesight damage. x When in use the flash in close proximity to you or your dealer or Samsung Camera Service centre. Danger DANGER indicates an imminently hazardous situation which , if not avoided, could result in death or serious injury. To ...

User Manual
Page 4
... the battery Inserting the memory card Instructions on , if you capture an image. Use battery with the polarities reversed. After use the camera for the First Time Setting up the Language Setting up the date, time and date type RECORDING 19 20 20 20 21 21 22...pin connector to the USB port of a PC. x Remove the battery when not planning to avoid taking an unclear image and possibly causing camera malfunction. Avoid leaving magnetic strip cards near case. Caution CAUTION indicates a potentially hazardous situation which, if not avoided, may leak corrosive electrolyte and...
... the battery Inserting the memory card Instructions on , if you capture an image. Use battery with the polarities reversed. After use the camera for the First Time Setting up the Language Setting up the date, time and date type RECORDING 19 20 20 20 21 21 22...pin connector to the USB port of a PC. x Remove the battery when not planning to avoid taking an unclear image and possibly causing camera malfunction. Avoid leaving magnetic strip cards near case. Caution CAUTION indicates a potentially hazardous situation which, if not avoided, may leak corrosive electrolyte and...

User Manual
Page 5
... sound 24 Pausing while recording a movie (Successive Recording) 25 Things to Watch Out for When Taking Pictures 26 Setting up the recording function using the camera buttons 26 POWER button 26 SHUTTER button 26 ZOOM W / T button 28 Function Description / Info / Up button 28 Macro / Down button 30 Focus lock... voice 47 SCENE mode PLAY 48 Starting play mode 48 Playing back a still image 48 Playing back a movie 49 Movie capture function 49 On camera movie trimming 50 Playing back a recorded voice 50 Playing back a voice memo 51 LCD monitor Indicator in play back mode 51 Setting up the...
... sound 24 Pausing while recording a movie (Successive Recording) 25 Things to Watch Out for When Taking Pictures 26 Setting up the recording function using the camera buttons 26 POWER button 26 SHUTTER button 26 ZOOM W / T button 28 Function Description / Info / Up button 28 Macro / Down button 30 Focus lock... voice 47 SCENE mode PLAY 48 Starting play mode 48 Playing back a still image 48 Playing back a movie 49 Movie capture function 49 On camera movie trimming 50 Playing back a recorded voice 50 Playing back a voice memo 51 LCD monitor Indicator in play back mode 51 Setting up the...

User Manual
Page 6
Content 53 Info / Up button 53 Play & Pause / Down button 54 Left / Right / Menu / OK button 54 Printer button 54 Delete button 55 E (Effect) button : Resize 56 E (Effect) button : Rotating an image 56 E (Effect) button : Colour 57 E (Effect) button : Image editing 57 ACB 57 Red eye Removal 57 Brightness control 58 Contrast control 58 Saturation control 58 Setting up the play back function using the LCD monitor 60 Multi slide show 60 Start the multi slide show 60 Selecting Images 61 Configure multi slide show effects 61 Setting play interval 61 Setting ...
Content 53 Info / Up button 53 Play & Pause / Down button 54 Left / Right / Menu / OK button 54 Printer button 54 Delete button 55 E (Effect) button : Resize 56 E (Effect) button : Rotating an image 56 E (Effect) button : Colour 57 E (Effect) button : Image editing 57 ACB 57 Red eye Removal 57 Brightness control 58 Contrast control 58 Saturation control 58 Setting up the play back function using the LCD monitor 60 Multi slide show 60 Start the multi slide show 60 Selecting Images 61 Configure multi slide show effects 61 Setting play interval 61 Setting ...

User Manual
Page 7
Content 75 Auto power off 76 Selecting Video out type 77 Auto Focus lamp SOFTWARE 77 Software Notes 78 System Requirements 78 About the software 79 Setting up the application software 82 Starting PC mode 84 Removing the removable disk 85 Setting up the USB Driver for MAC 85 Using the USB Driver for MAC 86 Removing the USB Driver for Windows 98SE 86 Samsung Master APPENDIX 89 Specifications 92 Important notes 94 Warning indicator 95 Before contacting a service centre 97 FAQ 6
Content 75 Auto power off 76 Selecting Video out type 77 Auto Focus lamp SOFTWARE 77 Software Notes 78 System Requirements 78 About the software 79 Setting up the application software 82 Starting PC mode 84 Removing the removable disk 85 Setting up the USB Driver for MAC 85 Using the USB Driver for MAC 86 Removing the USB Driver for Windows 98SE 86 Samsung Master APPENDIX 89 Specifications 92 Important notes 94 Warning indicator 95 Before contacting a service centre 97 FAQ 6

User Manual
Page 8
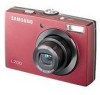
Included items Camera Rechargeable battery (SLB-10A) USB cable (SUC-C3) AC adapter (SAC-47) AV cable Camera strap Software CD Optional Items User manual, Product warranty SD/SDHC/MMC memory card (see p.15) Camera case 7 The contents can vary depending on the sales region. To buy the optional equipment, contact your nearest Samsung dealer or Samsung service centre. System chart Please check that you have the correct contents before using this product.
Included items Camera Rechargeable battery (SLB-10A) USB cable (SUC-C3) AC adapter (SAC-47) AV cable Camera strap Software CD Optional Items User manual, Product warranty SD/SDHC/MMC memory card (see p.15) Camera case 7 The contents can vary depending on the sales region. To buy the optional equipment, contact your nearest Samsung dealer or Samsung service centre. System chart Please check that you have the correct contents before using this product.

User Manual
Page 10
Identification of features Back LCD monitor Camera status lamp Zoom T button (Digital zoom) Zoom W button (Thumbnail) E (Effect) button Eyelet for camera strap Fn/Delete button 5-function button FD (Face Detection) button Play mode/Print button 9
Identification of features Back LCD monitor Camera status lamp Zoom T button (Digital zoom) Zoom W button (Thumbnail) E (Effect) button Eyelet for camera strap Fn/Delete button 5-function button FD (Face Detection) button Play mode/Print button 9

User Manual
Page 11
Identification of features Bottom Battery holder Battery chamber www.samsungcamera.com Battery chamber cover Tripod socket Memory card slot 5 Function button Function Description / Information / Up button MENU/OK button Flash / Left button Self-timer / Right button Macro / Down button Play & Pause button K To open the battery chamber cover, slide it in the direction shown above. 10
Identification of features Bottom Battery holder Battery chamber www.samsungcamera.com Battery chamber cover Tripod socket Memory card slot 5 Function button Function Description / Information / Up button MENU/OK button Flash / Left button Self-timer / Right button Macro / Down button Play & Pause button K To open the battery chamber cover, slide it in the direction shown above. 10

User Manual
Page 12
...(LCD monitor turns off) The lamp is off The lamp blinks The lamp turns on (The camera focuses on the subject) The lamp blinks (The camera doesn't focus on and off when the camera is ready to take a picture The lamp blinks while saving the image data and turns off ... MODE ICON MODE ICON Scene() Nightscene Children Landscape Close up (LCD monitor turns off after about the camera mode setting. Camera Status Lamp Status Power on After taking a picture When flash battery is charging When the USB cable is inserted to a PC Transmitting Data...
...(LCD monitor turns off) The lamp is off The lamp blinks The lamp turns on (The camera focuses on the subject) The lamp blinks (The camera doesn't focus on and off when the camera is ready to take a picture The lamp blinks while saving the image data and turns off ... MODE ICON MODE ICON Scene() Nightscene Children Landscape Close up (LCD monitor turns off after about the camera mode setting. Camera Status Lamp Status Power on After taking a picture When flash battery is charging When the USB cable is inserted to a PC Transmitting Data...

User Manual
Page 13
... used for 1 minute. x When the camera is perfectly normal. x During extended use the rechargeable battery SLB-10A supplied with the camera. x Low temperatures (below 0°C) can lose power over time and are measured under Samsung's standard conditions and shooting conditions and may vary... depending on every second shot. Using the camera for 5 minutes and then Powering it ...
... used for 1 minute. x When the camera is perfectly normal. x During extended use the rechargeable battery SLB-10A supplied with the camera. x Low temperatures (below 0°C) can lose power over time and are measured under Samsung's standard conditions and shooting conditions and may vary... depending on every second shot. Using the camera for 5 minutes and then Powering it ...

User Manual
Page 14
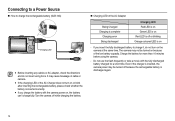
...x Use a USB cable (SUC-C3) with the correct specification. x If the camera is connected to a port located on the front of the PC : remove the cable and...doesn't meet the Power output standard(4.2V, 400mA), the camera may not be used as a power cable. x Using a USB cable : Remove the AC adapter (SAC-47). x the camera and other device. You can download stored images to your... PC (p.82) or supply the power to your camera through a USB hub: connect the camera directly to the PC. Important information about USB cable usage. x Using an AC ...
...x Use a USB cable (SUC-C3) with the correct specification. x If the camera is connected to a port located on the front of the PC : remove the cable and...doesn't meet the Power output standard(4.2V, 400mA), the camera may not be used as a power cable. x Using a USB cable : Remove the AC adapter (SAC-47). x the camera and other device. You can download stored images to your... PC (p.82) or supply the power to your camera through a USB hub: connect the camera directly to the PC. Important information about USB cable usage. x Using an AC ...
User Manual
Page 15
.... „ Charging LED of the AC Charger does not turn on , the battery can't charge fully. Even if the charger is inserted, the camera power may be turned on - x If you insert the fully discharged battery to charge the rechargeable battery (SLB-10A) Charging LED x Before inserting ... battery, please check whether the battery is inserted correctly. Do not use the flash frequently or take a movie with the camera power on the camera at the same time. x If the charging LED of the AC Adapter Being Charged Charging is complete Charging error Being discharged Charging ...
.... „ Charging LED of the AC Charger does not turn on , the battery can't charge fully. Even if the charger is inserted, the camera power may be turned on - x If you insert the fully discharged battery to charge the rechargeable battery (SLB-10A) Charging LED x Before inserting ... battery, please check whether the battery is inserted correctly. Do not use the flash frequently or take a movie with the camera power on the camera at the same time. x If the charging LED of the AC Adapter Being Charged Charging is complete Charging error Being discharged Charging ...

User Manual
Page 16
...the battery chamber cover. Have the front of the memory card facing toward the back of the camera (LCD monitor) and the card pins toward the front of the camera (Lens). - If the camera does not turn on the LCD monitor. www.samsungcamera.com - Do not insert the memory ... are displayed on after you have inserted battery, please check whether the battery is inserted with the correct polarity (+ / -). - Turn off the camera's power before inserting the memory card. Battery indicator Battery status The battery is opened, do not force it. Inserting the battery „ Insert the...
...the battery chamber cover. Have the front of the memory card facing toward the back of the camera (LCD monitor) and the card pins toward the front of the camera (Lens). - If the camera does not turn on the LCD monitor. www.samsungcamera.com - Do not insert the memory ... are displayed on after you have inserted battery, please check whether the battery is inserted with the correct polarity (+ / -). - Turn off the camera's power before inserting the memory card. Battery indicator Battery status The battery is opened, do not force it. Inserting the battery „ Insert the...

User Manual
Page 17
Instructions on the memory card is not covered by another digital camera. x Repeated use , you may notice that the memory card is warm. x Please keep the memory card in its case when not in use the memory card in this camera, format the memory card using a newly purchased memory ... used incorrectly. - x Do not allow the memory card to purchase a new memory card. x Do not use or store in another digital camera or memory card reader. x Samsung cannot be the case, you are extremes in an environment with a soft cloth. near loud speakers or TV receivers. x Please do not...
Instructions on the memory card is not covered by another digital camera. x Repeated use , you may notice that the memory card is warm. x Please keep the memory card in its case when not in use the memory card in this camera, format the memory card using a newly purchased memory ... used incorrectly. - x Do not allow the memory card to purchase a new memory card. x Do not use or store in another digital camera or memory card reader. x Samsung cannot be the case, you are extremes in an environment with a soft cloth. near loud speakers or TV receivers. x Please do not...

User Manual
Page 18
... 17'37" About 60'21" x The recording times can use the memory card „ The camera can be changed by variables such as subject matter and memory card type. Card pins Write protect switch Label [SD (Secure Digital) memory card] x The SD/ SDHC memory card has a write protect switch that prevents image...
... 17'37" About 60'21" x The recording times can use the memory card „ The camera can be changed by variables such as subject matter and memory card type. Card pins Write protect switch Label [SD (Secure Digital) memory card] x The SD/ SDHC memory card has a write protect switch that prevents image...

User Manual
Page 19
... Language Date&Time Back ENGLISH FRANÇAIS DEUTSCH ESPAÑOL ITALIANO Set x You can select one of each item. 18 x Even if the camera is restarted, the language setting will be maintained. Select the desired sub menu by pressing the UP/ DOWN button and press the RIGHT button. 2. x... When the camera is at the first item of its current position. In all other instances, the cursor will not be shifted to the [Date&Time] main...
... Language Date&Time Back ENGLISH FRANÇAIS DEUTSCH ESPAÑOL ITALIANO Set x You can select one of each item. 18 x Even if the camera is restarted, the language setting will be maintained. Select the desired sub menu by pressing the UP/ DOWN button and press the RIGHT button. 2. x... When the camera is at the first item of its current position. In all other instances, the cursor will not be shifted to the [Date&Time] main...

User Manual
Page 20
Description 6 Contrast 7 Sharpness 8 Saturation 9 Auto Focus Frame 10 Camera shake Warning 11 Date / Time 12 Exposure compensation 13 White Balance 14 ISO 15 Drive mode / Stabiliser 16 Metering 17 Image Quality / Frame Rate 18 ... 19 Battery 20 Memory card icon / Internal memory icon 21 Number of available shots remaining / Remaining time 22 Voice Memo/Mic. Off 23 Optical / Digital Zoom bar /Digital Zoom rate Icons Page p.37 p.37 p.38 p.45 p.25 2008/01/01 01:00 PM p.71 p.43...
Description 6 Contrast 7 Sharpness 8 Saturation 9 Auto Focus Frame 10 Camera shake Warning 11 Date / Time 12 Exposure compensation 13 White Balance 14 ISO 15 Drive mode / Stabiliser 16 Metering 17 Image Quality / Frame Rate 18 ... 19 Battery 20 Memory card icon / Internal memory icon 21 Number of available shots remaining / Remaining time 22 Voice Memo/Mic. Off 23 Optical / Digital Zoom bar /Digital Zoom rate Icons Page p.37 p.37 p.38 p.45 p.25 2008/01/01 01:00 PM p.71 p.43...

User Manual
Page 21
...PROGRAM mode ( ) „ Selecting the automatic mode will configure the camera with minimal user interaction. 1. If the memory card is incorrect, reset the date/ time before taking a picture.) 5. ...Point the camera towards the subject and compose the image by rotating the mode dial. 2. Insert the batteries ...2. Press the power button to use the AUTO mode ( ) „ Please select this camera has a 10MB internal memory, you do not need to insert the memory card. Should this be the case, the...
...PROGRAM mode ( ) „ Selecting the automatic mode will configure the camera with minimal user interaction. 1. If the memory card is incorrect, reset the date/ time before taking a picture.) 5. ...Point the camera towards the subject and compose the image by rotating the mode dial. 2. Insert the batteries ...2. Press the power button to use the AUTO mode ( ) „ Please select this camera has a 10MB internal memory, you do not need to insert the memory card. Should this be the case, the...

User Manual
Page 22
...the images. - Select the DIS mode by rotating the mode dial. 2. The digital zoom will not operate in situations where the camera shake warning indicator () is not displayed. - As the DIS uses the camera's digital signal processor, it may be blurred. - Up / Down button : changes ... image in dim conditions. 1. x Smaller Aperture values make both the object and background sharp. Low Shutter speeds can capture a moving the camera while the [Capturing!] message is () or (), the DIS mode can manually configure all functions, aperture value and shutter...
...the images. - Select the DIS mode by rotating the mode dial. 2. The digital zoom will not operate in situations where the camera shake warning indicator () is not displayed. - As the DIS uses the camera's digital signal processor, it may be blurred. - Up / Down button : changes ... image in dim conditions. 1. x Smaller Aperture values make both the object and background sharp. Low Shutter speeds can capture a moving the camera while the [Capturing!] message is () or (), the DIS mode can manually configure all functions, aperture value and shutter...
