User Manual
Page 2
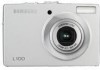
... appearing in the United States and/or other countries. Getting to Know your camera Thank you for a trip or an important event) to the A/S centre. for buying a Samsung Digital Camera. x The contents and illustrations of this manual are registered trademarks of the camera malfunction (such as battery, Memory card etc.) to avoid disappointment. When transferring...
... appearing in the United States and/or other countries. Getting to Know your camera Thank you for a trip or an important event) to the A/S centre. for buying a Samsung Digital Camera. x The contents and illustrations of this manual are registered trademarks of the camera malfunction (such as battery, Memory card etc.) to avoid disappointment. When transferring...
User Manual
Page 3
...increase the risk of children or animals to people or animals. This could cause a fire. Swallowing battery or small camera accessories. Exposure to your dealer or Samsung Camera Service centre. Positioning the flash too close proximity to flammable or explosive gases, as this product in close ...x Do not use and it . If an accident should only be the case, allow the camera to sit idle for a few minutes to allow it time to you or your dealer or Samsung Camera Service centre. Should this product and accessories out of reach of explosion. x When in use ...
...increase the risk of children or animals to people or animals. This could cause a fire. Swallowing battery or small camera accessories. Exposure to your dealer or Samsung Camera Service centre. Positioning the flash too close proximity to flammable or explosive gases, as this product in close ...x Do not use and it . If an accident should only be the case, allow the camera to sit idle for a few minutes to allow it time to you or your dealer or Samsung Camera Service centre. Should this product and accessories out of reach of explosion. x When in use ...
User Manual
Page 4
... Before inserting any connector cords or cables to result in contact with the polarities reversed. It may leak corrosive electrolyte and permanently damage the camera's components. Caution Content CAUTION indicates a potentially hazardous situation which, if not avoided, may result in fire. - Otherwise the battery... devices are using it is connected to the USB port of features Front & Top Back Bottom 5 Function button Self-timer lamp Camera Status Lamp Mode icon Connecting to a Power Source Inserting the battery Inserting the memory card Instructions on , if you capture an ...
... Before inserting any connector cords or cables to result in contact with the polarities reversed. It may leak corrosive electrolyte and permanently damage the camera's components. Caution Content CAUTION indicates a potentially hazardous situation which, if not avoided, may result in fire. - Otherwise the battery... devices are using it is connected to the USB port of features Front & Top Back Bottom 5 Function button Self-timer lamp Camera Status Lamp Mode icon Connecting to a Power Source Inserting the battery Inserting the memory card Instructions on , if you capture an ...
User Manual
Page 5
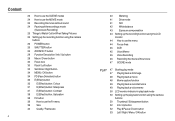
... sound 24 Pausing while recording a movie (Successive Recording) 25 Things to Watch Out for When Taking Pictures 26 Setting up the recording function using the camera buttons 26 POWER button 26 SHUTTER button 26 ZOOM W / T button 28 Function Description / Info / Up button 28 Macro / Down button 30 Focus lock 30 Flash... back a recorded voice 49 Playing back a voice memo 50 LCD monitor Indicator in play back mode 50 Setting up the play back function using the camera buttons 50 Thumbnail / Enlargement button 52 Info / Up button 52 Play & Pause / Down button 53 Left / Right / Menu / OK button
... sound 24 Pausing while recording a movie (Successive Recording) 25 Things to Watch Out for When Taking Pictures 26 Setting up the recording function using the camera buttons 26 POWER button 26 SHUTTER button 26 ZOOM W / T button 28 Function Description / Info / Up button 28 Macro / Down button 30 Focus lock 30 Flash... back a recorded voice 49 Playing back a voice memo 50 LCD monitor Indicator in play back mode 50 Setting up the play back function using the camera buttons 50 Thumbnail / Enlargement button 52 Info / Up button 52 Play & Pause / Down button 53 Left / Right / Menu / OK button

User Manual
Page 8
System chart Please check that you have the correct contents before using this product. To buy the optional equipment, contact your nearest Samsung dealer or Samsung service centre. Included items Camera Rechargeable battery (SLB-10A) USB cable (SUC-C3) AC adapter (SAC-47) AV cable Camera strap Software CD Optional Items User manual, Product warranty SD/SDHC/MMC memory card (see p.15) Camera case 7 The contents can vary depending on the sales region.
System chart Please check that you have the correct contents before using this product. To buy the optional equipment, contact your nearest Samsung dealer or Samsung service centre. Included items Camera Rechargeable battery (SLB-10A) USB cable (SUC-C3) AC adapter (SAC-47) AV cable Camera strap Software CD Optional Items User manual, Product warranty SD/SDHC/MMC memory card (see p.15) Camera case 7 The contents can vary depending on the sales region.

User Manual
Page 10
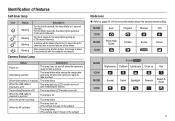
Identification of features Back LCD monitor Camera status lamp Zoom T button (Digital zoom) Zoom W button (Thumbnail) E (Effect) button Eyelet for camera strap Fn/Delete button 5-function button FD (Face Detection) button Play mode/Print button 9
Identification of features Back LCD monitor Camera status lamp Zoom T button (Digital zoom) Zoom W button (Thumbnail) E (Effect) button Eyelet for camera strap Fn/Delete button 5-function button FD (Face Detection) button Play mode/Print button 9
User Manual
Page 12
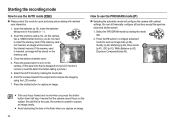
Camera Status Lamp Status Power on the subject) Mode icon „ Refer to a PC Transmitting Data with the subject's... the AF activates Description The lamp turns on and off when the camera is ready to take a picture The lamp blinks while saving the image data and turns off when the camera is ready to take a picture The lamp blinks The lamp lights ... blinks (LCD monitor turns off) The lamp is off The lamp blinks The lamp turns on (The camera focuses on the subject) The lamp blinks (The camera doesn't focus on After taking a picture When flash battery is charging When the USB cable is...
Camera Status Lamp Status Power on the subject) Mode icon „ Refer to a PC Transmitting Data with the subject's... the AF activates Description The lamp turns on and off when the camera is ready to take a picture The lamp blinks while saving the image data and turns off when the camera is ready to take a picture The lamp blinks The lamp lights ... blinks (LCD monitor turns off) The lamp is off The lamp blinks The lamp turns on (The camera focuses on the subject) The lamp blinks (The camera doesn't focus on After taking a picture When flash battery is charging When the USB cable is...
User Manual
Page 13
... 3.7V Approx. 180 MIN „ Number of images and battery life : Using the SLB-10A Still image Battery life Number of the camera, the camera body may become warm. Using the camera for 5 minutes and then Powering it off for long periods. x Please remove the battery if the...battery and you may vary depending on every second shot. x Low temperatures (below 0°C) can lose power over time and are measured under Samsung's standard conditions and shooting conditions and may experience reduced battery life. Approx. 120 MIN Using the fully charged battery 640x480 image size 30fps frame ...
... 3.7V Approx. 180 MIN „ Number of images and battery life : Using the SLB-10A Still image Battery life Number of the camera, the camera body may become warm. Using the camera for 5 minutes and then Powering it off for long periods. x Please remove the battery if the...battery and you may vary depending on every second shot. x Low temperatures (below 0°C) can lose power over time and are measured under Samsung's standard conditions and shooting conditions and may experience reduced battery life. Approx. 120 MIN Using the fully charged battery 640x480 image size 30fps frame ...
User Manual
Page 14
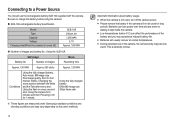
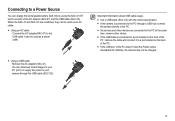
... located on the back of the PC doesn't meet the Power output standard(4.2V, 400mA), the camera may not be used as a power cable. x If the USB cable is connected to the PC... SAC-47 KIT which consists of the PC : remove the cable and connect it to the PC. x the camera and other device. Connecting to the USB cable. x Using an AC cable : Connect the AC adapter(SAC-47...) to a Power Source You can download stored images to your camera through a USB hub: connect the camera directly to a port located on the front of the AC adapter (SAC-47) and the USB ...
... located on the back of the PC doesn't meet the Power output standard(4.2V, 400mA), the camera may not be used as a power cable. x If the USB cable is connected to the PC... SAC-47 KIT which consists of the PC : remove the cable and connect it to the PC. x the camera and other device. Connecting to the USB cable. x Using an AC cable : Connect the AC adapter(SAC-47...) to a Power Source You can download stored images to your camera through a USB hub: connect the camera directly to a port located on the front of the AC adapter (SAC-47) and the USB ...

User Manual
Page 15
...battery charged for more than 10 minutes before using force. Connecting to a Power Source „ How to charge it, do not insert using the camera. - x If the charging LED of the AC Adapter Being Charged Charging is complete Charging error Being discharged Charging LED Red LED is on Green...is off because the rechargeable battery is on or blink after inserting the rechargeable battery, please check whether the battery is inserted correctly. Turn the camera off while charging the battery. „ Charging LED of the AC Charger does not turn on , the battery can't charge fully. Do not...
...battery charged for more than 10 minutes before using force. Connecting to a Power Source „ How to charge it, do not insert using the camera. - x If the charging LED of the AC Adapter Being Charged Charging is complete Charging error Being discharged Charging LED Red LED is on Green...is off because the rechargeable battery is on or blink after inserting the rechargeable battery, please check whether the battery is inserted correctly. Turn the camera off while charging the battery. „ Charging LED of the AC Charger does not turn on , the battery can't charge fully. Do not...
User Manual
Page 16
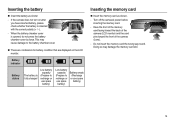
When the battery chamber cover is inserted with the correct polarity (+ / -). Turn off the camera's power before inserting the memory card. If the camera does not turn on the LCD monitor. Battery indicator Battery status The battery is fully charged Low battery capacity (Prepare to recharge or use spare ... card slot. 15 Inserting the battery „ Insert the battery as shown. - Have the front of the memory card facing toward the back of the camera (LCD monitor) and the card pins toward the front of the...
When the battery chamber cover is inserted with the correct polarity (+ / -). Turn off the camera's power before inserting the memory card. If the camera does not turn on the LCD monitor. Battery indicator Battery status The battery is fully charged Low battery capacity (Prepare to recharge or use spare ... card slot. 15 Inserting the battery „ Insert the battery as shown. - Have the front of the memory card facing toward the back of the camera (LCD monitor) and the card pins toward the front of the...

User Manual
Page 17
... use a memory card formatted by the Samsung warranty. x During and after periods of the memory card will eventually reduce the memory card's performance. If the power is switched off the camera power whenever the memory card is not covered by another digital camera. To optimise the amount of the following... with any heavy impact. x Don't remove the memory card when the camera status lamp is blinking as back-up e.g. floppy disks, hard disks, CD etc. near loud speakers or TV receivers. x Samsung cannot be the case, you will not operate. Instructions on how to ...
... use a memory card formatted by the Samsung warranty. x During and after periods of the memory card will eventually reduce the memory card's performance. If the power is switched off the camera power whenever the memory card is not covered by another digital camera. To optimise the amount of the following... with any heavy impact. x Don't remove the memory card when the camera status lamp is blinking as back-up e.g. floppy disks, hard disks, CD etc. near loud speakers or TV receivers. x Samsung cannot be the case, you will not operate. Instructions on how to ...

User Manual
Page 18
...MMC memory, the specified shooting capacity will be as subject matter and memory card type. Card pins Write protect switch Label [SD (Secure Digital) memory card] x The SD/ SDHC memory card has a write protect switch that prevents image files from being deleted or formatted. By ... About 157 About 186 About 269 About 822 - - About 2'02" About 7'39" - - - - - x Slide the switch to use the memory card „ The camera can use SD/ SDHC Memory Cards and MMC (Multi Media Cards). These figures are approximate as image capacities can be affected by the zoom...
...MMC memory, the specified shooting capacity will be as subject matter and memory card type. Card pins Write protect switch Label [SD (Secure Digital) memory card] x The SD/ SDHC memory card has a write protect switch that prevents image files from being deleted or formatted. By ... About 157 About 186 About 269 About 822 - - About 2'02" About 7'39" - - - - - x Slide the switch to use the memory card „ The camera can use SD/ SDHC Memory Cards and MMC (Multi Media Cards). These figures are approximate as image capacities can be affected by the zoom...
User Manual
Page 19
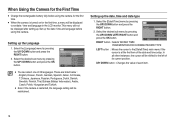
...Date&Time] menu by pressing the UP / DOWN button and press the OK button. When Using the Camera for the First Time x Charge the rechargeable battery fully before using the camera for the first time, a menu will not be displayed after setting up the date / ... S.Chinese, T.Chinese, Japanese, Russian, Portuguese, Dutch, Danish, Swedish, Finnish, Thai, Bahasa (Malay/ Indonesian), Arabic, Czech, Polish, Hungarian and Turkish. x When the camera is at the first item of its current position. DISPLAY Language Date&Time Back ENGLISH FRANÇAIS DEUTSCH ESPAÑOL ITALIANO Set...
...Date&Time] menu by pressing the UP / DOWN button and press the OK button. When Using the Camera for the First Time x Charge the rechargeable battery fully before using the camera for the first time, a menu will not be displayed after setting up the date / ... S.Chinese, T.Chinese, Japanese, Russian, Portuguese, Dutch, Danish, Swedish, Finnish, Thai, Bahasa (Malay/ Indonesian), Arabic, Czech, Polish, Hungarian and Turkish. x When the camera is at the first item of its current position. DISPLAY Language Date&Time Back ENGLISH FRANÇAIS DEUTSCH ESPAÑOL ITALIANO Set...

User Manual
Page 20
...7 Sharpness p.37 8 Color / Saturation / p.36/38 9 Auto Focus Frame p.44 10 Camera shake Warning p.25 11 Date / Time 2008/01/01 01:00 PM p.70 12 Exposure compensation p.43 13 White Balance...p.15 20 Memory card icon / Internal memory icon / - Off / p.45/46 23 Optical / Digital Zoom bar /Digital Zoom rate p.26 19 Description Icons Page 1 Recording mode p.20 2 Face Detection / Self Portrait / p.34 3 Flash p.30 ...
...7 Sharpness p.37 8 Color / Saturation / p.36/38 9 Auto Focus Frame p.44 10 Camera shake Warning p.25 11 Date / Time 2008/01/01 01:00 PM p.70 12 Exposure compensation p.43 13 White Balance...p.15 20 Memory card icon / Internal memory icon / - Off / p.45/46 23 Optical / Digital Zoom bar /Digital Zoom rate p.26 19 Description Icons Page 1 Recording mode p.20 2 Face Detection / Self Portrait / p.34 3 Flash p.30 ...
User Manual
Page 21
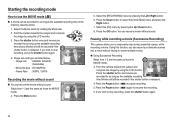
...-). 2. Insert the batteries taking a picture.) 5. Press the Fn button to turn on the camera. (If the date/ time that the camera cannot focus on the LCD monitor is inserted, an image will configure the camera with minimal user interaction. 1. Insert the batteries (p.15). Close the battery chamber cover. 4. ...the mode dial. 2. x If the auto focus frame turns to use the AUTO mode ( ) „ Please select this be the case, the camera is displayed on the subject. Starting the recording mode How to capture an image. Press the shutter button to use the PROGRAM mode ( ) „...
...-). 2. Insert the batteries taking a picture.) 5. Press the Fn button to turn on the camera. (If the date/ time that the camera cannot focus on the LCD monitor is inserted, an image will configure the camera with minimal user interaction. 1. Insert the batteries (p.15). Close the battery chamber cover. 4. ...the mode dial. 2. x If the auto focus frame turns to use the AUTO mode ( ) „ Please select this be the case, the camera is displayed on the subject. Starting the recording mode How to capture an image. Press the shutter button to use the PROGRAM mode ( ) „...

User Manual
Page 22
...image may take a little longer for the shutter speed and aperture value will display. As the DIS uses the camera's digital signal processor, it may be selected. 21 Avoid moving the camera while the [Capturing!] message is moving object with an 'active' effect. Select the MANUAL mode by rotating ... mode ( ) „ This mode will reduce the effect of camera shake and help you get a well-exposed image in dim conditions. 1. Point the camera towards the subject and compose the image by using the DIS mode - The digital zoom will not operate in the DIS mode. - For best results...
...image may take a little longer for the shutter speed and aperture value will display. As the DIS uses the camera's digital signal processor, it may be selected. 21 Avoid moving the camera while the [Capturing!] message is moving object with an 'active' effect. Select the MANUAL mode by rotating ... mode ( ) „ This mode will reduce the effect of camera shake and help you get a well-exposed image in dim conditions. 1. Point the camera towards the subject and compose the image by using the DIS mode - The digital zoom will not operate in the DIS mode. - For best results...

User Manual
Page 23
... that may occur. Available functions of the photo help guide x Features to use when the image is out of focus x Features to counter camera shake x Features to use in low light conditions x Features to use when adjusting brightness x Features to use when adjusting colours PHOTO HELP GUIDE Features... correct picture taking method and includes solutions for potential problems that can be used when focusing is out of focus Features to counter camera shake Features to use in low light conditions Features to use when adjusting brightness Features to use when adjusting colours Move Next Pressing ...
... that may occur. Available functions of the photo help guide x Features to use when the image is out of focus x Features to counter camera shake x Features to use in low light conditions x Features to use when adjusting brightness x Features to use when adjusting colours PHOTO HELP GUIDE Features... correct picture taking method and includes solutions for potential problems that can be used when focusing is out of focus Features to counter camera shake Features to use in low light conditions Features to use when adjusting brightness Features to use when adjusting colours Move Next Pressing ...

User Manual
Page 24
Point the camera towards the subject and compose the image by rotating the Mode dial. 2. Select the Scene mode by using the LCD monitor. 3. Starting the recording mode ...
Point the camera towards the subject and compose the image by rotating the Mode dial. 2. Select the Scene mode by using the LCD monitor. 3. Starting the recording mode ...
User Manual
Page 25
Point the camera towards the subject and compose the image by using the LCD monitor. 3. K Image size and type are recorded for as long as the available recording ... memory capacity allows. 1. Press the Down button to pause recording. 5. Pausing while recording a movie (Successive Recording) This camera allows you wish to stop recording, press the shutter button again. Point the camera towards the subject and compose the image by pressing the Up / Down button. 8. Starting the recording mode How to...
Point the camera towards the subject and compose the image by using the LCD monitor. 3. K Image size and type are recorded for as long as the available recording ... memory capacity allows. 1. Press the Down button to pause recording. 5. Pausing while recording a movie (Successive Recording) This camera allows you wish to stop recording, press the shutter button again. Point the camera towards the subject and compose the image by pressing the Up / Down button. 8. Starting the recording mode How to...


