
User Manual
Page 2
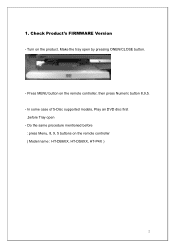
Press MENU button on the product. Check Product's FIRMWARE Version - In some case of 5-Disc supported models, Play an DVD disc first ,before : press Menu, 8, 9, 5 buttons on the remote controller ( Model name : HT-DB6XX, HT-DS6XX, HT-P4X ) 2 Turn on the remote controller, then press Numeric button 8,9,5. - Make the tray open - Do the same procedure mentioned before Tray open by pressing ONEN/CLOSE button. - 1.
Press MENU button on the product. Check Product's FIRMWARE Version - In some case of 5-Disc supported models, Play an DVD disc first ,before : press Menu, 8, 9, 5 buttons on the remote controller ( Model name : HT-DB6XX, HT-DS6XX, HT-P4X ) 2 Turn on the remote controller, then press Numeric button 8,9,5. - Make the tray open - Do the same procedure mentioned before Tray open by pressing ONEN/CLOSE button. - 1.
User Manual
Page 4
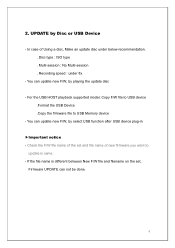
... name of the set , Firmware UPDATE can not be done. 4 If the file name is same - For the USB HOST playback supported model, Copy F/W file to USB device .Format the USB Device .Copy the firmware file to update is different between New F/W file and filename on the set and file name of Using a disc, Make an update disc under 8x - Multi-session : No Multi-session . UPDATE by playing the update disc - In case...
... name of the set , Firmware UPDATE can not be done. 4 If the file name is same - For the USB HOST playback supported model, Copy F/W file to USB device .Format the USB Device .Copy the firmware file to update is different between New F/W file and filename on the set and file name of Using a disc, Make an update disc under 8x - Multi-session : No Multi-session . UPDATE by playing the update disc - In case...

Quick Guide (easy Manual) (ver.1.0) (English)
Page 2
.... Use of controls, adjustments or performance of time. Install your player or disc has been stored in particular, specifies that are not covered. Do not expose the unit to important operating and maintenance instructions accompanying the unit. If transporting the player during the winter, wait approximately 2 hours until the unit has reached room temperature before using. NO USER SERVICEABLE PARTS INSIDE. Your player is...
.... Use of controls, adjustments or performance of time. Install your player or disc has been stored in particular, specifies that are not covered. Do not expose the unit to important operating and maintenance instructions accompanying the unit. If transporting the player during the winter, wait approximately 2 hours until the unit has reached room temperature before using. NO USER SERVICEABLE PARTS INSIDE. Your player is...

Quick Guide (easy Manual) (ver.1.0) (English)
Page 3
... polarized plug. POWER SOURCES This video product should be blocked or covered. When the video product exhibits a distinct change in wire to an antenna discharge unit, size of grounding conductors, location of supply to the operating instructions. Use a damp cloth for service. If you to dangerous voltage or other similar surface. b. this video product receiver during a lightning storm, or when it from the wall outlet...
... polarized plug. POWER SOURCES This video product should be blocked or covered. When the video product exhibits a distinct change in wire to an antenna discharge unit, size of grounding conductors, location of supply to the operating instructions. Use a damp cloth for service. If you to dangerous voltage or other similar surface. b. this video product receiver during a lightning storm, or when it from the wall outlet...
Quick Guide (easy Manual) (ver.1.0) (English)
Page 4
... VIEW Function 34 Bonus Group / Navigating Pages 35 Selecting Audio/Subtitle Language 36 Moving Directly to a Scene/Song 37 Using Disc Menu 38 Using the Title Menu 38 SETUP Setting the Language 39 Setting TV Screen type 41 Setting Parental Controls (Rating Level 43 Setting the Password 44 Setting the Wallpaper 45 DVD Playback Mode 47 Setting the Speaker Mode 48 Setting the Delay Time 49 Setting the Test Tone 51 Setting the DRC (Dynamic Range Compression 52 Setting the Audio 53 AV SYNC Setup...
... VIEW Function 34 Bonus Group / Navigating Pages 35 Selecting Audio/Subtitle Language 36 Moving Directly to a Scene/Song 37 Using Disc Menu 38 Using the Title Menu 38 SETUP Setting the Language 39 Setting TV Screen type 41 Setting Parental Controls (Rating Level 43 Setting the Password 44 Setting the Wallpaper 45 DVD Playback Mode 47 Setting the Speaker Mode 48 Setting the Delay Time 49 Setting the Test Tone 51 Setting the DRC (Dynamic Range Compression 52 Setting the Audio 53 AV SYNC Setup...
Quick Guide (easy Manual) (ver.1.0) (English)
Page 5
The Region Number for home and other rights owners. Copy Protection • Many DVD discs are played, a "WRONG REGION CODE" message appears on the TV screen. CD-R Discs • Some CD-R discs may not play on this player. Do not use the following types of disc! • LD, CD-G, CD-I, CD-ROM and DVD-ROM discs cannot be played on this , you should only connect your DVD player directly to your TV, not to begin...
The Region Number for home and other rights owners. Copy Protection • Many DVD discs are played, a "WRONG REGION CODE" message appears on the TV screen. CD-R Discs • Some CD-R discs may not play on this player. Do not use the following types of disc! • LD, CD-G, CD-I, CD-ROM and DVD-ROM discs cannot be played on this , you should only connect your DVD player directly to your TV, not to begin...

Quick Guide (easy Manual) (ver.1.0) (English)
Page 6
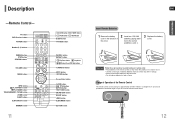
... TV's video input jacks (VIDEO IN) to connect external equipment capable of digital output. Headphone Jack External Audio Input Connectors PREPARATION Accessories Remote Control (AH59-01643H) Video Cable (AH39-40001V) FM Antenna (AH42-00017A) User's Manual (AH68-01852X) 10 Eject button Disc Insert Hole Display Power ( ) button Function button Volume control button button Play/Pause ( ) button Stop ( ) button Tuning up & Skip ( ) button Tuning down & Skip ( ) button -Rear Panel- 5.1 Channel Speaker Output Terminals Cooling Fan Cooling Fan 9 -Side Panel- Component Video...
... TV's video input jacks (VIDEO IN) to connect external equipment capable of digital output. Headphone Jack External Audio Input Connectors PREPARATION Accessories Remote Control (AH59-01643H) Video Cable (AH39-40001V) FM Antenna (AH42-00017A) User's Manual (AH68-01852X) 10 Eject button Disc Insert Hole Display Power ( ) button Function button Volume control button button Play/Pause ( ) button Stop ( ) button Tuning up & Skip ( ) button Tuning down & Skip ( ) button -Rear Panel- 5.1 Channel Speaker Output Terminals Cooling Fan Cooling Fan 9 -Side Panel- Component Video...
Quick Guide (easy Manual) (ver.1.0) (English)
Page 7
... button DVD Receiver button POWER button Number(0~9) buttons REMAIN button STEP button SEARCH buttons VOLUME button MENU button INFO button PL II EFFECT button PL II MODE button TUNER MEMORY, P.SCAN button ZOOM button SLEEP button SLOW, MO/ST button DIMMER button 11 ENG PREPARATION DVD button AUX button EJECT button TV/VIDEO button TUNER button D.IN button CANCEL button REPEAT button Play/Pause button Stop button Tuning Preset/CD Skip button TUNING/CH button MUTE button RETURN button Cursor/Enter button AUDIO button SUB TITLE button DSP/EQ button TEST TONE button SOUND EDIT button...
... button DVD Receiver button POWER button Number(0~9) buttons REMAIN button STEP button SEARCH buttons VOLUME button MENU button INFO button PL II EFFECT button PL II MODE button TUNER MEMORY, P.SCAN button ZOOM button SLEEP button SLOW, MO/ST button DIMMER button 11 ENG PREPARATION DVD button AUX button EJECT button TV/VIDEO button TUNER button D.IN button CANCEL button REPEAT button Play/Pause button Stop button Tuning Preset/CD Skip button TUNING/CH button MUTE button RETURN button Cursor/Enter button AUDIO button SUB TITLE button DSP/EQ button TEST TONE button SOUND EDIT button...

Quick Guide (easy Manual) (ver.1.0) (English)
Page 8
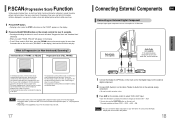
... the Home Theater. • Make sure the colors of the speaker terminals match the colors of the connecting plugs. If this occurs, place the speaker away from your TV set . 14 Black Red or Caution • Do not let children play with or near your TV set , screen color may be distorted because of the magnetic field generated by the speaker. Rear Speaker (R) Subwoofer Rear Speaker (L) Connecting the Speakers 1 Press...
... the Home Theater. • Make sure the colors of the speaker terminals match the colors of the connecting plugs. If this occurs, place the speaker away from your TV set . 14 Black Red or Caution • Do not let children play with or near your TV set , screen color may be distorted because of the magnetic field generated by the speaker. Rear Speaker (R) Subwoofer Rear Speaker (L) Connecting the Speakers 1 Press...
Quick Guide (easy Manual) (ver.1.0) (English)
Page 9
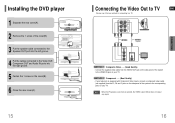
... jack on your television is selected, the VIDEO output (Yellow) does not output any signal. 15 16 If your TV. METHOD 2 Component ....... (Best Quality) - Note • When the Progressive scan mode is equipped with Component Video inputs, connect a component video cable (not supplied) from the VIDEO OUT jack on the side panel of the cover(B). 3 Put the speaker cable connected to the Speaker OUT port into the left groove. 4 Put the cables connected to a TV. cover(A) 2 Remove...
... jack on your television is selected, the VIDEO output (Yellow) does not output any signal. 15 16 If your TV. METHOD 2 Component ....... (Best Quality) - Note • When the Progressive scan mode is equipped with Component Video inputs, connect a component video cable (not supplied) from the VIDEO OUT jack on the side panel of the cover(B). 3 Put the speaker cable connected to the Speaker OUT port into the left groove. 4 Put the cables connected to a TV. cover(A) 2 Remove...
Quick Guide (easy Manual) (ver.1.0) (English)
Page 10
..., and connect the Audio Output jacks on the VCR to this function may not work. 17 1 Connect the Digital In (OPTICAL) on the main unit to the Digital Output on the external digital component. 2 Connect AUX (Audio) In on the Home Theater to Audio Out on the external analog component. • Be sure to match connector colors. 3 Press AUX on the remote control to select 'D.IN / AUX' input. • Each time the button is pressed, the selection changes as opposed...
..., and connect the Audio Output jacks on the VCR to this function may not work. 17 1 Connect the Digital In (OPTICAL) on the main unit to the Digital Output on the external digital component. 2 Connect AUX (Audio) In on the Home Theater to Audio Out on the external analog component. • Be sure to match connector colors. 3 Press AUX on the remote control to select 'D.IN / AUX' input. • Each time the button is pressed, the selection changes as opposed...
Quick Guide (easy Manual) (ver.1.0) (English)
Page 11
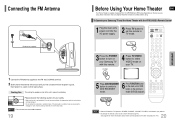
... does not receive AM broadcasts. 19 Before Using Your Home Theater ENG Your Home Theater is capable of playing DVD, CD, MP3/WMA and JPEG discs.Depending on the disc you are covered with other rigid surface. Note • Buttons Enabled for TV Operation: POWER, CHANNEL, VOLUME, TV/VIDEO, and Numeric (0-9) buttons. • By default, the remote control is set the remote to TV mode. Connecting the FM Antenna FM Antenna (supplied) 1 Connect the FM antenna supplied to...
... does not receive AM broadcasts. 19 Before Using Your Home Theater ENG Your Home Theater is capable of playing DVD, CD, MP3/WMA and JPEG discs.Depending on the disc you are covered with other rigid surface. Note • Buttons Enabled for TV Operation: POWER, CHANNEL, VOLUME, TV/VIDEO, and Numeric (0-9) buttons. • By default, the remote control is set the remote to TV mode. Connecting the FM Antenna FM Antenna (supplied) 1 Connect the FM antenna supplied to...

Quick Guide (easy Manual) (ver.1.0) (English)
Page 20
... 3 Press Cursor , buttons to move to 'DISC MENU' and then press ENTER button. • When you cannot use the menus for the audio language, subtitle language, profile, etc. Using Disc Menu DVD You can view the title of this feature may vary. 1 In Stop mode, press MENU button. 2 Press Cursor , button to move to exit the setup screen. Press Cursor , 2 buttons to move to Chapter ( ) display. 01/05 001...
... 3 Press Cursor , buttons to move to 'DISC MENU' and then press ENTER button. • When you cannot use the menus for the audio language, subtitle language, profile, etc. Using Disc Menu DVD You can view the title of this feature may vary. 1 In Stop mode, press MENU button. 2 Press Cursor , button to move to exit the setup screen. Press Cursor , 2 buttons to move to Chapter ( ) display. 01/05 001...

Quick Guide (easy Manual) (ver.1.0) (English)
Page 22
.... Press MENU button to the previous level. When playing DVDs recorded in the pan & scan mode on a conventional TV. • You can select the TV's aspect ratio. 1 In Stop mode, press MENU button. 2 Press Cursor button to move to 'TV DISPLAY' and then press ENTER button. SETUP 41 Press RETURN button to return to exit the setup screen. 42 WIDE : Select this to view a 16:9 picture in the full-screen mode on...
.... Press MENU button to the previous level. When playing DVDs recorded in the pan & scan mode on a conventional TV. • You can select the TV's aspect ratio. 1 In Stop mode, press MENU button. 2 Press Cursor button to move to 'TV DISPLAY' and then press ENTER button. SETUP 41 Press RETURN button to return to exit the setup screen. 42 WIDE : Select this to view a 16:9 picture in the full-screen mode on...
Quick Guide (easy Manual) (ver.1.0) (English)
Page 23
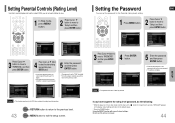
... playback of adult or violent DVDs you will be taken to 'Setup' and then press ENTER button. INPUT NUMBER RETURN EXIT If you have selected Level 6, you have forgotten the rating level password, do not want children to view. 1 In Stop mode, press MENU button. 2 Press Cursor button to move to the previous screen. Setting Parental Controls (Rating Level) Use this unless necessary. Using the RESET function will return to violent or...
... playback of adult or violent DVDs you will be taken to 'Setup' and then press ENTER button. INPUT NUMBER RETURN EXIT If you have selected Level 6, you have forgotten the rating level password, do not want children to view. 1 In Stop mode, press MENU button. 2 Press Cursor button to move to the previous screen. Setting Parental Controls (Rating Level) Use this unless necessary. Using the RESET function will return to violent or...

Quick Guide (easy Manual) (ver.1.0) (English)
Page 25
... DVD-Audio discs contain DVD-Video as well as factory default setting. • Powering off the main unit will automatically be adjusted according to register this when using the speakers. NONE : Select this when no speakers are used or not. 1 In Stop mode, press MENU button. 2 Press Cursor button to move to 'DVD TYPE' and then press ENTER button. Setting the Speaker Mode ENG Signal outputs and frequency responses from the speakers will automatically switch to the DVD Audio mode. To play the default DVD audio...
... DVD-Audio discs contain DVD-Video as well as factory default setting. • Powering off the main unit will automatically be adjusted according to register this when using the speakers. NONE : Select this when no speakers are used or not. 1 In Stop mode, press MENU button. 2 Press Cursor button to move to 'DVD TYPE' and then press ENTER button. Setting the Speaker Mode ENG Signal outputs and frequency responses from the speakers will automatically switch to the DVD Audio mode. To play the default DVD audio...

Quick Guide (easy Manual) (ver.1.0) (English)
Page 29
.... Set it is only available in STEREO mode. MOVE ENTER EXIT MOVE ENTER EXIT 3 Press Cursor , buttons to move to a digital TV. Press MENU button to the optimal status. Sound Field (DSP)/EQ Function DSP(Digital Signal Processor) DSP modes have been designed to show STEREO on the display. • This feature works with CDs, MP3-CDs, 2 channel DVD-Audio, DivX and Dolby Digital discs. • When playing a DVD disc encoded with a throbbing bass beat...
.... Set it is only available in STEREO mode. MOVE ENTER EXIT MOVE ENTER EXIT 3 Press Cursor , buttons to move to a digital TV. Press MENU button to the optimal status. Sound Field (DSP)/EQ Function DSP(Digital Signal Processor) DSP modes have been designed to show STEREO on the display. • This feature works with CDs, MP3-CDs, 2 channel DVD-Audio, DivX and Dolby Digital discs. • When playing a DVD disc encoded with a throbbing bass beat...

Quick Guide (easy Manual) (ver.1.0) (English)
Page 30
... button is pressed, the mode changes as if using five speakers, while using just the front left and right speakers and the subwoofer only. SETUP Note • When playing a DVD disc encoded with side wall imaging. 3 Press PL II EFFECT button to select C-Width, then press Cursor , buttons to select the desired effect setting. • You can experience sound effects as if you connect to only one of the center image. STEREO: Select...
... button is pressed, the mode changes as if using five speakers, while using just the front left and right speakers and the subwoofer only. SETUP Note • When playing a DVD disc encoded with side wall imaging. 3 Press PL II EFFECT button to select C-Width, then press Cursor , buttons to select the desired effect setting. • You can experience sound effects as if you connect to only one of the center image. STEREO: Select...
Quick Guide (easy Manual) (ver.1.0) (English)
Page 34
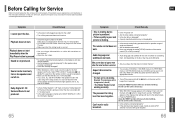
...; Are you selected the mode(TV/DVD) functions of main unit, hold the button on the display and all settings will not work . • Audio language and subtitles will return to the default values. • Press the POWER button. Dolby Digital 5.1 CH Surround Sound is output to the front speakers (L/R) only. The password for longer than 5 seconds. Can't receive radio broadcast. • While "NO DISC" message appears on ? • Are the video cables connected properly...
...; Are you selected the mode(TV/DVD) functions of main unit, hold the button on the display and all settings will not work . • Audio language and subtitles will return to the default values. • Press the POWER button. Dolby Digital 5.1 CH Surround Sound is output to the front speakers (L/R) only. The password for longer than 5 seconds. Can't receive radio broadcast. • While "NO DISC" message appears on ? • Are the video cables connected properly...
Quick Guide (easy Manual) (ver.1.0) (English)
Page 36
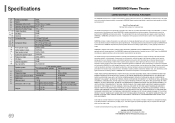
...(3Ω) 20Hz~20KHz 70dB 60dB (AUX)400mV Speaker system 5.1ch speaker system Front/Center/Rear speaker Subwoofer speaker Impedance Frequency range Output sound pressure level Rated input Maximum input Dimensions (W x H x D) Weights 3Ω 150Hz~20kHz 82dB/W/M 50W 100W Front 3.9 x 19.0 x 3.0 inches Center 17.4 x 3.9 x 3.0 inches Front 1.5 Ibs Center 0.5 Ibs 3Ω 40Hz~200Hz 85dB/W/M 50W 100W Rear 3.9 x 8.1 x 3.1 inches Subwoofer 7.1 x 14.3 x 14.9 inches Rear 0.5 Ibs Subwoofer 3.2 Ibs 69 SAMSUNG Home Theater LIMITED WARRANTY TO ORIGINAL PURCHASER This...
...(3Ω) 20Hz~20KHz 70dB 60dB (AUX)400mV Speaker system 5.1ch speaker system Front/Center/Rear speaker Subwoofer speaker Impedance Frequency range Output sound pressure level Rated input Maximum input Dimensions (W x H x D) Weights 3Ω 150Hz~20kHz 82dB/W/M 50W 100W Front 3.9 x 19.0 x 3.0 inches Center 17.4 x 3.9 x 3.0 inches Front 1.5 Ibs Center 0.5 Ibs 3Ω 40Hz~200Hz 85dB/W/M 50W 100W Rear 3.9 x 8.1 x 3.1 inches Subwoofer 7.1 x 14.3 x 14.9 inches Rear 0.5 Ibs Subwoofer 3.2 Ibs 69 SAMSUNG Home Theater LIMITED WARRANTY TO ORIGINAL PURCHASER This...


