User Manual
Page 2
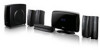
Do the same procedure mentioned before Tray open by pressing ONEN/CLOSE button. - Press MENU button on the product. In some case of 5-Disc supported models, Play an DVD disc first ,before : press Menu, 8, 9, 5 buttons on the remote controller ( Model name : HT-DB6XX, HT-DS6XX, HT-P4X ) 2 1. Turn on the remote controller, then press Numeric button 8,9,5. - Make the tray open - Check Product's FIRMWARE Version -
Do the same procedure mentioned before Tray open by pressing ONEN/CLOSE button. - Press MENU button on the product. In some case of 5-Disc supported models, Play an DVD disc first ,before : press Menu, 8, 9, 5 buttons on the remote controller ( Model name : HT-DB6XX, HT-DS6XX, HT-P4X ) 2 1. Turn on the remote controller, then press Numeric button 8,9,5. - Make the tray open - Check Product's FIRMWARE Version -
User Manual
Page 4
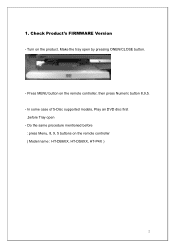
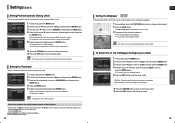
... Multi-session . For the USB HOST playback supported model, Copy F/W file to USB device .Format the USB Device .Copy the firmware file to update is different between New F/W file and filename on the set and file name of new firmware you want to USB Memory device - UPDATE by select USB function after USB device plug-in ▶Important notice - Disc type : ISO type . Check the F/W file name of Using a disc, Make an update disc...
... Multi-session . For the USB HOST playback supported model, Copy F/W file to USB device .Format the USB Device .Copy the firmware file to update is different between New F/W file and filename on the set and file name of new firmware you want to USB Memory device - UPDATE by select USB function after USB device plug-in ▶Important notice - Disc type : ISO type . Check the F/W file name of Using a disc, Make an update disc...

User Manual (user Manual) (ver.1.0) (English)
Page 2
... as the power-supply cord or plug is empty. CLASS 1 LASER PRODUCT This Compact Disc player is used as a CLASS 1 LASER product. CAUTION Apparatus shall not be placed on amplifiers or other . Keep these operating instructions carefully before using the unit. The wide blade or the third prong are provided for a long period of procedures other heat sources. Servicing is required when...
... as the power-supply cord or plug is empty. CLASS 1 LASER PRODUCT This Compact Disc player is used as a CLASS 1 LASER product. CAUTION Apparatus shall not be placed on amplifiers or other . Keep these operating instructions carefully before using the unit. The wide blade or the third prong are provided for a long period of procedures other heat sources. Servicing is required when...

User Manual (user Manual) (ver.1.0) (English)
Page 3
... full-frequency 5.1 channel sound. HDMI HDMI transmits DVD video and audio signals simultaneously, and provides a clearer picture. AV SYNC Function Video may lag behind the audio if the unit is an audio compression format developed by connecting the Home Theater to operate the main unit using a Samsung TV remote control, by Digital Theater Systems Inc. Anynet+(HDMI-CEC) Function Anynet+ is a function that can connect and play files from External Components 20 Connecting the FM Antenna 22 OPERATION Before Reading the User's Manual 23 Before Using Your Home Theater 24 Disc...
... full-frequency 5.1 channel sound. HDMI HDMI transmits DVD video and audio signals simultaneously, and provides a clearer picture. AV SYNC Function Video may lag behind the audio if the unit is an audio compression format developed by connecting the Home Theater to operate the main unit using a Samsung TV remote control, by Digital Theater Systems Inc. Anynet+(HDMI-CEC) Function Anynet+ is a function that can connect and play files from External Components 20 Connecting the FM Antenna 22 OPERATION Before Reading the User's Manual 23 Before Using Your Home Theater 24 Disc...

User Manual (user Manual) (ver.1.0) (English)
Page 5
... Eject button 5. External Digital Optical Input Jack Use this unit. 4. FM 75Ω COAXIAL Jack 9. Headphone Jack 2 2. Volume Control button Rear Panel 1 23 4 5 12 11 10 9 8 7 6 1. 5.1 Channel Speaker Output Connectors 2. USB Port Accessories Remote Control (AH59-01778P) Video Cable (AH39-40001V) FM Antenna (AH42-00017A) User's Manual (AH68-01943R) 9 Stop ( ) button 8. Component Video Output Jacks Connect a TV with Component video inputs to connect external equipment capable of digital output. 5. Stand 10. Stand Fix Hole 12. Function button 6. HDMI...
... Eject button 5. External Digital Optical Input Jack Use this unit. 4. FM 75Ω COAXIAL Jack 9. Headphone Jack 2 2. Volume Control button Rear Panel 1 23 4 5 12 11 10 9 8 7 6 1. 5.1 Channel Speaker Output Connectors 2. USB Port Accessories Remote Control (AH59-01778P) Video Cable (AH39-40001V) FM Antenna (AH42-00017A) User's Manual (AH68-01943R) 9 Stop ( ) button 8. Component Video Output Jacks Connect a TV with Component video inputs to connect external equipment capable of digital output. 5. Stand 10. Stand Fix Hole 12. Function button 6. HDMI...

User Manual (user Manual) (ver.1.0) (English)
Page 7
... about 2.5 to the back of the Home Theater. ■ Make sure the colors of the speaker terminals match the colors of the connecting plugs. • Do not let children play with the front face of the center speaker or place them about 45°) toward you like. 12 HT-X250 Front Speaker (R) Center Speaker ENG Front Speaker (L) SUB Subwoofer CONNECTIONS Rear Speaker (R) Rear Speaker (L) Connecting the Speakers 1 2 Black Red 1 Press down the terminal tab on...
... about 2.5 to the back of the Home Theater. ■ Make sure the colors of the speaker terminals match the colors of the connecting plugs. • Do not let children play with the front face of the center speaker or place them about 45°) toward you like. 12 HT-X250 Front Speaker (R) Center Speaker ENG Front Speaker (L) SUB Subwoofer CONNECTIONS Rear Speaker (R) Rear Speaker (L) Connecting the Speakers 1 2 Black Red 1 Press down the terminal tab on...

User Manual (user Manual) (ver.1.0) (English)
Page 8
... Wireless Receiving Amplifier To connect the rear speakers wirelessly, you have Purchased the Wireless Receiving Module (SWA-3000) Front Speaker (R) Front Speaker (L) Center Speaker Subwoofer Rear Speaker (L) Rear Speaker (R) WIRELESS RECEIVER MODULE TX card Slanted side face down or in Power Standby mode. 1 With the main unit turned off . When you use a ball point pen or a toothpick to press the RESET button on the back of the unit. ■ The STANDBY LED on the front panel of the wireless receiver module blinks...
... Wireless Receiving Amplifier To connect the rear speakers wirelessly, you have Purchased the Wireless Receiving Module (SWA-3000) Front Speaker (R) Front Speaker (L) Center Speaker Subwoofer Rear Speaker (L) Rear Speaker (R) WIRELESS RECEIVER MODULE TX card Slanted side face down or in Power Standby mode. 1 With the main unit turned off . When you use a ball point pen or a toothpick to press the RESET button on the back of the unit. ■ The STANDBY LED on the front panel of the wireless receiver module blinks...

User Manual (user Manual) (ver.1.0) (English)
Page 9
... DVD Player. Arranging the Cables Use the cable tie to fix it from the AC outlet before installing the main unit. ■ Connect the cables before installation. 1 23 4 ENG CONNECTIONS 1 Turn the stand counter-clockwise and pull it apart. ■ The DVD Player and stand are separated. 2 Lift the right side of the stand so that the DVD Player Lays Flat. Preparation : ■ Disconnect the AC power cord...
... DVD Player. Arranging the Cables Use the cable tie to fix it from the AC outlet before installing the main unit. ■ Connect the cables before installation. 1 23 4 ENG CONNECTIONS 1 Turn the stand counter-clockwise and pull it apart. ■ The DVD Player and stand are separated. 2 Lift the right side of the stand so that the DVD Player Lays Flat. Preparation : ■ Disconnect the AC power cord...

User Manual (user Manual) (ver.1.0) (English)
Page 10
... Definition) button on how to select the TV's Video Input source. You will get sharper digital pictures when using the TV's remote control. METHOD 3 : Composite Video ....... (Good Quality) Connect the supplied Video cable from the Component Video Output (Pr, Pb and Y) Jacks on the back of the DVD Player to the Component Video Input Jacks on how to select the TV's Video Input source. • If you use HDMI (High Definition Multimedia Interface)? Using Anynet+(HDMI-CEC) Anynet+ is a function that support Anynet+. This...
... Definition) button on how to select the TV's Video Input source. You will get sharper digital pictures when using the TV's remote control. METHOD 3 : Composite Video ....... (Good Quality) Connect the supplied Video cable from the Component Video Output (Pr, Pb and Y) Jacks on the back of the DVD Player to the Component Video Input Jacks on how to select the TV's Video Input source. • If you use HDMI (High Definition Multimedia Interface)? Using Anynet+(HDMI-CEC) Anynet+ is a function that support Anynet+. This...

User Manual (user Manual) (ver.1.0) (English)
Page 11
... component. 2 Press the AUX button on the remote control to select input. ■ You can also use the FUNCTION button on the Home Theater to the Digital Output of the external analog component. ■ Be sure to match connector colors. 2 Press the AUX button on the remote control to select . ■ You can also use the FUNCTION button on the main unit. Optical Cable (not supplied) AUX1 : Connecting an External Analog Component Analog signal components such as a Cable Box/Satellite receiver (Set-Top Box). 1 Connect the Digital Input (OPTICAL...
... component. 2 Press the AUX button on the remote control to select input. ■ You can also use the FUNCTION button on the Home Theater to the Digital Output of the external analog component. ■ Be sure to match connector colors. 2 Press the AUX button on the remote control to select . ■ You can also use the FUNCTION button on the main unit. Optical Cable (not supplied) AUX1 : Connecting an External Analog Component Analog signal components such as a Cable Box/Satellite receiver (Set-Top Box). 1 Connect the Digital Input (OPTICAL...
User Manual (user Manual) (ver.1.0) (English)
Page 13
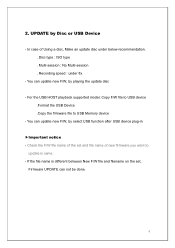
... function works only with this player because it violates the CSS (Content Scrambling System : a copy protection system) recommendations. 24 25 Before Using Your Home Theater To Operate your Samsung TV and the Home Theater with the HT-X250's Remote Control The DVD Home Theater's remote can be stored in this remote. 4 Press the TV/VIDEO button to select VIDEO mode on your Samsung TV with DVDs.) ■ If pressed twice, is displayed, and if the PLAY/PAUSE ( ) button is displayed and...
... function works only with this player because it violates the CSS (Content Scrambling System : a copy protection system) recommendations. 24 25 Before Using Your Home Theater To Operate your Samsung TV and the Home Theater with the HT-X250's Remote Control The DVD Home Theater's remote can be stored in this remote. 4 Press the TV/VIDEO button to select VIDEO mode on your Samsung TV with DVDs.) ■ If pressed twice, is displayed, and if the PLAY/PAUSE ( ) button is displayed and...
User Manual (user Manual) (ver.1.0) (English)
Page 19
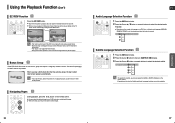
... not supported for details and the key number. EZ VIEW EZ VIEW OFF • This function will switch between On and Off. Bonus Group DVD-AUDIO Some DVD-Audio discs have a built-in Widescreen format, black bars at the top and bottom of languages on the remote control. ■ You can be able to select the desired subtitle. Using the Playback Function (Con't) EZ VIEW Function DVD Press the EZ VIEW button...
... not supported for details and the key number. EZ VIEW EZ VIEW OFF • This function will switch between On and Off. Bonus Group DVD-AUDIO Some DVD-Audio discs have a built-in Widescreen format, black bars at the top and bottom of languages on the remote control. ■ You can be able to select the desired subtitle. Using the Playback Function (Con't) EZ VIEW Function DVD Press the EZ VIEW button...

User Manual (user Manual) (ver.1.0) (English)
Page 20
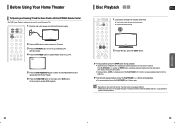
... audio language, subtitle language, profile, etc. Press the EXIT button to exit the setup screen. Press the EXIT button to exit the setup screen. • The Title menu display may vary. 1 In Stop mode, press the MENU button. 2 Press the Cursor , button to move to the selected title or time. Using the Disc Menu DVD You can view the title of this feature may be different depending on the disc. DVD menu...
... audio language, subtitle language, profile, etc. Press the EXIT button to exit the setup screen. Press the EXIT button to exit the setup screen. • The Title menu display may vary. 1 In Stop mode, press the MENU button. 2 Press the Cursor , button to move to the selected title or time. Using the Disc Menu DVD You can view the title of this feature may be different depending on the disc. DVD menu...
User Manual (user Manual) (ver.1.0) (English)
Page 21
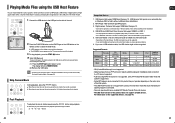
... show REMOVE USB. (2) Remove the USB cable. • To listen to your music files with 5.1 channel home theater sound, you must set the Dolby Pro Logic II mode to the USB HDD for proper operation. 5. button, the previous file is played. 3 To stop playback, press the STOP ( ) button. For information on the manufacturer. PHONES USB 2 Press the FUNCTION button on the DVD Player or the USB button on the remote control to this product does not support all USB...
... show REMOVE USB. (2) Remove the USB cable. • To listen to your music files with 5.1 channel home theater sound, you must set the Dolby Pro Logic II mode to the USB HDD for proper operation. 5. button, the previous file is played. 3 To stop playback, press the STOP ( ) button. For information on the manufacturer. PHONES USB 2 Press the FUNCTION button on the DVD Player or the USB button on the remote control to this product does not support all USB...
User Manual (user Manual) (ver.1.0) (English)
Page 23
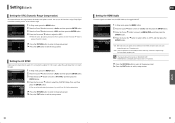
... new password. Using the RESET function will be displayed on . COPY LOGO DATA 1 During playback, press the PLAY/PAUSE button when an image you cannot view DVDs with Level 7 or higher. SETUP 45 To Select One of the 3 Wallpaper Settings you do the following • While the player is complete, you will erase all settings will turn off and then back on the TV screen. 3 The power will...
... new password. Using the RESET function will be displayed on . COPY LOGO DATA 1 During playback, press the PLAY/PAUSE button when an image you cannot view DVDs with Level 7 or higher. SETUP 45 To Select One of the 3 Wallpaper Settings you do the following • While the player is complete, you will erase all settings will turn off and then back on the TV screen. 3 The power will...

User Manual (user Manual) (ver.1.0) (English)
Page 24
..., go to exit the setup screen. MOVE CHANGE RETURN EXIT • SMALL : Select this when using the speakers. • NONE : Select this player with the DivX (R) video on PRO LOGIC and STEREO settings, the speaker mode may be different for SL and SR between 00 and 15mSEC. • The Center channel is only adjustable on a DVD audio disc. • DVD AUDIO : set to play back the DVD-Video portion of the Center and Surround Speakers. For C, SL, and...
..., go to exit the setup screen. MOVE CHANGE RETURN EXIT • SMALL : Select this when using the speakers. • NONE : Select this player with the DivX (R) video on PRO LOGIC and STEREO settings, the speaker mode may be different for SL and SR between 00 and 15mSEC. • The Center channel is only adjustable on a DVD audio disc. • DVD AUDIO : set to play back the DVD-Video portion of the Center and Surround Speakers. For C, SL, and...
User Manual (user Manual) (ver.1.0) (English)
Page 26
... SYNC Video may look slower than the audio if it to 2ch for TV speakers. Press the RETURN button to return to the previous level. CHANGE RETURN EXIT Press the RETURN button to return to the previous level. ENG Setting the HDMI Audio The audio signals transmitted over the HDMI connection cable only, and audio is output through the home theater speakers only. • The default setting of this function to adjust the DRC. You can use...
... SYNC Video may look slower than the audio if it to 2ch for TV speakers. Press the RETURN button to return to the previous level. CHANGE RETURN EXIT Press the RETURN button to return to the previous level. ENG Setting the HDMI Audio The audio signals transmitted over the HDMI connection cable only, and audio is output through the home theater speakers only. • The default setting of this function to adjust the DRC. You can use...

User Manual (user Manual) (ver.1.0) (English)
Page 27
..., 2 channel DVD-Audio, DivX and Dolby Digital discs. • When playing a DVD disc encoded with a throbbing bass beat. • HALL : Provides a clear vocal as follows. If you connect to only one of a dance club with two or more channels, multi-channel mode will be selected automatically and DSP/EQ function does not work. 52 PRO LOGIC II • MUSIC: When listening to music, you can experience sound effects as if using five speakers...
..., 2 channel DVD-Audio, DivX and Dolby Digital discs. • When playing a DVD disc encoded with a throbbing bass beat. • HALL : Provides a clear vocal as follows. If you connect to only one of a dance club with two or more channels, multi-channel mode will be selected automatically and DSP/EQ function does not work. 52 PRO LOGIC II • MUSIC: When listening to music, you can experience sound effects as if using five speakers...

User Manual (user Manual) (ver.1.0) (English)
Page 28
... or rear. • When playing a DVD disc encoded with side wall imaging. 3 Press the PL II EFFECT button to select (CENTER WIDTH), then press the Cursor , button to a lower or higher frequency. Automatic Tuning 1 : When the ed. button is pressed, a preset broadcast station is pressed, the sound switches between (STEREO) and (MONO). Automatic Tuning 1 : Press the STOP ( ) button to select and then press the button to select the FM band. 2 Select a broadcast station. MISCELLANEOUS...
... or rear. • When playing a DVD disc encoded with side wall imaging. 3 Press the PL II EFFECT button to select (CENTER WIDTH), then press the Cursor , button to a lower or higher frequency. Automatic Tuning 1 : When the ed. button is pressed, a preset broadcast station is pressed, the sound switches between (STEREO) and (MONO). Automatic Tuning 1 : Press the STOP ( ) button to select and then press the button to select the FM band. 2 Select a broadcast station. MISCELLANEOUS...
User Manual (user Manual) (ver.1.0) (English)
Page 31
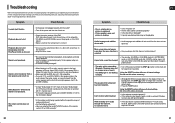
... settings. na in the information display? The password for longer than 5 seconds. Is the speaker setup cor- Audio language and subtitles do not work if the disc does not con- If the problem you using the D.IN, AUX functions, the DVD functions are turned on . • Check the region number of the setup screen, no sound is heard during fast playback, slow playback, and step motion playback. • Are the speakers connected...
... settings. na in the information display? The password for longer than 5 seconds. Is the speaker setup cor- Audio language and subtitles do not work if the disc does not con- If the problem you using the D.IN, AUX functions, the DVD functions are turned on . • Check the region number of the setup screen, no sound is heard during fast playback, slow playback, and step motion playback. • Are the speakers connected...


