
Quick Guide (easy Manual) (ver.1.0) (English)
Page 3
... range, low-level resolution and high-frequency detail. Power Saving Function The HT-TXQ120 will automatically switch to the Power Saving mode after 20 minutes in the Screen Saver mode. To compensate for 3 minutes, the Samsung logo appears on -board 24-bit/192kHz DAC enables this , you can...Connecting the Speakers 14 Connecting the Optional Wireless Receiving Amplifier ....17 Connecting the Video Out to your TV 19 Connecting the HDMI IN/OUT 20 HDMI Function 21 Connecting Audio from External Components 22 Connecting the FM Antenna 23 OPERATION Before Reading the User's Manual 24 Before...
... range, low-level resolution and high-frequency detail. Power Saving Function The HT-TXQ120 will automatically switch to the Power Saving mode after 20 minutes in the Screen Saver mode. To compensate for 3 minutes, the Samsung logo appears on -board 24-bit/192kHz DAC enables this , you can...Connecting the Speakers 14 Connecting the Optional Wireless Receiving Amplifier ....17 Connecting the Video Out to your TV 19 Connecting the HDMI IN/OUT 20 HDMI Function 21 Connecting Audio from External Components 22 Connecting the FM Antenna 23 OPERATION Before Reading the User's Manual 24 Before...

Quick Guide (easy Manual) (ver.1.0) (English)
Page 5
... equipment capable of digital output. 13 External Digital Optical Input Connector 1 Use this to connect external equipment capable of digital output. 14 HDMI OUT Jack 15 HDMI IN Jack 16 USB Port 17 Headphone Jack 8 Subwoofer ENG PREPARATION 1 Standby indicator 2 Power on indicator 3 Auto Sound Calibration Input ...01643Z) (AH39-40001V) Microphone (AH59-01183D) (Toroidal Ferrite Core) (3301-000144) Cable Holder (3EA) (AH61-02393A) FM Antenna (AH42-00017A) HDMI Cable (AH39-00923A) User's Manual (AH68-01959R) Screw (6EA) Stand base (AH64-01106Q) (AH97-01906A) STAND (AH97-01905A) 9
... equipment capable of digital output. 13 External Digital Optical Input Connector 1 Use this to connect external equipment capable of digital output. 14 HDMI OUT Jack 15 HDMI IN Jack 16 USB Port 17 Headphone Jack 8 Subwoofer ENG PREPARATION 1 Standby indicator 2 Power on indicator 3 Auto Sound Calibration Input ...01643Z) (AH39-40001V) Microphone (AH59-01183D) (Toroidal Ferrite Core) (3301-000144) Cable Holder (3EA) (AH61-02393A) FM Antenna (AH42-00017A) HDMI Cable (AH39-00923A) User's Manual (AH68-01959R) Screw (6EA) Stand base (AH64-01106Q) (AH97-01906A) STAND (AH97-01905A) 9

Quick Guide (easy Manual) (ver.1.0) (English)
Page 6
... AUX button TUNER button USB button 20. PLAY/PAUSE button STOP button Tuning Preset/CD Skip button 25. SOUND EDIT button 34. DIMMER button 35. HDMI AUDIO SELECT button 38. Batteries that look similar may differ in voltage. • Always replace both batteries at a horizontal angle of the arrow. 2 Insert two...
... AUX button TUNER button USB button 20. PLAY/PAUSE button STOP button Tuning Preset/CD Skip button 25. SOUND EDIT button 34. DIMMER button 35. HDMI AUDIO SELECT button 38. Batteries that look similar may differ in voltage. • Always replace both batteries at a horizontal angle of the arrow. 2 Insert two...
Quick Guide (easy Manual) (ver.1.0) (English)
Page 10
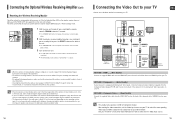
... is clear of any other device that the area around the wireless receiver module location is about 33 feet, but may be heard from the HDMI OUT jack on the back of the wireless receiver module blinks 2 Times. 3 Turn on your TV. CONNECTIONS TV METHOD2 METHOD 3 (supplied) METHOD 1 (... only operates in Power Standby mode. 1 With the main unit turned off, press and hold the remote control's REMAIN button for connecting to the HDMI IN jack on the main unit's display. s The STANDBY LED on the front panel of the wireless receiver module blinks. 2 With the wireless...
... is clear of any other device that the area around the wireless receiver module location is about 33 feet, but may be heard from the HDMI OUT jack on the back of the wireless receiver module blinks 2 Times. 3 Turn on your TV. CONNECTIONS TV METHOD2 METHOD 3 (supplied) METHOD 1 (... only operates in Power Standby mode. 1 With the main unit turned off, press and hold the remote control's REMAIN button for connecting to the HDMI IN jack on the main unit's display. s The STANDBY LED on the front panel of the wireless receiver module blinks. 2 With the wireless...
Quick Guide (easy Manual) (ver.1.0) (English)
Page 11
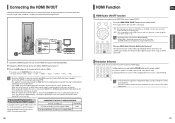
... Digital Content Protection System (HDCP). Video/Audio A TV with an DVI-D jack (TV that supports HDCP) Video A TV with an HDMI jack. Press the HDMI AUDIO SELECT button on the remote control to select . s You can also use the FUNCTION button on the display. • ON ...mode switches as follows : ➝ ➝ ➝ ➝ ➝ ➝ . • Audio from an external device is connected via the HDMI connection. Why use a player supporting CPPM. • The quality of the audio output through the home theater speakers only. • The default setting of this...
... Digital Content Protection System (HDCP). Video/Audio A TV with an DVI-D jack (TV that supports HDCP) Video A TV with an HDMI jack. Press the HDMI AUDIO SELECT button on the remote control to select . s You can also use the FUNCTION button on the display. • ON ...mode switches as follows : ➝ ➝ ➝ ➝ ➝ ➝ . • Audio from an external device is connected via the HDMI connection. Why use a player supporting CPPM. • The quality of the audio output through the home theater speakers only. • The default setting of this...
Quick Guide (easy Manual) (ver.1.0) (English)
Page 12
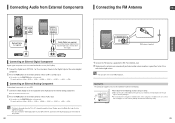
Connecting an External Analog Component Analog signal components such as follows : ➝ ➝ ➝ ➝ ➝ ➝ . • To listen to the audio from External Components Connecting the FM Antenna ENG CONNECTIONS Optical Cable (not supplied) Audio Cable (not supplied) If the external analog component has only one Audio Out, connect either left or right. s Make sure the unit is good, then fasten it . The mode switches as a Cable Box/Satellite receiver (Set-Top Box). 1 Connect the Digital Input (OPTICAL 1 or 2) on the Home Theater to the Digital ...
Connecting an External Analog Component Analog signal components such as follows : ➝ ➝ ➝ ➝ ➝ ➝ . • To listen to the audio from External Components Connecting the FM Antenna ENG CONNECTIONS Optical Cable (not supplied) Audio Cable (not supplied) If the external analog component has only one Audio Out, connect either left or right. s Make sure the unit is good, then fasten it . The mode switches as a Cable Box/Satellite receiver (Set-Top Box). 1 Connect the Digital Input (OPTICAL 1 or 2) on the Home Theater to the Digital ...

Quick Guide (easy Manual) (ver.1.0) (English)
Page 15
... • The maximum resolutions supported by this Home Theater. Each image is displayed for progressive image files. • If a JPEG file is played when the HDMI output resolution is 720p/1080i, the mode is displayed. Press the button to skip to select the album, and then press the ENTER button. ENG...
... • The maximum resolutions supported by this Home Theater. Each image is displayed for progressive image files. • If a JPEG file is played when the HDMI output resolution is 720p/1080i, the mode is displayed. Press the button to skip to select the album, and then press the ENTER button. ENG...


