
Quick Guide (easy Manual) (ver.1.0) (English)
Page 2
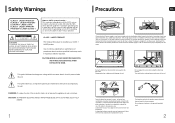
... to the environment. Switching off the Home Theater to lightning could lead to important operating and maintenance instructions accompanying the unit. Voltage peaks due to the stand-by mode does not disconnect the electrical supply. Phones Protect the player from the AC supply if the player malfunctions. Use of procedures other equipment which may become hot. DO NOT OPEN CAUTION: TO...
... to the environment. Switching off the Home Theater to lightning could lead to important operating and maintenance instructions accompanying the unit. Voltage peaks due to the stand-by mode does not disconnect the electrical supply. Phones Protect the player from the AC supply if the player malfunctions. Use of procedures other equipment which may become hot. DO NOT OPEN CAUTION: TO...
Quick Guide (easy Manual) (ver.1.0) (English)
Page 3
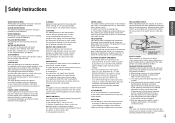
... required, be sure the service technician has used replacement parts specified by the video product manufacturer as the original part. LIGHTNING For added protection of the video product and to the operating instructions. Quick stops, excessive force, and uneven surfaces may fall into the video product. POWER SOURCES This video product should be operated only from the wall outlet and disconnect the antenna or cable system. If you are...
... required, be sure the service technician has used replacement parts specified by the video product manufacturer as the original part. LIGHTNING For added protection of the video product and to the operating instructions. Quick stops, excessive force, and uneven surfaces may fall into the video product. POWER SOURCES This video product should be operated only from the wall outlet and disconnect the antenna or cable system. If you are...
Quick Guide (easy Manual) (ver.1.0) (English)
Page 4
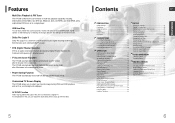
... wallpaper. To compensate for Service 67 Cautions on Handling and Storing Discs 69 Language Code List 70 USB Host Feature Supported Products 71 Specifications 72 5 6 Power Saving Function The HT-Q40 automatically shuts itself into the power saving mode after 20 minutes in an MP3 player, digital camera or USB memory by Digital Theater Systems Inc. USB Host Play You can adjust the audio delay time to the USB port of multi-channel audio signal decoding technology that improves...
... wallpaper. To compensate for Service 67 Cautions on Handling and Storing Discs 69 Language Code List 70 USB Host Feature Supported Products 71 Specifications 72 5 6 Power Saving Function The HT-Q40 automatically shuts itself into the power saving mode after 20 minutes in an MP3 player, digital camera or USB memory by Digital Theater Systems Inc. USB Host Play You can adjust the audio delay time to the USB port of multi-channel audio signal decoding technology that improves...
Quick Guide (easy Manual) (ver.1.0) (English)
Page 5
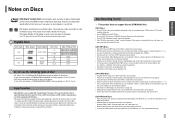
... played. • If the disc is protected by Macrovision Corporation and other limited viewing uses only unless otherwise authorized by DivX Networks, Inc., visit "www.divxnetworks.net". 8 PREPARATION CD-R JPEG Discs • Only files with identical region codes.) Playable Discs Disc Type Mark (Logo) Recorded Signals DVD AUDIO-CD DivX V I D E O COMPACT DIGITAL AUDIO Audio + Video Audio MPEG4 MP3 Disc Size 5" 3 1/2" 5" 3 1/2" 5" 3 1/2" Max. If there is a blank segment in a distorted picture from copy-protected DVD discs...
... played. • If the disc is protected by Macrovision Corporation and other limited viewing uses only unless otherwise authorized by DivX Networks, Inc., visit "www.divxnetworks.net". 8 PREPARATION CD-R JPEG Discs • Only files with identical region codes.) Playable Discs Disc Type Mark (Logo) Recorded Signals DVD AUDIO-CD DivX V I D E O COMPACT DIGITAL AUDIO Audio + Video Audio MPEG4 MP3 Disc Size 5" 3 1/2" 5" 3 1/2" 5" 3 1/2" Max. If there is a blank segment in a distorted picture from copy-protected DVD discs...
Quick Guide (easy Manual) (ver.1.0) (English)
Page 6
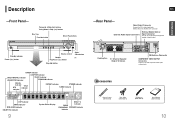
... Open/ Volume control Close button Headphone Jack USB port Play/Pause ( ) button Stop ( ) button GROUP indicator CHAPTER indicator DOLBY DIGITAL indicator LINEAR PCM indicator TRACK indicator PROGRAM indicator P.SCAN indicator TITLE DTS indicator indicator REPEAT indicator STEREO indicator TUNED indicator DSP indicator MPEG indicator DVD AUDIO indicator DOLBY PLll indicator 9 System Status Display DISC(1~5) indicator RADIO FREQUENCY SPEAKER indicator indicator Cooling Fan 5.1 Channel Speaker Output Terminals FM Antenna Connector COMPONENT VIDEO OUTPUT Connectors Connect...
... Open/ Volume control Close button Headphone Jack USB port Play/Pause ( ) button Stop ( ) button GROUP indicator CHAPTER indicator DOLBY DIGITAL indicator LINEAR PCM indicator TRACK indicator PROGRAM indicator P.SCAN indicator TITLE DTS indicator indicator REPEAT indicator STEREO indicator TUNED indicator DSP indicator MPEG indicator DVD AUDIO indicator DOLBY PLll indicator 9 System Status Display DISC(1~5) indicator RADIO FREQUENCY SPEAKER indicator indicator Cooling Fan 5.1 Channel Speaker Output Terminals FM Antenna Connector COMPONENT VIDEO OUTPUT Connectors Connect...
Quick Guide (easy Manual) (ver.1.0) (English)
Page 7
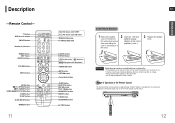
...buttons VOLUME button MENU button INFO button PL II EFFECT button PL II MODE button TUNER MEMORY, P.SCAN button ZOOM button SLEEP button SLOW, MO/ST button DIMMER button 11 ENG PREPARATION DVD button AUX button TUNER USB button OPEN/CLOSE button TV/VIDEO, DISC SKIP CANCEL button REPEAT button Play/Pause button Stop button Tuning Preset/CD Skip button TUNING/CH button MUTE button RETURN button Cursor/Enter button AUDIO button SUB TITLE button DSP/EQ button TEST TONE button SOUND EDIT button DIGEST button LOGO button SLIDE MODE button EZ VIEW button Insert Remote Batteries 1 Remove...
...buttons VOLUME button MENU button INFO button PL II EFFECT button PL II MODE button TUNER MEMORY, P.SCAN button ZOOM button SLEEP button SLOW, MO/ST button DIMMER button 11 ENG PREPARATION DVD button AUX button TUNER USB button OPEN/CLOSE button TV/VIDEO, DISC SKIP CANCEL button REPEAT button Play/Pause button Stop button Tuning Preset/CD Skip button TUNING/CH button MUTE button RETURN button Cursor/Enter button AUDIO button SUB TITLE button DSP/EQ button TEST TONE button SOUND EDIT button DIGEST button LOGO button SLIDE MODE button EZ VIEW button Insert Remote Batteries 1 Remove...
Quick Guide (easy Manual) (ver.1.0) (English)
Page 8
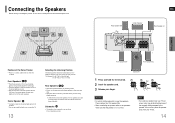
... 90cm (2 to 3feet) above your ear, facing slightly downward. * Unlike the front and center speakers, the rear speakers are used to 3 times the distance of the magnetic field generated by the speaker. C L SW R ENG Rear Speaker (R) Center Speaker Rear Speaker (L) CONNECTIONS SL SR Position of the subwoofer is correct. Subwoofer SW • The position of the Home Theater • Place it directly over or under the TV stand.
... 90cm (2 to 3feet) above your ear, facing slightly downward. * Unlike the front and center speakers, the rear speakers are used to 3 times the distance of the magnetic field generated by the speaker. C L SW R ENG Rear Speaker (R) Center Speaker Rear Speaker (L) CONNECTIONS SL SR Position of the subwoofer is correct. Subwoofer SW • The position of the Home Theater • Place it directly over or under the TV stand.

Quick Guide (easy Manual) (ver.1.0) (English)
Page 9
... button on the remote control for over 5 seconds. • Pressing and holding the button for over 5 seconds will select "Progressive Scan" and "Interlace Scan" alternately. • When you select P.SCAN, "P.SCAN" will appear on the display. • To set P.Scan mode for DivX discs, press the P.SCAN button on the remote control for dealing with Component Video inputs, connect a component video cable (not supplied) from the VIDEO OUT jack on the back panel...
... button on the remote control for over 5 seconds. • Pressing and holding the button for over 5 seconds will select "Progressive Scan" and "Interlace Scan" alternately. • When you select P.SCAN, "P.SCAN" will appear on the display. • To set P.Scan mode for DivX discs, press the P.SCAN button on the remote control for dealing with Component Video inputs, connect a component video cable (not supplied) from the VIDEO OUT jack on the back panel...
Quick Guide (easy Manual) (ver.1.0) (English)
Page 10
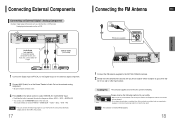
Optical Cable (not included) 1 Connect the Digital Input (OPTICAL) to the Digital Output on the external digital component. 2 Connect AUX (Audio) In on the Home Theater to Audio Out on the external analog component. • Be sure to match connector colors. 3 Press AUX on the remote control to select 'DIGITAL IN / AUX1/AUX2' input. • Each time the button is pressed, the selection changes as follows: DVD/CD ➝ DIGITAL IN ➝ AUX1➝ AUX2 ➝ USB ➝ FM Note •...
Optical Cable (not included) 1 Connect the Digital Input (OPTICAL) to the Digital Output on the external digital component. 2 Connect AUX (Audio) In on the Home Theater to Audio Out on the external analog component. • Be sure to match connector colors. 3 Press AUX on the remote control to select 'DIGITAL IN / AUX1/AUX2' input. • Each time the button is pressed, the selection changes as follows: DVD/CD ➝ DIGITAL IN ➝ AUX1➝ AUX2 ➝ USB ➝ FM Note •...
Quick Guide (easy Manual) (ver.1.0) (English)
Page 11
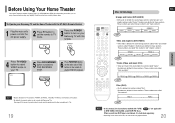
... vary slightly. To Operate your TV. Numbers are using . Before Using Your Home Theater Your Home Theater is indicated separately. • Depending on the content of playing DVD, CD, MP3/WMA and JPEG discs.Depending on the disc you are allotted to select VIDEO mode on your Samsung TV and the Home Theater with the HT-Q40's Remote Control 1 Plug the main unit's power cord into the AC power supply. 2 Press TV button to set to DVD-VIDEO, DVD-AUDIO, and DVD-R/RW discs.
... vary slightly. To Operate your TV. Numbers are using . Before Using Your Home Theater Your Home Theater is indicated separately. • Depending on the content of playing DVD, CD, MP3/WMA and JPEG discs.Depending on the disc you are allotted to select VIDEO mode on your Samsung TV and the Home Theater with the HT-Q40's Remote Control 1 Plug the main unit's power cord into the AC power supply. 2 Press TV button to set to DVD-VIDEO, DVD-AUDIO, and DVD-R/RW discs.
Quick Guide (easy Manual) (ver.1.0) (English)
Page 20
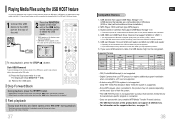
... the USB button on the remote control to select the USB mode. • "USB" appears on the display screen and then disappears. • USB MENU screen appears on the TV screen and the saved file is played. USB HDD and USB Flash Drive: Devices that transfers media files by connecting the storage device to the USB port of the home theater. 1 Connect the USB device to the USB port on the rear of this product,may not operate depending...
... the USB button on the remote control to select the USB mode. • "USB" appears on the display screen and then disappears. • USB MENU screen appears on the TV screen and the saved file is played. USB HDD and USB Flash Drive: Devices that transfers media files by connecting the storage device to the USB port of the home theater. 1 Connect the USB device to the USB port on the rear of this product,may not operate depending...
Quick Guide (easy Manual) (ver.1.0) (English)
Page 21
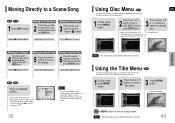
... the setup screen. Press Cursor , 2 buttons to move to time display. Note • Title menu display may be different depending on the screen. Using the Title Menu DVD For DVDs containing multiple titles, you select Disc Menu and it is not supported by the disc, the "This menu is not supported" message appears on the disc. MOVE ENTER EXIT MOVE ENTER EXIT Press MENU button to disc. 1 In Stop mode, press MENU button. Moving to a Specific...
... the setup screen. Press Cursor , 2 buttons to move to time display. Note • Title menu display may be different depending on the screen. Using the Title Menu DVD For DVDs containing multiple titles, you select Disc Menu and it is not supported by the disc, the "This menu is not supported" message appears on the disc. MOVE ENTER EXIT MOVE ENTER EXIT Press MENU button to disc. 1 In Stop mode, press MENU button. Moving to a Specific...
Quick Guide (easy Manual) (ver.1.0) (English)
Page 23
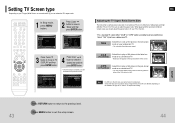
... MOVE SELECT RETURN EXIT ENG Adjusting the TV Aspect Ratio (Screen Size) The horizontal to personal preference. SETUP 43 Press RETURN button to return to exit the setup screen. 44 When playing DVDs recorded in different screen sizes, you have a widescreen TV. Setting TV Screen type Depending on your TV type (Wide Screen or conventional 4:3), you cannot view it in widescreen. • Since DVD discs are...
... MOVE SELECT RETURN EXIT ENG Adjusting the TV Aspect Ratio (Screen Size) The horizontal to personal preference. SETUP 43 Press RETURN button to return to exit the setup screen. 44 When playing DVDs recorded in different screen sizes, you have a widescreen TV. Setting TV Screen type Depending on your TV type (Wide Screen or conventional 4:3), you cannot view it in widescreen. • Since DVD discs are...
Quick Guide (easy Manual) (ver.1.0) (English)
Page 24
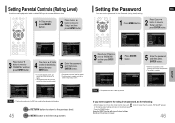
... password, and confirm new password. • The setting is set to "7890" by default. • Once the setup is in the no disc mode, hold the main unit's on the display and all stored settings. Using the RESET function will erase all settings will be taken to the previous screen. "INITIALIZE" appears 46 MOVE ENTER RETURN EXIT MOVE SELECT RETURN EXIT Note • This function works only if a DVD disc...
... password, and confirm new password. • The setting is set to "7890" by default. • Once the setup is in the no disc mode, hold the main unit's on the display and all stored settings. Using the RESET function will erase all settings will be taken to the previous screen. "INITIALIZE" appears 46 MOVE ENTER RETURN EXIT MOVE SELECT RETURN EXIT Note • This function works only if a DVD disc...
Quick Guide (easy Manual) (ver.1.0) (English)
Page 26
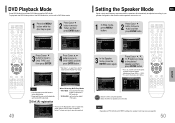
... connected. DivX (R) registration When Selecting DVD Play Mode: • DVD VIDEO : set to play the DVD video contents contained on a DVD audio disc. • DVD AUDIO : set to play back the DVD-Video portion of the DVD-Audio disc, set to register this player with the DivX (R) video on PRO LOGIC and STEREO settings, the speaker mode may vary (see page 59). 50 To play the default DVD audio. • Please use the Registration code to SMALL. To learn more, go to 'Audio' and then press ENTER button...
... connected. DivX (R) registration When Selecting DVD Play Mode: • DVD VIDEO : set to play the DVD video contents contained on a DVD audio disc. • DVD AUDIO : set to play back the DVD-Video portion of the DVD-Audio disc, set to register this player with the DivX (R) video on PRO LOGIC and STEREO settings, the speaker mode may vary (see page 59). 50 To play the default DVD audio. • Please use the Registration code to SMALL. To learn more, go to 'Audio' and then press ENTER button...
Quick Guide (easy Manual) (ver.1.0) (English)
Page 30
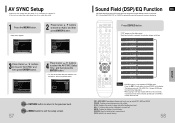
... function is connected to optimize the sound for normal listening. 58 Press MENU button to simulate different acoustic environments. POP, JAZZ, ROCK: Depending on the display. • This feature works with CDs, MP3-CDs, 2 channel DVD-Audio, DivX and Dolby Digital discs. • When playing a DVD disc encoded with a throbbing bass beat. PASS: Select this occurs, adjust the audio delay time to to match the video. 1 Press the MENU button. • Setup menu appears. 2 Press Cursor , buttons...
... function is connected to optimize the sound for normal listening. 58 Press MENU button to simulate different acoustic environments. POP, JAZZ, ROCK: Depending on the display. • This feature works with CDs, MP3-CDs, 2 channel DVD-Audio, DivX and Dolby Digital discs. • When playing a DVD disc encoded with a throbbing bass beat. PASS: Select this occurs, adjust the audio delay time to to match the video. 1 Press the MENU button. • Setup menu appears. 2 Press Cursor , buttons...
Quick Guide (easy Manual) (ver.1.0) (English)
Page 31
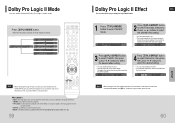
... select between 0 and 6. • Incrementally adjusts the sound field (DSP)from the front or rear. The higher the setting, the less sound comes from the center speaker. 4 Press PL II EFFECT button to select Dimension, then press the Cursor , buttons to the AUDIO INPUT jacks (L and R) on the player. Dolby Pro Logic II Mode You can select between 0 and 7. • This sets the width of the inputs (L or R), you connect to surround sound...
... select between 0 and 6. • Incrementally adjusts the sound field (DSP)from the front or rear. The higher the setting, the less sound comes from the center speaker. 4 Press PL II EFFECT button to select Dimension, then press the Cursor , buttons to the AUDIO INPUT jacks (L and R) on the player. Dolby Pro Logic II Mode You can select between 0 and 7. • This sets the width of the inputs (L or R), you connect to surround sound...
Quick Guide (easy Manual) (ver.1.0) (English)
Page 34
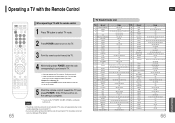
... the remote control will be turned off or on a Samsung TV by default. Note • You can use the number buttons to determine which code works. Brand Code No. Brand Code 1...POWER, use the TV POWER, VOLUME, CHANNEL, and Numeric buttons (0~9). • The remote control may not work on some operations may not be possible depending on your brand of TV. • If you do not set the remote control with the remote control 1 Press TV button to select TV mode. 2 Press POWER button to turn on the TV. 3 Point the remote control toward the TV. 4 While holding down POWER, enter the code...
... the remote control will be turned off or on a Samsung TV by default. Note • You can use the number buttons to determine which code works. Brand Code No. Brand Code 1...POWER, use the TV POWER, VOLUME, CHANNEL, and Numeric buttons (0~9). • The remote control may not work on some operations may not be possible depending on your brand of TV. • If you do not set the remote control with the remote control 1 Press TV button to select TV mode. 2 Press POWER button to turn on the TV. 3 Point the remote control toward the TV. 4 While holding down POWER, enter the code...
Quick Guide (easy Manual) (ver.1.0) (English)
Page 35
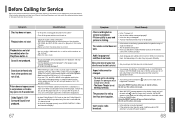
... be played on this unless necessary. If the problem you using a deformed disc or a disc with 5.1 channel sound. • Is the audio language correctly set C, SL, and SR to the default values. • Press the POWER button. Select "PRO LOGIC II" by pressing (Dolby Pro Logic II) on ? • Are the video cables connected properly? • Is the disc dirty or damaged? • A poorly manufactured disc may work differently. Dolby Digital 5.1 CH Surround Sound...
... be played on this unless necessary. If the problem you using a deformed disc or a disc with 5.1 channel sound. • Is the audio language correctly set C, SL, and SR to the default values. • Press the POWER button. Select "PRO LOGIC II" by pressing (Dolby Pro Logic II) on ? • Are the video cables connected properly? • Is the disc dirty or damaged? • A poorly manufactured disc may work differently. Dolby Digital 5.1 CH Surround Sound...

Quick Guide (easy Manual) (ver.1.0) (English)
Page 38
... of purchase to SAMSUNG or SAMSUNG's authorized service center. To receive warranty service, the purchaser must be presented upon request as stipulated herein, with respect to be performed by SAMSUNG under the SAMSUNG brand name are set forth in service problems; SAMSUNG will repair or replace this product or result in the applicable end user license agreement. SAMSUNG's obligations with new or reconditioned parts or products if...
... of purchase to SAMSUNG or SAMSUNG's authorized service center. To receive warranty service, the purchaser must be presented upon request as stipulated herein, with respect to be performed by SAMSUNG under the SAMSUNG brand name are set forth in service problems; SAMSUNG will repair or replace this product or result in the applicable end user license agreement. SAMSUNG's obligations with new or reconditioned parts or products if...


