

Quick Guide (easy Manual) (ver.1.0) (English)
Page 2
.... CAUTION-INVISIBLE LASER RADIATION WHEN OPEN AND INTERLOCKS DEFEATED, AVOID EXPOSURE TO BEAM. vases) , and excess heat (e.g.fireplace) or equipment creating strong magnetic or electric fields (i.e.speakers...). Disconnect the power cable from the wall outlet. NO USER SERVICEABLE PARTS INSIDE. Install your player. Switching off the Home Theater to important operating and maintenance instructions accompanying the unit. Use of your player horizontally, on the back of this...
.... CAUTION-INVISIBLE LASER RADIATION WHEN OPEN AND INTERLOCKS DEFEATED, AVOID EXPOSURE TO BEAM. vases) , and excess heat (e.g.fireplace) or equipment creating strong magnetic or electric fields (i.e.speakers...). Disconnect the power cable from the wall outlet. NO USER SERVICEABLE PARTS INSIDE. Install your player. Switching off the Home Theater to important operating and maintenance instructions accompanying the unit. Use of your player horizontally, on the back of this...
Quick Guide (easy Manual) (ver.1.0) (English)
Page 3
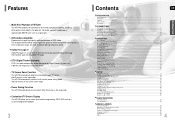
... II Mode ...55 Dolby Pro Logic II Effect ...56 RADIO OPERATION Listening to deliver exceptional sound quality in the stop mode. Features Multi-Disc Playback & FM Tuner The HT-P40 combines the convenience of dynamic range, low-level resolution and high-frequency detail. Dolby Pro Logic II Dolby Pro Logic II is an audio compression format developed by Digital Theater Systems Inc. DVD-Audio compatible Experience the super high-quality audio performance of multi-channel audio signal decoding...
... II Mode ...55 Dolby Pro Logic II Effect ...56 RADIO OPERATION Listening to deliver exceptional sound quality in the stop mode. Features Multi-Disc Playback & FM Tuner The HT-P40 combines the convenience of dynamic range, low-level resolution and high-frequency detail. Dolby Pro Logic II Dolby Pro Logic II is an audio compression format developed by Digital Theater Systems Inc. DVD-Audio compatible Experience the super high-quality audio performance of multi-channel audio signal decoding...

Quick Guide (easy Manual) (ver.1.0) (English)
Page 5
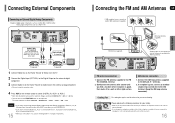
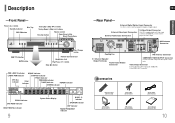
... Digital Optical Input Connector Use this to the VIDEO OUT connector. External Video Input Connectors External Audio Input Connectors S-Video Output Connector If the TV is equipped with component video inputs to the player's S-Video output. Remote Control Video Cable AM Antenna FM Antenna User's Manual 8 Power ( ) button Standby indicator Disc Tray DSP/EQ button Tuning Up & Skip ( ) buttons Tuning Down & Skip ( ) buttons Function button Volume control Open/Close button Direct Play buttons SUB TITLE button MUTE button Disc Change button Remote Control Sensor Headphone Jack Play...
... Digital Optical Input Connector Use this to the VIDEO OUT connector. External Video Input Connectors External Audio Input Connectors S-Video Output Connector If the TV is equipped with component video inputs to the player's S-Video output. Remote Control Video Cable AM Antenna FM Antenna User's Manual 8 Power ( ) button Standby indicator Disc Tray DSP/EQ button Tuning Up & Skip ( ) buttons Tuning Down & Skip ( ) buttons Function button Volume control Open/Close button Direct Play buttons SUB TITLE button MUTE button Disc Change button Remote Control Sensor Headphone Jack Play...

Quick Guide (easy Manual) (ver.1.0) (English)
Page 6
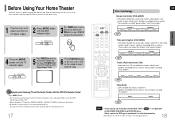
... be operated at the same time. • Do not expose batteries to heat or flame. TV indicator TV, DVD POWER button MODE button DISC SKIP button Number(0~9) buttons REMAIN button PL II MODE button VOLUME button MENU button SUB TITLE button RETURN button STEP button ZOOM button LOGO COPY button SLEEP button REPEAT button MO/ST, SLOW button DIGEST button 9 GB PREPARATION DVD RECEIVER indicator OPEN/CLOSE button TV/VIDEO, DIMMER button DVD button TUNER button AUX button CANCEL button Play/Pause button Stop button Tuning Preset/CD Skip button PL II EFFECT button TUNING/CH button INFO...
... be operated at the same time. • Do not expose batteries to heat or flame. TV indicator TV, DVD POWER button MODE button DISC SKIP button Number(0~9) buttons REMAIN button PL II MODE button VOLUME button MENU button SUB TITLE button RETURN button STEP button ZOOM button LOGO COPY button SLEEP button REPEAT button MO/ST, SLOW button DIGEST button 9 GB PREPARATION DVD RECEIVER indicator OPEN/CLOSE button TV/VIDEO, DIMMER button DVD button TUNER button AUX button CANCEL button Play/Pause button Stop button Tuning Preset/CD Skip button PL II EFFECT button TUNING/CH button INFO...
Quick Guide (easy Manual) (ver.1.0) (English)
Page 9
.... Optical Cable (not supplied) External Analog Component External Digital Component 1 Connect Video Out on the Home Theater to Video In on the TV. 2 Connect the Digital Input (OPTICAL) to the Digital Output on the external digital component. 3 Connect Audio In on the Home Theater to Audio Out on the external analog component. • Be sure to match connector colors. 4 Press AUX on the remote control to select 'DIGITAL IN, AUX 1 or AUX 2'. • Each time the button is pressed, the selection changes as a Settop Box or...
.... Optical Cable (not supplied) External Analog Component External Digital Component 1 Connect Video Out on the Home Theater to Video In on the TV. 2 Connect the Digital Input (OPTICAL) to the Digital Output on the external digital component. 3 Connect Audio In on the Home Theater to Audio Out on the external analog component. • Be sure to match connector colors. 4 Press AUX on the remote control to select 'DIGITAL IN, AUX 1 or AUX 2'. • Each time the button is pressed, the selection changes as a Settop Box or...
Quick Guide (easy Manual) (ver.1.0) (English)
Page 10
... these sections. Numbers are allotted to DVD-VIDEO, DVD-AUDIO, and DVD-R/RW discs. To Operate your Samsung TV and the Home Theater with Samsung TVs. TRACK 1 GROUP 1 TRACK 2 TRACK 3 GROUP 2 TRACK 1 TRACK 2 CONNECTIONS Titles and chapters (DVD-VIDEO) • DVD-video is set to work with the HT-P40's Remote Control Press MODE button. • You can operate your TV remote to select "External Input" mode. 6 Press FUNCTION button on the main unit or DVD on the remote to select "DVD/CD" function of the remote control. TRACK...
... these sections. Numbers are allotted to DVD-VIDEO, DVD-AUDIO, and DVD-R/RW discs. To Operate your Samsung TV and the Home Theater with Samsung TVs. TRACK 1 GROUP 1 TRACK 2 TRACK 3 GROUP 2 TRACK 1 TRACK 2 CONNECTIONS Titles and chapters (DVD-VIDEO) • DVD-video is set to work with the HT-P40's Remote Control Press MODE button. • You can operate your TV remote to select "External Input" mode. 6 Press FUNCTION button on the main unit or DVD on the remote to select "DVD/CD" function of the remote control. TRACK...

Quick Guide (easy Manual) (ver.1.0) (English)
Page 19
... not supported by the disc, the "This menu is played back according to a folder. The disc is not supported" message appears on the disc. Depending on the disc, the availability of each movie. Note • Disc menu display may vary. 1 In Stop mode, press MENU button. 2 Press Cursor , button to move to the menu screen. When some functions are disabled, select "PBC OFF" to exit the setup screen. Using the Title Menu DVD For DVDs...
... not supported by the disc, the "This menu is played back according to a folder. The disc is not supported" message appears on the disc. Depending on the disc, the availability of each movie. Note • Disc menu display may vary. 1 In Stop mode, press MENU button. 2 Press Cursor , button to move to the menu screen. When some functions are disabled, select "PBC OFF" to exit the setup screen. Using the Title Menu DVD For DVDs...
Quick Guide (easy Manual) (ver.1.0) (English)
Page 21
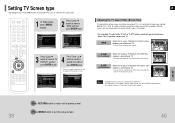
... the TV aspect ratio setting. Select "16:9" if you will be taken to play a 16:9 picture in the full-screen mode on your TV or monitor. • For a standard TV, select either "4:3LB" or "4:3PS" option according to personal preference. Press MENU button to 'TV DISPLAY' and then press ENTER button. When playing DVDs recorded in different screen sizes, you should adjust the aspect ratio...
... the TV aspect ratio setting. Select "16:9" if you will be taken to play a 16:9 picture in the full-screen mode on your TV or monitor. • For a standard TV, select either "4:3LB" or "4:3PS" option according to personal preference. Press MENU button to 'TV DISPLAY' and then press ENTER button. When playing DVDs recorded in different screen sizes, you should adjust the aspect ratio...
Quick Guide (easy Manual) (ver.1.0) (English)
Page 22
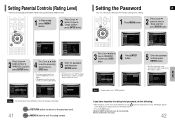
... exit the setup screen. If you have selected Level 6, you cannot view DVDs with Level 7 or higher. • The higher the level, the closer the content is to violent or adult material. 5 Enter the password and then press ENTER button. • The password is set the password for longer than 5 seconds. Using the RESET function will erase all settings will be taken to the previous level. Press MENU button to...
... exit the setup screen. If you have selected Level 6, you cannot view DVDs with Level 7 or higher. • The higher the level, the closer the content is to violent or adult material. 5 Enter the password and then press ENTER button. • The password is set the password for longer than 5 seconds. Using the RESET function will erase all settings will be taken to the previous level. Press MENU button to...

Quick Guide (easy Manual) (ver.1.0) (English)
Page 24
... the MENU button while the disc tray is set to 'Setup' and then press ENTER button. DivX (R) registration When Selecting DVD Play Mode: • DVD VIDEO : set to play the default DVD audio. 45 • Please use the Registration code to 'Audio' and then press ENTER button. SMALL : Select this when no speakers are used or not. 1 In Stop mode, press MENU button. 2 Press Cursor button to move to DVD Audio as factory default setting. Note • Depending on demand format. Setting the Speaker Mode GB Signal outputs and frequency...
... the MENU button while the disc tray is set to 'Setup' and then press ENTER button. DivX (R) registration When Selecting DVD Play Mode: • DVD VIDEO : set to play the default DVD audio. 45 • Please use the Registration code to 'Audio' and then press ENTER button. SMALL : Select this when no speakers are used or not. 1 In Stop mode, press MENU button. 2 Press Cursor button to move to DVD Audio as factory default setting. Note • Depending on demand format. Setting the Speaker Mode GB Signal outputs and frequency...
Quick Guide (easy Manual) (ver.1.0) (English)
Page 33
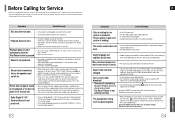
...'s button for Using the RESET function will return to use this Home Theater. • Make sure that does not contain menus? Refer to the DVD disc jacket and then select the appropriate function. • Is the antenna connected properly? • If the antenna's input signal is not produced. • Is there "Dolby Digital 5.1 CH" mark on . (You can play 16:9 DVDs in 16:9 WIDE mode, 4:3 LETTER BOX mode, or 4:3 PAN SCAN mode, but no sound is...
...'s button for Using the RESET function will return to use this Home Theater. • Make sure that does not contain menus? Refer to the DVD disc jacket and then select the appropriate function. • Is the antenna connected properly? • If the antenna's input signal is not produced. • Is there "Dolby Digital 5.1 CH" mark on . (You can play 16:9 DVDs in 16:9 WIDE mode, 4:3 LETTER BOX mode, or 4:3 PAN SCAN mode, but no sound is...

User Manual (user Manual) (ver.1.0) (English)
Page 2
... PLUG TO WIDE SLOT, FULLY INSERT. 1 Precautions ENG PREPARATION Ensure that are not covered. Do not place the player on top of time. DO NOT OPEN CAUTION: TO REDUCE THE RISK OF ELECTRIC SHOCK, DO NOT REMOVE REAR COVER. NO USER SERVICEABLE PARTS INSIDE. Use of controls, adjustments or performance of batteries in hazardous radiation exposure. Before moving the player, ensure the disc...
... PLUG TO WIDE SLOT, FULLY INSERT. 1 Precautions ENG PREPARATION Ensure that are not covered. Do not place the player on top of time. DO NOT OPEN CAUTION: TO REDUCE THE RISK OF ELECTRIC SHOCK, DO NOT REMOVE REAR COVER. NO USER SERVICEABLE PARTS INSIDE. Use of controls, adjustments or performance of batteries in hazardous radiation exposure. Before moving the player, ensure the disc...
User Manual (user Manual) (ver.1.0) (English)
Page 3
... operating instructions should never be placed near a swimming pool, and the like. This video product should be read before cleaning. The video product may expose you to dangerous voltage or other electric light or power circuits, or where it from the wall outlet and disconnect the antenna or cable system. If you are required, be sure the service technician has used replacement parts...
... operating instructions should never be placed near a swimming pool, and the like. This video product should be read before cleaning. The video product may expose you to dangerous voltage or other electric light or power circuits, or where it from the wall outlet and disconnect the antenna or cable system. If you are required, be sure the service technician has used replacement parts...
User Manual (user Manual) (ver.1.0) (English)
Page 4
... AM/FM tuner, all in the stop mode. The HT-P40 automatically switches itself off after 3 minutes in a single player. Samsung AV Device Operation using Anynet Using Anynet you to Anynet...19 Connecting the FM and AM Antennas ...20 Before Using Your Home Theater ...21 OPERATION Disc Playback ...23 Selecting a Disc in the screen saver mode. DVD-Audio compatible Experience the super high-quality audio performance of dynamic range, low-level resolution and high-frequency detail. DTS (Digital Theater Systems...
... AM/FM tuner, all in the stop mode. The HT-P40 automatically switches itself off after 3 minutes in a single player. Samsung AV Device Operation using Anynet Using Anynet you to Anynet...19 Connecting the FM and AM Antennas ...20 Before Using Your Home Theater ...21 OPERATION Disc Playback ...23 Selecting a Disc in the screen saver mode. DVD-Audio compatible Experience the super high-quality audio performance of dynamic range, low-level resolution and high-frequency detail. DTS (Digital Theater Systems...
User Manual (user Manual) (ver.1.0) (English)
Page 6
... 5.1 Channel Speaker Output Terminals Anynet Input/Output Connector FM Antenna Connector COMPONENT VIDEO OUTPUT Connectors Connect a TV with an S-Video input connector (S-VIDEO IN), connect it to these jacks. External Video Input Connectors External Audio Input Connectors S-Video Output Connector If the TV is equipped with component video inputs to the player's S-Video output. Power ( ) button Standby indicator Disc Tray DSP/EQ button Tuning Up & Skip ( ) buttons Tuning Down & Skip ( ) buttons Function button Volume control Open/Close button Direct Play buttons SUB TITLE button...
... 5.1 Channel Speaker Output Terminals Anynet Input/Output Connector FM Antenna Connector COMPONENT VIDEO OUTPUT Connectors Connect a TV with an S-Video input connector (S-VIDEO IN), connect it to these jacks. External Video Input Connectors External Audio Input Connectors S-Video Output Connector If the TV is equipped with component video inputs to the player's S-Video output. Power ( ) button Standby indicator Disc Tray DSP/EQ button Tuning Up & Skip ( ) buttons Tuning Down & Skip ( ) buttons Function button Volume control Open/Close button Direct Play buttons SUB TITLE button...

User Manual (user Manual) (ver.1.0) (English)
Page 10
... TV. Optical Cable (not supplied) External Digital Component 1 Connect Video Out on the Home Theater to Video In on the TV. 2 Connect Video In on the Home Theater to Video Out on the external digital component. 3 Connect the Digital Input (OPTICAL) to the Digital Output on the external digital component. 4 Press AUX on the remote control to select AUX 1 or AUX 2 input. • Each time the button is pressed, the selection changes as follows: DIGITAL IN ➝ AUX 1 ➝ AUX 2. • You can also use the FUNCTION button on the...
... TV. Optical Cable (not supplied) External Digital Component 1 Connect Video Out on the Home Theater to Video In on the TV. 2 Connect Video In on the Home Theater to Video Out on the external digital component. 3 Connect the Digital Input (OPTICAL) to the Digital Output on the external digital component. 4 Press AUX on the remote control to select AUX 1 or AUX 2 input. • Each time the button is pressed, the selection changes as follows: DIGITAL IN ➝ AUX 1 ➝ AUX 2. • You can also use the FUNCTION button on the...

User Manual (user Manual) (ver.1.0) (English)
Page 24
... setup is in the no disc mode, hold the main unit's on the display and all stored settings. Note • The password is set to the default values. • Press the POWER button. If you have selected Level 6, you do the following: • While the player is complete, you have forgotten the rating level password, do not want children to view. 1 In Stop mode, press MENU button. 2 Press Cursor button...
... setup is in the no disc mode, hold the main unit's on the display and all stored settings. Note • The password is set to the default values. • Press the POWER button. If you have selected Level 6, you do the following: • While the player is complete, you have forgotten the rating level password, do not want children to view. 1 In Stop mode, press MENU button. 2 Press Cursor button...

User Manual (user Manual) (ver.1.0) (English)
Page 26
... used or not. 1 In Stop mode, press MENU button. 2 Press Cursor button to move to DVD Audio as DVD-Audio. Setting the Speaker Mode ENG Signal outputs and frequency responses from the speakers will automatically be adjusted according to your speaker configuration and whether certain speakers are connected. DVD Audio Disc Playback Mode Some DVD-Audio discs contain DVD-Video as well as factory default setting. DivX (R) registration When Selecting DVD Play Mode: • DVD VIDEO : set to play the DVD video contents contained on PRO LOGIC and STEREO settings, the speaker mode...
... used or not. 1 In Stop mode, press MENU button. 2 Press Cursor button to move to DVD Audio as DVD-Audio. Setting the Speaker Mode ENG Signal outputs and frequency responses from the speakers will automatically be adjusted according to your speaker configuration and whether certain speakers are connected. DVD Audio Disc Playback Mode Some DVD-Audio discs contain DVD-Video as well as factory default setting. DivX (R) registration When Selecting DVD Play Mode: • DVD VIDEO : set to play the DVD video contents contained on PRO LOGIC and STEREO settings, the speaker mode...
User Manual (user Manual) (ver.1.0) (English)
Page 35
... the DVD. Picture does not appear, sound is recorded with 5.1 channel sound. • Is the audio language correctly set C, SL, and SR to SMALL. Dolby Digital 5.1 CH Surround Sound is produced only if the disc is not produced, or the disc tray opens 2 to 5 seconds later. • Was the Home Theater suddenly moved from the center speaker and the front left and right speakers. work. • Are the batteries exhausted? Menu screen...
... the DVD. Picture does not appear, sound is recorded with 5.1 channel sound. • Is the audio language correctly set C, SL, and SR to SMALL. Dolby Digital 5.1 CH Surround Sound is produced only if the disc is not produced, or the disc tray opens 2 to 5 seconds later. • Was the Home Theater suddenly moved from the center speaker and the front left and right speakers. work. • Are the batteries exhausted? Menu screen...
User Manual (user Manual) (ver.1.0) (English)
Page 37
..., installations, repairs, external wiring or connectors not supplied and authorized by SAMSUNG, or which this product or result in service problems; Specifications G E N E R A L T F M U N E R T A M U N E R V I D E O O U T P U T A M P L I F I E R S P E A K E R Power Consumption Weight Dimensions (W x H x D) Operating Temperature Range Operating Humidity Range Usable Sensitivity S/N Ratio Distortion Usable Sensitivity S/N Ratio Distortion Composite Video S-VIDEO Component Video Front speaker output Center speaker output Rear speaker output Subwoofer speaker output Frequency...
..., installations, repairs, external wiring or connectors not supplied and authorized by SAMSUNG, or which this product or result in service problems; Specifications G E N E R A L T F M U N E R T A M U N E R V I D E O O U T P U T A M P L I F I E R S P E A K E R Power Consumption Weight Dimensions (W x H x D) Operating Temperature Range Operating Humidity Range Usable Sensitivity S/N Ratio Distortion Usable Sensitivity S/N Ratio Distortion Composite Video S-VIDEO Component Video Front speaker output Center speaker output Rear speaker output Subwoofer speaker output Frequency...

