User Manual (user Manual) (ver.2.0) (English)
Page 1
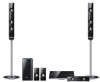
To receive more complete service, please register your product at www.samsung.com/register HT-C7530W 5.1CH Blu-ray Home Theater System user manual imagine the possibilities Thank you for purchasing this Samsung product.
To receive more complete service, please register your product at www.samsung.com/register HT-C7530W 5.1CH Blu-ray Home Theater System user manual imagine the possibilities Thank you for purchasing this Samsung product.

User Manual (user Manual) (ver.2.0) (English)
Page 2
NO USER-SERVICEABLE PARTS ARE INSIDE. AVOID DIRECT EXPOSURE TO BEAM. (FDA 21 CFR) CAUTION CLASS 1 LASER PRODUCT • This product is classified as vases, shall be determined by turning the equipment off and on, the user is connected. • Consult the dealer or an experienced radio/TV technician for connections. These limits are used to connect the unit to other than those specified herein may result in accordance with the instructions, may void the user's authority to which can radiate radio frequency energy and, if not installed and used as radios ...
NO USER-SERVICEABLE PARTS ARE INSIDE. AVOID DIRECT EXPOSURE TO BEAM. (FDA 21 CFR) CAUTION CLASS 1 LASER PRODUCT • This product is classified as vases, shall be determined by turning the equipment off and on, the user is connected. • Consult the dealer or an experienced radio/TV technician for connections. These limits are used to connect the unit to other than those specified herein may result in accordance with the instructions, may void the user's authority to which can radiate radio frequency energy and, if not installed and used as radios ...

User Manual (user Manual) (ver.2.0) (English)
Page 3
If the provided plug does not fi t into the apparatus, the apparatus has been exposed to the environment. Use of the obsolete outlet. 10) Protect the power cord from the apparatus. 11) Only use only. • Condensation may become hot. Follow all the safety instructions listed below. Precautions • Ensure that the AC power supply in any way, such as radiators, heat registers, stoves, or other equipment which may occur if your product horizontally, on or pinched particularly at plugs, convenience receptacles, and the point where they exit from being walked ...
If the provided plug does not fi t into the apparatus, the apparatus has been exposed to the environment. Use of the obsolete outlet. 10) Protect the power cord from the apparatus. 11) Only use only. • Condensation may become hot. Follow all the safety instructions listed below. Precautions • Ensure that the AC power supply in any way, such as radiators, heat registers, stoves, or other equipment which may occur if your product horizontally, on or pinched particularly at plugs, convenience receptacles, and the point where they exit from being walked ...

User Manual (user Manual) (ver.2.0) (English)
Page 4
... is covered by the edges so that fingerprints will not get fingerprints or dirt on the disc may not operate correctly. Copyright © 2010 Samsung Electronics Co., Ltd. Disc Storage • Do not keep in direct sunlight • Keep in a cool ventilated area • Keep in the device setup menu...
... is covered by the edges so that fingerprints will not get fingerprints or dirt on the disc may not operate correctly. Copyright © 2010 Samsung Electronics Co., Ltd. Disc Storage • Do not keep in direct sunlight • Keep in a cool ventilated area • Keep in the device setup menu...
User Manual (user Manual) (ver.2.0) (English)
Page 5
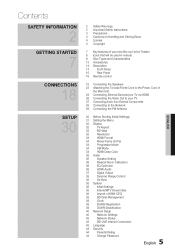
Contents SAFETY INFORMATION 2 GETTING STARTED 7 CONNECTIONS 18 SETUP 30 2 Safety Warnings 3 Important Safety Instructions 3 Precautions 4 Cautions on Handling and Storing Discs 4 License 4 Copyright 7 Key features of your new Blu-ray Home Theater 8 Icons that will be used in manual 9 Disc Types and Characteristics 13 Accessories 14 Description 14 Front Panel 15 Rear Panel 16 Remote control 18 Connecting the Speakers 23 Attaching the Toroidal Ferrite Core to the Power Cord of the Main Unit 24 Connecting External Devices/your TV via HDMI 26 Connecting the Video Out to your TV 27 ...
Contents SAFETY INFORMATION 2 GETTING STARTED 7 CONNECTIONS 18 SETUP 30 2 Safety Warnings 3 Important Safety Instructions 3 Precautions 4 Cautions on Handling and Storing Discs 4 License 4 Copyright 7 Key features of your new Blu-ray Home Theater 8 Icons that will be used in manual 9 Disc Types and Characteristics 13 Accessories 14 Description 14 Front Panel 15 Rear Panel 16 Remote control 18 Connecting the Speakers 23 Attaching the Toroidal Ferrite Core to the Power Cord of the Main Unit 24 Connecting External Devices/your TV via HDMI 26 Connecting the Video Out to your TV 27 ...

User Manual (user Manual) (ver.2.0) (English)
Page 6
... OTHER INFORMATION 64 44 General 44 Background 44 Energy Saving 44 Front Display 44 Power On/Off Sound 45 Support 45 Software Upgrade 45 Contact Samsung 46 Playing a Disc 46 Using the Disc menu / Title menu / Popup menu 47 Using the Search and Skip Functions 48 Slow Motion Play/Step Motion...
... OTHER INFORMATION 64 44 General 44 Background 44 Energy Saving 44 Front Display 44 Power On/Off Sound 45 Support 45 Software Upgrade 45 Contact Samsung 46 Playing a Disc 46 Using the Disc menu / Title menu / Popup menu 47 Using the Search and Skip Functions 48 Slow Motion Play/Step Motion...
User Manual (user Manual) (ver.2.0) (English)
Page 7
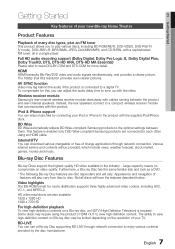
...distribution supports three highly advanced video codecs, including AVC, VC-1, and MPEG-2. BD Wise BD Wise automatically adjusts BD Wise-compliant Samsung products to the optimal settings between the product and rear-channel speakers. Full HD audio decoding support (Dolby Digital, Dolby Pro ...various chargeable or free-of charge applications through network connection to enjoy various contents provided by connecting your TV. Wireless receiver module Samsung's rear-channel wireless receiver module does away with cables running between them. iPod & iPhone support You can use a Blu-ray...
...distribution supports three highly advanced video codecs, including AVC, VC-1, and MPEG-2. BD Wise BD Wise automatically adjusts BD Wise-compliant Samsung products to the optimal settings between the product and rear-channel speakers. Full HD audio decoding support (Dolby Digital, Dolby Pro ...various chargeable or free-of charge applications through network connection to enjoy various contents provided by connecting your TV. Wireless receiver module Samsung's rear-channel wireless receiver module does away with cables running between them. iPod & iPhone support You can use a Blu-ray...

User Manual (user Manual) (ver.2.0) (English)
Page 8
DVD-RW (V) DVD-R DVD+RW This involves a function available on a USB storage device. - ! F This involves a function available on recorded DVD+RW or DVD-RW (V)/ y DVD-R/+R discs that help each function operate. - This involves a situation where a function does not operate or settings may be used in manual Make sure to check the following terms before reading the user manual. Term BD-ROM Logo Icon Definition h This involves a function available on a DVD-VIDEO. This involves a function available on a BD-ROM. This function provides direct and easy access pressing the ...
DVD-RW (V) DVD-R DVD+RW This involves a function available on a USB storage device. - ! F This involves a function available on recorded DVD+RW or DVD-RW (V)/ y DVD-R/+R discs that help each function operate. - This involves a situation where a function does not operate or settings may be used in manual Make sure to check the following terms before reading the user manual. Term BD-ROM Logo Icon Definition h This involves a function available on a DVD-VIDEO. This involves a function available on a BD-ROM. This function provides direct and easy access pressing the ...
User Manual (user Manual) (ver.2.0) (English)
Page 9
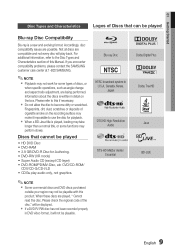
... Audio DTS-HD Master Audio | Essential Dolby Digital Plus Dolby TrueHD Java BD-LIVE 9 English If you encounter compatibility problems, please contact the SAMSUNG customer care center at 1-800 SAMSUNG. ✎ NOTE Playback may not work for Authoring. • DVD-RW (VR mode) • Super Audio CD (except CD layer) •...
... Audio DTS-HD Master Audio | Essential Dolby Digital Plus Dolby TrueHD Java BD-LIVE 9 English If you encounter compatibility problems, please contact the SAMSUNG customer care center at 1-800 SAMSUNG. ✎ NOTE Playback may not work for Authoring. • DVD-RW (VR mode) • Super Audio CD (except CD layer) •...

User Manual (user Manual) (ver.2.0) (English)
Page 10
...; Once a DVD-R/-RW recorded in Video Mode is finalized, it becomes DVD-Video. Ability to play back a DVD+R disc recorded and finalized with a Samsung DVD video recorder. • Playback can play the disc. Disc Type Blu-ray Region Code Area North America, Central America, A South America, Korea, Japan, Taiwan...
...; Once a DVD-R/-RW recorded in Video Mode is finalized, it becomes DVD-Video. Ability to play back a DVD+R disc recorded and finalized with a Samsung DVD video recorder. • Playback can play the disc. Disc Type Blu-ray Region Code Area North America, Central America, A South America, Korea, Japan, Taiwan...

User Manual (user Manual) (ver.2.0) (English)
Page 11
If possible, do not use , playability may cut in the DTS format can be played by Microsoft and is supported. For MP3 files recorded with a VBR (Variable Bit Rates), the sound may vary depending on the screen during playback. • Qpel and gmc is 640x480 pixels (4:3), this product. TV screen resolutions higher than 48khz or 320kbps, you may not be playable with UDF, ISO9660 or JOLIET format can be displayed. • Progressive JPEG is based on a DVD-RW or DVD-R disc. 01 Getting Started Audio CD • An audio disc on which was not recorded as broken images ...
If possible, do not use , playability may cut in the DTS format can be played by Microsoft and is supported. For MP3 files recorded with a VBR (Variable Bit Rates), the sound may vary depending on the screen during playback. • Qpel and gmc is 640x480 pixels (4:3), this product. TV screen resolutions higher than 48khz or 320kbps, you may not be playable with UDF, ISO9660 or JOLIET format can be displayed. • Progressive JPEG is based on a DVD-RW or DVD-R disc. 01 Getting Started Audio CD • An audio disc on which was not recorded as broken images ...

User Manual (user Manual) (ver.2.0) (English)
Page 12
Compliant with WMA version 10 * Sampling rates (in the range 5kbps to 384kbps USB Host Specification USB Host Specification • Supports USB 1.1 or USB 2.0 compliant devices. • Supports devices connected using the USB A type cable. • Supports UMS (USB Mass Storage Device) V1.0 compliant devices. • Supports FAT (FAT, FAT16, FAT32) file system formatting. 12 English All bit-rates in kHz) - 8, 11, 16, 22, 32, 44.1, 48 * Bit rates - Getting Started Supported File Formats Video File Support File Extension Container *.avi AVI *.mkv MKV *.wmv *....
Compliant with WMA version 10 * Sampling rates (in the range 5kbps to 384kbps USB Host Specification USB Host Specification • Supports USB 1.1 or USB 2.0 compliant devices. • Supports devices connected using the USB A type cable. • Supports UMS (USB Mass Storage Device) V1.0 compliant devices. • Supports FAT (FAT, FAT16, FAT32) file system formatting. 12 English All bit-rates in kHz) - 8, 11, 16, 22, 32, 44.1, 48 * Bit rates - Getting Started Supported File Formats Video File Support File Extension Container *.avi AVI *.mkv MKV *.wmv *....

User Manual (user Manual) (ver.2.0) (English)
Page 13
Format File name File extension Bit rate Version Pixel Sampling Frequency Still Picture JPG JPG .JPEG - - 640x480 - 01 Getting Started Notes on USB connection Supported devices: USB storage media, MP3 player, digital camera, USB card reader 10) Bigger the image resolution, the longer the delay to the product's USB port. Music MP3 .MP3 80~384kbps - - 44.1kHz Accessories Check for digital camera is not supported. 9) Do not disconnect USB device during a "loading" process. Otherwise, the file may not played. 6) Connect directly to displaying. 11) DRM applied MP3 fi...
Format File name File extension Bit rate Version Pixel Sampling Frequency Still Picture JPG JPG .JPEG - - 640x480 - 01 Getting Started Notes on USB connection Supported devices: USB storage media, MP3 player, digital camera, USB card reader 10) Bigger the image resolution, the longer the delay to the product's USB port. Music MP3 .MP3 80~384kbps - - 44.1kHz Accessories Check for digital camera is not supported. 9) Do not disconnect USB device during a "loading" process. Otherwise, the file may not played. 6) Connect directly to displaying. 11) DRM applied MP3 fi...

User Manual (user Manual) (ver.2.0) (English)
Page 14
IN AUX ONLINE HDMI 1 HDMI 2 FM Stops disc playback. 5 PLAY/PAUSE BUTTON Plays a disc or pauses playback. 6 VOLUME CONTROL Volume adjustment. 7 OPEN/CLOSE BUTTON Opens and closes the disc tray. 8 POWER BUTTON ( ) 9 DISC TRAY 10 USB PORT 11 ASC IN JACK Turns the product on and off. Used to BD-LIVE. Insert disc here. A USB storage device can also be performed with a USB memory flash stick only. 14 English It can be connected here and used for setting up MRC (Musical Room Calibration). ✎ NOTE Software upgrades using the USB Port must be used as ...
IN AUX ONLINE HDMI 1 HDMI 2 FM Stops disc playback. 5 PLAY/PAUSE BUTTON Plays a disc or pauses playback. 6 VOLUME CONTROL Volume adjustment. 7 OPEN/CLOSE BUTTON Opens and closes the disc tray. 8 POWER BUTTON ( ) 9 DISC TRAY 10 USB PORT 11 ASC IN JACK Turns the product on and off. Used to BD-LIVE. Insert disc here. A USB storage device can also be performed with a USB memory flash stick only. 14 English It can be connected here and used for setting up MRC (Musical Room Calibration). ✎ NOTE Software upgrades using the USB Port must be used as ...

User Manual (user Manual) (ver.2.0) (English)
Page 15
Can be used for the best quality picture. Connect to these jacks. 11 FM ANTENNA JACK 12 VIDEO OUT JACK Connect the FM antenna. Can be used for network based services (see pages 58~63), BD-LIVE and software upgrade with Component video inputs to the 2CH analog output of an external device (such as a VCR) Connect a TV with a wireless LAN adapter. Use this to the VIDEO OUT Jack on all sides of digital output. CAUTION Ensure a minimum of 4 inches of clear space on this HDMI output terminal to prevent overheating and always revolves when the power is on your TV...
Can be used for the best quality picture. Connect to these jacks. 11 FM ANTENNA JACK 12 VIDEO OUT JACK Connect the FM antenna. Can be used for network based services (see pages 58~63), BD-LIVE and software upgrade with Component video inputs to the 2CH analog output of an external device (such as a VCR) Connect a TV with a wireless LAN adapter. Use this to the VIDEO OUT Jack on all sides of digital output. CAUTION Ensure a minimum of 4 inches of clear space on this HDMI output terminal to prevent overheating and always revolves when the power is on your TV...
User Manual (user Manual) (ver.2.0) (English)
Page 16
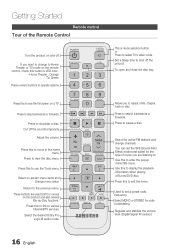
Press to the previous menu. Cut off . Return to stop/play a disc. These buttons are listening to. or Press to search backwards or forwards. Press to select TV's video mode. Select MONO or STEREO for active FM stations and change menu value. Getting Started Remote control Tour of music you to repeat a title, chapter, track or disc. Press this to link to various Internet@TV services. Press to operate options. Press this to the home menu. Allows you are used both for the type of the Remote Control Turn the product on and off the sound temporarily. Press this ...
Press to the previous menu. Cut off . Return to stop/play a disc. These buttons are listening to. or Press to search backwards or forwards. Press to select TV's video mode. Select MONO or STEREO for active FM stations and change menu value. Getting Started Remote control Tour of music you to repeat a title, chapter, track or disc. Press this to link to various Internet@TV services. Press to operate options. Press this to the home menu. Allows you are used both for the type of the Remote Control Turn the product on and off the sound temporarily. Press this ...

User Manual (user Manual) (ver.2.0) (English)
Page 17
...; NOTE Make sure to match the "+" and "-" ends of TV. The remote control will work on some operations may not work with Samsung TVs by default. Also, some brands of TV. • If there is complete. • You can control certain functions of your brand of the batteries...TV turns off, the setting is more than one code listed for about one at a time to determine which code works. • Example : For a Samsung TV While holding down the POWER button, use the number buttons to approximately 23 feet (7 meters) in the table, enter one year. The remote...
...; NOTE Make sure to match the "+" and "-" ends of TV. The remote control will work on some operations may not work with Samsung TVs by default. Also, some brands of TV. • If there is complete. • You can control certain functions of your brand of the batteries...TV turns off, the setting is more than one code listed for about one at a time to determine which code works. • Example : For a Samsung TV While holding down the POWER button, use the number buttons to approximately 23 feet (7 meters) in the table, enter one year. The remote...

User Manual (user Manual) (ver.2.0) (English)
Page 18
Selecting the Listening Position The listening position should be located about 2.5 to 3 times the distance of the TV's screen size away from them all the time. Center Speaker f It is not so critical. You can also install it on a stand or cabinet shelf, or under the TV. Surround Speakershj Place these speakers to the side of your ear, facing slightly downward. * Unlike the front and center speakers, the surround speakers are used to handle mainly sound effects and sound will be sure to turn off the power and disconnect the power cord. Place it at the same height as the ...
Selecting the Listening Position The listening position should be located about 2.5 to 3 times the distance of the TV's screen size away from them all the time. Center Speaker f It is not so critical. You can also install it on a stand or cabinet shelf, or under the TV. Surround Speakershj Place these speakers to the side of your ear, facing slightly downward. * Unlike the front and center speakers, the surround speakers are used to handle mainly sound effects and sound will be sure to turn off the power and disconnect the power cord. Place it at the same height as the ...

User Manual (user Manual) (ver.2.0) (English)
Page 19
02 Connections Speaker Components Assembled Speakers (L) (R) CENTER FRONT (L) (R) SCREW (4x20): 4EA SCREW (5x15): 12EA ¨ STAND NECK SURROUND STAND POLE CENTER SPEAKER SUBWOOFER STAND BRACKET STAND BASE SUBWOOFER SPEAKER CABLE SWA-5000 FRONT SPEAKER SURROUND SPEAKER Wireless Receiver Module Speaker Cable (2EA) ✎ NOTE Refer to page 20 to install the Speakers on the Tallboy Stand. 19 English
02 Connections Speaker Components Assembled Speakers (L) (R) CENTER FRONT (L) (R) SCREW (4x20): 4EA SCREW (5x15): 12EA ¨ STAND NECK SURROUND STAND POLE CENTER SPEAKER SUBWOOFER STAND BRACKET STAND BASE SUBWOOFER SPEAKER CABLE SWA-5000 FRONT SPEAKER SURROUND SPEAKER Wireless Receiver Module Speaker Cable (2EA) ✎ NOTE Refer to page 20 to install the Speakers on the Tallboy Stand. 19 English

User Manual (user Manual) (ver.2.0) (English)
Page 20
Make sure all holes are properly connected, if not, the stand will fall down. 4 Stand Neck Stand Base Stand Pole 20 English Connections Connecting the Speakers Installing the Speakers on the Stand 2 Bracket as shown in the illustration. 3. Connect the Stand Pole to the Stand Bracket. 1 Stand Bracket Stand Pole 2. Insert and tighten three large screws (5x15, For connecting Stand Pole & Stand Bracket) into the three holes on the Tallboy Stand 1. Connect the Stand Pole to the Stand Neck and Stand Base. - Straighten the speaker wire and route it through the Stand Pole. 3 ...
Make sure all holes are properly connected, if not, the stand will fall down. 4 Stand Neck Stand Base Stand Pole 20 English Connections Connecting the Speakers Installing the Speakers on the Stand 2 Bracket as shown in the illustration. 3. Connect the Stand Pole to the Stand Bracket. 1 Stand Bracket Stand Pole 2. Insert and tighten three large screws (5x15, For connecting Stand Pole & Stand Bracket) into the three holes on the Tallboy Stand 1. Connect the Stand Pole to the Stand Neck and Stand Base. - Straighten the speaker wire and route it through the Stand Pole. 3 ...