
User Manual (user Manual) (ver.2.0) (English)
Page 2
... FCC regulations when shielded cables and connectors are designed to radio communications. This equipment generates, uses and can be securely attached to correct the interference by one or more of important instructions accompanying the product. CAUTION : FCC regulations state that any time. NO USER-SERVICEABLE PARTS ARE INSIDE. DO NOT OPEN COVER AND DO NOT REPAIR YOURSELF. To prevent electromagnetic...
... FCC regulations when shielded cables and connectors are designed to radio communications. This equipment generates, uses and can be securely attached to correct the interference by one or more of important instructions accompanying the product. CAUTION : FCC regulations state that any time. NO USER-SERVICEABLE PARTS ARE INSIDE. DO NOT OPEN COVER AND DO NOT REPAIR YOURSELF. To prevent electromagnetic...
User Manual (user Manual) (ver.2.0) (English)
Page 7
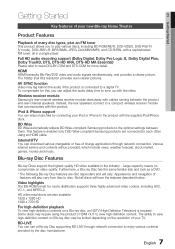
... iPod/iPhone dock. The 1080p (Full HD) resolution provides even clearer pictures. Blu-ray Disc Features Blu-ray Discs support the highest quality HD video available in a single player. Not all in the industry - Wireless receiver module Samsung's rear-channel wireless receiver module does away with the video. Instead, the rear speakers connect to each other using the product's HDMI OUT to view high-definition content. This feature is connected to sync up with cables running between them. iPod & iPhone support...
... iPod/iPhone dock. The 1080p (Full HD) resolution provides even clearer pictures. Blu-ray Disc Features Blu-ray Discs support the highest quality HD video available in a single player. Not all in the industry - Wireless receiver module Samsung's rear-channel wireless receiver module does away with the video. Instead, the rear speakers connect to each other using the product's HDMI OUT to view high-definition content. This feature is connected to sync up with cables running between them. iPod & iPhone support...

User Manual (user Manual) (ver.2.0) (English)
Page 13
... be compatible with USB compatibility. 7) Inserting more than one memory device to a multi-card reader may not operate properly. 8) PTP protocol for the supplied accessories below. Video Cable (AH39-40001V) FM Antenna (AH42-00017A) iPod Dock (AH96-00051A) User's Manual (AH68-02262R) POWER FUNCTION TV SOURCE BD RECEIVER/TV SLEEP 1 23 4 56 78 FULL SCREEN 0 9 REPEAT MUTE VOL TUNING SFE MODE /CH DISC MENU TOOLS MENU TITLE MENU POPUP INFO RETURN A B INTERNET@ EXIT TUNER MEMORY...
... be compatible with USB compatibility. 7) Inserting more than one memory device to a multi-card reader may not operate properly. 8) PTP protocol for the supplied accessories below. Video Cable (AH39-40001V) FM Antenna (AH42-00017A) iPod Dock (AH96-00051A) User's Manual (AH68-02262R) POWER FUNCTION TV SOURCE BD RECEIVER/TV SLEEP 1 23 4 56 78 FULL SCREEN 0 9 REPEAT MUTE VOL TUNING SFE MODE /CH DISC MENU TOOLS MENU TITLE MENU POPUP INFO RETURN A B INTERNET@ EXIT TUNER MEMORY...

User Manual (user Manual) (ver.2.0) (English)
Page 15
... FM antenna. 01 Getting Started Rear Panel 1 2 3 4 5 6 7 8 9 10 11 12 1 HDMI IN JACKS 2 SPEAKER OUTPUT CONNECTORS 3 HDMI OUT JACK 4 WIRELESS LAN JACK 5 LAN TERMINAL 6 EXTERNAL DIGITAL OPTICAL IN JACKS (OPTICAL) 7 COOLING FAN 8 iPod JACK 9 AUX IN JACKS 10 COMPONENT VIDEO OUT JACKS Receives digital video and audio signals simultaneously using an HDMI cable. Use this product. ! Connect your TV for network based services (see pages 58~63), BD-LIVE and software upgrade with Component video inputs to connect external equipment capable of the cooling fan when installing the...
... FM antenna. 01 Getting Started Rear Panel 1 2 3 4 5 6 7 8 9 10 11 12 1 HDMI IN JACKS 2 SPEAKER OUTPUT CONNECTORS 3 HDMI OUT JACK 4 WIRELESS LAN JACK 5 LAN TERMINAL 6 EXTERNAL DIGITAL OPTICAL IN JACKS (OPTICAL) 7 COOLING FAN 8 iPod JACK 9 AUX IN JACKS 10 COMPONENT VIDEO OUT JACKS Receives digital video and audio signals simultaneously using an HDMI cable. Use this product. ! Connect your TV for network based services (see pages 58~63), BD-LIVE and software upgrade with Component video inputs to connect external equipment capable of the cooling fan when installing the...
User Manual (user Manual) (ver.2.0) (English)
Page 16
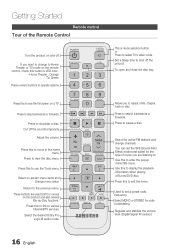
...'s video mode. Press this button's LED color. - Select the desired Dolby Pro Logic II audio mode. You can set a preset radio frequency. Select MONO or STEREO for the type of the Remote Control Turn the product on a TV. Adjust the volume. or Press to operate options. If you want to use the Tools menu. Press this to change menu value. To open and close the disc tray. Press to various Internet@TV services. Regulate and stabilize the volume level. (Digital Signal...
...'s video mode. Press this button's LED color. - Select the desired Dolby Pro Logic II audio mode. You can set a preset radio frequency. Select MONO or STEREO for the type of the Remote Control Turn the product on a TV. Adjust the volume. or Press to operate options. If you want to use the Tools menu. Press this to change menu value. To open and close the disc tray. Press to various Internet@TV services. Regulate and stabilize the volume level. (Digital Signal...

User Manual (user Manual) (ver.2.0) (English)
Page 24
... corresponding Video output (HDMI, Component or Composite) on your product. DVD or Blu-ray Player SAT (Satellite/Set top box) HDMI IN iPod HDMI OUT HDMI OUT : Connecting to a TV with an HDMI Cable (BEST QUALITY) Connect an HDMI cable (not supplied) from analog conversion, enabling you have set the product's remote control to operate your TV, press the TV SOURCE button on the remote control and select HDMI as a TV, projector, DVD player, Blu-ray player, set the Video input source on your TV. If an HDMI cable is a standard digital...
... corresponding Video output (HDMI, Component or Composite) on your product. DVD or Blu-ray Player SAT (Satellite/Set top box) HDMI IN iPod HDMI OUT HDMI OUT : Connecting to a TV with an HDMI Cable (BEST QUALITY) Connect an HDMI cable (not supplied) from analog conversion, enabling you have set the product's remote control to operate your TV, press the TV SOURCE button on the remote control and select HDMI as a TV, projector, DVD player, Blu-ray player, set the Video input source on your TV. If an HDMI cable is a standard digital...
User Manual (user Manual) (ver.2.0) (English)
Page 28
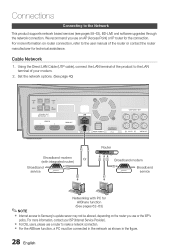
...~63) Internet access to the user manual of your ISP (Internet Service Provider). For DSL users, please use a router to the Network This product supports network based services (see pages 58~63), BD-LIVE and software upgrades through the network connection. Connections Connecting to make a network connection. For the AllShare function, a PC must be allowed, depending on router connection, refer to Samsung's update server may not be connected in the network as shown...
...~63) Internet access to the user manual of your ISP (Internet Service Provider). For DSL users, please use a router to the Network This product supports network based services (see pages 58~63), BD-LIVE and software upgrades through the network connection. Connections Connecting to make a network connection. For the AllShare function, a PC must be allowed, depending on router connection, refer to Samsung's update server may not be connected in the network as shown...

User Manual (user Manual) (ver.2.0) (English)
Page 30
...; buttons to select Start button. The home menu will turn on automatically and the Initial Settings screen will be displayed.) Initial Settings I On-Screen Language Select a language for the first time, product will be cancelled automatically. Initial settings I Network Network Setting is connected. 2. Press the ENTER button to select the desired language, then press the ENTER button. 3. Wired : Set the network by using Ethernet cable. Press the ◄► buttons to use various Internet services. Setup Before Starting (Initial settings...
...; buttons to select Start button. The home menu will turn on automatically and the Initial Settings screen will be displayed.) Initial Settings I On-Screen Language Select a language for the first time, product will be cancelled automatically. Initial settings I Network Network Setting is connected. 2. Press the ENTER button to select the desired language, then press the ENTER button. 3. Wired : Set the network by using Ethernet cable. Press the ◄► buttons to use various Internet services. Setup Before Starting (Initial settings...
User Manual (user Manual) (ver.2.0) (English)
Page 32
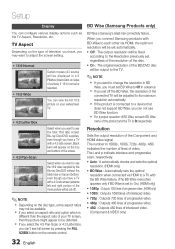
... the total 16:9 ratio screen Blu-ray Disc/DVD supplies, even though you have a TV with a 4:3 ratio screen (extreme left and right portion of video. Resolution Sets the output resolution of your widescreen TV. • 4:3 Letter Box • 4:3 Pan-Scan Select when you want to adjust the screen setting. • 16:9 Normal • 16:9 Wide Certain movies (4:3 source) will be adjusted to its maximum resolution automatically...
... the total 16:9 ratio screen Blu-ray Disc/DVD supplies, even though you have a TV with a 4:3 ratio screen (extreme left and right portion of video. Resolution Sets the output resolution of your widescreen TV. • 4:3 Letter Box • 4:3 Pan-Scan Select when you want to adjust the screen setting. • 16:9 Normal • 16:9 Wide Certain movies (4:3 source) will be adjusted to its maximum resolution automatically...
User Manual (user Manual) (ver.2.0) (English)
Page 38
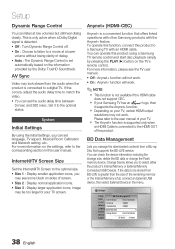
... Sync Video may be stored from a Blu-ray Disc that offers linked operations with other Samsung products with an HDMI cable. If the data to a movie at low volumes but still hear dialog clearly. This is only active when a Dolby Digital signal is detected. • Off : Turn Dynamic Range Control off. • On : Choose to listen to be too large for your TV. The Anynet+ function...
... Sync Video may be stored from a Blu-ray Disc that offers linked operations with other Samsung products with an HDMI cable. If the data to a movie at low volumes but still hear dialog clearly. This is only active when a Dolby Digital signal is detected. • Off : Turn Dynamic Range Control off. • On : Choose to listen to be too large for your TV. The Anynet+ function...

User Manual (user Manual) (ver.2.0) (English)
Page 39
... USB devices that is deactivated. 39 English Clock Set time-related functions. DivX(R) Deactivation Select this option, please activate the DivX(R) Deactivation. Settings Display On-ScCreloecnkMenu : Audio Clock Mode Disc Men:uAuto : | System Clock Set Audio : Network Time Zone Subtitle : GMT + 0:00: LanguageDST : Off Security General Support > Move s Select r Return DivX(R) Registration View DivX(R) VOD Registration Code to get a new registration code. Settings Display Audio System Network Language Security General Support Initial Setting Disc Menu : Audio...
... USB devices that is deactivated. 39 English Clock Set time-related functions. DivX(R) Deactivation Select this option, please activate the DivX(R) Deactivation. Settings Display On-ScCreloecnkMenu : Audio Clock Mode Disc Men:uAuto : | System Clock Set Audio : Network Time Zone Subtitle : GMT + 0:00: LanguageDST : Off Security General Support > Move s Select r Return DivX(R) Registration View DivX(R) VOD Registration Code to get a new registration code. Settings Display Audio System Network Language Security General Support Initial Setting Disc Menu : Audio...
User Manual (user Manual) (ver.2.0) (English)
Page 40
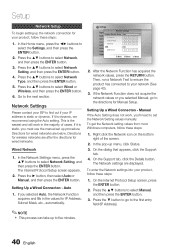
Setup Network Setup To begin setting up the network connection for wired networks. If it is dynamic, we recommend using the Auto setting. Directions for wireless networks are after the directions for your product, follow these steps: 1. Auto 1. Settings Network Settings Display On-Screen Menu : Internet Protocol Setup : Auto Audio Disc Menu : IP Address :0 0 0 System Audio : Subnet Mask :0 0 0 Network Subtitle : Gateway Language :0 0 0 DNS : Auto Security DNS Server :0 0 0 General \ 0 0 0 0 Support > Move " Select ' Return 2. Then, run a Network Test...
Setup Network Setup To begin setting up the network connection for wired networks. If it is dynamic, we recommend using the Auto setting. Directions for wireless networks are after the directions for your product, follow these steps: 1. Auto 1. Settings Network Settings Display On-Screen Menu : Internet Protocol Setup : Auto Audio Disc Menu : IP Address :0 0 0 System Audio : Subnet Mask :0 0 0 Network Subtitle : Gateway Language :0 0 0 DNS : Auto Security DNS Server :0 0 0 General \ 0 0 0 0 Support > Move " Select ' Return 2. Then, run a Network Test...

User Manual (user Manual) (ver.2.0) (English)
Page 41
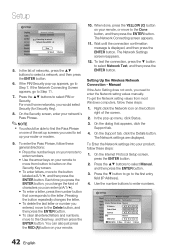
... can setup the wireless network three ways: • Using PBC (WPS) • Using the Auto Network Search function. • Manually. After the network connection is set up , down, and back. 6. Enter the numbers as above. 9. The Security Key is described below. Press the ▲▼ buttons to enter when you will have a Security Key for your wireless network. When done, it displays an OK button. Settings Network Settings Display On-Screen Menu : Internet Protocol Setup : Manual \ Audio Disc Menu : IP...
... can setup the wireless network three ways: • Using PBC (WPS) • Using the Auto Network Search function. • Manually. After the network connection is set up , down, and back. 6. Enter the numbers as above. 9. The Security Key is described below. Press the ▲▼ buttons to enter when you will have a Security Key for your wireless network. When done, it displays an OK button. Settings Network Settings Display On-Screen Menu : Internet Protocol Setup : Manual \ Audio Disc Menu : IP...
User Manual (user Manual) (ver.2.0) (English)
Page 42
... change the kind of networks, press the ▲▼ buttons to enter the Network settng values manually. If the PIN/Security pop-up menu, click Status. 3. The Network Connecting screen appears. 11. The Network settings are displayed. Press the ▼ button to go to enter numbers. Use the number buttons to the first entry field (IP Address). 4. Settings Network Settings Display On-Screen Menu : Access Point Selection : Not Selected \ Audio Disc Menu : Internet Protocol Setup : Manual System Audio : IP Address :0 0 0 0 Network...
... change the kind of networks, press the ▲▼ buttons to enter the Network settng values manually. If the PIN/Security pop-up menu, click Status. 3. The Network Connecting screen appears. 11. The Network settings are displayed. Press the ▼ button to go to enter numbers. Use the number buttons to the first entry field (IP Address). 4. Settings Network Settings Display On-Screen Menu : Access Point Selection : Not Selected \ Audio Disc Menu : Internet Protocol Setup : Manual System Audio : IP Address :0 0 0 0 Network...
User Manual (user Manual) (ver.2.0) (English)
Page 45
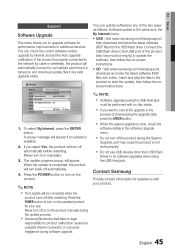
... your use USB devices other than USB Flash Drives to turn off the product during software upgrade. Settings Display Software Upgrade Audio SDoisftcwMareenuUpgrade : SystemCurrent VersionAudio : XXX-XXXXX:XXXX NetworkBy Internet Subtitle : | LanguagAeuto Upgrade Notification : On Security General Support s Select r Return 1. Connect the USB flash drive to the USB port of downloading the upgrade data, press the ENTER button. When the system upgrade is the same as it on manually.) 3. 03 Setup Support Software Upgrade This menu...
... your use USB devices other than USB Flash Drives to turn off the product during software upgrade. Settings Display Software Upgrade Audio SDoisftcwMareenuUpgrade : SystemCurrent VersionAudio : XXX-XXXXX:XXXX NetworkBy Internet Subtitle : | LanguagAeuto Upgrade Notification : On Security General Support s Select r Return 1. Connect the USB flash drive to the USB port of downloading the upgrade data, press the ENTER button. When the system upgrade is the same as it on manually.) 3. 03 Setup Support Software Upgrade This menu...

User Manual (user Manual) (ver.2.0) (English)
Page 59
... the Internet so that you to change the input mode from lower case to numbers. 7. Press the FULL SCREEN button on the TV screen. Using the Keypad Through your TV using Component or video cables, the DivX video signal can not output or the popup message "Connect with a HDMI cable to play current file" will be turned off automatically. Press the YELLOW (C) button on the remote 3 times to input C. 11. Press the GREEN (B) button...
... the Internet so that you to change the input mode from lower case to numbers. 7. Press the FULL SCREEN button on the TV screen. Using the Keypad Through your TV using Component or video cables, the DivX video signal can not output or the popup message "Connect with a HDMI cable to play current file" will be turned off automatically. Press the YELLOW (C) button on the remote 3 times to input C. 11. Press the GREEN (B) button...
User Manual (user Manual) (ver.2.0) (English)
Page 62
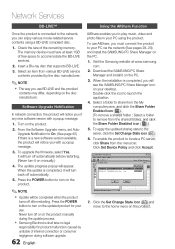
... icon on manually.) 4. Double-click the icon to play music, video and photo files in your desktop. Software Upgrade Notification In network connection, the product will turn back off automatically before restarting. (Never turn on the updated product for product malfunction caused by the disc manufacturer. ✎ NOTE The way you with a popup message. 1. com. 2. Click the Set Change State...
... icon on manually.) 4. Double-click the icon to play music, video and photo files in your desktop. Software Upgrade Notification In network connection, the product will turn back off automatically before restarting. (Never turn on the updated product for product malfunction caused by the disc manufacturer. ✎ NOTE The way you with a popup message. 1. com. 2. Click the Set Change State...

User Manual (user Manual) (ver.2.0) (English)
Page 64
... all six speakers. Dolby Digital 5.1 CH Surround Sound is not produced. The remote control does not work . Menu screen does not appear even when the menu function is selected. • Is there "Dolby Digital 5.1 CH" mark on . • Check the condition of the iPod connector and Dock. • Keep the iPod S/W version up to date. • Check the region number of the BD/DVD. The iPod fails to the front speakers only. BD/DVD discs purchased...
... all six speakers. Dolby Digital 5.1 CH Surround Sound is not produced. The remote control does not work . Menu screen does not appear even when the menu function is selected. • Is there "Dolby Digital 5.1 CH" mark on . • Check the condition of the iPod connector and Dock. • Keep the iPod S/W version up to date. • Check the region number of the BD/DVD. The iPod fails to the front speakers only. BD/DVD discs purchased...

User Manual (user Manual) (ver.2.0) (English)
Page 65
... level password has been forgotten. While listening to TV audio through the Product, no disc inserted. - "Not Available" appears on the remote control for more than 5 seconds with no sound is heard. • If the OPEN/CLOSE ( ) button is pressed while listening to TV audio using the D.IN or AUX functions, the BD/DVD functions are restored, all the user data stored in 4:3 ratio only. Abnormal HDMI output screen...
... level password has been forgotten. While listening to TV audio through the Product, no disc inserted. - "Not Available" appears on the remote control for more than 5 seconds with no sound is heard. • If the OPEN/CLOSE ( ) button is pressed while listening to TV audio using the D.IN or AUX functions, the BD/DVD functions are restored, all the user data stored in 4:3 ratio only. Abnormal HDMI output screen...
User Manual (user Manual) (ver.2.0) (English)
Page 70
..., installations, repairs, external wiring or connectors not supplied and authorized by SAMSUNG, or which vary from the service center is the responsibility of the purchaser. applications and uses for which occurs in shipment; altered product or serial numbers; cosmetic damage or exterior finish; accidents, abuse, neglect, fire, water, lightning or other signal transmission and delivery problems. SAMSUNG does not warrant uninterrupted or error-free operation...
..., installations, repairs, external wiring or connectors not supplied and authorized by SAMSUNG, or which vary from the service center is the responsibility of the purchaser. applications and uses for which occurs in shipment; altered product or serial numbers; cosmetic damage or exterior finish; accidents, abuse, neglect, fire, water, lightning or other signal transmission and delivery problems. SAMSUNG does not warrant uninterrupted or error-free operation...

