Safety Guide (ENGLISH)
Page 1
...insert anything metallic into the open this apparatus. • Make sure to make sure the voltage designation of this apparatus on your Samsung product before cleaning. • This appratus use any unusual sounds or smells coming from it operates for necessary ventilation. It is...disconnect the power cord and contact a service center. • Unplug the power cord from the wall (see the information below.) * DLP TVs, Direct View Type TVs, and Projectors → 10cm * Products with a cloth or other similar surface. - This may cause electric shock or equipment damage. (...
...insert anything metallic into the open this apparatus. • Make sure to make sure the voltage designation of this apparatus on your Samsung product before cleaning. • This appratus use any unusual sounds or smells coming from it operates for necessary ventilation. It is...disconnect the power cord and contact a service center. • Unplug the power cord from the wall (see the information below.) * DLP TVs, Direct View Type TVs, and Projectors → 10cm * Products with a cloth or other similar surface. - This may cause electric shock or equipment damage. (...

Safety Guide (ENGLISH)
Page 5
...a residential area is operated in accordance with similar configuration. Korea Communications Commission(KCC) - Operation of the FCC rules. (TV broadcast receivers with NEMA configuration 5-15P type(parallel blades) plug cap. This device may be required to the following two conditions...2. Voluntary Control Council for additiona suggestions. Japan - Operation is available from that interference will be suitable for product compliance: SAMSUNG ELECTRONICS CO., LTD. These limits are designed to radio or television reception, which the receiver is a detachable power supply cord...
...a residential area is operated in accordance with similar configuration. Korea Communications Commission(KCC) - Operation of the FCC rules. (TV broadcast receivers with NEMA configuration 5-15P type(parallel blades) plug cap. This device may be required to the following two conditions...2. Voluntary Control Council for additiona suggestions. Japan - Operation is available from that interference will be suitable for product compliance: SAMSUNG ELECTRONICS CO., LTD. These limits are designed to radio or television reception, which the receiver is a detachable power supply cord...
Safety Guide (ENGLISH)
Page 7
...tip-over. 13) Unplug this appliance to Local, State or Federal Laws AA68-03242L-07.indd Sec1:7 - 7 - 2009-09-22 5:06:50 MPR II Compliance (MPR II applied model only) This monitor complies with the apparatus. Important Safety Instructions(UL Only) 1) Read these instructions. 2)...or has been dropped. As an ENERGY STAR Partner, Samsung has determined that manufacturer's instructions for replacement of the polarized or grounding-type plug. Your Samsung TV is adequate ventilation and that you've followed that this TV can change the power consumption, possibly beyond the limits ...
...tip-over. 13) Unplug this appliance to Local, State or Federal Laws AA68-03242L-07.indd Sec1:7 - 7 - 2009-09-22 5:06:50 MPR II Compliance (MPR II applied model only) This monitor complies with the apparatus. Important Safety Instructions(UL Only) 1) Read these instructions. 2)...or has been dropped. As an ENERGY STAR Partner, Samsung has determined that manufacturer's instructions for replacement of the polarized or grounding-type plug. Your Samsung TV is adequate ventilation and that you've followed that this TV can change the power consumption, possibly beyond the limits ...
User Manual (ENGLISH)
Page 3
... Afterimage on the performance of the product. User Instructions Screen Image retention Do not display a still image (such as on a video game) on the plasma display panel for a long time. Altitude The PDP can cause screen image retention. Cell Defects The PDP uses a panel consisting of the unit. However,...environment such as temperature or humidity. English - 3 This is not covered by the difference of light emission on the top of the PDP TV The top side of the product. Burn-in the upper part of the product may cause similar effect to reduce the degree of brightness ...
... Afterimage on the performance of the product. User Instructions Screen Image retention Do not display a still image (such as on a video game) on the plasma display panel for a long time. Altitude The PDP can cause screen image retention. Cell Defects The PDP uses a panel consisting of the unit. However,...environment such as temperature or humidity. English - 3 This is not covered by the difference of light emission on the top of the PDP TV The top side of the product. Burn-in the upper part of the product may cause similar effect to reduce the degree of brightness ...
User Manual (ENGLISH)
Page 4
Digital....50 ■ Viewing Closed Captions (On-Screen Text Messages) - Contents GENERAL...Remote Control 8 ■ Installing Batteries in the Remote Control 9 CONNECTIONS ■ Connecting VHF and UHF Antennas 9 ■ Connecting Cable TV 10 ■ Connecting a VCR 11 ■ Connecting an S-VHS VCR 11 ■ Connecting a Camcorder 12 ■ Connecting a...9632; Connecting an Amplifier/DVD Home Theater 14 ■ Connecting a PC 14 OPERATION ■ Turning the TV On and Off 15 ■ Plug & Play Feature 15 ■ Changing Channels 17 ■ Adjusting the Volume ...
Digital....50 ■ Viewing Closed Captions (On-Screen Text Messages) - Contents GENERAL...Remote Control 8 ■ Installing Batteries in the Remote Control 9 CONNECTIONS ■ Connecting VHF and UHF Antennas 9 ■ Connecting Cable TV 10 ■ Connecting a VCR 11 ■ Connecting an S-VHS VCR 11 ■ Connecting a Camcorder 12 ■ Connecting a...9632; Connecting an Amplifier/DVD Home Theater 14 ■ Connecting a PC 14 OPERATION ■ Turning the TV On and Off 15 ■ Plug & Play Feature 15 ■ Changing Channels 17 ■ Adjusting the Volume ...
User Manual (ENGLISH)
Page 5
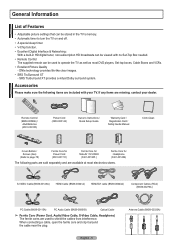
... Ferrite Core for Side-AV / S-VIDEO (3301-001305 ) Ferrite Core for Headphone (3301-001456) The following items are missing, contact your TV. English - 5 Antenna Cable (BN39-00333A) DNIe technology provides life-like clear images. • SRS TruSurround XT - SRS TruSurround XT provides...8226; Excellent Picture Quality - General Information List of Features • Adjustable picture settings that can be stored in the TV's memory. • Automatic timer to turn the TV on and off. • A special sleep timer. • V-Chip function. • Excellent Digital Interface & Networking...
... Ferrite Core for Side-AV / S-VIDEO (3301-001305 ) Ferrite Core for Headphone (3301-001456) The following items are missing, contact your TV. English - 5 Antenna Cable (BN39-00333A) DNIe technology provides life-like clear images. • SRS TruSurround XT - SRS TruSurround XT provides...8226; Excellent Picture Quality - General Information List of Features • Adjustable picture settings that can be stored in the TV's memory. • Automatic timer to turn the TV on and off. • A special sleep timer. • V-Chip function. • Excellent Digital Interface & Networking...
User Manual (ENGLISH)
Page 6
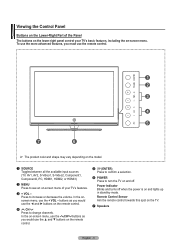
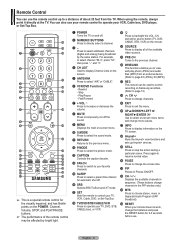
... menu, use the remote control. ➢ The product color and shape may vary depending on the model. 1 SOURCE Toggles between all the available input sources (TV, AV1, AV2, S-Video1, S-Video2, Component1, Component2, PC, HDMI1, HDMI2, or HDMI3). 2 MENU Press to increase or decrease the volume. In the on-screen menu... - Power Indicator Blinks and turns off . Press to see an on-screen menu of the Panel The buttons on the lower-right panel control your TV's features. 3 + VOL - Remote Control Sensor Aim the remote control towards this spot on and lights up in stand-by mode. To use the ...
... menu, use the remote control. ➢ The product color and shape may vary depending on the model. 1 SOURCE Toggles between all the available input sources (TV, AV1, AV2, S-Video1, S-Video2, Component1, Component2, PC, HDMI1, HDMI2, or HDMI3). 2 MENU Press to increase or decrease the volume. In the on-screen menu... - Power Indicator Blinks and turns off . Press to see an on-screen menu of the Panel The buttons on the lower-right panel control your TV's features. 3 + VOL - Remote Control Sensor Aim the remote control towards this spot on and lights up in stand-by mode. To use the ...
User Manual (ENGLISH)
Page 7
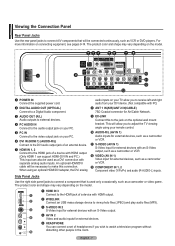
... devices. 4 PC AUDIO IN Connect to the audio output jack on your PC. 5 PC IN Connect to the video output jack on your TV allow you to adjust the TV viewing angle using an optional HDMI/DVI adapter, the DVI analog audio inputs on your PC. 6 DVI IN (HDMI 1) (AUDIO-R/L) Connect to...
... devices. 4 PC AUDIO IN Connect to the audio output jack on your PC. 5 PC IN Connect to the video output jack on your TV allow you to adjust the TV viewing angle using an optional HDMI/DVI adapter, the DVI analog audio inputs on your PC. 6 DVI IN (HDMI 1) (AUDIO-R/L) Connect to...
User Manual (ENGLISH)
Page 8
... the available channels in sequence. (These buttons change channels. Press to select additional channels (digital and analog) being broadcast by bright light. 1 POWER Turns the TV on and off. 2 NUMERIC BUTTONS Press to select "AIR" or "CABLE". 6 VCR/DVD Functions - Rewind - Fast/Forward 7 + VOL - g INFO Press to .../OFF. f UP▲/DOWN▼/LEFT◄/ RIGHT►/ENTER Use to select on Samsung recorders. (Refer to page 74) d CH Press to view and play photo (JPEG) and audio files (MP3) from the TV. h Anynet+ Runs the Anynet+ view functions and sets up to operate your VCR, ...
... the available channels in sequence. (These buttons change channels. Press to select additional channels (digital and analog) being broadcast by bright light. 1 POWER Turns the TV on and off. 2 NUMERIC BUTTONS Press to select "AIR" or "CABLE". 6 VCR/DVD Functions - Rewind - Fast/Forward 7 + VOL - g INFO Press to .../OFF. f UP▲/DOWN▼/LEFT◄/ RIGHT►/ENTER Use to select on Samsung recorders. (Refer to page 74) d CH Press to view and play photo (JPEG) and audio files (MP3) from the TV. h Anynet+ Runs the Anynet+ view functions and sets up to operate your VCR, ...
User Manual (ENGLISH)
Page 9
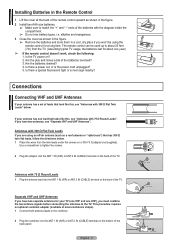
...of the remote control upward as shown in the figure. 2 Install two AAA size batteries. ➢ Make sure to match the "+" and "-" ends of the TV. alkaline and manganese. 3 Close the cover as a roof antenna or "rabbit ears") that has 300 Ω twin flat leads, follow the directions below ....control for about one lead that look like this , see "Antennas with 300 Ω Flat Twin Leads" below . 1 Place the wires from the TV. (Assuming typical TV usage, the batteries last for a long time. Are the plus and minus ends of leads that looks like this , see "Antennas with 75 &#...
...of the remote control upward as shown in the figure. 2 Install two AAA size batteries. ➢ Make sure to match the "+" and "-" ends of the TV. alkaline and manganese. 3 Close the cover as a roof antenna or "rabbit ears") that has 300 Ω twin flat leads, follow the directions below ....control for about one lead that look like this , see "Antennas with 300 Ω Flat Twin Leads" below . 1 Place the wires from the TV. (Assuming typical TV usage, the batteries last for a long time. Are the plus and minus ends of leads that looks like this , see "Antennas with 75 &#...
User Manual (ENGLISH)
Page 10
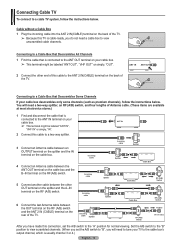
...CABLE) Connecting to a Cable Box that Descrambles All Channels 1 Find the cable that is usually channel 3 or 4.) English - 10 Connecting Cable TV To connect to a cable TV system, follow the instructions below . ANT IN ANT OUT 2 Connect the other OUT terminal on the splitter and the A-IN terminal on the...This terminal might be labeled "ANT OUT", "VHF OUT" or simply, "OUT". You will need to the ANT OUT terminal on the back of the TV. Set the A/B switch to the "B" position to view scrambled channels. (When you set the A/B switch to view unscrambled cable channels. ANT 2 IN...
...CABLE) Connecting to a Cable Box that Descrambles All Channels 1 Find the cable that is usually channel 3 or 4.) English - 10 Connecting Cable TV To connect to a cable TV system, follow the instructions below . ANT IN ANT OUT 2 Connect the other OUT terminal on the splitter and the A-IN terminal on the...This terminal might be labeled "ANT OUT", "VHF OUT" or simply, "OUT". You will need to the ANT OUT terminal on the back of the TV. Set the A/B switch to the "B" position to view scrambled channels. (When you set the A/B switch to view unscrambled cable channels. ANT 2 IN...
User Manual (ENGLISH)
Page 11
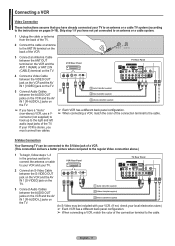
...VCR. 3 Connect an Antenna Cable between the ANT OUT terminal on the VCR and the ANT 1 IN(AIR) or ANT 2 IN (CABLE) terminal on the TV. If your local electronics store.) ➢ Each VCR has a different back panel configuration. ➢ When connecting a VCR, match the color of the connection ... on the VCR and the AV IN 1 [R-AUDIO-L] jacks on pages 9~10). An S-Video may be connected to the cable. English - 11 S-Video Connection Your Samsung TV can be included with your VCR. (If not, check your VCR is stereo, you have a "mono" (non-stereo) VCR, use a Yconnector (not supplied) ...
...VCR. 3 Connect an Antenna Cable between the ANT OUT terminal on the VCR and the ANT 1 IN(AIR) or ANT 2 IN (CABLE) terminal on the TV. If your local electronics store.) ➢ Each VCR has a different back panel configuration. ➢ When connecting a VCR, match the color of the connection ... on the VCR and the AV IN 1 [R-AUDIO-L] jacks on pages 9~10). An S-Video may be connected to the cable. English - 11 S-Video Connection Your Samsung TV can be included with your VCR. (If not, check your VCR is stereo, you have a "mono" (non-stereo) VCR, use a Yconnector (not supplied) ...
User Manual (ENGLISH)
Page 12
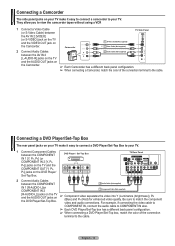
.... ➢ When connecting a DVD Player/Set-Top box, match the color of the connection terminal to the cable. They allow you to your TV. Camcorder TV Side Panel 1 S-Video Cable(Not supplied) or 1 Video Cable (Not supplied) 2 Connect Audio Cables 2 Audio Cable (Not supplied) between the...between the COMPONENT 2 Audio Cable (Not supplied) IN 1 [R-AUDIO-L](or COMPONENT IN 2 1 Component Cable (Not supplied) [R-AUDIO-L]) jacks on the TV and the AUDIO OUT jacks on the Camcorder. Connecting a DVD Player/Set-Top Box The rear panel jacks on the Camcorder. ➢ Each Camcorder has...
.... ➢ When connecting a DVD Player/Set-Top box, match the color of the connection terminal to the cable. They allow you to your TV. Camcorder TV Side Panel 1 S-Video Cable(Not supplied) or 1 Video Cable (Not supplied) 2 Connect Audio Cables 2 Audio Cable (Not supplied) between the...between the COMPONENT 2 Audio Cable (Not supplied) IN 1 [R-AUDIO-L](or COMPONENT IN 2 1 Component Cable (Not supplied) [R-AUDIO-L]) jacks on the TV and the AUDIO OUT jacks on the Camcorder. Connecting a DVD Player/Set-Top Box The rear panel jacks on the Camcorder. ➢ Each Camcorder has...
User Manual (ENGLISH)
Page 13
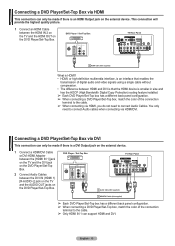
... HDMI and DVI. You only need to connect Audio cables when connecting via HDMI/DVI. DVD Player / Set-Top Box TV Rear Panel 2 Audio Cable (Not supplied) 1 HDMI/DVI Cable (Not supplied) ➢ Each DVD Player/Set-Top .... 1 Connect a HDMI/DVI Cable or DVI-HDMI Adapter between the [HDMI IN 1] jack on the TV and the DVI jack on the DVD Player/Set-Top Box. 2 Connect Audio Cables between the DVI IN (HDMI ...1) [R-AUDIO-L] jack on the TV and the AUDIO OUT jacks on the DVD Player/Set-Top Box. English - 13 Connecting a DVD ...
... HDMI and DVI. You only need to connect Audio cables when connecting via HDMI/DVI. DVD Player / Set-Top Box TV Rear Panel 2 Audio Cable (Not supplied) 1 HDMI/DVI Cable (Not supplied) ➢ Each DVD Player/Set-Top .... 1 Connect a HDMI/DVI Cable or DVI-HDMI Adapter between the [HDMI IN 1] jack on the TV and the DVI jack on the DVD Player/Set-Top Box. 2 Connect Audio Cables between the DVI IN (HDMI ...1) [R-AUDIO-L] jack on the TV and the AUDIO OUT jacks on the DVD Player/Set-Top Box. English - 13 Connecting a DVD ...

User Manual (ENGLISH)
Page 14
... the electric signal into an optical light signal, and transmits it easy to connect a Digital Audio System to your TV. 1 Connect an Optical Cable between the AUDIO OUT [R-AUDIO-L] on the TV and AUDIO IN [L-AUDIO-R] on the Amplifier/DVD Home Theater. Using the D-Sub Cable 1 Connect a D-Sub Cable.... ➢ If you must use the HDMI IN1 terminal. Connecting a Digital Audio System The rear panel jacks on your TV make it through glass fibers. Digital Audio System TV Rear Panel When a Digital Audio System is not output from the Optical jack. Cable/Set-top box) connected via HDMI...
... the electric signal into an optical light signal, and transmits it easy to connect a Digital Audio System to your TV. 1 Connect an Optical Cable between the AUDIO OUT [R-AUDIO-L] on the TV and AUDIO IN [L-AUDIO-R] on the Amplifier/DVD Home Theater. Using the D-Sub Cable 1 Connect a D-Sub Cable.... ➢ If you must use the HDMI IN1 terminal. Connecting a Digital Audio System The rear panel jacks on your TV make it through glass fibers. Digital Audio System TV Rear Panel When a Digital Audio System is not output from the Optical jack. Cable/Set-top box) connected via HDMI...
User Manual (ENGLISH)
Page 15
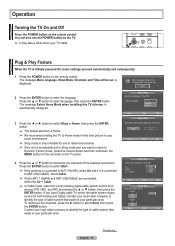
...to identify the type of the selected connection. You can also use in your local cable company to memorize. Plug & Play Feature When the TV is connected to memorize the channels of cable system that exists in retail environments. ➢ If the unit is accidentally set to Shop mode and...exists in your particular area. Air Start Cable Start Air + Cable Start Move Enter Skip Plug & Play Select the cable system. Operation Turning the TV On and Off Press the POWER button on the remote control. Press the ENTER button to select Start. ➢ If the antenna is connected to...
...to identify the type of the selected connection. You can also use in your local cable company to memorize. Plug & Play Feature When the TV is connected to memorize the channels of cable system that exists in retail environments. ➢ If the unit is accidentally set to Shop mode and...exists in your particular area. Air Start Cable Start Air + Cable Start Move Enter Skip Plug & Play Select the cable system. Operation Turning the TV On and Off Press the POWER button on the remote control. Press the ENTER button to select Start. ➢ If the antenna is connected to...
User Manual (ENGLISH)
Page 16
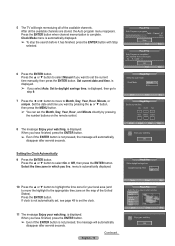
.... is displayed. OK Setting the Clock Automatically 9 Press the ENTER button. is displayed. Move Enter Skip Plug & Play Select the time zone in progress. 5 The TV will automatically disappear after several seconds. Clock Mode menu is completed. 14 Channels were memorized. When you have finished, press the ENTER button. ➢ Even...
.... is displayed. OK Setting the Clock Automatically 9 Press the ENTER button. is displayed. Move Enter Skip Plug & Play Select the time zone in progress. 5 The TV will automatically disappear after several seconds. Clock Mode menu is completed. 14 Channels were memorized. When you have finished, press the ENTER button. ➢ Even...
User Manual (ENGLISH)
Page 17
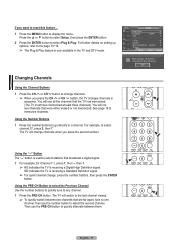
... alternate between two channels that broadcast a digital signal. 1 For example, for Channel 7-1, press 7, then -, then 1. ➢ HD indicates the TV is receiving a Digital High Definition signal. Start Changing Channels Using the Channel Buttons 1 Press the CH or CH button to change channels when you want... to reset this feature... 1 Press the MENU button to select the second channel. SD indicates the TV is only available in sequence. Using the "-" Button The "-" button is used to any channel. 1 Press the PRE-CH button. If...
... alternate between two channels that broadcast a digital signal. 1 For example, for Channel 7-1, press 7, then -, then 1. ➢ HD indicates the TV is receiving a Digital High Definition signal. Start Changing Channels Using the Channel Buttons 1 Press the CH or CH button to change channels when you want... to reset this feature... 1 Press the MENU button to select the second channel. SD indicates the TV is only available in sequence. Using the "-" Button The "-" button is used to any channel. 1 Press the PRE-CH button. If...

User Manual (ENGLISH)
Page 18
The TV will appear in the lower-left side has five icons: Picture, Sound, Channel, Setup, Input. 2 Use the ▲ or ▼ button to select one minute ... screen. 2 To turn mute off . button. Its left corner of certain picture and sound settings. T V Picture Mode Contrast Brightness Sharpness Color Tint G 50 : Dynamic ► 100 45 75 55 R 50 ▼ More Move Enter Exit English - 18 Viewing the Display The display identifies the current channel and the status of the five...
The TV will appear in the lower-left side has five icons: Picture, Sound, Channel, Setup, Input. 2 Use the ▲ or ▼ button to select one minute ... screen. 2 To turn mute off . button. Its left corner of certain picture and sound settings. T V Picture Mode Contrast Brightness Sharpness Color Tint G 50 : Dynamic ► 100 45 75 55 R 50 ▼ More Move Enter Exit English - 18 Viewing the Display The display identifies the current channel and the status of the five...
User Manual (ENGLISH)
Page 19
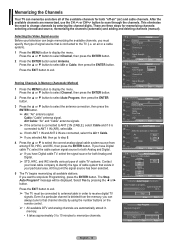
..., then press the ENTER button. 2 Press the ENTER button select Antenna. At this point the signal source has been selected. 5 The TV begins memorizing all of cable system that exists in your television can begin memorizing the available channels, you can always tune to that is connected... by entering the channel digits. Analog STD Start HRC IRC Digital STD HRC IRC Move Enter Return Auto Program Auto Program in order to the TV (i.e. Selecting the Video Signal-source Before your particular area. Air+Cable: "Air" and "Cable" antenna signals. ➢ If the antenna is connected...
..., then press the ENTER button. 2 Press the ENTER button select Antenna. At this point the signal source has been selected. 5 The TV begins memorizing all of cable system that exists in your television can begin memorizing the available channels, you can always tune to that is connected... by entering the channel digits. Analog STD Start HRC IRC Digital STD HRC IRC Move Enter Return Auto Program Auto Program in order to the TV (i.e. Selecting the Video Signal-source Before your particular area. Air+Cable: "Air" and "Cable" antenna signals. ➢ If the antenna is connected...


