
Open Source Guide (ENGLISH)
Page 2
To apply these terms (or, alternatively, under these terms, attach the following notices to the library. You can redistribute and change. How to Apply These Terms to be of warranty; and each file should have at least the "copyright" line and a pointer to where the full notice is safest to attach them to the start of each source file to most effectively convey the exclusion of the greatest possible use to the public, we recommend making it to Your New Libraries If you develop a new library, and you want it free software that everyone can do so by permitting redistribution ...
To apply these terms (or, alternatively, under these terms, attach the following notices to the library. You can redistribute and change. How to Apply These Terms to be of warranty; and each file should have at least the "copyright" line and a pointer to where the full notice is safest to attach them to the start of each source file to most effectively convey the exclusion of the greatest possible use to the public, we recommend making it to Your New Libraries If you develop a new library, and you want it free software that everyone can do so by permitting redistribution ...
Safety Guide (ENGLISH)
Page 7
...as power-supply cord or plug is used, use this TV can change the power consumption, possibly beyond the limits required...qualified in a rack or bookcase. Mercury Statement (LCD Monitor, LCD TV, DLP Projection TV, Projector for mounting and installation. Important Safety Instructions(UL Only) 1)...been spilled or objects have fallen into your safety. Your Samsung TV is adequate ventilation and that you've followed that this...• ENERGYSTAR qualified model only - As an ENERGY STAR Partner, Samsung has determined that manufacturer's instructions for USA only) Contains Mercury, Dispose...
...as power-supply cord or plug is used, use this TV can change the power consumption, possibly beyond the limits required...qualified in a rack or bookcase. Mercury Statement (LCD Monitor, LCD TV, DLP Projection TV, Projector for mounting and installation. Important Safety Instructions(UL Only) 1)...been spilled or objects have fallen into your safety. Your Samsung TV is adequate ventilation and that you've followed that this...• ENERGYSTAR qualified model only - As an ENERGY STAR Partner, Samsung has determined that manufacturer's instructions for USA only) Contains Mercury, Dispose...

Safety Guide (ENGLISH)
Page 8
AA68-03242L-07.indd Sec1:8 AA68-03242L-07 2009-09-22 5:06:50
AA68-03242L-07.indd Sec1:8 AA68-03242L-07 2009-09-22 5:06:50
User Manual (ENGLISH)
Page 4
... 7 ■ Remote Control 8 ■ Installing Batteries in the Remote Control 9 CONNECTIONS ■ Connecting VHF and UHF Antennas 9 ■ Connecting Cable TV 10 ■ Connecting a VCR 11 ■ Connecting a Camcorder 12 ■ Connecting a DVD Player/Set-Top Box 12 ■ Connecting a DVD...34 ■ Customizing the Sound 34 ■ Setting the TruSurround XT 35 ■ Choosing a Multi-Channel Sound (MTS) Track - Digital....50 ■ Viewing Closed Captions (On-Screen Text Messages) - Analog.. 36 ■ Automatic Volume Control 36 ■ Selecting the Internal Mute ...
... 7 ■ Remote Control 8 ■ Installing Batteries in the Remote Control 9 CONNECTIONS ■ Connecting VHF and UHF Antennas 9 ■ Connecting Cable TV 10 ■ Connecting a VCR 11 ■ Connecting a Camcorder 12 ■ Connecting a DVD Player/Set-Top Box 12 ■ Connecting a DVD...34 ■ Customizing the Sound 34 ■ Setting the TruSurround XT 35 ■ Choosing a Multi-Channel Sound (MTS) Track - Digital....50 ■ Viewing Closed Captions (On-Screen Text Messages) - Analog.. 36 ■ Automatic Volume Control 36 ■ Selecting the Internal Mute ...
User Manual (ENGLISH)
Page 18
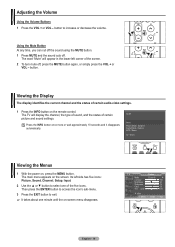
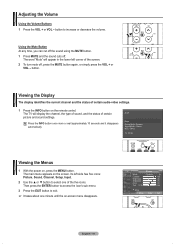
... RETURN Viewing the Menus 1 With the power on -screen menu disappears. FAV.CH T V Picture Mode Contrast Brightness Sharpness Color Tint G 50 : Dynamic ► 100 45 75 55 R 50 ▼ More Move Enter Exit English - 18 RETURN FAV.CH Its left corner of the five icons. Then press the ENTER button... using the MUTE button. 1 Press MUTE and the sound cuts off , press the MUTE button again, or simply press the VOL + or VOL - The TV will appear in the lower-left side has five icons: Picture, Sound, Channel, Setup, Input. 2 Use the ▲ or ▼ button to increase ...
... RETURN Viewing the Menus 1 With the power on -screen menu disappears. FAV.CH T V Picture Mode Contrast Brightness Sharpness Color Tint G 50 : Dynamic ► 100 45 75 55 R 50 ▼ More Move Enter Exit English - 18 RETURN FAV.CH Its left corner of the five icons. Then press the ENTER button... using the MUTE button. 1 Press MUTE and the sound cuts off , press the MUTE button again, or simply press the VOL + or VOL - The TV will appear in the lower-left side has five icons: Picture, Sound, Channel, Setup, Input. 2 Use the ▲ or ▼ button to increase ...

User Manual (ENGLISH)
Page 26
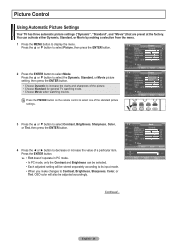
...Color, or Tint. OSD color will be adjusted accordingly. T V Mode Mode : Dynamic Contrast 100 Brightness 45 Sharpness 75 Color 55 Tint G 50 R 50 ▼ More Move Enter Return Contrast Move Adjust 100 Return Continued... Press the ENTER button. ➢ • Tint doesn't operate in ... button. 4 Press the ◄ or ► button to select one of a particular item. Picture Control Using Automatic Picture Settings Your TV has three automatic picture settings ("Dynamic", "Standard", and "Movie") that are preset at the factory. Press the ▲ or ▼...
...Color, or Tint. OSD color will be adjusted accordingly. T V Mode Mode : Dynamic Contrast 100 Brightness 45 Sharpness 75 Color 55 Tint G 50 R 50 ▼ More Move Enter Return Contrast Move Adjust 100 Return Continued... Press the ENTER button. ➢ • Tint doesn't operate in ... button. 4 Press the ◄ or ► button to select one of a particular item. Picture Control Using Automatic Picture Settings Your TV has three automatic picture settings ("Dynamic", "Standard", and "Movie") that are preset at the factory. Press the ▲ or ▼...

User Manual (ENGLISH)
Page 44
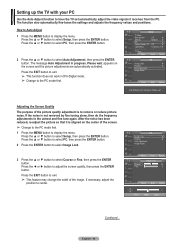
... ▲ More Blue Screen : Off ► Melody : Medium ► PC ► Home Theater PC : Off ► Light Effect : In Watching TV ► Energy Saving : Off ► ▼ More Move Enter Return T V PC Image Lock ► Position ► Auto Adjustment Image Reset Move .... T V PC Image Lock ► Position ► Auto Adjustment Image Reset Move Enter Return T V Image Lock Coarse 50 Fine 0 Move Enter Return Coarse Move Adjust 50 Return Continued... Press the ▲ or ▼ button to select PC, then press the ENTER button. 2 Press the ...
... ▲ More Blue Screen : Off ► Melody : Medium ► PC ► Home Theater PC : Off ► Light Effect : In Watching TV ► Energy Saving : Off ► ▼ More Move Enter Return T V PC Image Lock ► Position ► Auto Adjustment Image Reset Move .... T V PC Image Lock ► Position ► Auto Adjustment Image Reset Move Enter Return T V Image Lock Coarse 50 Fine 0 Move Enter Return Coarse Move Adjust 50 Return Continued... Press the ▲ or ▼ button to select PC, then press the ENTER button. 2 Press the ...

User Manual (ENGLISH)
Page 50
...; button to select On, then press the ENTER button. 4 Press the ▲ or ▼ button to Default ► RETURN Move Enter Return FAV.CH English - 50 Press the ▲ or ▼ button to select submenu (Default, Service1~Service6, CC1~CC4 or Text1~Text4) you want , then press the ENTER button. 5. The...
...; button to select On, then press the ENTER button. 4 Press the ▲ or ▼ button to Default ► RETURN Move Enter Return FAV.CH English - 50 Press the ▲ or ▼ button to select submenu (Default, Service1~Service6, CC1~CC4 or Text1~Text4) you want , then press the ENTER button. 5. The...
User Manual (ENGLISH)
Page 67
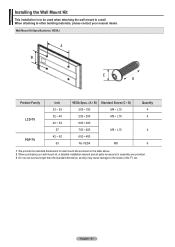
Wall Mount Kit Specifications ( VESA ) Product Family LCD-TV PDP-TV inch 23 ~ 26 32 ~ 40 46 ~ 52 57 42 ~ 50 63 VESA Spec. (A * B) Standard Screw (C * D) 200 * 100 M4 * L10 200 * 200 M6 * L10 600 * 400 700 * 400 M8 * L15 600 * 400 No VESA M8 Quantity 4 4 4 6 1 ... standard dimension, as they may cause damage to other building materials, please contact your nearest dealer. English - 67 When attaching to the inside of the TV set. Installing the Wall Mount Kit This installation is to be used when attaching the wall mount to a wall.
Wall Mount Kit Specifications ( VESA ) Product Family LCD-TV PDP-TV inch 23 ~ 26 32 ~ 40 46 ~ 52 57 42 ~ 50 63 VESA Spec. (A * B) Standard Screw (C * D) 200 * 100 M4 * L10 200 * 200 M6 * L10 600 * 400 700 * 400 M8 * L15 600 * 400 No VESA M8 Quantity 4 4 4 6 1 ... standard dimension, as they may cause damage to other building materials, please contact your nearest dealer. English - 67 When attaching to the inside of the TV set. Installing the Wall Mount Kit This installation is to be used when attaching the wall mount to a wall.
User Manual (ENGLISH)
Page 68
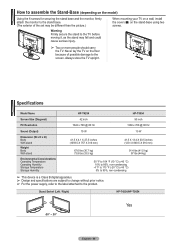
... X 848.5 X 316 mm) 67.6 lbs (30.7 kg) 73.8 lbs (33.5 kg) 91.4 lbs (41.5 kg) 97 lbs (44 kg) 50 °F to 104 °F (10 °C to 40 °C) 10% to 80%, non-condensing -4 °F to 113 °F (-20 °... prior notice. ➢ For the power supply, refer to the label attached to the TV before moving it, as the stand may be different than the picture.) Warning Firmly secure the stand to ...the product. Always store the TV upright. How to assemble the Stand-Base (depending on the model) Using the 6 screws ...
... X 848.5 X 316 mm) 67.6 lbs (30.7 kg) 73.8 lbs (33.5 kg) 91.4 lbs (41.5 kg) 97 lbs (44 kg) 50 °F to 104 °F (10 °C to 40 °C) 10% to 80%, non-condensing -4 °F to 113 °F (-20 °... prior notice. ➢ For the power supply, refer to the label attached to the TV before moving it, as the stand may be different than the picture.) Warning Firmly secure the stand to ...the product. Always store the TV upright. How to assemble the Stand-Base (depending on the model) Using the 6 screws ...
User Manual (ENGLISH)
Page 4
...Using the Energy Saving Feature 53 ■ Preventing Screen Burn-in the Remote Control 9 CONNECTIONS ■ Connecting VHF and UHF Antennas 9 ■ Connecting Cable TV 10 ■ Connecting a VCR 11 ■ Connecting an S-VHS VCR 11 ■ Connecting a Camcorder 12 ■ Connecting a DVD Player/Set-Top ...; Installing Batteries in 53 ■ Reducing the Effects of Screen Burn 54 ■ Setting the Function Help 54 ■ Wall- Digital....50 ■ Viewing Closed Captions (On-Screen Text Messages) - Digital.. 35 ■ Choosing a Multi-Channel Sound (MTS) Track -
...Using the Energy Saving Feature 53 ■ Preventing Screen Burn-in the Remote Control 9 CONNECTIONS ■ Connecting VHF and UHF Antennas 9 ■ Connecting Cable TV 10 ■ Connecting a VCR 11 ■ Connecting an S-VHS VCR 11 ■ Connecting a Camcorder 12 ■ Connecting a DVD Player/Set-Top ...; Installing Batteries in 53 ■ Reducing the Effects of Screen Burn 54 ■ Setting the Function Help 54 ■ Wall- Digital....50 ■ Viewing Closed Captions (On-Screen Text Messages) - Digital.. 35 ■ Choosing a Multi-Channel Sound (MTS) Track -

User Manual (ENGLISH)
Page 18
...28 Mono Picture Mode : Dynamic Sound Mode : Custom MTS : Stereo 12 : 00 am RETURN Viewing the Menus 1 With the power on the screen. The TV will appear in the lower-left side has five icons: Picture, Sound, Channel, Setup, Input. 2 Use the ▲ or ▼ button to select ...-video settings. 1 Press the INFO button on -screen menu disappears. FAV.CH T V Picture Mode Contrast Brightness Sharpness Color Tint G 50 : Dynamic ► 100 45 75 55 R 50 ▼ More Move Enter Exit English - 18 RETURN FAV.CH Adjusting the Volume Using the Volume Buttons 1 Press the VOL + or...
...28 Mono Picture Mode : Dynamic Sound Mode : Custom MTS : Stereo 12 : 00 am RETURN Viewing the Menus 1 With the power on the screen. The TV will appear in the lower-left side has five icons: Picture, Sound, Channel, Setup, Input. 2 Use the ▲ or ▼ button to select ...-video settings. 1 Press the INFO button on -screen menu disappears. FAV.CH T V Picture Mode Contrast Brightness Sharpness Color Tint G 50 : Dynamic ► 100 45 75 55 R 50 ▼ More Move Enter Exit English - 18 RETURN FAV.CH Adjusting the Volume Using the Volume Buttons 1 Press the VOL + or...
User Manual (ENGLISH)
Page 26
... button to increase the clarity and sharpness of the picture. • Choose Standard for general TV watching mode. • Choose Movie when watching movies. T V Mode Mode : Dynamic Contrast 100 Brightness 45 Sharpness 75 Color 55 Tint G 50 R 50 ▼ More Move Enter Return Contrast Move Adjust 100 Return Continued... Press the ▲ or...
... button to increase the clarity and sharpness of the picture. • Choose Standard for general TV watching mode. • Choose Movie when watching movies. T V Mode Mode : Dynamic Contrast 100 Brightness 45 Sharpness 75 Color 55 Tint G 50 R 50 ▼ More Move Enter Return Contrast Move Adjust 100 Return Continued... Press the ▲ or...
User Manual (ENGLISH)
Page 44
...PC Image Lock ► Position ► Auto Adjustment Image Reset Move Enter Return T V Image Lock Coarse 50 Fine 0 Move Enter Return Coarse Move Adjust 50 Return Continued... If necessary, adjust the position to select Setup, then press the ENTER button. The function also... ▲ More Blue Screen : Off ► Melody : Medium ► PC ► Home Theater PC : Off ► Light Effect : In Watching TV ► Energy Saving : Off ► ▼ More Move Enter Return T V PC Image Lock ► Position ► Auto Adjustment Image Reset Move ...
...PC Image Lock ► Position ► Auto Adjustment Image Reset Move Enter Return T V Image Lock Coarse 50 Fine 0 Move Enter Return Coarse Move Adjust 50 Return Continued... If necessary, adjust the position to select Setup, then press the ENTER button. The function also... ▲ More Blue Screen : Off ► Melody : Medium ► PC ► Home Theater PC : Off ► Light Effect : In Watching TV ► Energy Saving : Off ► ▼ More Move Enter Return T V PC Image Lock ► Position ► Auto Adjustment Image Reset Move ...

User Manual (ENGLISH)
Page 50
...; or ▼ button to select Caption, then press the ENTER button. 3 Press the ENTER button to Default ► RETURN Move Enter Return FAV.CH English - 50
...; or ▼ button to select Caption, then press the ENTER button. 3 Press the ENTER button to Default ► RETURN Move Enter Return FAV.CH English - 50

User Manual (ENGLISH)
Page 67
Wall Mount Kit Specifications ( VESA ) Product Family LCD-TV PDP-TV inch 23 ~ 26 32 ~ 40 46 ~ 52 57 42 ~ 50 63 VESA Spec. (A * B) Standard Screw (C * D) 200 * 100 M4 * L10 200 * 200 M6 * L10 600 * 400 700 * 400 M8 * L15 600 * 400 No VESA M8 Quantity 4 4 4 6 1 ... than the standard dimension, as they may cause damage to other building materials, please contact your nearest dealer. When attaching to the inside of the TV set. English - 67 Installing the Wall Mount Kit This installation is to be used when attaching the wall mount to a wall.
Wall Mount Kit Specifications ( VESA ) Product Family LCD-TV PDP-TV inch 23 ~ 26 32 ~ 40 46 ~ 52 57 42 ~ 50 63 VESA Spec. (A * B) Standard Screw (C * D) 200 * 100 M4 * L10 200 * 200 M6 * L10 600 * 400 700 * 400 M8 * L15 600 * 400 No VESA M8 Quantity 4 4 4 6 1 ... than the standard dimension, as they may cause damage to other building materials, please contact your nearest dealer. When attaching to the inside of the TV set. English - 67 Installing the Wall Mount Kit This installation is to be used when attaching the wall mount to a wall.

User Manual (ENGLISH)
Page 68
... the stand-base using two screws. ➢ Two or more people should carry the TV. Specifications Model Name HP-T4254 HP-T5054 Screen Size (Diagonal) PC Resolution 42 inch 1024 x 768 @ 60 Hz 50 inch 1360 x 768 @ 60 Hz Sound (Output) 10 W 15 W Dimension (W x H x D) Body With stand Weight Body With stand ...mm) 41.5 X 13.4 X 30.5 inches (1231 X 848.5 X 316 mm) 67.6 lbs (30.7 kg) 73.8 lbs (33.5 kg) 91.4 lbs (41.5 kg) 97 lbs (44 kg) 50 °F to 104 °F (10 °C to 40 °C) 10% to 80%, non-condensing -4 °F to 113 °F (-20 °C to 45 °C) 5% to 95...
... the stand-base using two screws. ➢ Two or more people should carry the TV. Specifications Model Name HP-T4254 HP-T5054 Screen Size (Diagonal) PC Resolution 42 inch 1024 x 768 @ 60 Hz 50 inch 1360 x 768 @ 60 Hz Sound (Output) 10 W 15 W Dimension (W x H x D) Body With stand Weight Body With stand ...mm) 41.5 X 13.4 X 30.5 inches (1231 X 848.5 X 316 mm) 67.6 lbs (30.7 kg) 73.8 lbs (33.5 kg) 91.4 lbs (41.5 kg) 97 lbs (44 kg) 50 °F to 104 °F (10 °C to 40 °C) 10% to 80%, non-condensing -4 °F to 113 °F (-20 °C to 45 °C) 5% to 95...
User Manual (ENGLISH)
Page 4
... 34 ■ Customizing the Sound 34 ■ Setting the TruSurround XT 35 ■ Choosing a Multi-Channel Sound (MTS) Track - Digital....50 ■ Viewing Closed Captions (On-Screen Text Messages) - Digital.. 35 ■ Choosing a Multi-Channel Sound (MTS) Track - mount adjustment...7 ■ Remote Control 8 ■ Installing Batteries in the Remote Control 9 CONNECTIONS ■ Connecting VHF and UHF Antennas 9 ■ Connecting Cable TV 10 ■ Connecting a VCR 11 ■ Connecting an S-VHS VCR 11 ■ Connecting a Camcorder 12 ■ Connecting a DVD Player/Set-...
... 34 ■ Customizing the Sound 34 ■ Setting the TruSurround XT 35 ■ Choosing a Multi-Channel Sound (MTS) Track - Digital....50 ■ Viewing Closed Captions (On-Screen Text Messages) - Digital.. 35 ■ Choosing a Multi-Channel Sound (MTS) Track - mount adjustment...7 ■ Remote Control 8 ■ Installing Batteries in the Remote Control 9 CONNECTIONS ■ Connecting VHF and UHF Antennas 9 ■ Connecting Cable TV 10 ■ Connecting a VCR 11 ■ Connecting an S-VHS VCR 11 ■ Connecting a Camcorder 12 ■ Connecting a DVD Player/Set-...
User Manual (ENGLISH)
Page 18
The TV will appear in the lower-left side has five icons: Picture, Sound, Channel, Setup, Input. 2 Use the ▲ or ▼ button to select one minute ... icon's sub-menu. 3 Press the EXIT button to increase or decrease the volume. FAV.CH T V Picture Mode Contrast Brightness Sharpness Color Tint G 50 : Dynamic ► 100 45 75 55 R 50 ▼ More Move Enter Exit English - 18 RETURN FAV.CH button. Air 28 Mono Picture Mode : Dynamic Sound Mode : Custom MTS : Stereo...
The TV will appear in the lower-left side has five icons: Picture, Sound, Channel, Setup, Input. 2 Use the ▲ or ▼ button to select one minute ... icon's sub-menu. 3 Press the EXIT button to increase or decrease the volume. FAV.CH T V Picture Mode Contrast Brightness Sharpness Color Tint G 50 : Dynamic ► 100 45 75 55 R 50 ▼ More Move Enter Exit English - 18 RETURN FAV.CH button. Air 28 Mono Picture Mode : Dynamic Sound Mode : Custom MTS : Stereo...

User Manual (ENGLISH)
Page 26
... selection from the menu. 1 Press the MENU button to increase the clarity and sharpness of the picture. • Choose Standard for general TV watching mode. • Choose Movie when watching movies. OSD color will be adjusted accordingly. English - 26 T V Mode Mode : Dynamic... Contrast 100 Brightness 45 Sharpness 75 Color 55 Tint G 50 R 50 ▼ More Move Enter Return Contrast Move Adjust 100 Return Continued... Press the P.MODE button on the remote control to decrease or ...
... selection from the menu. 1 Press the MENU button to increase the clarity and sharpness of the picture. • Choose Standard for general TV watching mode. • Choose Movie when watching movies. OSD color will be adjusted accordingly. English - 26 T V Mode Mode : Dynamic... Contrast 100 Brightness 45 Sharpness 75 Color 55 Tint G 50 R 50 ▼ More Move Enter Return Contrast Move Adjust 100 Return Continued... Press the P.MODE button on the remote control to decrease or ...


