User Manual (ENGLISH)
Page 2
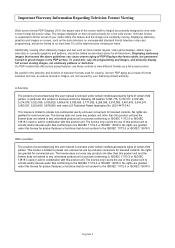
... user manual is limited to private non-commercial use , as well as the dark side-bars on them should be in the PDP picture. No rights are granted for licensed contents. Other countries The product unit accompanying this product unit. English-2 To avoid this product unit ...of this , vary the programming and images, and primarily display full screen moving . This license is limited to fill the screen if your Samsung limited warranty. The license only covers the use by end-user consumers for commercial use . The images displayed on nonexpanded standard format television ...
... user manual is limited to private non-commercial use , as well as the dark side-bars on them should be in the PDP picture. No rights are granted for licensed contents. Other countries The product unit accompanying this product unit. English-2 To avoid this product unit ...of this , vary the programming and images, and primarily display full screen moving . This license is limited to fill the screen if your Samsung limited warranty. The license only covers the use by end-user consumers for commercial use . The images displayed on nonexpanded standard format television ...
User Manual (ENGLISH)
Page 4
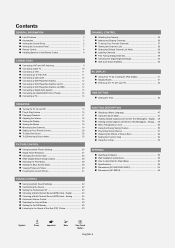
...Menu Transparency Level 50 Using the Energy Saving Feature 50 Preventing Screen Burn-in -Picture 30 Freezing the Current Picture 31 SOUND CONTROL Using Automatic Sound Settings 32 Customizing the Sound 32 Setting the ...Instructions 60 How to assemble the Stand-Base 62 Specifications 62 Dimensions (SP-S4223/HP-S4233 63 Dimensions (HP-S5033 64 Symbol Press Important ➢ Note One-Touch Button English-4 Contents GENERAL ... Amplifier 40 PC DISPLAY Using Your TV as a Computer (PC) Display 41 Display Modes 41 Setting up the TV with your PC 42 TIME SETTING Setting the Time 44 ...
...Menu Transparency Level 50 Using the Energy Saving Feature 50 Preventing Screen Burn-in -Picture 30 Freezing the Current Picture 31 SOUND CONTROL Using Automatic Sound Settings 32 Customizing the Sound 32 Setting the ...Instructions 60 How to assemble the Stand-Base 62 Specifications 62 Dimensions (SP-S4223/HP-S4233 63 Dimensions (HP-S5033 64 Symbol Press Important ➢ Note One-Touch Button English-4 Contents GENERAL ... Amplifier 40 PC DISPLAY Using Your TV as a Computer (PC) Display 41 Display Modes 41 Setting up the TV with your PC 42 TIME SETTING Setting the Time 44 ...

User Manual (ENGLISH)
Page 5
.... When connecting a cable, open the ferrite core and clip it around the cable near the plug. Automatic timer to operate the TV as well as most electronics stores. V-Chip function. Excellent Digital Interface & Networking : With a built-in HD digital tuner, non... off. SRS TruSurround XT provides a virtual Dolby surround system. Optical Cable Coaxial Cable (BN39-00110A) Antenna Cable (BN39-00333A) English-5 Excellent Picture Quality - Remote Control (BN59-00511A) / AAA Batteries (4301-000103) Power Cord (3903-000144) Owner's Instructions / Quick Setup Guide Warranty ...
.... When connecting a cable, open the ferrite core and clip it around the cable near the plug. Automatic timer to operate the TV as well as most electronics stores. V-Chip function. Excellent Digital Interface & Networking : With a built-in HD digital tuner, non... off. SRS TruSurround XT provides a virtual Dolby surround system. Optical Cable Coaxial Cable (BN39-00110A) Antenna Cable (BN39-00333A) English-5 Excellent Picture Quality - Remote Control (BN59-00511A) / AAA Batteries (4301-000103) Power Cord (3903-000144) Owner's Instructions / Quick Setup Guide Warranty ...
User Manual (ENGLISH)
Page 8
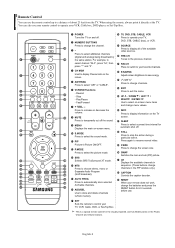
...", then press "-" and "3". ¨ CH MGR Used to display Channel Lists on -screen menu. ˝ S.MODE Press to select the sound mode. Ô PIP Picture-in the PIP window only.) ¥ CAPTION Controls the caption decoder. ≥ RESET When your remote does not work, change the batteries and press the... ∏ + VOL - You can use your remote control to operate your VCR, Cable box, DVD player, or Set-Top Box. Œ POWER Turns the TV on and off . ÷ STILL Press to stop the action during a particular scene. INFO Press to change menu values. - English-8 Stop - Remote Control You...
...", then press "-" and "3". ¨ CH MGR Used to display Channel Lists on -screen menu. ˝ S.MODE Press to select the sound mode. Ô PIP Picture-in the PIP window only.) ¥ CAPTION Controls the caption decoder. ≥ RESET When your remote does not work, change the batteries and press the... ∏ + VOL - You can use your remote control to operate your VCR, Cable box, DVD player, or Set-Top Box. Œ POWER Turns the TV on and off . ÷ STILL Press to stop the action during a particular scene. INFO Press to change menu values. - English-8 Stop - Remote Control You...
User Manual (ENGLISH)
Page 11
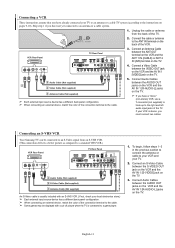
...(This connection delivers a better picture as compared to a standard VHS VCR.) VCR Rear Panel TV Rear Panel 3 Audio Cable (Not supplied) 2 S-Video Cable (Not supplied) 1 Antenna Cable (Not supplied) An S-Video cable is stereo, you must connect two cables. Connecting an S-VHS VCR Your Samsung TV can be connected to an... S-Video signal from the back of the TV. Connect an S-Video Cable between the AUDIO OUT jacks on the VCR and the AV IN 1 [R-AUDIO-L] ...
...(This connection delivers a better picture as compared to a standard VHS VCR.) VCR Rear Panel TV Rear Panel 3 Audio Cable (Not supplied) 2 S-Video Cable (Not supplied) 1 Antenna Cable (Not supplied) An S-Video cable is stereo, you must connect two cables. Connecting an S-VHS VCR Your Samsung TV can be connected to an... S-Video signal from the back of the TV. Connect an S-Video Cable between the AUDIO OUT jacks on the VCR and the AV IN 1 [R-AUDIO-L] ...
User Manual (ENGLISH)
Page 18
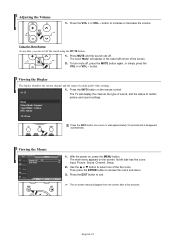
...English-18 Press MUTE and the sound cuts off , press the MUTE button again, or simply press the VOL + or VOL - The TV will appear in the lower-left side has five icons: Input, Picture, Sound, Channel, Setup. 2. Then press the ENTER button to increase or decrease the volume. Mono...you can cut off the sound using the MUTE button. 1. button. Viewing the Display The display identifies the current channel and the status of certain picture and sound settings. Press the INFO button on , press the MENU button. With the power on the remote control. The word "Mute" will...
...English-18 Press MUTE and the sound cuts off , press the MUTE button again, or simply press the VOL + or VOL - The TV will appear in the lower-left side has five icons: Input, Picture, Sound, Channel, Setup. 2. Then press the ENTER button to increase or decrease the volume. Mono...you can cut off the sound using the MUTE button. 1. button. Viewing the Display The display identifies the current channel and the status of certain picture and sound settings. Press the INFO button on , press the MENU button. With the power on the remote control. The word "Mute" will...
User Manual (ENGLISH)
Page 26
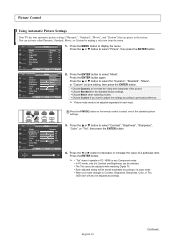
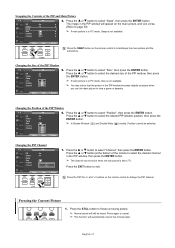
...Brightness, Sharpness, Color, or Tint. Choose Standard for each input. Choose Custom if you make changes to be adjusted accordingly. TV Mode Size Digital NR DNIe Film Mode Blue Screen PIP Picture : Dynamic √ : 16:9 √ : On √ : On √ : Off √ : Off...Contrast and Brightness can activate either Dynamic, Standard, Movie, or Custom by making a selection from the menu. Picture Control Using Automatic Picture Settings Your TV has four automatic picture settings ("Dynamic", "Standard", "Movie", and "Custom") that are preset at the factory. You can be...
...Brightness, Sharpness, Color, or Tint. Choose Standard for each input. Choose Custom if you make changes to be adjusted accordingly. TV Mode Size Digital NR DNIe Film Mode Blue Screen PIP Picture : Dynamic √ : 16:9 √ : On √ : On √ : Off √ : Off...Contrast and Brightness can activate either Dynamic, Standard, Movie, or Custom by making a selection from the menu. Picture Control Using Automatic Picture Settings Your TV has four automatic picture settings ("Dynamic", "Standard", "Movie", and "Custom") that are preset at the factory. You can be...
User Manual (ENGLISH)
Page 27
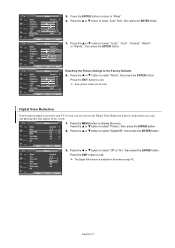
... Sharpness Color Tint G 50 Color Tone Reset : Dynamic √ 100 45 75 55 R 50 : Cool1 √ 8. Move Enter Return TV Mode Resetting the Picture Settings to select "Cool2", "Cool1", "Normal", "Warm1", or "Warm2", then press the ENTER button. or † button to select "Digital... can activate the Digital Noise Reduction feature to help reduce any static and ghosting that may appear on the screen. Move Enter Return TV Picture 3. or † button to display the menu. Press the ... Mode Contrast Brightness Sharpness Color Tint G 50 Color Tone Reset :...
... Sharpness Color Tint G 50 Color Tone Reset : Dynamic √ 100 45 75 55 R 50 : Cool1 √ 8. Move Enter Return TV Mode Resetting the Picture Settings to select "Cool2", "Cool1", "Normal", "Warm1", or "Warm2", then press the ENTER button. or † button to select "Digital... can activate the Digital Noise Reduction feature to help reduce any static and ghosting that may appear on the screen. Move Enter Return TV Picture 3. or † button to display the menu. Press the ... Mode Contrast Brightness Sharpness Color Tint G 50 Color Tone Reset :...
User Manual (ENGLISH)
Page 28
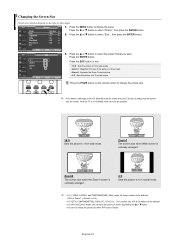
...button. 2. Press the P.SIZE button on screen by pressing the ... Zoom1 The screen size when Wide screen is vertically enlarged. 4:3 Sets the picture to 4:3 normal mode. ➢ • In TV, VIDEO, S-VIDEO, and COMPONENT(480i, 480p) modes, all screen modes can be selected. (16:9 ➞ Zoom1 ➞ Zoom2 ➞...display the menu. Press the MENU button to select "Size", then press the ENTER button. View the TV in 16:9 (Wide) mode as much as possible. 16:9 Sets the picture to 16:9 wide mode. English-28 Press the ... Press the ENTER button. Changing the Screen Size ...
...button. 2. Press the P.SIZE button on screen by pressing the ... Zoom1 The screen size when Wide screen is vertically enlarged. 4:3 Sets the picture to 4:3 normal mode. ➢ • In TV, VIDEO, S-VIDEO, and COMPONENT(480i, 480p) modes, all screen modes can be selected. (16:9 ➞ Zoom1 ➞ Zoom2 ➞...display the menu. Press the MENU button to select "Size", then press the ENTER button. View the TV in 16:9 (Wide) mode as much as possible. 16:9 Sets the picture to 16:9 wide mode. English-28 Press the ... Press the ENTER button. Changing the Screen Size ...

User Manual (ENGLISH)
Page 29
...8730; : On √ : Off √ : Off √ 1. Press the ... Press the MENU button to exit. Press the ... Move Enter Return TV Picture 3. Mode Size Digital NR DNIe Film Mode Blue Screen PIP : Dynamic : 16:9 : On : On : OOfff : OOfnf Press the EXIT button to display ... Off √ 1. Move Enter Return Setting the Blue Screen Mode If no signal from all sources and adjusts the picture for demonstration purposes. TV Mode Size Digital NR DNIe Film Mode Blue Screen PIP Picture : Dynamic √ : 16:9 √ : On √ : On √ : Off √ :...
...8730; : On √ : Off √ : Off √ 1. Press the ... Press the MENU button to exit. Press the ... Move Enter Return TV Picture 3. Mode Size Digital NR DNIe Film Mode Blue Screen PIP : Dynamic : 16:9 : On : On : OOfff : OOfnf Press the EXIT button to display ... Off √ 1. Move Enter Return Setting the Blue Screen Mode If no signal from all sources and adjusts the picture for demonstration purposes. TV Mode Size Digital NR DNIe Film Mode Blue Screen PIP Picture : Dynamic √ : 16:9 √ : On √ : On √ : Off √ :...
User Manual (ENGLISH)
Page 30
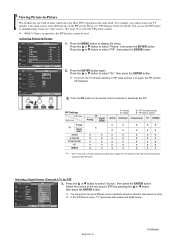
...not allow PIP to function in the same mode. Press the ... Move Enter Return English-30 Continued... Activating Picture-in the PIP screen. For example, you turn the TV off while watching in PIP mode and turn it on again, the PIP window will disappear. or †... press the ENTER button. or † button to select "On", then press the ENTER button. ➢ If you cannot watch one in -Picture TV Mode Size Digital NR DNIe Film Mode Blue Screen PIP Picture : Dynamic √ : 16:9 √ : On √ : On √ : Off √ : Off √ 1. Selecting a ...
...not allow PIP to function in the same mode. Press the ... Move Enter Return English-30 Continued... Activating Picture-in the PIP screen. For example, you turn the TV off while watching in PIP mode and turn it on again, the PIP window will disappear. or †... press the ENTER button. or † button to select "On", then press the ENTER button. ➢ If you cannot watch one in -Picture TV Mode Size Digital NR DNIe Film Mode Blue Screen PIP Picture : Dynamic √ : 16:9 √ : On √ : On √ : Off √ : Off √ 1. Selecting a ...
User Manual (ENGLISH)
Page 31
.... ➢ This function will still be heard. Press again to freeze a moving picture. ➢ Normal sound will automatically cancel five minutes later. Changing the Size of the PIP Window TV PIP Source Swap Size Position Channel PIP : On : TV : : : Air 3 6. Press the ... Press the ... Press the PIP... to exit. Press the ... or † button at the bottom of the PIP and Main Picture TV PIP Source Swap Size Position Channel PIP : On : TV : : : Air 3 4. or † button to TV. English-31 Swapping the Contents of the remote to select the desired channel in the PIP window,...
.... ➢ This function will still be heard. Press again to freeze a moving picture. ➢ Normal sound will automatically cancel five minutes later. Changing the Size of the PIP Window TV PIP Source Swap Size Position Channel PIP : On : TV : : : Air 3 6. Press the ... Press the ... Press the PIP... to exit. Press the ... or † button at the bottom of the PIP and Main Picture TV PIP Source Swap Size Position Channel PIP : On : TV : : : Air 3 4. or † button to TV. English-31 Swapping the Contents of the remote to select the desired channel in the PIP window,...

User Manual (ENGLISH)
Page 35
...8226; When Internal Mute is set to come on when the TV is set to audio through your sound system instead of the main picture. Setting the On/Off Melody A melody sound can be set...select "Sound Select", then press the ENTER button. Sub: Used to listen to the sound of the sub picture. ➢ You can listen to "On", Sound menus except Multi-track Options cannot be adjusted. •...the ... Move Enter Return Listening to the Sound of the Sub (PIP) Picture When the PIP feature is set to the sound of the TV. More Melody Sound Select Reset : On : MMaainin Sub Press the EXIT...
...8226; When Internal Mute is set to come on when the TV is set to audio through your sound system instead of the main picture. Setting the On/Off Melody A melody sound can be set...select "Sound Select", then press the ENTER button. Sub: Used to listen to the sound of the sub picture. ➢ You can listen to "On", Sound menus except Multi-track Options cannot be adjusted. •...the ... Move Enter Return Listening to the Sound of the Sub (PIP) Picture When the PIP feature is set to the sound of the TV. More Melody Sound Select Reset : On : MMaainin Sub Press the EXIT...
User Manual (ENGLISH)
Page 40
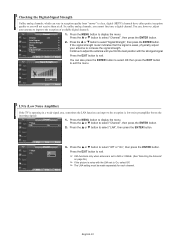
... find the best position with the LNA set to AIR or CABLE. (See "Selecting the Antenna" on page 36.) ➢ If the picture is operating in reception quality from "snowy" to clear, digital (HDTV) channels have either perfect reception quality or you cannot fine tune a ...digital channel. Move Enter Return TV ... or † button to select "Signal Strength", then press the ENTER button. √ If the signal strength meter indicates that the signal...
... find the best position with the LNA set to AIR or CABLE. (See "Selecting the Antenna" on page 36.) ➢ If the picture is operating in reception quality from "snowy" to clear, digital (HDTV) channels have either perfect reception quality or you cannot fine tune a ...digital channel. Move Enter Return TV ... or † button to select "Signal Strength", then press the ENTER button. √ If the signal strength meter indicates that the signal...
User Manual (ENGLISH)
Page 42
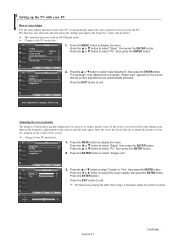
... the ENTER button. 2. Press the EXIT button to exit. ➢ This feature may change the width of the picture quality adjustment is to remove or reduce picture noise. Move Enter TV PC Image Lock Position Auto Adjustment Image Reset Return √ √ 2. appears on the center of the screen....adjusts the frequency values and positions. ➢ This function does not work in progress. Coarse Move Enter Return 50 English-42 Continued... The message "Auto Adjustment in progress. Press the ... Press the MENU button to the utmost and fine tune again.
... the ENTER button. 2. Press the EXIT button to exit. ➢ This feature may change the width of the picture quality adjustment is to remove or reduce picture noise. Move Enter TV PC Image Lock Position Auto Adjustment Image Reset Return √ √ 2. appears on the center of the screen....adjusts the frequency values and positions. ➢ This function does not work in progress. Coarse Move Enter Return 50 English-42 Continued... The message "Auto Adjustment in progress. Press the ... Press the MENU button to the utmost and fine tune again.
User Manual (ENGLISH)
Page 47
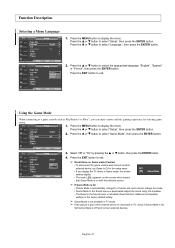
... Enter Return Using the Game Mode When connecting to select "Setup", then press the ENTER button. Press the MENU button to Off in TV mode. ➢ If the picture is poor when external device is deactivated. Plug & Play Language Time Game Mode V-Chip Caption † More √ : English √ √ : Off √...
... Enter Return Using the Game Mode When connecting to select "Setup", then press the ENTER button. Press the MENU button to Off in TV mode. ➢ If the picture is poor when external device is deactivated. Plug & Play Language Time Game Mode V-Chip Caption † More √ : English √ √ : Off √...
User Manual (ENGLISH)
Page 51
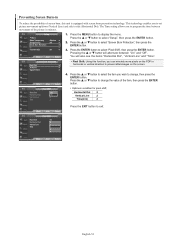
..."Vertical Line" and "Time". Horizontal Dot 2 Vertical Line 2 Time(min) 2 Move Enter Return TV Pixel Shift Pixel Shift : On Horizontal Dot : 40 Vertical Line : 41 Time : 42 3 4 Press the EXIT button to prevent after-images on the PDP in horizontal or vertical direction to... reduce the possibility of the item, then press the ENTER Move Enter Return button. Move Enter Return You will alternate between movement of the picture in minutes. Menu Transparency Energy Saving : Medium √ : Off √ 2. or † button to select "Setup", then press...
..."Vertical Line" and "Time". Horizontal Dot 2 Vertical Line 2 Time(min) 2 Move Enter Return TV Pixel Shift Pixel Shift : On Horizontal Dot : 40 Vertical Line : 41 Time : 42 3 4 Press the EXIT button to prevent after-images on the PDP in horizontal or vertical direction to... reduce the possibility of the item, then press the ENTER Move Enter Return button. Move Enter Return You will alternate between movement of the picture in minutes. Menu Transparency Energy Saving : Medium √ : Off √ 2. or † button to select "Setup", then press...

User Manual (ENGLISH)
Page 55
... proceed to set up Restrictions Using the MPAA Ratings: G, PG, PG-13, R, NC-17, X, NR The MPAA rating system uses the Motion Picture Association of the following sub-ratings: FV: Fantasy violence / D: Sexually suggestive dialog / L: Adult language / S: Sexual situation / V: Violence ➢...; The V-Chip will automatically be displayed for each sub-rating. Move Enter Return ➢ The TV-Y, TV-Y7, TV-G, TV-PG, TV-14 and TV-MA have additional options. Press the MENU button to block the sub rating. or † button to select "Setup", then...
... proceed to set up Restrictions Using the MPAA Ratings: G, PG, PG-13, R, NC-17, X, NR The MPAA rating system uses the Motion Picture Association of the following sub-ratings: FV: Fantasy violence / D: Sexually suggestive dialog / L: Adult language / S: Sexual situation / V: Violence ➢...; The V-Chip will automatically be displayed for each sub-rating. Move Enter Return ➢ The TV-Y, TV-Y7, TV-G, TV-PG, TV-14 and TV-MA have additional options. Press the MENU button to block the sub rating. or † button to select "Setup", then...
User Manual (ENGLISH)
Page 59
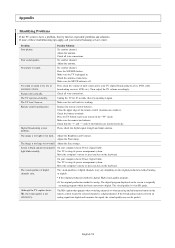
.... light blinks steadily. Although the TV caption shows HD, the visual quality is off. No picture or sound. Then, adjust the TV volume accordingly. Unplug the TV for 30 seconds, then try this list of these troubleshooting tips apply, call your nearest Samsung service center. Clean the upper edge... of digital channels may not be perfect. The image is too low at maximum volume. The visual quality is plugged in the "TV" mode. Problem Poor picture Poor sound quality. No sound or ...
.... light blinks steadily. Although the TV caption shows HD, the visual quality is off. No picture or sound. Then, adjust the TV volume accordingly. Unplug the TV for 30 seconds, then try this list of these troubleshooting tips apply, call your nearest Samsung service center. Clean the upper edge... of digital channels may not be perfect. The image is too low at maximum volume. The visual quality is plugged in the "TV" mode. Problem Poor picture Poor sound quality. No sound or ...

User Manual (ENGLISH)
Page 60
... the wall bracket. 5. The package contents and parts supplied for the wall mount are securely inserted into Left and Right. Samsung Electronics is not responsible for any damages to the product or harm to customers or others when the installation is delivered separately. ... : 4 Screw : 4 Accessories How to assemble the Wall Mount Bracket 1. Remove the screws from a falling TV. Use the screw and assemble the plastic hanger. (Please refer to the following picture.) • Please ask the installers to install the wall mount bracket. • Please be sure to check...
... the wall bracket. 5. The package contents and parts supplied for the wall mount are securely inserted into Left and Right. Samsung Electronics is not responsible for any damages to the product or harm to customers or others when the installation is delivered separately. ... : 4 Screw : 4 Accessories How to assemble the Wall Mount Bracket 1. Remove the screws from a falling TV. Use the screw and assemble the plastic hanger. (Please refer to the following picture.) • Please ask the installers to install the wall mount bracket. • Please be sure to check...


